Prep Time: 5 minutes | Cook Time: 10 minutes | Total Time: 15 minutes | Servings: 22 Cookies
There’s something almost magical about a cookie recipe that requires only four ingredients and delivers restaurant-quality results. These Salted Chocolate Dipped Peanut Butter Cookies have become my secret weapon for unexpected guests, last-minute bake sales, and those moments when you need something sweet but don’t want to spend hours in the kitchen. What makes them even more special is their incredible simplicity – 50 seconds to mix, 10 minutes to bake, and honestly, about 2 minutes to devour an entire tray!
I discovered this recipe during one of those chaotic weekday afternoons when my kids announced they needed cookies for a school event the next morning. With minimal ingredients in my pantry and zero time to spare, I threw together what I had on hand. The result was so spectacular that it’s now my go-to recipe for any occasion requiring quick, impressive treats.
Why These Cookies Will Revolutionize Your Baking
These aren’t just any peanut butter cookies – they’re a masterclass in how simplicity can create perfection. The beauty lies in their minimal ingredient list, which means fewer things can go wrong and less cleanup afterward. Additionally, the combination of creamy peanut butter, natural sweetener, and rich chocolate creates a sophisticated flavor profile that rivals any bakery creation.
The texture is absolutely divine: soft and chewy on the inside with a slightly crisp exterior, then enhanced by the smooth chocolate coating and finishing salt flakes. Furthermore, these cookies are naturally gluten-free and can easily be made sugar-free, making them suitable for various dietary preferences.
Most importantly, they’re incredibly forgiving for beginner bakers while being impressive enough for experienced cooks to proudly serve at dinner parties. The chocolate dipping transforms simple cookies into elegant treats that look professionally made.
Essential Ingredients
Cookie Base:
- 1 cup smooth peanut butter (preferably no sugar, no salt variety)
- ¾ cup natural granulated sweetener (or white sugar, raw sugar, or coconut sugar)
- 1 large egg
- 1 teaspoon pure vanilla extract
Chocolate Coating:
- ⅓ cup chocolate chips (sugar-free, semi-sweet, or dark chocolate)
- 1 teaspoon butter or shortening
- Salt flakes (for garnish)
Serving Suggestions:
These cookies are perfect alongside a glass of cold milk, a cup of hot coffee, or even crumbled over vanilla ice cream. They also make excellent gifts when packaged in clear bags with ribbon, and they’re absolutely divine for dunking in hot chocolate during colder months.
Step-by-Step Instructions
Preparing Your Kitchen
Start by preheating your oven to 190°C (375°F). Line two baking trays with parchment paper or baking paper, ensuring the paper lies flat without wrinkles. This preparation step is crucial for preventing the cookies from sticking and ensures even baking.
Creating the Cookie Dough
In a medium-sized bowl, combine the peanut butter, sweetener, egg, and vanilla extract. Mix these ingredients thoroughly until they form a cohesive dough – this should take about 50 seconds of vigorous stirring. The mixture should be smooth and well-combined, with no streaks of egg visible.
The beauty of this recipe is its simplicity, but don’t let that fool you into thinking the mixing isn’t important. Proper incorporation ensures even texture and prevents the cookies from spreading unevenly during baking.
Shaping the Cookies
Using a tablespoon or cookie scoop, portion out the dough into 22 equal pieces. Roll each portion into a ball using your palms, then place them on the prepared baking trays with about 2 inches of space between each cookie.
Next, flatten each ball using either the palm of your hand or the tines of a fork. If using a fork, create the classic crosshatch pattern that’s traditional for peanut butter cookies. The cookies should be about ¼ inch thick after flattening.
Baking to Perfection
Bake the cookies for 10-15 minutes, watching carefully during the last few minutes. They’re done when they turn golden brown around the edges and feel set when lightly touched in the center. The cookies will continue cooking slightly on the hot baking tray, so don’t overbake.
Remove from the oven and allow the cookies to cool on the baking tray for about 10 minutes before transferring to a wire rack. This cooling period prevents them from breaking apart and helps them maintain their shape.
Creating the Chocolate Coating
While the cookies are cooling, prepare the chocolate coating. In a microwave-safe bowl, combine the chocolate chips and butter. Microwave in 30-second intervals, stirring between each interval, until the mixture becomes smooth and glossy.
Alternatively, you can melt the chocolate using a double boiler method. Place the chocolate and butter in a heatproof bowl over a pot of simmering water, stirring constantly until melted and smooth.
The Dipping Process
Once the cookies have cooled completely, dip each one halfway into the melted chocolate mixture. Allow any excess chocolate to drip back into the bowl by gently tapping the cookie against the bowl’s edge.
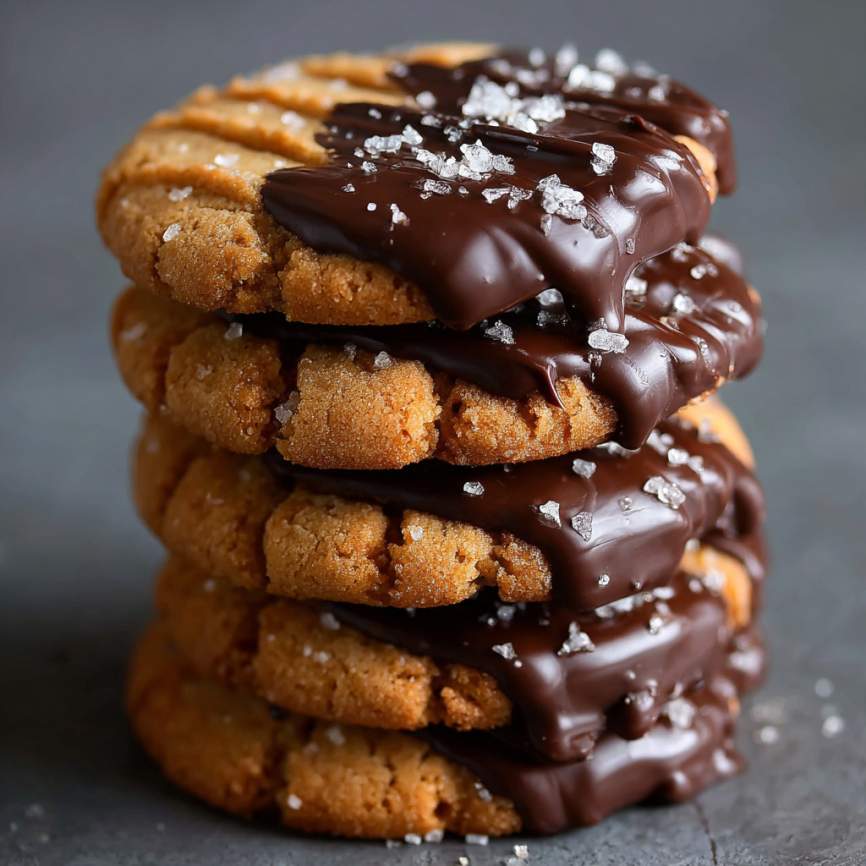
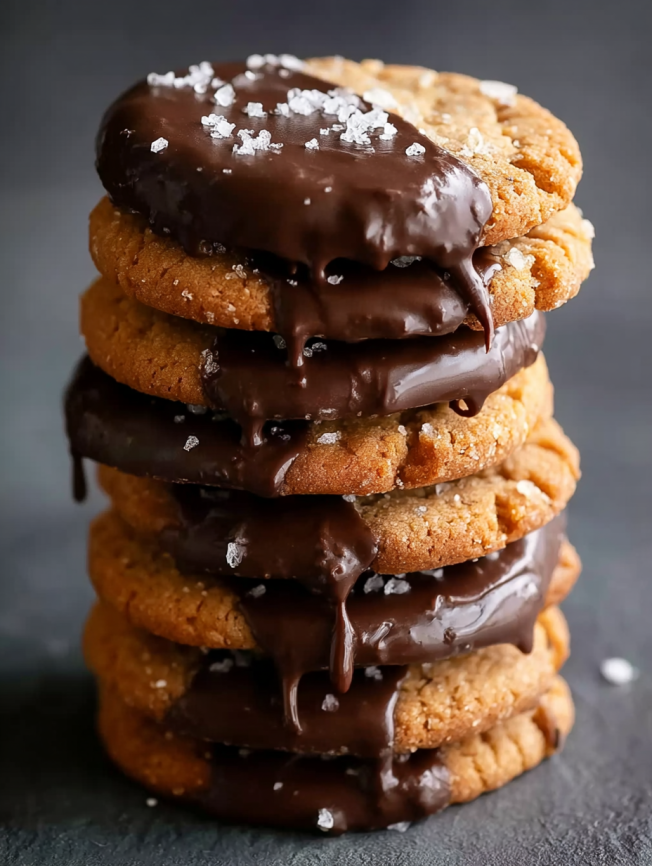
Place the dipped cookies on waxed paper or parchment paper, then immediately sprinkle with salt flakes while the chocolate is still wet. This timing ensures the salt adheres properly and creates that perfect sweet-salty contrast.

Creative Serving Ideas
Elegant Presentation
Arrange these cookies on a tiered serving stand for an impressive dessert display. The contrast between the golden cookie base and dark chocolate coating creates visual appeal that’s perfect for special occasions or holiday gatherings.
Seasonal Decorations
During holidays, consider adding themed sprinkles or crushed candy to the wet chocolate coating. Halloween calls for orange and black sprinkles, while Christmas might feature crushed candy canes or festive colored sugars.
Gift-Worthy Packaging
These cookies make wonderful homemade gifts when arranged in decorative tins or clear cellophane bags tied with ribbon. They stay fresh for several days and transport beautifully without losing their appeal.
Delicious Recipe Variations
Double Chocolate Indulgence
Add 2 tablespoons of unsweetened cocoa powder to the cookie dough for chocolate peanut butter cookies. The result is an intensely chocolatey base that pairs beautifully with the chocolate coating for serious chocolate lovers.
Crunchy Texture Twist
Substitute crunchy peanut butter for smooth to add textural interest throughout the cookies. The small peanut pieces provide delightful bursts of flavor and create a more rustic appearance.
White Chocolate Elegance
Use white chocolate chips instead of dark chocolate for a more delicate flavor profile. The white chocolate pairs beautifully with the peanut butter and creates an elegant appearance that’s perfect for bridal showers or baby celebrations.
Spiced Holiday Version
Add ½ teaspoon of cinnamon and a pinch of nutmeg to the cookie dough for warm, spiced notes that make these perfect for fall and winter celebrations.
Make-Ahead Tips
Dough Preparation
The cookie dough can be prepared up to 24 hours in advance and stored in the refrigerator. Simply cover the bowl with plastic wrap and let it come to room temperature before shaping and baking. This advance preparation actually improves the flavor as the ingredients have time to meld together.
Freezer-Friendly Options
Both the unbaked dough and baked cookies freeze beautifully. For unbaked dough, shape the cookies and freeze them on baking trays, then transfer to freezer bags once solid. Bake directly from frozen, adding 1-2 extra minutes to the baking time.
Baked cookies can be frozen for up to three months. Layer them between parchment paper in airtight containers to prevent sticking and maintain their texture.
Chocolate Coating Strategy
For best results, dip the cookies in chocolate the day you plan to serve them. However, the chocolate-dipped cookies can be stored in the refrigerator for up to one week in an airtight container.
Important Notes
Peanut Butter Selection
The type of peanut butter you choose significantly impacts the final result. Natural peanut butters with no added sugar or salt work best, as they provide pure peanut flavor without competing with the other ingredients. Avoid using peanut butter with oil separation, as this can affect the cookie texture.
Temperature Considerations
Room temperature ingredients mix more easily and create better texture. If your egg is cold from the refrigerator, place it in warm water for a few minutes before using. Similarly, if your peanut butter is too thick, microwave it for 10-15 seconds to soften.
Storage Guidelines
Store uncoated cookies in an airtight container at room temperature for up to one week. Chocolate-dipped cookies should be stored in the refrigerator to prevent the chocolate from melting, especially in warm weather.
Frequently Asked Questions
Q: Can I use natural peanut butter with oil separation? A: It’s best to avoid using peanut butter with oil separation, as this can make the cookie dough too oily and affect the texture. If you must use it, stir it thoroughly first and consider adding an extra tablespoon of flour to compensate for the extra oil.
Q: Why did my cookies spread too much during baking? A: Excessive spreading usually occurs when the dough is too warm or the oven temperature is too low. Make sure your oven is properly preheated, and if the dough feels very soft, chill it for 15 minutes before baking.
Q: Can I make these cookies without eggs? A: Yes! You can substitute the egg with 1 tablespoon of ground flaxseed mixed with 3 tablespoons of water (let it sit for 5 minutes until gel-like), or use a commercial egg replacer following package directions.
Q: How do I prevent the chocolate from seizing when melting? A: Ensure all your equipment is completely dry before melting chocolate, and avoid getting any water in the chocolate. If using the microwave, use short intervals and stir frequently. If the chocolate does seize, try adding a small amount of coconut oil or shortening to smooth it out.
Q: Can I use different types of chocolate for dipping? A: Absolutely! Dark chocolate, milk chocolate, or white chocolate all work beautifully. Each will create a different flavor profile – dark chocolate provides sophistication, milk chocolate offers classic sweetness, and white chocolate creates elegant contrast.
Q: How long do the chocolate-dipped cookies need to set? A: At room temperature, the chocolate typically sets in 15-20 minutes. For faster results, place the cookies in the refrigerator for 5-10 minutes. The chocolate should be firm to the touch when properly set.
Q: Are these cookies suitable for people with dietary restrictions? A: These cookies are naturally gluten-free and can easily be made sugar-free by using sugar-free chocolate chips and natural sweeteners. For vegan versions, substitute the egg with a flax egg and use vegan butter for the chocolate coating.
Q: Can I double this recipe? A: Yes, this recipe doubles perfectly! Just make sure you have enough baking trays and oven space. You may need to bake in batches, but the timing remains the same for each batch.
Nutrition Information (per cookie):
- Calories: 87kcal
- Carbohydrates: 12g
- Protein: 3g
- Fat: 6g
- Saturated Fat: 1g
- Cholesterol: 8mg
- Sodium: 192mg
- Fiber: 1g
- Sugar: 1g
- Calcium: 7mg
- Iron: 0.2mg
These nutritional values are approximate and may vary based on specific ingredients and brands used.


