My first encounter with authentic tiramisu happened during a magical evening in a small trattoria tucked away in Rome’s Trastevere district. As the waiter placed that perfectly dusted square before me, I had no idea I was about to experience what would become my absolute favorite dessert. The moment my spoon broke through the cocoa-dusted surface, revealing layers of coffee-soaked ladyfingers and cloud-like mascarpone, I knew I had to master this Italian masterpiece at home.
Why This Tiramisu Will Transform Your Dessert Game
Authentic Italian Simplicity
Traditional tiramisu relies on just a handful of premium ingredients, each playing a crucial role in creating the dessert’s signature harmony. Rather than complicated techniques, success comes from understanding how these simple components work together to create something extraordinary.
No-Bake Convenience with Gourmet Results
Unlike many impressive desserts that require oven expertise, tiramisu achieves its magic through careful layering and patient chilling. This makes it perfect for summer entertaining when you want to avoid heating up the kitchen while still serving something spectacular.
Make-Ahead Entertaining Hero
Actually improving with time, tiramisu becomes more flavorful and cohesive after overnight chilling. This characteristic makes it ideal for dinner parties, allowing you to prepare a show-stopping dessert hours or even a day in advance.
Coffee Lover’s Dream
The bold espresso flavor paired with creamy mascarpone creates an adult dessert that satisfies both coffee cravings and sweet tooth desires. Each bite delivers that perfect balance of bitter and sweet that makes tiramisu so irresistibly addictive.
Essential Ingredients & Quality Guidelines
The Foundation: Ladyfingers & Coffee
- 300g ladyfinger biscuits (savoiardi) – Seek out authentic Italian savoiardi for the best texture and absorption
- 300ml freshly brewed espresso – Use strong, quality coffee; instant won’t deliver the depth needed
- 50ml dark rum – Adds complexity and authentic Italian flair (optional but highly recommended)
The Creamy Heart
- 500g mascarpone cheese – Room temperature mascarpone blends more easily and creates silkier texture
- 100g fine granulated sugar – Dissolves completely into the mascarpone for smooth consistency
The Finishing Touches
- 30g unsweetened cocoa powder – Dutch-processed cocoa provides the richest color and flavor
- 50g dark chocolate – For elegant shavings that add textural contrast
Shopping Success Tips
Purchase mascarpone from the refrigerated cheese section rather than shelf-stable versions for superior taste and texture. Fresh ladyfingers from an Italian bakery will elevate your tiramisu significantly, though quality packaged versions work well too.
Step-by-Step Assembly Guide
Preparing Your Coffee Base
Begin by brewing a strong espresso using your preferred method – espresso machine, moka pot, or French press all work wonderfully. The coffee should be robust enough to stand up to the rich mascarpone. Allow it to cool completely before adding the rum, which enhances the coffee flavor while adding sophisticated depth.
Creating the Perfect Mascarpone Mixture
Remove mascarpone from refrigeration 30 minutes before use to ensure easy mixing. In a large bowl, combine the softened mascarpone with sugar, whisking gently until completely smooth. Overmixing can cause the mascarpone to separate, so use a light hand and stop once the sugar dissolves completely.
Mastering the Ladyfinger Technique
Working quickly to prevent over-soaking, dip each ladyfinger into the cooled coffee mixture for just 2-3 seconds per side. The biscuits should absorb coffee flavor without becoming soggy. Immediately arrange them in a single layer in your serving dish – a 20cm x 30cm rectangular dish works perfectly.
Building Beautiful Layers
First Layer Foundation
Cover your coffee-soaked ladyfingers with half the mascarpone mixture, spreading it evenly with an offset spatula. Take care to reach all corners and edges, creating a smooth, uniform layer that completely covers the biscuits below.
Second Layer Perfection
Repeat the dipping process with remaining ladyfingers, arranging them in the opposite direction from the first layer for structural stability. Top with the remaining mascarpone mixture, again spreading evenly and smoothing the surface for an elegant presentation.
The Crucial Chilling Phase
Cover your assembled tiramisu tightly with plastic wrap, ensuring the wrap doesn’t touch the surface. Refrigerate for a minimum of 4 hours, though overnight chilling yields superior results. During this time, flavors meld while the texture becomes perfectly set yet still creamy.

Presentation and Serving Excellence
The Final Flourish
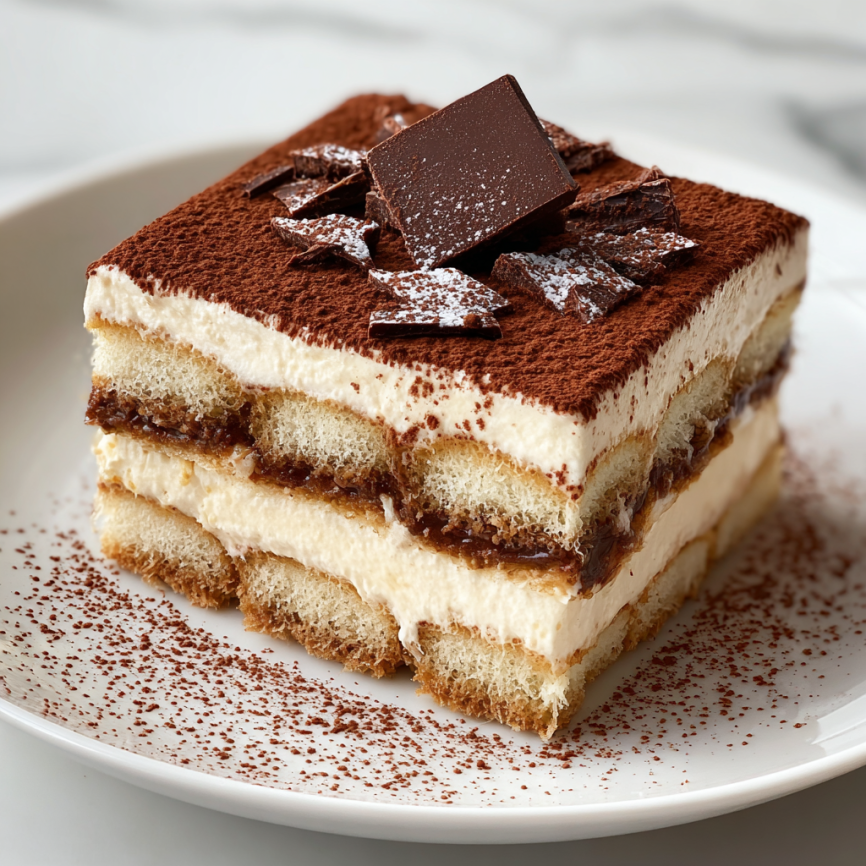
Just before serving, remove the plastic wrap and dust the entire surface evenly with cocoa powder using a fine-mesh sieve. This creates the classic appearance while adding an extra layer of chocolate flavor to each bite.
Elegant Chocolate Shavings
Using a vegetable peeler or microplane grater, create delicate chocolate shavings from your dark chocolate. Sprinkle these artfully over the cocoa-dusted surface for restaurant-quality presentation that showcases your attention to detail.
Perfect Portion Techniques
Using a sharp, thin knife cleaned between cuts, slice the tiramisu into neat squares. A gentle sawing motion works better than pressing down, which can compress the delicate layers. Serve immediately on chilled dessert plates for the best experience.
Creative Variations and Seasonal Twists
Flavor Enhancement Options
Transform the classic recipe by adding orange zest to the mascarpone mixture for a bright citrus note, or incorporate a tablespoon of coffee liqueur like Kahlua for extra richness. These subtle additions create new flavor profiles while maintaining the dessert’s essential character.
Seasonal Adaptations
Summer versions might feature fresh berries between layers for color and tartness. Winter variations could include a touch of cinnamon or even crushed amaretti cookies for added texture and warmth.
Individual Presentation Style
Create elegant individual portions by assembling tiramisu in wine glasses or small ramekins. Layer the components as directed, creating beautiful striped presentations that work wonderfully for formal dinner parties.
Storage and Make-Ahead Strategies
Optimal Timing Guidelines
While tiramisu can be served after 4 hours of chilling, it reaches peak flavor and texture after 8-24 hours of refrigeration. The extended time allows the coffee to fully permeate the ladyfingers while the flavors develop complexity.
Proper Storage Methods
Store covered tiramisu in the refrigerator for up to 3 days, though it’s at its absolute best within the first 48 hours. Always keep it well-covered to prevent absorption of other refrigerator flavors and to maintain proper moisture levels.
Advance Preparation Tips
Prepare tiramisu completely up to 2 days ahead, adding the final cocoa dusting and chocolate shavings just before serving. This timing allows for stress-free entertaining while ensuring optimal presentation and flavor.
Professional Techniques and Troubleshooting
Avoiding Common Pitfalls
Temperature control proves crucial for success. Mascarpone that’s too cold won’t blend smoothly, while overly warm mascarpone may separate. Room temperature mascarpone mixed gently creates the silkiest texture.
Achieving Perfect Consistency
If your mascarpone mixture appears grainy, it may have been overmixed or too cold. Gentle warming and careful re-whisking can often restore smoothness, though prevention through proper technique works best.
Ladyfinger Soaking Secrets
The key to perfect texture lies in quick, confident dipping. Hesitation leads to oversaturated, mushy biscuits that compromise the dessert’s structure. Practice the timing with a few test pieces before assembling your final dish.
Regional Variations and Authentic Touches
Traditional Italian Approach
Authentic Italian tiramisu often includes raw egg yolks in the mascarpone mixture for extra richness and traditional flavor. However, this version focuses on food safety while maintaining incredible taste and authenticity.
Coffee Culture Connections
In Italy, tiramisu pairs beautifully with a small glass of grappa or limoncello as a digestif. The alcohol cuts through the richness while complementing the coffee flavors, creating a sophisticated end to any meal.

Frequently Asked Questions
Can I substitute mascarpone with cream cheese?
While cream cheese can work in a pinch, it creates a denser, more tangy result that differs significantly from authentic tiramisu. If substituting, use full-fat cream cheese at room temperature and consider adding a splash of heavy cream for better texture.
What if I don’t have espresso?
Strong coffee works as an alternative, though the flavor won’t be quite as intense. Use about twice the amount of coffee grounds you’d normally use, or try cold brew concentrate for a smoother, less acidic option that still provides rich coffee flavor.
How do I prevent soggy ladyfingers?
The key is speed and confidence. Dip quickly and immediately place in your dish. If your coffee mixture is too hot, it will oversoften the biscuits, so ensure complete cooling before assembly.
Can tiramisu be frozen?
While freezing is possible, it significantly affects the texture. The mascarpone may become grainy upon thawing, and the ladyfingers can become unpleasantly soft. Fresh preparation delivers far superior results.
Why is my tiramisu runny?
Runny tiramisu usually results from insufficient chilling time or mascarpone that was overmixed and separated. Ensure at least 4 hours of refrigeration, and be gentle when mixing the mascarpone to maintain its thick consistency.
Is it safe to eat tiramisu with raw eggs?
This recipe doesn’t include raw eggs for food safety reasons. Traditional versions sometimes do, but modern interpretations often omit them without sacrificing flavor or authenticity.
How can I make tiramisu alcohol-free?
Simply omit the rum and increase the vanilla extract slightly for added flavor complexity. The dessert will still be delicious, though it will lack some of the traditional depth that alcohol provides.
What size dish should I use?
A 20cm x 30cm rectangular dish or 23cm square dish works perfectly for this recipe. The depth should be at least 7cm to accommodate the layers comfortably while allowing for proper presentation.
Recipe Summary:
- Total Time: 4 hours 30 minutes (including chilling)
- Active Prep Time: 30 minutes
- Yield: 8 generous servings
- Diet: Vegetarian
- Skill Level: Beginner-Friendly
- Best Served: Chilled, within 48 hours
Nutrition Information (per serving):
- Calories: 350
- Total Fat: 20g (Saturated: 10g, Unsaturated: 5g)
- Carbohydrates: 30g
- Fiber: 1g
- Protein: 5g
- Sugar: 20g
- Sodium: 50mg
- Cholesterol: 50mg


