Growing up, my family always celebrated special occasions with elaborate layer cakes that seemed to take forever to make. However, as an adult with a busy schedule, I discovered this incredible ice cream loaf cake that delivers all the wow factor with surprisingly manageable effort. This dessert has become my secret weapon for dinner parties, birthdays, and any time I want to create something truly memorable without spending an entire day in the kitchen.
Why You’ll Fall in Love with This Recipe
Perfect Balance of Textures
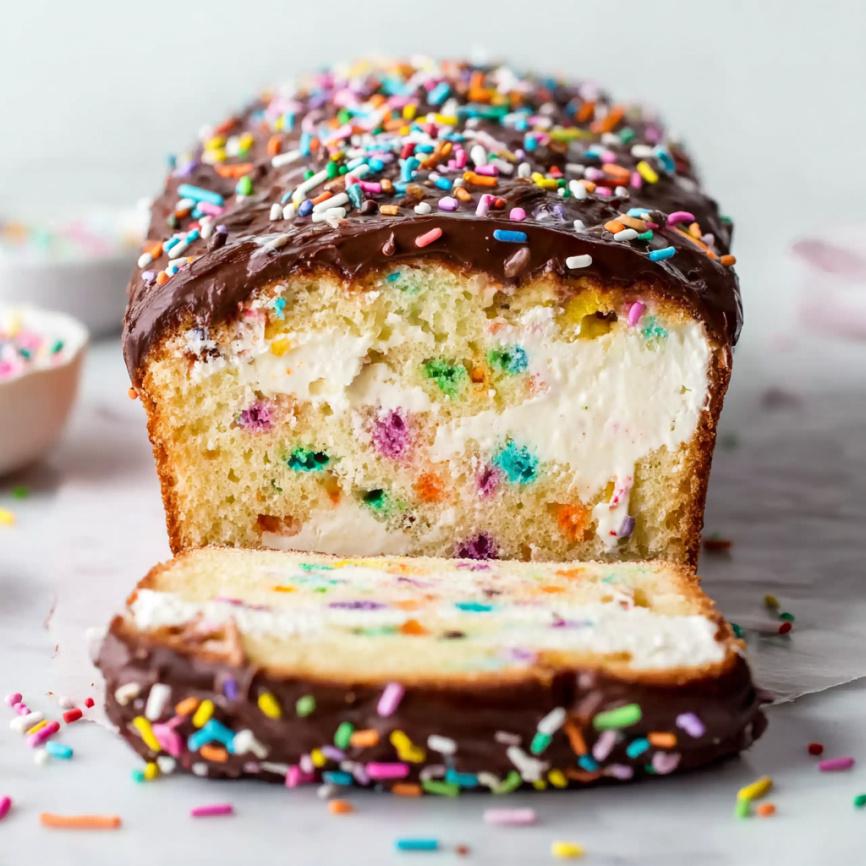
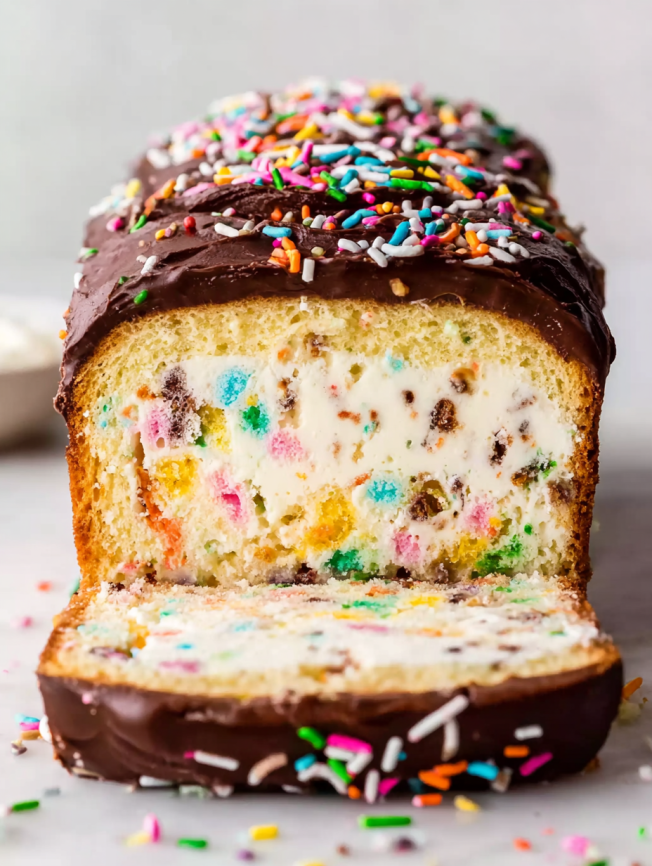
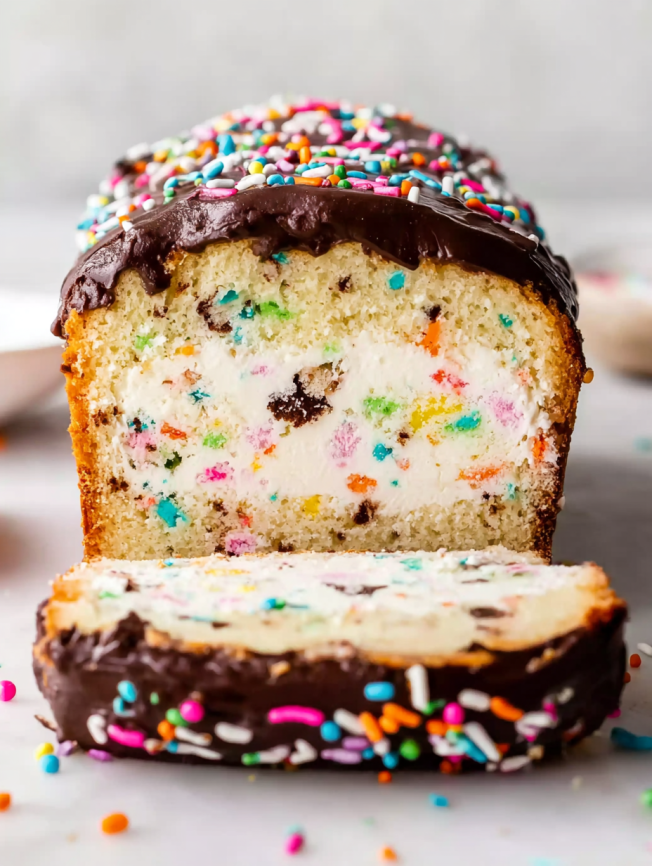
This ice cream loaf cake masterfully combines the tender crumb of homemade sprinkle cake with creamy layers of your favorite ice cream. Additionally, the rich chocolate ganache on top creates a beautiful contrast that makes each bite absolutely divine.
Make-Ahead Friendly
Unlike traditional layer cakes that require last-minute assembly, this dessert actually improves with time in the freezer. Furthermore, you can prepare it days in advance, making it ideal for entertaining or busy weekends.
Customizable to Your Taste
While the recipe calls for specific flavors, you can easily adapt it to suit any preference. For instance, swap vanilla ice cream for strawberry, or use different sprinkle colors to match your party theme.
Impressive Presentation
The layered cross-section reveals beautiful stripes of cake and ice cream that never fail to draw gasps of admiration. Moreover, the glossy ganache topping adds an elegant finishing touch that looks professionally made.
Essential Ingredients
For the Sprinkle Cake
- 2 cups cake flour (spooned and leveled for accuracy)
- 1 teaspoon baking powder plus 1/4 teaspoon baking soda for perfect rise
- 1/4 teaspoon salt to enhance flavors
- 6 tablespoons unsalted butter, melted and slightly cooled
- 1 large egg at room temperature for better mixing
- 1 cup granulated sugar for sweetness and structure
- 1/3 cup sour cream (or Greek yogurt) for moisture and tang
- 2/3 cup whole milk at room temperature for smooth batter
- 2 teaspoons pure vanilla extract for rich flavor
- 1/3 cup colorful sprinkles for fun and texture
For Assembly and Topping
- 2 pints of your favorite ice cream (avoid chunky varieties)
- 4 ounces quality semi-sweet chocolate, finely chopped
- 1/2 cup heavy cream for silky ganache
- Extra sprinkles for garnish (optional but recommended)
Step-by-Step Instructions
Preparing the Cake Base
Begin by preheating your oven to 350°F (177°C) and generously spraying a 9×5 inch loaf pan with nonstick spray. In a large bowl, whisk together the cake flour, baking powder, baking soda, and salt until well combined.
Next, prepare your wet ingredients in a separate medium bowl. Whisk the melted butter, egg, granulated sugar, sour cream, milk, and vanilla extract until the mixture is smooth and unified. Pour these wet ingredients into the dry mixture, then gently whisk until just combined—avoid over-mixing, which can result in a tough cake. Finally, fold in the sprinkles with a gentle hand.
Baking to Perfection
Pour the batter into your prepared loaf pan, spreading it evenly. Bake for 50 minutes to 1 hour, covering loosely with foil halfway through to prevent over-browning. Test for doneness by inserting a toothpick into the center—it should come out clean when the cake is ready.
Once baked, allow the cake to cool completely in the pan on a wire rack. This cooling step is crucial for successful slicing later.
Creating Perfect Layers
After the cake has cooled completely, carefully remove it from the loaf pan and place it on a cutting board. Using a very sharp or serrated knife, slice the cake horizontally into three even layers. For best results, stand the loaf upright and cut down vertically, using a ruler for precision if needed.
Assembly Magic
Line your loaf pan with parchment paper or plastic wrap, leaving enough overhang to lift the finished cake out later. Remove your ice cream from the freezer and let it soften for 15 minutes, or microwave for 20-30 seconds until spreadable.
Place the bottom cake layer in the lined pan, then carefully spread one pint of softened ice cream in an even layer on top. Add the middle cake layer, followed by the second pint of ice cream. Top with the final cake layer, pressing gently to ensure it adheres to the ice cream below.
The Freezing Process
Cover the assembled cake with aluminum foil or plastic wrap and freeze for at least 8 hours. This extended freezing time ensures clean slices and proper texture when serving.
Creating the Ganache
With about 15 minutes left in the freezing time, prepare your chocolate ganache. Place the finely chopped chocolate in a heat-proof bowl. Meanwhile, heat the cream in a small saucepan over medium heat until it begins to gently simmer—avoid rapid boiling, which can create a grainy texture.
Pour the hot cream over the chocolate and let it sit for 2-3 minutes to soften. Then, using a metal spoon or small silicone spatula, slowly stir until the mixture becomes completely smooth and glossy. Set aside for 10 minutes to thicken slightly.
Final Assembly and Serving
Remove the frozen cake from the pan using the parchment overhang, then place it on a cutting board. Pour the ganache over the top, spreading it evenly, and garnish with additional sprinkles if desired. The ganache will set quickly due to the cold temperature of the cake.
Allow the cake to sit for 3-5 minutes to soften slightly before slicing—this makes cutting much easier. Use a very sharp knife to cut slices about 3/4 inch thick, cleaning the blade between cuts for neat presentation.
Serving Suggestions
This ice cream loaf cake shines as the centerpiece of any celebration. Serve it at birthday parties alongside other colorful treats, or present it as an elegant finale to a dinner party. For special occasions, consider pairing it with fresh berries or a drizzle of fruit sauce.
During summer gatherings, this dessert provides a refreshing end to barbecues or outdoor parties. The frozen nature makes it particularly appealing on hot days, while the festive appearance adds joy to any table setting.
Creative Variations
Flavor Combinations
Experiment with different ice cream flavors to create unique variations. Neapolitan ice cream creates beautiful tri-colored layers, while coffee ice cream paired with chocolate cake offers a sophisticated adult twist. Alternatively, strawberry ice cream with vanilla cake creates a classic combination that appeals to all ages.
Seasonal Adaptations
During holidays, adjust the sprinkle colors to match the season—red and green for Christmas, pastels for Easter, or school colors for graduation parties. You can also incorporate seasonal ice cream flavors like pumpkin spice in fall or peppermint during winter holidays.
Dietary Modifications
For those with dietary restrictions, substitute gluten-free flour blend for the cake flour, or use dairy-free ice cream and coconut cream for the ganache. These modifications maintain the dessert’s appeal while accommodating various needs.
Make-Ahead Tips
This dessert actually benefits from advance preparation. You can assemble the cake up to three days before serving, keeping it covered in the freezer. However, it’s best to add the ganache topping closer to serving time for optimal appearance and texture.
If you must add the ganache in advance, carefully cover the topped cake and return it to the freezer for up to 8 hours. Before serving, let it sit at room temperature for 5 minutes to make slicing easier.
For longer storage, wrap individual slices in plastic wrap and store them in airtight containers for up to one week in the freezer.
Important Notes
Equipment Essentials
Success with this recipe depends on having the right tools. A 9×5 inch loaf pan is crucial for proper proportions, while a very sharp or serrated knife ensures clean cuts through both frozen cake and ice cream layers. Additionally, a heat-proof bowl for ganache preparation and parchment paper for easy removal are essential.
Ingredient Specifications
Real cake flour produces the best texture—substitutes often result in a denser cake that doesn’t complement the ice cream as well. Similarly, full-fat sour cream and whole milk are strongly recommended for optimal taste and texture, though plain Greek yogurt can substitute for sour cream if necessary.
Ice Cream Selection
Choose ice cream flavors without large chunks or mix-ins, as these make slicing extremely difficult. Smooth varieties like vanilla, chocolate, or strawberry work best, while flavors with small pieces like chocolate chip are acceptable.
Frequently Asked Questions
Q: Can I use a different size pan? A: While a 9×5 inch loaf pan is recommended, you can use a similar-sized container. However, adjust the baking time accordingly and ensure your ice cream layers fit properly.
Q: What if my ganache is too thick or thin? A: If the ganache is too thick, gently reheat it and add a tablespoon of cream. If it’s too thin, let it cool longer before applying, or add more chopped chocolate and stir until melted.
Q: How do I prevent ice crystals from forming? A: Ensure your cake is completely cool before assembly, wrap tightly to prevent air exposure, and don’t freeze for longer than recommended without proper wrapping.
Q: Can I make this without the ganache? A: Absolutely! The cake is delicious on its own, or you can substitute with whipped cream, caramel sauce, or simply dust with powdered sugar for a simpler presentation.
Q: Why is my cake difficult to slice? A: Make sure you’re using a very sharp knife and letting the cake soften for a few minutes after removing from the freezer. Clean your knife between cuts for the neatest slices.


