Growing up, I was the kid who always ate the cookie part of Oreos first, then savored the cream filling separately. Fast-forward to my adult baking adventures, and I discovered these incredible cookies and cream cupcakes that capture everything I loved about that childhood ritual. The first time I made these for a friend’s birthday party, guests literally gasped when they saw the beautiful chocolate-vanilla swirl frosting, and several people asked for the recipe before they’d even taken a bite.
Why These Cupcakes Will Steal Every Show
Light and Fluffy Perfection
Unlike dense, overly sweet cupcakes that leave you feeling heavy, these treats feature an incredibly light vanilla base studded with chunks of Oreo cookies. Furthermore, the cake flour creates a tender crumb that practically melts in your mouth, making each bite absolutely divine.
Stunning Visual Appeal
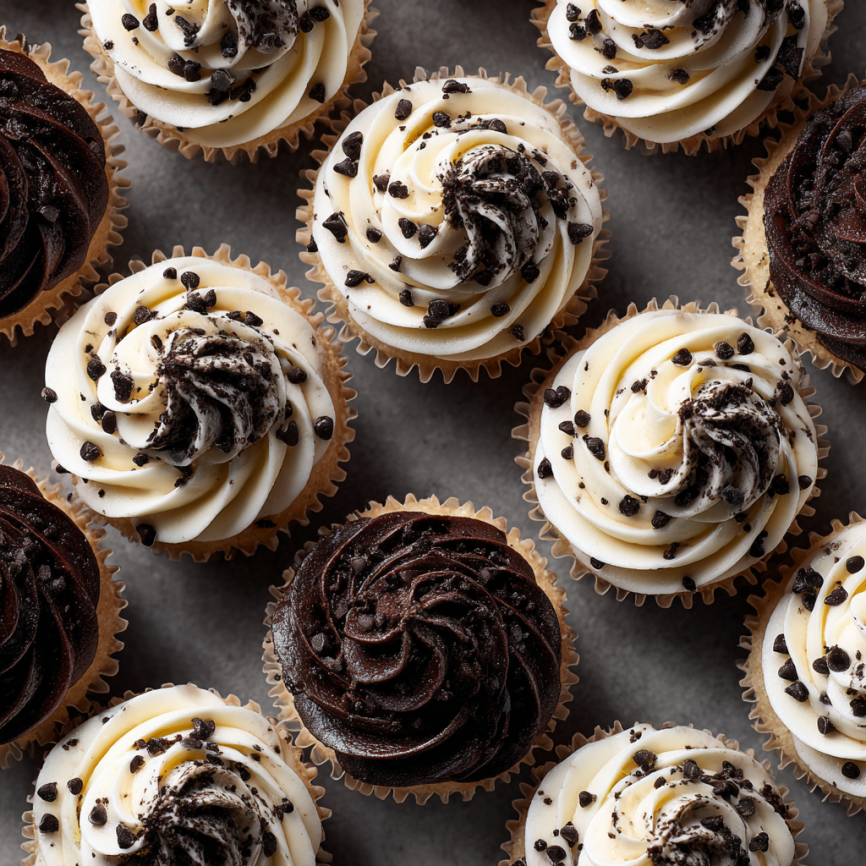
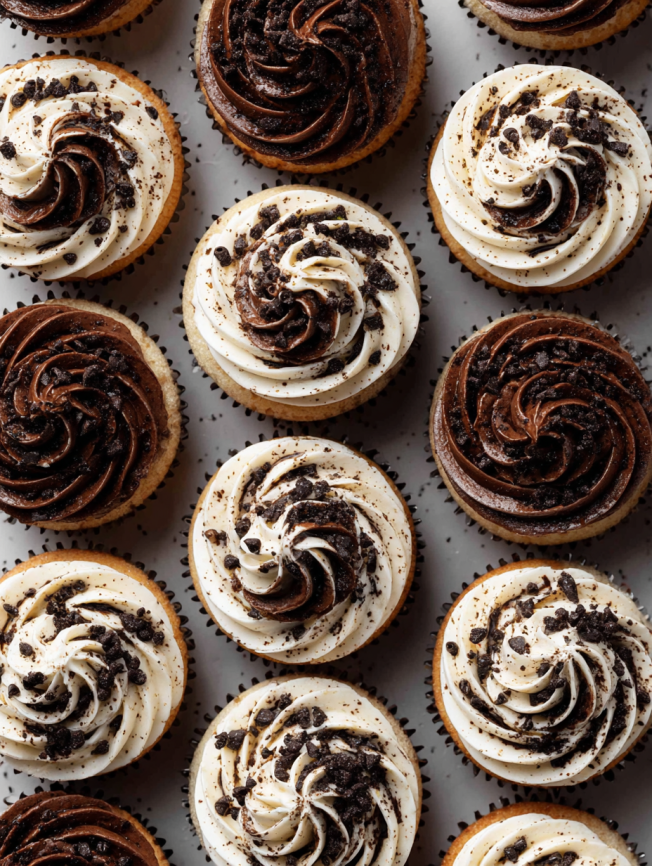
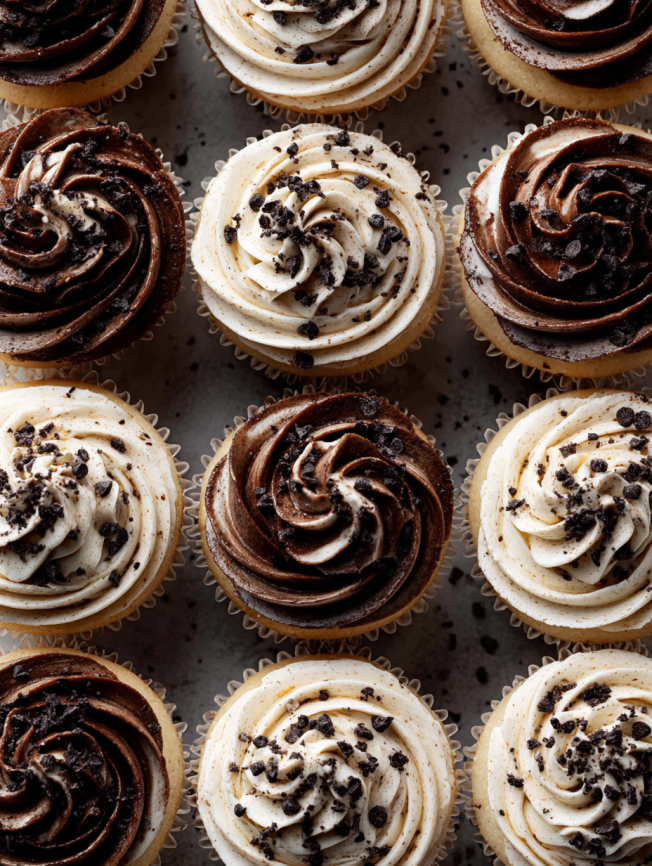
The signature chocolate-vanilla swirl frosting creates a professional bakery appearance that never fails to impress. Additionally, the contrast between the speckled vanilla cake and the dramatic two-toned topping makes these cupcakes Instagram-worthy from every angle.
Customizable Creativity
While the classic combination is perfection on its own, these cupcakes serve as an excellent canvas for seasonal variations. Moreover, you can adjust the Oreo-to-cake ratio or experiment with different cookie varieties to suit your taste preferences.
Make-Ahead Convenience
Perfect for party planning, both the cupcakes and frosting can be prepared in advance and assembled when needed. Consequently, you can enjoy stress-free entertaining while still delivering homemade quality that guests will remember.
Essential Ingredients for Success
The Cupcake Foundation
- 1 3/4 cups cake flour (spooned and leveled for accuracy)
- 3/4 teaspoon baking powder plus 1/4 teaspoon baking soda for optimal rise
- 1/4 teaspoon salt to enhance all flavors
- 1/2 cup unsalted butter, softened to room temperature for proper creaming
- 1 cup granulated sugar for sweetness and structure
- 3 large egg whites at room temperature for stability and lightness
- 2 teaspoons pure vanilla extract for rich flavor depth
- 1/2 cup full-fat sour cream for moisture and tang
- 1/2 cup whole milk at room temperature for smooth mixing
- 1 1/2 cups chopped Oreos (approximately 12 cookies for perfect distribution)
Vanilla Buttercream Components
- 1/2 cup unsalted butter, softened for smooth consistency
- 1 3/4 cups confectioners’ sugar for sweetness and body
- 2 tablespoons heavy cream for optimal texture
- 1 teaspoon pure vanilla extract for classic flavor
- Salt to taste for balance
Chocolate Buttercream Elements
- 1/2 cup unsalted butter, softened to match vanilla frosting
- 1 3/4 cups confectioners’ sugar for consistent sweetness
- 1/4 cup unsweetened cocoa powder for rich chocolate flavor
- 2 tablespoons heavy cream for smooth spreading
- 1 teaspoon pure vanilla extract to enhance chocolate notes
- Salt to taste plus crushed Oreos for optional garnish
Step-by-Step Baking Instructions
Preparing Your Kitchen
Begin by preheating your oven to 350°F (177°C) and lining a 12-cup muffin pan with cupcake liners. Since this recipe yields 16-17 cupcakes, prepare a second pan with 4-5 additional liners or plan to bake in batches for consistent results.
Creating the Perfect Batter
Whisk together the cake flour, baking powder, baking soda, and salt in a medium bowl, then set this dry mixture aside. Using either a handheld or stand mixer with paddle attachment, cream the softened butter and granulated sugar on medium-high speed for about 3 minutes until the mixture becomes light and fluffy.
Scrape down the bowl sides and bottom as needed, then add the egg whites and beat on high speed for 2 minutes until the mixture is smooth and well-combined. Next, incorporate the sour cream and vanilla extract, beating on medium-high speed for about 1 minute until fully integrated.
Combining Wet and Dry Ingredients
Add the flour mixture to the creamed butter mixture, then slowly pour in the milk while mixing on low speed. Beat just until combined—overmixing will result in tough cupcakes rather than the desired tender texture. Check the bottom of the bowl with a whisk to ensure no flour pockets remain, then gently fold in the chopped Oreos for even distribution.
Baking to Perfection
Divide the batter among the prepared liners, filling each only 2/3 full to prevent overflow during baking. Bake for 19-22 minutes, testing for doneness with a toothpick inserted in the center—it should come out clean when the cupcakes are ready.
Allow the cupcakes to cool in the pans for 20 minutes before transferring to a wire rack. Complete cooling is essential before frosting to prevent melting and sliding.
Mastering the Dual Buttercream
Vanilla Buttercream Base
Using a handheld or stand mixer with paddle attachment, beat the softened butter on medium speed for about 2 minutes until creamy and smooth. Add the confectioners’ sugar, heavy cream, and vanilla extract, then beat on low speed for 30 seconds before increasing to medium-high speed.
Continue beating for 2 full minutes until the frosting becomes light and fluffy. Adjust consistency by adding more confectioners’ sugar if too thin, or additional cream if too thick. Taste and add a pinch of salt if the frosting seems overly sweet. Transfer to a separate bowl.
Chocolate Buttercream Creation
Without cleaning the mixing bowl, repeat the process for chocolate buttercream. Beat the softened butter for 2 minutes until creamy, then add confectioners’ sugar, cocoa powder, heavy cream, and vanilla extract. Beat on low speed for 30 seconds, then increase to high speed for 1 full minute.
Adjust consistency as needed with additional confectioners’ sugar, cocoa powder, or cream until you achieve the same texture as your vanilla frosting. The two frostings should have similar consistency for optimal swirling.
Professional Swirl Technique
For bakery-quality presentation, use a piping bag fitted with either Ateco 829 or 849 tip. Place the bag in a tall glass with edges folded over for stability, then spoon vanilla frosting on one side and chocolate frosting on the other. Remove from the glass, push frosting toward the tip while eliminating air bubbles, twist the top, and pipe beautiful swirls onto each cupcake.
Creative Serving Suggestions
These cupcakes shine at birthday parties, where their playful appearance appeals to both children and adults. For elegant dinner parties, arrange them on tiered stands with subtle lighting to highlight the beautiful frosting swirls.
During holiday celebrations, consider adding themed sprinkles or colored sugar to match your decorative scheme. Summer barbecues become more memorable when these cupcakes provide a cool, refreshing dessert option that doesn’t require heating the kitchen.
Exciting Recipe Variations
Seasonal Adaptations
During autumn, substitute pumpkin spice Oreos for traditional cookies and add a pinch of cinnamon to the frosting. Winter holidays call for peppermint bark Oreos with a hint of mint extract in the vanilla buttercream.
Spring celebrations benefit from lemon Oreos paired with lemon zest in the cake batter, while summer gatherings shine with birthday cake Oreos and rainbow sprinkles throughout.
Flavor Combinations
Coffee lovers will appreciate espresso powder added to the chocolate frosting, creating a mocha variation that pairs beautifully with the vanilla cake. Alternatively, substitute the vanilla extract with almond extract for a sophisticated flavor profile that complements the chocolate elements.
Dietary Modifications
For gluten-free versions, use a high-quality gluten-free flour blend in place of cake flour, though the texture may be slightly different. Dairy-free adaptations work well with plant-based butter and non-dairy milk, maintaining much of the original flavor and texture.
Make-Ahead Strategies
Timeline Planning
Bake cupcakes up to one day in advance, storing them covered tightly at room temperature. Prepare both frostings up to two days ahead, refrigerating them in covered containers until needed.
When ready to serve, allow refrigerated frosting to come to room temperature, then beat briefly with a splash of cream or milk to restore proper consistency. This method ensures fresh-tasting results with minimal day-of preparation.
Storage Solutions
Unfrosted cupcakes freeze beautifully for up to three months when wrapped individually in plastic wrap and stored in airtight containers. Thaw overnight in the refrigerator, then bring to room temperature before frosting and serving.
Frosted cupcakes should be stored in the refrigerator for up to three days, though they’re best enjoyed within 24 hours of assembly for optimal texture and appearance.
Professional Baking Tips
Ingredient Temperature Matters
Room temperature ingredients blend more easily and create better texture than cold ingredients. Take eggs, milk, and sour cream out of the refrigerator 1-2 hours before baking, or use the quick-warming method of placing eggs in warm water for 5-10 minutes.
Measuring Accuracy
Cake flour should always be spooned into measuring cups and leveled rather than scooped directly, which can pack too much flour and create dense cupcakes. Similarly, confectioners’ sugar benefits from sifting to eliminate lumps that can affect frosting smoothness.
Mixing Techniques
Cream butter and sugar thoroughly—this process incorporates air that creates light, fluffy cupcakes. However, once flour is added, mix just until combined to avoid developing gluten, which would create tough, chewy results.
Essential Equipment Notes
Baking Tools
A 12-cup muffin pan with additional capacity for extra cupcakes ensures even baking and consistent results. Quality cupcake liners prevent sticking and create professional presentation, while a reliable electric mixer makes frosting preparation effortless.
Piping Supplies
Professional piping tips like Ateco 829 or 849 create beautiful swirled effects that elevate these cupcakes from homemade to bakery-quality. Reusable piping bags offer better control than disposable options, though both work well for this technique.
Frequently Asked Questions
Q: Can I use regular all-purpose flour instead of cake flour? A: While cake flour produces the lightest texture, you can substitute by removing 2 tablespoons from each cup of all-purpose flour and replacing with cornstarch. However, the results won’t be quite as tender.
Q: Why do I use only egg whites instead of whole eggs? A: Egg whites create a lighter, more delicate crumb and prevent the golden color that yolks would add, keeping the cake base pristinely white to showcase the Oreo pieces.
Q: How do I prevent the frosting from being too sweet? A: Adding a pinch of salt to each frosting helps balance sweetness. Additionally, using high-quality vanilla extract and cocoa powder provides depth that reduces the perception of excessive sugar.
Q: Can I make these cupcakes without a mixer? A: While possible, hand mixing requires significantly more effort and may not achieve the same light, fluffy texture. If necessary, ensure butter is very soft and mix vigorously, especially during the creaming stage.
Q: What’s the best way to chop Oreos for even distribution? A: Pulse whole Oreos (including filling) in a food processor until they reach your desired size, or place them in a sealed plastic bag and crush with a rolling pin for more rustic pieces.
Q: How can I tell when the cupcakes are perfectly baked? A: Besides the toothpick test, properly baked cupcakes will spring back lightly when touched in the center and just begin to pull away from the liner edges. Overbaking creates dry cupcakes, so check early and adjust timing as needed.


