
There’s something magical about the combination of butter, sugar, and fresh lemon that instantly transports me back to my grandmother’s kitchen. Growing up, I’d watch her carefully zest bright yellow lemons, the citrus oils perfuming the air with their sunny fragrance. Now, whenever I make these lemon shortbread cookies, I’m reminded of those precious moments and the joy that simple, quality ingredients can bring to our lives.
These aren’t just any ordinary cookies – they’re little bites of sunshine that brighten even the gloomiest days. Whether you’re planning a tea party, need a thoughtful gift for a neighbor, or simply want to treat yourself to something special, these cookies deliver pure happiness in every buttery, tangy bite.
Prep Time: 3 hours, 30 minutes (includes chilling)
Cook Time: 14 minutes
Total Time: 3 hours, 45 minutes
Yield: 36-38 2.25-inch cookies
Why You’ll Fall in Love with This Recipe
Perfect Balance of Flavors
The beauty of these shortbread cookies lies in their exquisite balance. Furthermore, the rich, creamy butter provides the perfect canvas for the bright, zesty lemon to shine through. Additionally, the subtle sweetness doesn’t overpower the citrus notes, creating a harmonious flavor profile that’s both sophisticated and comforting.
Versatile Presentation Options
What makes this recipe truly special is its adaptability. You can enjoy these cookies completely plain for a simple, elegant treat. Alternatively, sprinkle them with sparkling sugar for a festive touch, or dip them in the optional lemon icing for an extra layer of citrusy goodness. Each variation offers its own unique charm and visual appeal.
Foolproof Technique
Despite their bakery-quality appearance, these cookies are surprisingly straightforward to make. The secret lies in properly chilling the dough, which ensures clean cuts and perfectly shaped cookies. Moreover, the cornstarch addition creates that signature shortbread texture – tender and crumbly yet sturdy enough to hold intricate shapes.
Essential Ingredients
For the Cookies
- 2/3 cup (135g) granulated sugar – Forms the sweet foundation
- 2 tablespoons fresh lemon zest – Provides intense citrus flavor
- 1 cup (16 tbsp; 226g) unsalted butter, softened – Creates the rich, buttery base
- 1 tablespoon (15ml) fresh lemon juice – Adds tangy brightness
- 1/2 teaspoon pure vanilla extract – Enhances overall flavor complexity
- 2 cups (250g) all-purpose flour (spooned & leveled) – Provides structure
- 1/3 cup (40g) cornstarch – Creates tender, melt-in-your-mouth texture
- 1/8 teaspoon salt – Balances sweetness and enhances flavors
- Coarse sparkling sugar (optional) – For decoration if not using icing
For the Optional Lemon Icing
- 1 cup (120g) confectioners’ sugar, sifted – Creates smooth, sweet coating
- 1 tablespoon (15ml) fresh lemon juice – Maintains citrus theme
- 1 tablespoon (15ml) milk, heavy cream, or half-and-half – Achieves proper consistency
- 1/4 teaspoon pure vanilla extract – Adds depth of flavor
- Fresh lemon zest (optional) – For beautiful garnish
Step-by-Step Instructions
Preparing the Lemon Sugar
Begin by placing the granulated sugar and fresh lemon zest in a small food processor. Pulse the mixture 12-15 times until the sugar becomes moistened and the lemon zest is finely chopped. This crucial step should never be skipped, as it intensifies the lemon flavor throughout the cookies.
Creating the Cookie Dough
In a large bowl, use either a handheld or stand mixer fitted with a paddle attachment to beat the lemon sugar and softened butter together. Mix on high speed for 2-3 minutes until the mixture becomes light and creamy. Remember to scrape down the sides and bottom of the bowl as needed to ensure even mixing.
Next, add the fresh lemon juice and vanilla extract, beating until fully combined. Again, scrape down the bowl to incorporate all ingredients evenly. Then, add the flour, cornstarch, and salt to the mixture. Start beating on low speed for about 1 minute as the dry ingredients begin to combine with the wet ingredients.
Achieving the Perfect Dough Consistency
Turn the mixer up to medium speed and continue beating for 1-3 minutes until the dough clumps together. The finished dough should be thick yet soft to the touch. If the mixture seems too dry, don’t worry – this is normal for shortbread dough.
Rolling and Chilling the Dough
Generously dust a piece of parchment paper or silicone baking mat with flour. Using a floured rolling pin, carefully roll the dough out to approximately 1/4 to 1/2 inch thickness. Use additional flour if the dough seems too sticky during this process.
The rolled-out dough can be any shape, but maintaining even thickness throughout is essential for uniform baking. Transfer the rolled-out dough, still on its parchment or baking mat, to a baking sheet. Cover the dough and refrigerate for at least 3 hours, though it can stay chilled for up to 2 days.
Cutting and Baking the Cookies
Once the dough has chilled properly, preheat your oven to 350°F (177°C). Line large baking sheets with fresh parchment paper or silicone baking mats.
Using your preferred cookie cutter, cut the chilled dough into shapes. Work quickly during this step, as the dough should remain cold for clean cuts. Re-roll any dough scraps and continue cutting until all dough is used. If the dough becomes too soft during cutting, refrigerate the shaped cookies for 15 minutes before baking.
For a traditional shortbread appearance, gently poke holes in the tops of the cookies using a fork, being careful not to push all the way through. If you’re not planning to ice the cookies, lightly sprinkle coarse sparkling sugar on top – it will adhere properly during baking.
Baking to Perfection
Bake the cookies for 14-15 minutes, until the edges are set and just beginning to turn golden. Watch smaller cookies carefully after the 10-minute mark, as they may bake faster. Conversely, larger cookies may require additional baking time.
Allow the cookies to cool on the baking sheet for 10 minutes before transferring them to a cooling rack. This initial cooling period prevents the delicate cookies from breaking during transfer.
Creating the Optional Lemon Icing
Preparing the Icing
In a small bowl, whisk together the sifted confectioners’ sugar, fresh lemon juice, milk or cream, and vanilla extract until the mixture is completely smooth. The consistency should be thick enough to coat the cookies but thin enough to drip slightly.
Applying the Icing
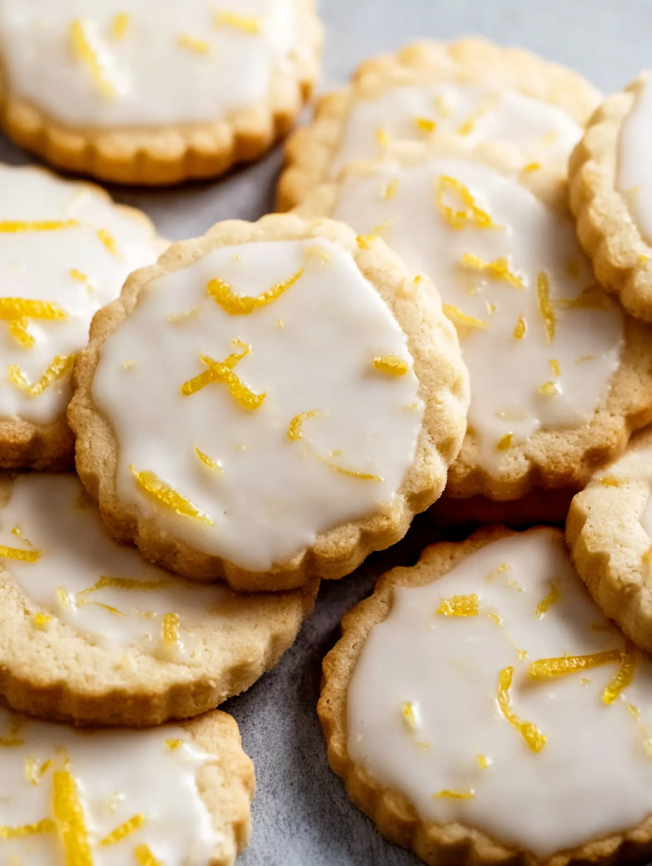
Dip the tops of completely cooled cookies into the icing, allowing any excess to drip back into the bowl. Place the iced cookies on a cooling rack or baking sheet to dry. While the icing is still wet, sprinkle fresh lemon zest on top for an elegant finishing touch.
The icing will set completely after about 1-2 hours, making the cookies ready for stacking, storing, or transporting.
Serving Suggestions
Tea Time Elegance
These lemon shortbread cookies pair beautifully with afternoon tea or coffee. Arrange them on a tiered serving tray alongside other petit fours for an elegant presentation. The bright lemon flavor complements both black teas and herbal varieties perfectly.
Dessert Platter Addition
Include these cookies as part of a larger dessert spread. They provide a refreshing contrast to richer desserts like chocolate cake or creamy puddings. Additionally, their beautiful appearance makes them an attractive addition to any dessert table.
Gift Giving
Package these cookies in decorative tins or cellophane bags tied with ribbon for thoughtful homemade gifts. The professional appearance and delicious taste make them perfect for teacher appreciation, hostess gifts, or holiday giving.
Delicious Recipe Variations
Citrus Alternatives
While lemon is classic, you can easily substitute other citrus fruits. Orange zest and juice create a sweeter, more mellow flavor profile, while lime offers a more intense, tropical twist. Simply replace the lemon juice and zest with equal amounts of your preferred citrus.
Herb Infusions
For a sophisticated twist, try adding finely chopped fresh herbs like rosemary or thyme. Use about 1 teaspoon of chopped herbs in addition to the lemon zest for an unexpected savory note that complements the citrus beautifully.
Chocolate Variations
Dip half of each cooled cookie in melted white or dark chocolate for an elegant presentation. Allow the chocolate to set completely before serving or storing.
Make-Ahead Tips
Dough Preparation
The cookie dough can be prepared up to 3 months in advance and frozen. After completing step 2 of the recipe, flatten the dough into a disc, wrap tightly in plastic wrap, and freeze. To use frozen dough, thaw it in the refrigerator overnight, then bring to room temperature for about 1 hour before rolling.
Baked Cookie Storage
Both plain and iced cookies can be made several days ahead. Store plain cookies in an airtight container at room temperature for up to 5 days. Iced cookies should be stored the same way for up to 3 days, or refrigerated for up to 5 days once the icing has set completely.
Freezing Baked Cookies
Completely cooled cookies freeze exceptionally well for up to 3 months. If freezing iced cookies, wait for the icing to set completely before layering between sheets of parchment paper in a freezer-friendly container.
Important Notes
The Critical Sugar and Zest Step
Pulsing the lemon zest with sugar in step 1 serves three important purposes. First, it breaks down both the sugar granules and lemon zest into finer particles. Second, this process extracts oils from the lemon peel, which moistens the sugar. Finally, it infuses more intense flavor into the dough because the mixture is then creamed with butter, and fat carries flavor exceptionally well.
Temperature Considerations
Room temperature butter is crucial for proper creaming. However, avoid overly soft or melted butter, as this will affect the dough’s texture and the cookies’ ability to hold their shape during baking.
Dough Thickness Matters
Maintaining consistent thickness when rolling ensures even baking. Cookies that are too thin may become overly crispy, while those that are too thick might not bake through properly in the center.

Frequently Asked Questions
Can I make these cookies without a food processor?
Absolutely! While the food processor creates the ideal texture, you can crush the lemon zest into the sugar using a mortar and pestle. Alternatively, you can skip this step entirely, though you’ll lose some flavor intensity. Mix the zest directly with the sugar and butter if you don’t have either tool.
How do I know when the cookies are properly baked?
Look for edges that are set and just beginning to turn golden. The centers should appear dry rather than shiny or wet. Remember that cookies continue cooking slightly on the hot pan after removal from the oven.
Can I double this recipe for a larger batch?
Yes, this recipe doubles beautifully. Simply multiply all ingredients by two and follow the same instructions. You may need to work in batches when rolling and cutting the dough.
What’s the best way to achieve clean cookie cuts?
Ensure your dough is properly chilled and your cookie cutters are clean and sharp. Dip cutters in flour between cuts to prevent sticking. Work quickly to keep the dough cold, refrigerating shaped cookies if they become too soft.
How can I fix icing that’s too thick or too thin?
If the icing is too thick, add milk or cream one teaspoon at a time until you reach the desired consistency. If it’s too thin, gradually whisk in additional sifted confectioners’ sugar until it reaches the proper thickness for dipping.
Can I use salted butter instead of unsalted?
While unsalted butter is preferred for better flavor control, you can use salted butter if necessary. Simply omit the added salt from the recipe to prevent the cookies from becoming too salty.
These lemon shortbread cookies represent the perfect marriage of simplicity and sophistication. With their tender, buttery texture and bright citrus flavor, they’re sure to become a beloved addition to your baking repertoire. Whether served plain or dressed up with icing, they never fail to bring smiles and satisfaction to everyone who tries them.


