There’s something deeply satisfying about capturing all the flavors of your favorite sushi roll in a quick, accessible bowl format. This sesame salmon sushi bowl has become my go-to solution for those moments when I crave the complex, umami-rich flavors of fresh sushi but only have 15 minutes to spare. The first time I made this recipe, watching the salmon develop a gorgeous golden crust while absorbing those savory sesame-soy flavors, I knew I’d found the perfect weekday lunch that never gets boring.
What makes this bowl truly special is how it delivers authentic sushi flavors without any of the intimidation factor. Every component works in harmony – the perfectly seasoned sushi rice provides the foundation, while tangy pickled vegetables add brightness and crunch. Meanwhile, creamy avocado and crispy seaweed sheets create textural interest that makes each bite as exciting as the last.
Why This Sushi Bowl Will Revolutionize Your Lunch Game
Lightning-Fast Assembly
Ready in just 15 minutes from start to finish, this recipe proves that satisfying, restaurant-quality meals don’t require extensive preparation or specialized skills.
Sushi Shop Flavors at Home
All the complex, umami-rich flavors you love from your favorite sushi restaurant, delivered in an approachable bowl format that’s perfect for home cooking.
Customizable Components
Every element can be adjusted to your preferences – more pickled vegetables for tang, extra avocado for creaminess, or different proteins for variety.
Meal Prep Friendly
Components can be prepared ahead and assembled when ready to eat, making this perfect for work lunches or busy weekday planning.
Nutritiously Balanced
Packed with high-quality protein, healthy fats from avocado and sesame oil, plus probiotics from pickled vegetables, this bowl delivers both satisfaction and nutrition.
Budget-Friendly Alternative
Enjoy sushi flavors at a fraction of restaurant cost while controlling quality and portion sizes to meet your preferences perfectly.
Essential Ingredients for Authentic Results
The Star Protein
- 1 lb salmon fillet, skin removed, diced into 1-inch pieces
- 1½ tablespoons sesame oil
- ⅓ cup soy sauce (low-sodium preferred)
- 2 cloves fresh garlic, finely minced
- 1 teaspoon ginger paste (or freshly grated ginger)
- Kosher salt and black pepper
Perfect Sushi Rice Foundation
- 1½ cups uncooked sushi rice (yields about 4 cups cooked)
- 2 cups water
- ¼ cup seasoned rice vinegar
Fresh and Pickled Elements
- 1 cup pickled sliced cucumbers
- 1 cup pickled matchstick carrots
- 1 ripe avocado, thinly sliced
- 2 sheets nori seaweed, cut into thin strips
- 1 tablespoon furikake seasoning
Creamy Soy Mayo Sauce
- ¼ cup Kewpie mayonnaise
- 1 tablespoon soy sauce
- ½ teaspoon sesame oil
Serves 4-6 | Prep: 10 minutes | Cook: 5 minutes | Total: 15 minutes
Step-by-Step Instructions for Perfect Results
Preparing the Perfect Sushi Rice
Begin by cooking your sushi rice according to package directions, using the absorption method for the best texture. Short-grain sushi rice creates the ideal sticky consistency that holds together beautifully in bowl format.
Once cooked, drizzle the seasoned rice vinegar over the warm rice. Using a rice paddle or large spoon, gently fold the vinegar into the rice with cutting motions rather than stirring, which prevents the grains from becoming mushy.
Creating the Signature Sesame Salmon
Heat sesame oil in a large skillet over medium-high heat until it shimmers. While the oil heats, season your salmon pieces generously with salt and pepper on all sides.
Add the seasoned salmon to the hot pan, leaving space between pieces to ensure proper searing. Cook undisturbed for 2-3 minutes until a beautiful golden-brown crust forms on the bottom.
Achieving the Perfect Sear and Glaze
Carefully turn each piece of salmon to sear all sides, creating an even golden crust that locks in moisture and flavor. This step takes patience but creates incredible texture contrast.
Once all sides are seared, add the soy sauce, minced garlic, and ginger paste to the pan. Reduce heat to medium-low and let everything simmer gently for 2-3 minutes, allowing the salmon to absorb those aromatic flavors while finishing its cook.
Crafting the Signature Sauce
While the salmon finishes cooking, whisk together Kewpie mayonnaise, soy sauce, and sesame oil in a small bowl until smooth and well combined. This creamy, umami-rich sauce ties all the bowl elements together beautifully.
Adjust the consistency by adding more mayonnaise for creaminess or more soy sauce for saltiness, tasting as you go to achieve your perfect balance.
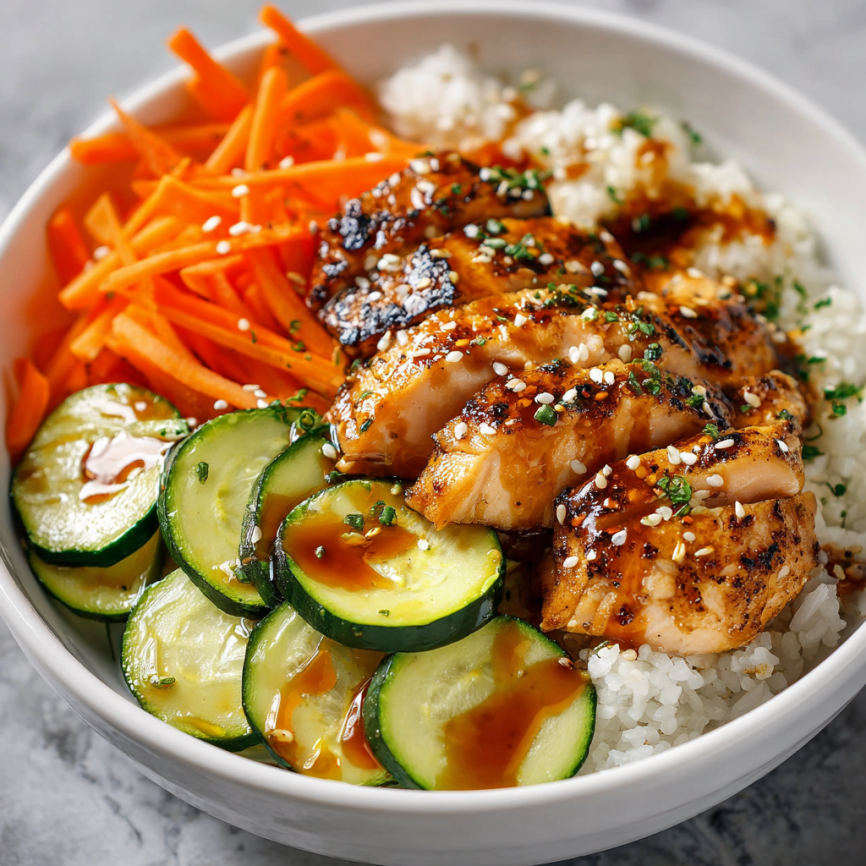
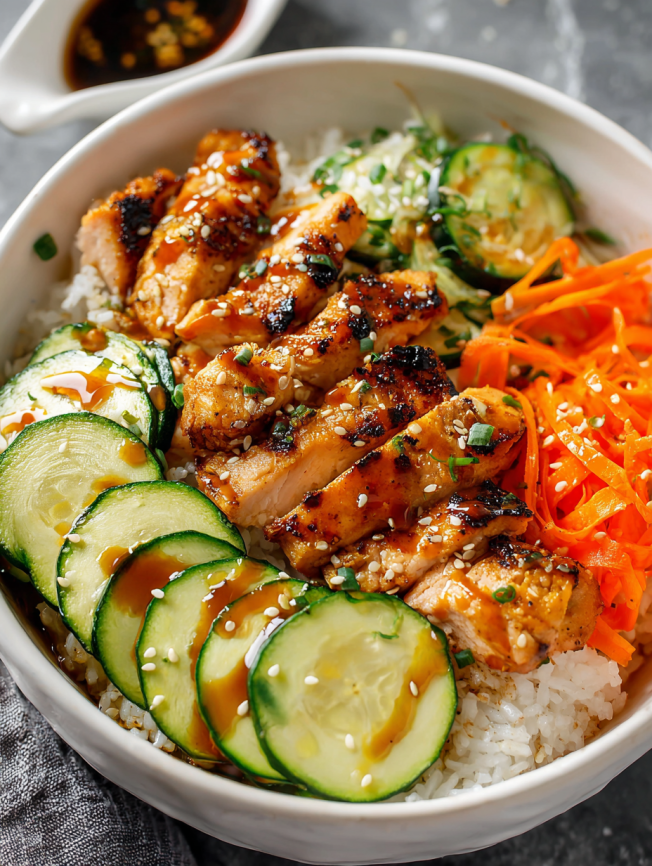
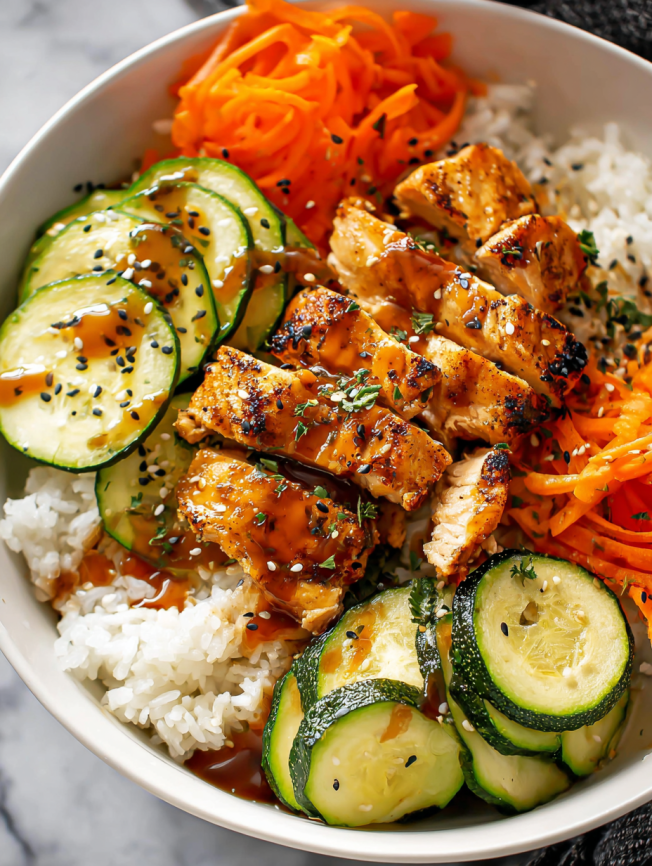
Assembly for Maximum Visual Impact
Start with a generous portion of the seasoned sushi rice in each bowl, creating a foundation for all the other components. Arrange the pickled cucumbers and carrots in separate sections for visual appeal.
Add thin slices of fresh avocado, fanned out attractively, then nestle the warm sesame salmon pieces throughout the bowl. Scatter the nori strips and sprinkle furikake over everything for authentic presentation.
Final Finishing Touches
Drizzle the soy mayo sauce artfully over each bowl, either in lines or dots for professional presentation. Serve immediately while the salmon is still warm for the best contrast of temperatures and textures.
Creative Serving and Presentation Ideas
Traditional Bowl Style
Present in deep ceramic bowls with chopsticks and a small spoon for the rice, creating an authentic Japanese dining experience at home.
Lunch Box Assembly
Pack components separately for work lunches – rice in the bottom, other elements in compartments, with sauce on the side for fresh assembly.
Family-Style Service
Set up a DIY sushi bowl bar with all components in separate dishes, letting everyone customize their perfect combination of flavors and textures.
Elegant Plating
Arrange components in colorful sections within shallow bowls for Instagram-worthy presentation that showcases each element beautifully.
Delicious Variations to Explore
Spicy Mayo Version
Replace the soy mayo with a mixture of equal parts Kewpie mayonnaise and sriracha for those who enjoy heat with their sushi flavors.
Vegetarian Alternative
Substitute extra-firm pressed tofu, cubed and prepared the same way as the salmon, for a plant-based version that’s equally satisfying.
Additional Protein Options
Try this same preparation with shrimp, scallops, or even chicken thighs for variety while maintaining the same delicious flavor profile.
Extra Veggie Power
Add thinly sliced radishes, edamame, or shredded cabbage for additional crunch, color, and nutritional value throughout the bowl.
Make-Ahead Strategies for Busy Schedules
Component Preparation Timeline
Sushi rice can be prepared up to 2 days ahead and stored in the refrigerator. Pickled vegetables actually improve with time and keep for up to a week.
Salmon Prep Planning
Season salmon pieces up to 4 hours in advance for deeper flavor penetration. Store covered in the refrigerator until cooking time.
Assembly Strategy
For meal prep, store components separately and assemble just before eating to maintain optimal textures and prevent sogginess.
Sauce Storage
The soy mayo sauce keeps beautifully in the refrigerator for up to a week, making multiple bowl preparations even faster.
Professional Techniques for Restaurant Results
Rice Texture Mastery
Properly cooked sushi rice should be sticky enough to hold together but not mushy. Rinse rice until water runs clear before cooking for best results.
Salmon Cutting Technique
Cut salmon into uniform 1-inch pieces to ensure even cooking. Larger pieces prevent overcooking while smaller ones can dry out quickly.
Searing Temperature Control
Medium-high heat creates the perfect crust without overcooking the interior. The salmon should remain tender and slightly pink in the center.
Pickle Quality Impact
High-quality pickled vegetables make a significant difference. Consider making your own for optimal flavor and texture control.
Essential Notes for Consistent Success
Timing Coordination
Start the rice first since it takes the longest. While it cooks, prepare other components so everything comes together seamlessly.
Salmon Freshness Importance
Use the freshest salmon possible, preferably sushi-grade if available. Fresh fish makes an enormous difference in both flavor and food safety.
Temperature Contrast Magic
Serve immediately after assembly to enjoy the contrast between warm salmon and cool pickled vegetables – this temperature variation is key to the dish’s appeal.
Equipment Recommendations
A well-seasoned or non-stick pan is crucial for achieving the perfect salmon sear without sticking or tearing the delicate fish.
Frequently Asked Questions
Can I use regular rice instead of sushi rice? While possible, sushi rice’s short-grain structure creates the ideal sticky texture that holds the bowl together. Regular rice won’t provide the same authentic experience.
How do I know when the salmon is perfectly cooked? The salmon should have a golden crust on all sides while remaining slightly pink and tender in the center. Overcooking makes it dry and less enjoyable.
Can I make my own pickled vegetables? Absolutely! Quick-pickled cucumbers and carrots are easy to make and taste significantly better than store-bought versions. They can be prepared days ahead.
What’s the difference between regular mayo and Kewpie? Kewpie mayonnaise is richer and tangier than regular mayo, with a silkier texture that’s perfect for Asian-inspired dishes. Regular mayo can substitute if needed.
How long do leftovers keep? The salmon and rice keep for 2-3 days refrigerated, but it’s best to store components separately and reassemble when eating for optimal texture.
Can I make this bowl ahead for meal prep? Components can be prepped ahead, but assemble just before eating to prevent the rice from absorbing too much moisture from other ingredients.
Nutrition per serving: 425 calories, 22.2g protein, 43.5g carbohydrates, 18.2g fat


