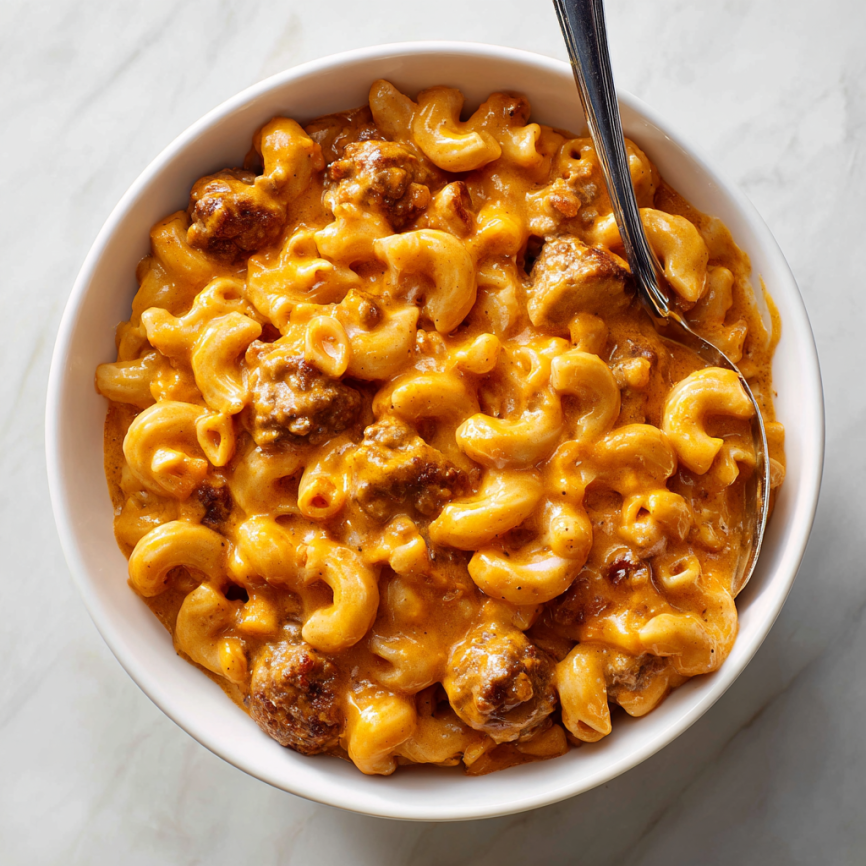
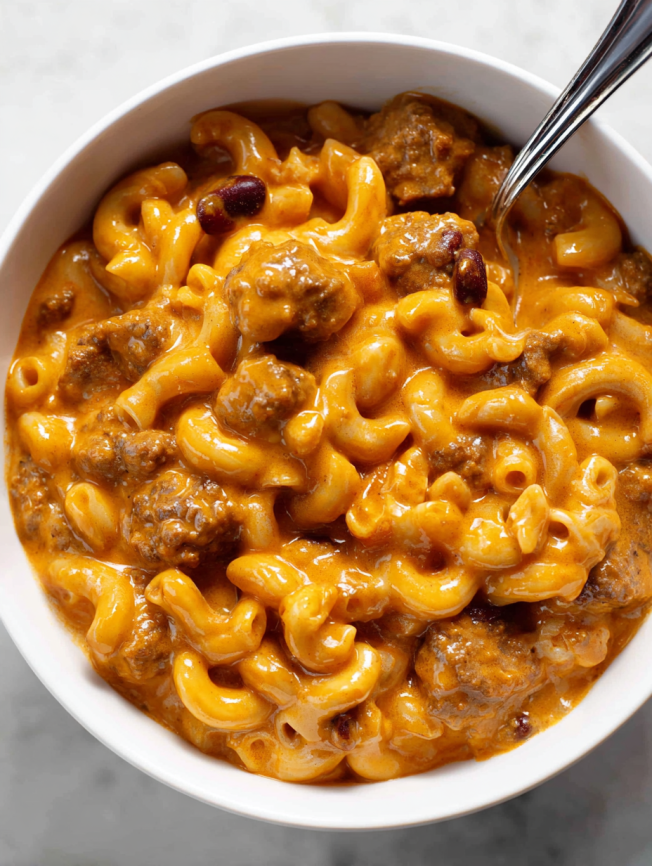
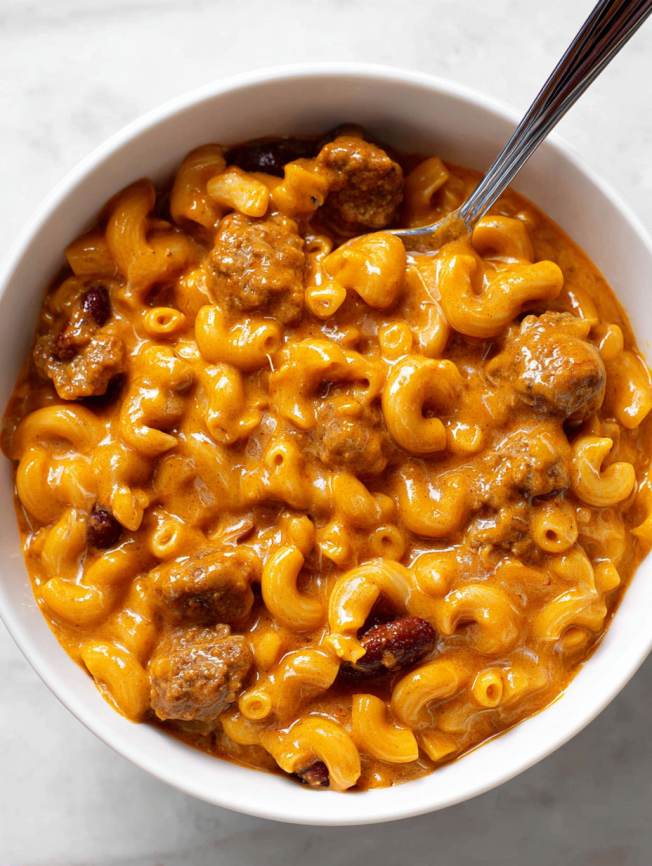
There are moments in cooking when you stumble upon a combination so brilliant, so perfectly logical, that you wonder why it took you so long to discover it. That’s exactly what happened the first time I made chili mac – a gloriously indulgent fusion that transforms leftover chili into something entirely new and utterly irresistible.
Picture this: creamy, cheese-laden macaroni meeting robust, hearty chili in a symphony of comfort food perfection. This isn’t just a way to use up leftovers; it’s a deliberate celebration of two beloved American classics coming together to create something greater than the sum of their parts. Best of all, this magical transformation happens in just 30 minutes, making it perfect for those nights when you crave maximum comfort with minimal effort.
What started as a practical solution for stretching leftover chili has become one of our most requested family dinners. The combination satisfies every craving – cheesy, hearty, warming, and completely satisfying in a way that leaves everyone at the table completely content.
Why This Chili Mac Recipe Deserves a Permanent Spot in Your Rotation
The Ultimate Leftover Transformation
Rather than simply reheating yesterday’s chili, this recipe elevates those leftovers into an entirely new dining experience. The addition of creamy, cheesy macaroni transforms the chili’s flavor profile while stretching it to feed more people. Moreover, the pasta absorbs some of the chili’s bold flavors, creating a cohesive dish that tastes intentionally crafted rather than thrown together.
Quick Weeknight Warrior
With only 30 minutes from start to finish, this recipe fits seamlessly into busy schedules. While the pasta cooks, you can prepare the cheese sauce, creating an efficient cooking process that maximizes flavor while respecting your time. Additionally, most of the ingredients are pantry staples, making this an accessible option for impromptu dinners.
Family-Friendly Crowd Pleaser
This dish appeals to both adults seeking sophisticated comfort food and children who gravitate toward familiar mac and cheese flavors. The chili adds protein and vegetables in a format that even picky eaters find appealing. Furthermore, the customizable spice level means you can adjust the heat to suit your family’s preferences.
Budget-Friendly Brilliance
By combining affordable pasta with leftover chili, you can create a substantial meal that feeds eight people generously. The addition of pasta effectively doubles the volume of your chili, providing excellent value while maintaining rich, satisfying flavors throughout every serving.
Essential Ingredients for Chili Mac Success
The Pasta Foundation
Creating the perfect base requires attention to both quality and technique:
- 8 ounces elbow macaroni – The classic shape that holds both sauce and chili pieces perfectly
- Kosher salt for pasta water – Essential for properly seasoned noodles
The Cheese Sauce Components
These ingredients work together to create a luxurious, creamy base that binds everything together:
- 2 tablespoons butter – Creates the roux foundation for silky texture
- 2 tablespoons all-purpose flour – Thickens the sauce without graininess
- 1 cup whole milk – Provides richness without overwhelming heaviness
- 1/2 cup heavy cream – Adds luxurious texture and prevents breaking
- 1/2 teaspoon mustard powder – Enhances cheese flavor with subtle tang
- 1/2 teaspoon garlic powder – Aromatic depth that complements both components
- 1/2 teaspoon onion powder – Savory foundation that ties flavors together
- 12 ounces sharp cheddar cheese, freshly shredded and divided – Bold flavor that stands up to chili
- Kosher salt and black pepper – Essential seasonings for balance
The Star Addition
- 3-4 cups prepared chili – The hearty component that transforms this from simple mac and cheese
Step-by-Step Instructions for Perfect Chili Mac
Creating the Pasta Base
Begin by bringing a large pot of water to a rolling boil, then add several tablespoons of kosher salt until the water tastes mildly salty. Add the elbow macaroni and cook according to package directions until just al dente – the pasta will finish cooking in the oven, so slightly firm noodles prevent mushiness in the final dish.
While the pasta cooks, preheat your oven to 375°F. This moderate temperature will warm the assembled dish thoroughly while creating those desirable bubbly edges without overcooking the delicate cheese sauce.
Building the Cheese Sauce Foundation
In a large sauté pan, melt the butter over medium-low heat. Once it begins to bubble gently, add the flour and whisk constantly for about 2 minutes. This cooking time eliminates the raw flour taste while creating a smooth roux that will thicken your sauce perfectly.
Gradually whisk in the milk first, followed by the heavy cream, ensuring the mixture remains smooth throughout the process. The key to preventing lumps lies in adding the liquid slowly while whisking continuously – patience here pays dividends in the final texture.
Seasoning and Cheese Integration
Stir in the mustard powder, garlic powder, and onion powder along with generous pinches of salt and pepper. These seasonings create depth that elevates the dish beyond basic mac and cheese while complementing the chili’s existing flavors beautifully.
Gradually add 8 ounces of the freshly shredded cheddar cheese, stirring constantly until it melts completely into a smooth, creamy sauce. The gradual addition prevents the cheese from seizing or becoming grainy, ensuring silky perfection.
Combining the Components
Add the drained pasta to the cheese sauce, stirring until every piece is thoroughly coated. The warm pasta will help maintain the sauce’s perfect consistency while beginning the flavor integration process.
Next, gently fold in the warm chili, distributing it evenly throughout the cheesy pasta mixture. If your chili has been refrigerated, warm it slightly before adding to prevent temperature shock that could cause the cheese sauce to break.
Final Assembly and Baking
Transfer the combined mixture to a baking dish if desired, or simply top it directly in the sauté pan if it’s oven-safe. Sprinkle the remaining 4 ounces of shredded cheese evenly over the top, creating a delicious golden layer that will become beautifully bubbly in the oven.
Bake uncovered for 5-10 minutes, until the casserole is heated through and bubbling around the edges. For extra appeal, broil for 1-2 minutes at the end to achieve a gorgeously golden-brown cheese topping that adds textural contrast to the creamy interior.
Serving Suggestions That Complete the Experience
Classic Comfort Accompaniments
Serve this hearty chili mac with simple sides that complement rather than compete with its bold flavors. A crisp green salad with tangy vinaigrette provides refreshing contrast to the rich, cheesy dish. Alternatively, steamed broccoli or roasted green beans add nutritional balance while maintaining the comfort food theme.
Elevated Presentation Ideas
Transform this humble dish into dinner party fare by serving it in individual ramekins with a sprinkle of fresh herbs like chives or green onions. The individual portions look elegant while making serving easier for entertaining. Additionally, a light dusting of smoked paprika adds visual appeal and subtle flavor enhancement.
Garnish Options That Add Flair
Consider topping each serving with sliced green onions, a dollop of sour cream, or even some crispy bacon bits. These additions provide textural contrast and allow diners to customize their plates according to personal preferences.
Creative Recipe Variations for Every Taste
Spice Level Adjustments
While the base recipe offers moderate heat, you can easily customize the spice level to suit your family’s preferences. Add a few dashes of hot sauce during the cheese sauce preparation, or incorporate a pinch of cayenne pepper for building heat. For those who prefer milder flavors, use a gentle chili recipe or add extra cheese to temper any existing heat.
Protein Enhancements
Though chili typically contains plenty of protein, you can boost the dish further by adding cooked ground beef, diced ham, or even leftover pulled pork to the mixture. These additions make the dish even more substantial while providing variety in texture and flavor.
Vegetable Additions
Enhance the nutritional profile by stirring in frozen corn kernels, diced bell peppers, or even some spinach during the final assembly. These vegetables integrate seamlessly while adding color, nutrients, and fresh flavors that complement the rich base.
Cheese Variety Experiments
While sharp cheddar provides the classic flavor, don’t hesitate to experiment with cheese combinations. Try adding some pepper jack for heat, smoked gouda for depth, or even a touch of cream cheese for extra richness and tang.
Make-Ahead Strategies for Busy Households
Component Preparation
Both the chili and the cheese sauce base can be prepared up to 2 days in advance and stored separately in the refrigerator. When ready to serve, simply cook fresh pasta, gently reheat the components, and proceed with assembly. This approach allows you to enjoy homemade comfort food even on the busiest weeknights.
Complete Assembly Option
The entire dish can be assembled up to 24 hours before baking, making it perfect for meal planning or entertaining. Cover tightly and refrigerate, then add an extra 5-10 minutes to the baking time to ensure it’s heated through completely.
Freezing Guidelines
While best enjoyed fresh, this dish can be frozen for up to 2 months. Expect some texture changes in the pasta and sauce, but the flavors will remain delicious. Thaw completely before reheating, and consider adding a splash of milk to restore creaminess.
Professional Notes for Guaranteed Success
The Importance of Fresh-Shredded Cheese
Just as with traditional mac and cheese, using freshly shredded cheese makes an enormous difference in the final texture and flavor. Pre-shredded cheeses contain anti-caking agents that prevent proper melting, resulting in grainy or separated sauces. Take the extra few minutes to shred your own cheese – the results justify the effort completely.
Chili Temperature Considerations
Adding cold chili directly to hot cheese sauce can cause the sauce to break or become grainy. If using leftover chili from the refrigerator, warm it gently in the microwave or a small saucepan before incorporating it into the dish. This simple step ensures smooth integration and maintains the sauce’s luxurious texture.
Pasta Cooking Precision
Since the pasta will continue cooking in the oven, aim for true al dente texture during the initial boiling phase. Overcooked pasta becomes mushy when baked, while properly cooked pasta maintains pleasant texture throughout the final dish.
Sauce Consistency Management
If your cheese sauce seems too thick before adding the chili, thin it with additional milk rather than cream. The chili will add its own liquid, so starting with a slightly thicker sauce prevents the final dish from becoming too loose or watery.
Frequently Asked Questions
Can I use any type of chili for this recipe?
Absolutely! This recipe works beautifully with any chili variety, from mild vegetarian versions to spicy meat-heavy styles. Turkey chili, white bean chili, and even Cincinnati-style chili all create delicious variations. The key is using chili you already enjoy, as its flavors will be the dominant characteristic in the finished dish.
What if I don’t have leftover chili?
While this recipe was designed to use leftovers, you can certainly make fresh chili specifically for this dish. Quick-cooking chili recipes work perfectly, or you can use high-quality canned chili as a convenient shortcut. Just ensure any chili you use is well-seasoned and flavorful.
How do I prevent the cheese sauce from becoming grainy?
Grainy cheese sauce typically results from high heat, adding cheese too quickly, or using pre-shredded cheese. Keep the heat at medium-low, add freshly shredded cheese gradually while stirring constantly, and remove the pan from heat once the cheese melts completely.
Can I make this recipe dairy-free?
Traditional chili mac relies heavily on dairy products for its characteristic creaminess, making dairy-free versions quite different. However, you can experiment with plant-based milk, dairy-free cheese alternatives, and cashew cream, though expect significantly different flavors and textures.
How spicy will this dish be?
The final spice level depends entirely on the chili you use. The cheese sauce and pasta will mellow any heat from the chili, creating a more balanced overall flavor. If you’re concerned about heat levels, start with less chili and add more to taste.
What’s the best way to reheat leftovers?
Reheat leftover chili mac gently on the stovetop over low heat, stirring frequently and adding small amounts of milk if needed to restore creaminess. Microwave reheating works for individual portions – heat in 30-second intervals, stirring between each, until warmed through.
Can I add vegetables to this recipe?
Definitely! Frozen corn, diced bell peppers, or chopped jalapeños all work wonderfully. Add heartier vegetables like peppers during the sauce-making process, while more delicate additions like corn or spinach can be stirred in during final assembly.
How do I adjust the chili-to-mac ratio?
The beauty of this recipe lies in its flexibility. For more chili flavor, use 4-5 cups of chili; for more mac and cheese character, use only 2-3 cups. Adjust gradually and taste as you go to find your family’s perfect balance.
This recipe serves 8 generously with 422 calories per serving, transforming simple leftovers into a completely new comfort food experience that satisfies every craving for hearty, cheesy, warming satisfaction.


