Prep Time: 3 hours, 20 minutes | Cook Time: 12 minutes | Total Time: 3 hours, 45 minutes | Yield: 32 cookies
The summer I turned twelve, my Italian grandmother taught me that the most beautiful things in life often come from the simplest ideas. As we stood in her sun-drenched kitchen making these Neapolitan cookies, she explained how one basic dough could transform into three distinct flavors – just like the famous ice cream that inspired them. Watching her layer strawberry, vanilla, and chocolate dough in that old loaf pan, I learned that patience and creativity could turn ordinary ingredients into something truly extraordinary.
Why These Cookies Will Capture Your Heart
Ingenious One-Dough Method
The brilliance of this recipe lies in its efficiency. Instead of making three separate cookie doughs, you create one master dough and divide it into thirds, adding different flavors and colors to each portion. This approach saves time while ensuring all three layers have the same perfect texture and baking properties.
Visual Impact That Wows
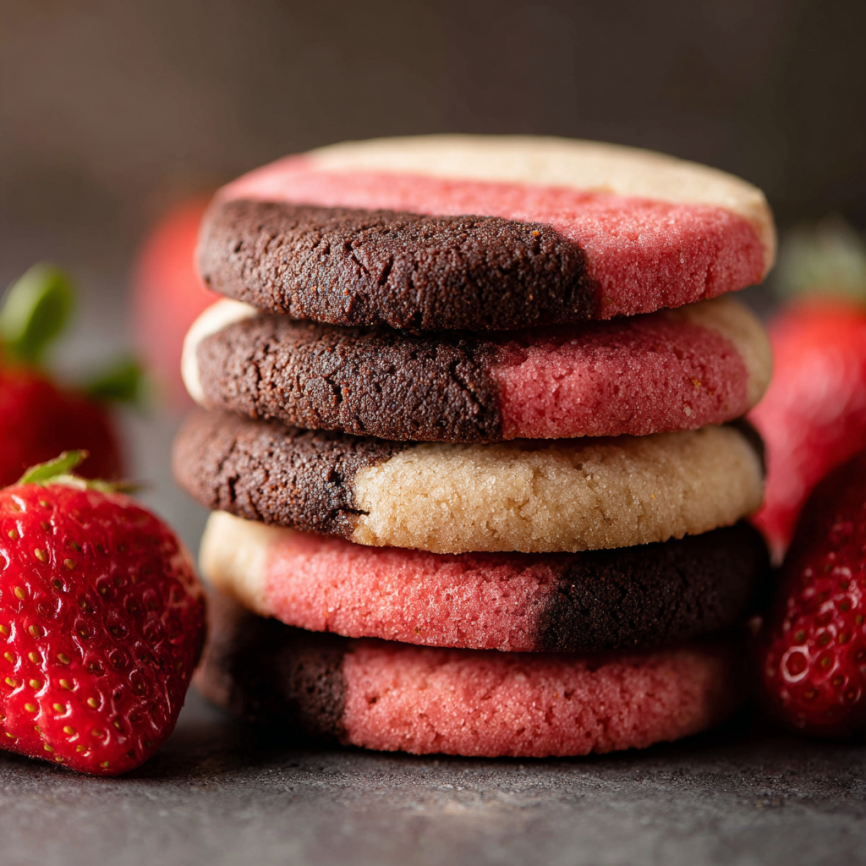
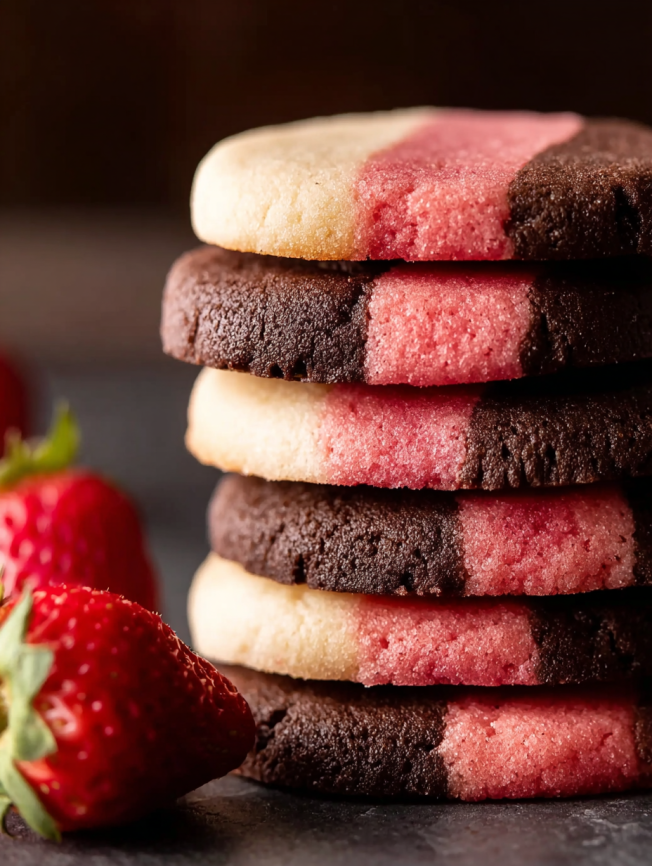
When you slice through the chilled dough loaf, each cookie reveals beautiful, distinct layers that mirror the classic Neapolitan color scheme. The pink strawberry, creamy vanilla, and rich chocolate create an Instagram-worthy presentation that never fails to impress guests.
Perfect Balance of Flavors
Each bite delivers a harmonious blend of three beloved flavors. The strawberry layer provides fruity sweetness, the vanilla offers classic comfort, and the chocolate adds rich depth. Together, they create a nostalgic experience that appeals to both children and adults.
Essential Ingredients
Base Cookie Dough Foundation
- 2½ cups (313g) all-purpose flour (spooned & leveled)
- ½ teaspoon baking powder
- ½ teaspoon salt
- 1 cup (16 Tbsp; 226g) unsalted butter, softened to room temperature
- 1 cup (200g) granulated sugar
- 1 large egg + 1 egg yolk, at room temperature
- 1½ teaspoons pure vanilla extract
- Optional: 1 tablespoon water and coarse sugar for sprinkling
Strawberry Layer Enhancement
- 1½ tablespoons (12g) all-purpose flour
- 1 tablespoon (20g) strawberry jam
- ½ teaspoon almond extract
- Pink or red food coloring
- Optional: ¼ teaspoon strawberry extract for enhanced flavor
Chocolate Layer Richness
- 1½ tablespoons (8g) unsweetened natural cocoa powder
- 1 ounce (28g) semi-sweet chocolate, melted and slightly cooled
Quality Ingredient Tips
Using room temperature eggs and butter ensures smooth mixing. High-quality strawberry jam provides the best flavor and texture, while gel food coloring gives vibrant color without compromising dough consistency.
Step-by-Step Instructions
Creating the Master Dough
Begin by whisking flour, baking powder, and salt in a medium bowl. Set this dry mixture aside while you prepare the base. Using either a hand mixer or stand mixer with paddle attachment, cream the softened butter and granulated sugar on medium-high speed for about 2 minutes until light and fluffy.
Add the whole egg, egg yolk, and vanilla extract, beating on high speed for 1 minute until fully incorporated. Scrape down the bowl sides and bottom, then beat again to ensure complete mixing. Gradually add the flour mixture, mixing on low speed until just combined. The resulting dough should be thick and slightly sticky.
Dividing and Flavoring
Remove the dough from the mixing bowl – you’ll have approximately 30 ounces total. Divide this into three equal portions of about 10 ounces each. One portion remains your vanilla dough and needs no additions. Set this aside while you work on the flavored portions.
Crafting the Strawberry Layer
Return one dough portion to your mixing bowl (no need to wash it). Add the additional flour, strawberry jam, almond extract, and strawberry extract if using. Start with just 1 drop of gel food coloring – you can always add more, but you can’t take it away. Mix on low speed until combined, then evaluate the color and add 1-2 more drops if desired for deeper pink tones.
Developing the Chocolate Layer
Place the final dough portion back in the mixing bowl and add the cocoa powder and melted chocolate. Beat on low speed until the mixture is uniformly chocolate-colored with no streaks remaining. The chocolate should be slightly cooled to prevent melting the butter in the dough.
Layering and Shaping
Line a 9×5-inch loaf pan with aluminum foil or parchment paper, ensuring generous overhang for easy removal later. Layer the dough strategically: strawberry on the bottom, vanilla in the middle, and chocolate on top. Using your hands, press each layer firmly and evenly, ensuring there are no air pockets between layers.
Essential Chilling Time
Cover the loaf pan tightly and refrigerate for at least 3 hours. This chilling period is crucial for achieving clean slices and preventing the layers from blending during cutting. The dough can be chilled for up to 4 days or frozen for longer storage.
Precision Slicing
When ready to bake, preheat your oven to 350°F (177°C) and line baking sheets with parchment paper. Lift the chilled dough from the pan using the parchment overhang. You’ll have a rectangular block that should be sliced in half lengthwise, creating two strips. Trim the ends to create neat 8-inch lengths, then slice each strip into 16 cookies, making each cookie ½ inch thick.
Baking to Perfection
Arrange cookies 2-3 inches apart on prepared baking sheets. For extra elegance, brush lightly with egg wash (made from the reserved egg white and 1 tablespoon water) and sprinkle with coarse sugar. Bake for 11-13 minutes until edges are lightly golden.
Allow cookies to cool on the baking sheet for 5 minutes before transferring to wire racks. This brief cooling period prevents breaking while ensuring they don’t overbake from residual heat.

Serving Suggestions
Elegant Presentation
Arrange these colorful cookies on a white serving platter to showcase their beautiful layers. They’re perfect for afternoon tea parties, baby showers, or any occasion where visual appeal matters as much as taste.
Pairing Ideas
These cookies pair wonderfully with vanilla ice cream for a true Neapolitan experience, or alongside fresh berries and whipped cream for an elegant dessert presentation. They also complement coffee or milk beautifully for everyday enjoyment.
Creative Variations
Seasonal Adaptations
Transform these cookies for different occasions by adjusting the strawberry layer. Use raspberry jam and extract for a deeper berry flavor, or try apricot jam with a touch of orange zest for a summery twist.
Flavor Enhancements
Elevate the vanilla layer by adding ½ cup of crushed walnuts or ½ teaspoon coconut extract. For the chocolate layer, consider adding a pinch of espresso powder to create a sophisticated mocha flavor that appeals to adult palates.
Chocolate-Dipped Elegance
Transform these cookies into bakery-quality treats by dipping one corner in melted semi-sweet chocolate. Use the remaining chocolate from your baking bar plus additional chocolate for a total of 7 ounces, melted until smooth and glossy.
Make-Ahead Tips
Dough Storage Strategy
The beauty of this recipe lies in its make-ahead potential. Assemble the layered dough in the loaf pan and refrigerate for up to 4 days, or freeze for up to 3 months. This makes them perfect for holiday baking or planned entertaining.
Baking Timeline
For best results, slice and bake the cookies on the day you plan to serve them. However, baked cookies maintain their quality for up to one week when stored properly at room temperature.
Freezing Solutions
Both baked cookies and assembled dough freeze exceptionally well. Baked cookies can be frozen for up to 3 months, while frozen dough should be thawed overnight in the refrigerator before slicing and baking.
Important Notes
Equipment Essentials
A 9×5-inch loaf pan is crucial for achieving the proper proportions and layer distribution. Sharp knives ensure clean cuts through all three layers, while parchment paper makes removal and transfer effortless.
Food Coloring Wisdom
Gel food coloring provides vibrant color without altering dough texture, unlike liquid varieties. Start with minimal amounts – one drop often provides sufficient color, and you can always add more during mixing.
Texture Considerations
The strawberry jam not only provides flavor but also adds moisture that complements the additional flour. This balance ensures the strawberry layer bakes at the same rate as the vanilla and chocolate layers.
Frequently Asked Questions
Q: Can I use liquid food coloring instead of gel? A: While possible, gel food coloring is strongly recommended. Liquid food coloring can alter the dough’s texture and may cause the cookies to spread unevenly during baking.
Q: Why can’t I use freeze-dried strawberry powder? A: Freeze-dried strawberry powder causes the strawberry layer to spread excessively while other layers maintain their shape, resulting in lopsided cookies. The jam and flour combination provides better structural integrity.
Q: How do I prevent the layers from mixing during assembly? A: Press each layer firmly and evenly into the pan, ensuring complete coverage before adding the next layer. Chilling between layers isn’t necessary, but firm pressing is crucial.
Q: Can I make smaller or larger cookies? A: While you can adjust slice thickness, maintaining ½-inch thickness ensures even baking across all three layers. Thinner cookies may overbake, while thicker ones may underbake in the center.
Q: What if my dough is too soft to slice cleanly? A: Return the dough to the refrigerator for additional chilling time. Properly chilled dough should slice cleanly without the layers separating or smearing.
Q: Can I substitute different extracts in the vanilla layer? A: Absolutely! Try coconut, lemon, or rum extract for unique flavor variations. Use the same quantity as the vanilla extract called for in the base recipe.
Q: How do I store cookies with chocolate coating? A: Chocolate-dipped cookies stay fresh at room temperature for 3 days or refrigerated for up to one week. Store in single layers separated by parchment paper to prevent sticking.
Q: What causes uneven layer distribution? A: This typically results from uneven dough division or inadequate pressing during assembly. Weigh dough portions for accuracy and press each layer thoroughly before adding the next.
These one-dough Neapolitan cookies prove that sometimes the most impressive results come from the cleverest techniques. By transforming a single dough into three distinct flavors, you create not just cookies, but edible works of art that celebrate both creativity and tradition. Whether served at special gatherings or enjoyed as everyday treats, these layered beauties never fail to bring smiles and spark conversations about the magic that happens when simple ingredients meet thoughtful technique.


