Last Halloween, my neighbor’s four-year-old daughter took one look at my first batch of spider cookies and announced with complete seriousness, “These spiders look too friendly to eat!” Her observation perfectly captured what makes these treats so special—they manage to be simultaneously spooky and adorable, creating just the right balance of Halloween fun without genuine fright. Watching her carefully examine each spider before selecting “the friendliest one” reminded me that the best Halloween treats should spark imagination and joy, not nightmares.
Since that memorable afternoon, these chocolate cookies have become my signature contribution to every Halloween gathering. The combination of rich chocolate cookie base, creamy peanut butter cup centers, and crunchy pretzel legs creates a textural symphony that appeals to both children and adults. What truly sets them apart is how each cookie becomes a unique character—some spiders appear mischievous, others look surprised, and a few seem downright cheerful depending on how the eyes land.
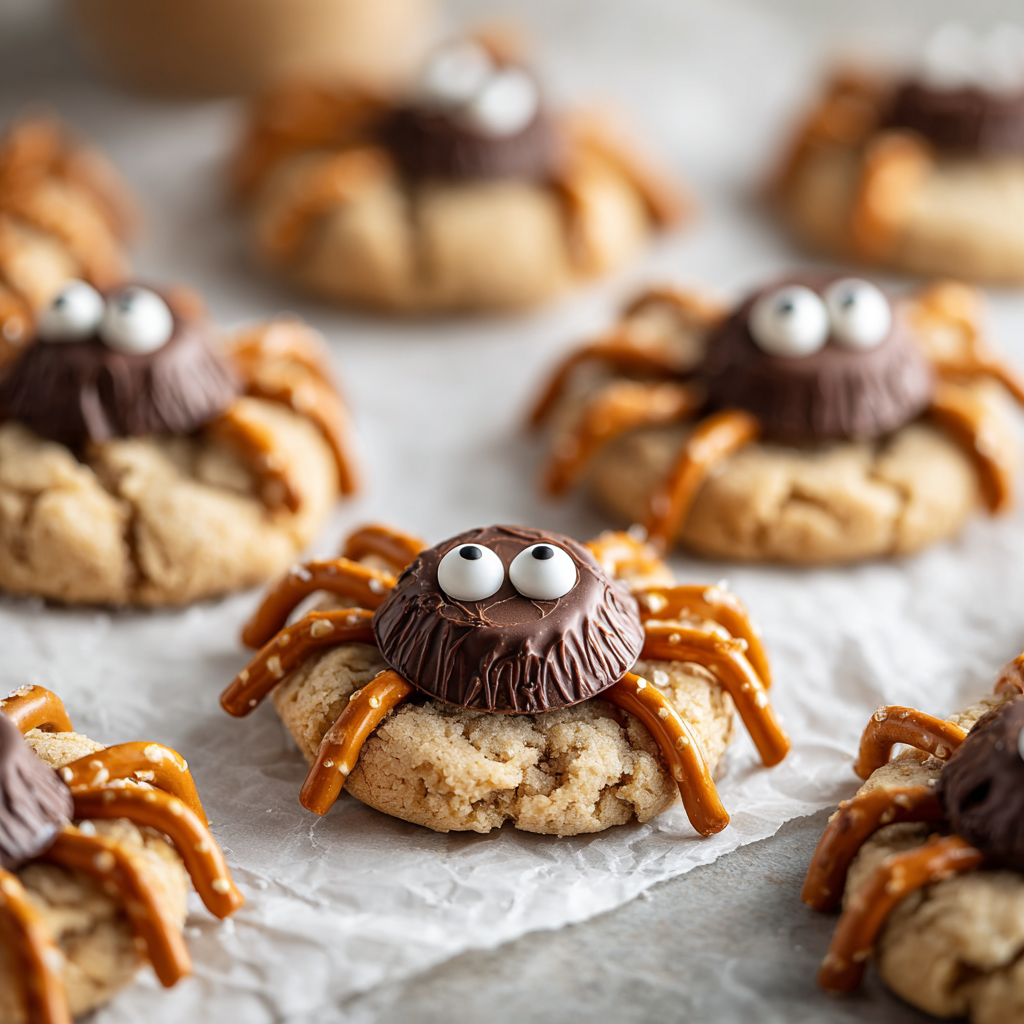
Why These Eight-Legged Treats Will Spin a Web Around Your Heart
Perfect Texture Combination: Each bite delivers multiple satisfying textures—the soft, chewy chocolate cookie base contrasts beautifully with the creamy peanut butter cup center and crispy pretzel legs. Furthermore, this variety keeps every bite interesting and prevents flavor fatigue.
Interactive Assembly Fun: Unlike traditional decorated cookies, these spiders invite creativity and personality into each creation. Moreover, children become genuinely invested in the decorating process, carefully positioning legs and eyes to give their spiders distinct personalities.
Crowd-Pleasing Flavor Profile: The classic combination of chocolate, peanut butter, and salt appeals to virtually every palate preference. Additionally, the familiar flavors make even hesitant eaters willing to try these creepy-crawly creations.
Photography-Ready Appeal: These cookies are incredibly photogenic, creating instant conversation starters and social media moments. The dimensional quality of the protruding legs and googly eyes makes them stand out dramatically from typical flat Halloween cookies.
Essential Ingredients & Serving Information
Serves: 10-12 people (makes approximately 20 spider cookies)
Rich Chocolate Cookie Base:
- 1 cup unsalted butter, softened to room temperature
- 1 cup granulated sugar
- 1 cup packed light brown sugar
- 2 large eggs, room temperature
- 1 teaspoon pure vanilla extract
Dry Ingredient Foundation:
- 2½ cups all-purpose flour, measured correctly
- ½ cup unsweetened cocoa powder (Dutch-process preferred)
- 1 teaspoon baking soda
- ½ teaspoon salt
Spider Body and Leg Assembly:
- 20 mini peanut butter cups, unwrapped
- 80 pretzel sticks (4 per spider, broken in half)
- 40 small candy eyes or mini chocolate chips
- Optional: melted chocolate for “gluing” eyes
Delightful Serving Companions:
- Cold milk in spooky glasses
- Hot chocolate with whipped cream
- Apple cider with cinnamon sticks
- Halloween-themed ice cream flavors
Detailed Step-by-Step Spider Creation
Preparing Your Cookie Laboratory
- Oven Setup: Preheat oven to 350°F (175°C) and position racks in upper and lower thirds for even baking. This temperature ensures proper spreading without burning the chocolate elements.
- Baking Sheet Preparation: Line two large baking sheets with parchment paper, ensuring paper extends slightly over edges for easy cookie removal. Avoid overcrowding, which leads to uneven baking.
Creating the Perfect Cookie Dough
- Butter and Sugar Creaming: In a large mixing bowl, cream softened butter with both sugars using an electric mixer on medium speed for 4-5 minutes. The mixture should become noticeably lighter and fluffy.
- Egg Integration: Beat in eggs one at a time, followed by vanilla extract, mixing until completely smooth. Scrape bowl sides as needed to ensure even incorporation.
Mastering the Chocolate Base
- Dry Ingredient Combination: In a separate bowl, whisk together flour, cocoa powder, baking soda, and salt until no streaks remain. Sifting cocoa powder prevents lumps in the final cookies.
- Dough Formation: Add dry ingredients to wet mixture in two additions, mixing on low speed just until combined. Overmixing develops gluten, creating tough cookies instead of tender ones.
Baking the Spider Bodies
- Dough Portioning: Using a cookie scoop or tablespoon, drop rounded portions onto prepared baking sheets, spacing them 2 inches apart. Consistent sizing ensures even baking times.
- Optimal Baking: Bake for 10-12 minutes, rotating pans halfway through for even browning. Cookies should be set around edges but still soft in centers when done.
Spider Assembly Magic
- Peanut Butter Cup Placement: While cookies are still warm, gently press one mini peanut butter cup into the center of each cookie. The warmth helps the cup settle properly without cracking the cookie.
- Leg Insertion Technique: Working quickly while cookies remain warm, insert four pretzel stick halves around each peanut butter cup, angling them slightly outward to mimic spider legs. Press gently but firmly for secure attachment.
Bringing Spiders to Life
- Eye Application: Once cookies have cooled for 5 minutes, attach candy eyes to the peanut butter cups using a tiny dab of melted chocolate as “glue,” or simply press them gently into the soft chocolate surface.
- Final Setting: Allow cookies to cool completely on baking sheets for 15-20 minutes before transferring to serving plates. This ensures legs stay securely attached during handling.
Creative Presentation and Serving Ideas
Transform your Halloween table into a spider’s den by arranging these cookies on black plates surrounded by fake spider webs and plastic spiders. The contrast between real edible spiders and fake decorative ones creates an amusing optical illusion that delights guests.
For children’s parties, create individual “spider habitats” by placing each cookie in a small clear container with a few plastic leaves and twigs. This presentation turns each treat into a mini terrarium that kids can examine before devouring their new eight-legged friends.
Consider arranging them on a multi-level cake stand to create the illusion of spiders crawling at different heights. Battery-operated LED lights underneath add an eerie glow that makes the spiders appear to move in dim lighting.
Spine-Tingling Recipe Variations
White Chocolate Albino Spiders
Use vanilla cookie dough instead of chocolate and white chocolate peanut butter cups for rare “albino” spiders. The pale appearance creates an otherworldly effect that’s equally spooky but uniquely different.
Peanut-Free Spider Alternative
Replace peanut butter cups with chocolate-covered caramel candies or mini chocolate donuts for those with peanut allergies. The assembly process remains identical while accommodating dietary restrictions.
Giant Tarantula Cookies
Use regular-sized peanut butter cups and full-length pretzel sticks to create larger, more dramatic spiders. Increase cookie base size proportionally for proper visual balance.
Colorful Tropical Spiders
Tint white chocolate cookie dough with food coloring to create brightly colored exotic spider species. Use colored chocolate melts for the bodies to complete the tropical theme.
Double-Chocolate Spider Deluxe
Add ½ cup mini chocolate chips to the cookie dough for extra chocolate intensity. This creates a richer base that chocolate lovers find absolutely irresistible.
Strategic Make-Ahead Planning
Up to Five Days Before: Bake cookies without decorations and store in airtight containers. The cookies actually improve in texture over 1-2 days, becoming more tender and flavorful.
Two Days Ahead: Complete entire assembly process and store finished spiders in single layers between parchment paper. Cover containers loosely to prevent moisture buildup that softens pretzels.
Day of Serving: If transporting, pack carefully with cushioning material to prevent leg breakage. Alternatively, bring components separately and assemble on-site for guaranteed perfect presentation.
Freezer Storage Option: Freeze decorated cookies for up to 2 months in rigid containers. Thaw at room temperature for 1 hour before serving—texture remains perfect.
Important Notes (Notas)
Timing is Crucial: Assembly must happen while cookies are still warm to ensure peanut butter cups soften properly and pretzel legs stay secure. Have all decorating supplies ready before baking begins.
Pretzel Selection: Choose straight pretzel sticks rather than curved ones for the most realistic spider legs. Break them cleanly to avoid sharp, jagged ends that could poke tongues.
Peanut Butter Cup Handling: Unwrap peanut butter cups ahead of time but keep them cool until use. Warm cups become too soft and lose their shape when pressed into cookies.
Storage Humidity: Keep finished cookies in low-humidity environments to maintain pretzel crispness. High humidity quickly softens pretzel legs, affecting both texture and appearance.
Frequently Asked Questions
Why do my pretzel legs keep falling off? This usually happens when cookies are too cool during assembly. The warm cookie surface helps pretzels adhere properly. Press them in while cookies are still warm but not hot enough to burn fingers.
Can I use regular-sized peanut butter cups instead of minis? Yes, but you’ll need to make larger cookies to maintain proper proportions. Use about 2 tablespoons of dough per cookie and increase baking time by 2-3 minutes.
What’s the best way to break pretzel sticks evenly? Score pretzel sticks lightly with a knife, then snap them cleanly at the score mark. This creates more uniform breaks than random snapping and prevents sharp edges.
How do I prevent cocoa powder from creating lumps in my dough? Sift cocoa powder with the flour before adding to wet ingredients. This prevents clumping and ensures even chocolate distribution throughout the cookie dough.
Can I make these without peanut butter for allergy concerns? Absolutely! Substitute mini chocolate-covered caramel candies, small chocolate truffles, or even chocolate-covered marshmallows for the spider bodies. The assembly process remains the same.
Why are my cookies spreading too much during baking? Over-softened butter or insufficient chilling can cause excessive spreading. Ensure butter is softened but not melted, and consider chilling dough for 30 minutes if your kitchen is very warm.
How long do these cookies stay fresh? Properly stored cookies maintain optimal texture for 4-5 days at room temperature. The chocolate cookie base stays soft while pretzel legs remain crispy when stored correctly in airtight containers.


