Four years ago, during a particularly chaotic Halloween afternoon, I found myself with thirty minutes until trick-or-treaters arrived and absolutely nothing prepared for the neighborhood kids who always stopped by our house. Panic set in as I rifled through my pantry, desperately searching for inspiration. That’s when I spotted a lonely box of brownie mix sitting next to some white chocolate chips, and suddenly, the most brilliant idea struck—what if I could transform ordinary brownies into something extraordinary with just a few simple decorating touches?
The result exceeded all my expectations. Those hastily decorated mummy brownies became an instant legend in our neighborhood, with kids specifically requesting “the house with the mummy brownies” for years afterward. What started as a desperate last-minute solution has evolved into one of my most treasured Halloween traditions, proving that sometimes the most memorable treats come from moments of creative inspiration rather than elaborate planning.
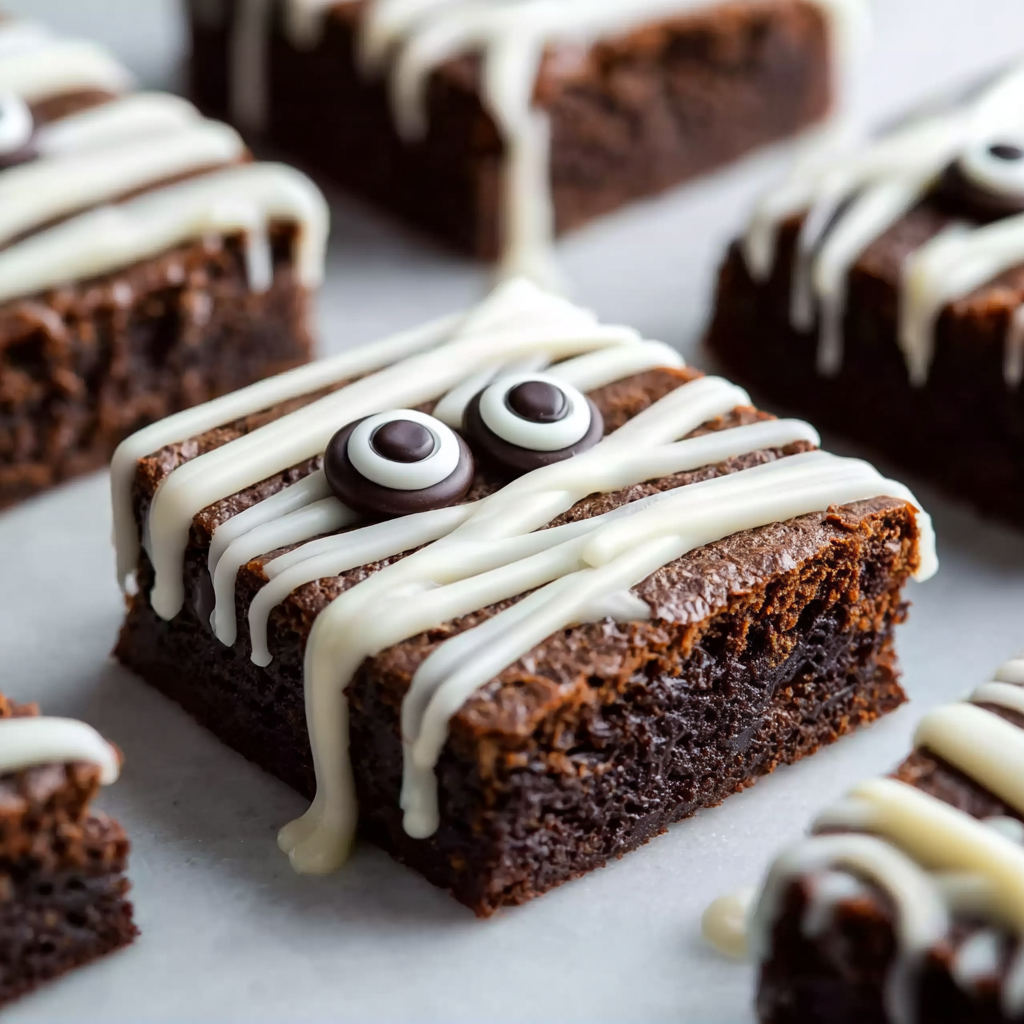
Why These Bandaged Beauties Will Wrap You in Sweet Delight
Effortless Elegance: These brownies prove that stunning presentation doesn’t require professional decorating skills or expensive tools. Moreover, the simple drizzling technique creates impressive results that look far more complicated than they actually are.
Perfect Fudgy Foundation: Using quality brownie mix as the base ensures consistently rich, chocolatey results without the guesswork of from-scratch baking. Additionally, the dense texture provides the ideal canvas for white chocolate decoration that won’t crack or slide off.
Crowd-Pleasing Simplicity: Unlike elaborate decorated cookies that require individual attention, one pan of brownies can feed a large group while still delivering that special Halloween magic. Furthermore, the rectangular shape makes portion control easy and eliminates the need for fancy cutting techniques.
Kid-Friendly Assembly Process: Children absolutely love helping with the bandage drizzling, making this an ideal family activity that builds excitement while creating memories. The forgiving nature of the decoration means there’s no “wrong” way to wrap your mummies.
Essential Ingredients & Serving Information
Serves: 10-15 people (makes 12-15 generous brownies)
Rich Brownie Foundation:
- 1 box premium brownie mix (18.3 oz size recommended)
- Ingredients specified on brownie box (typically eggs, oil, and water)
- Optional: ½ cup mini chocolate chips for extra richness
Mummy Bandage Creation:
- 1½ cups high-quality white chocolate chips
- 2 tablespoons coconut oil (for smoother drizzling consistency)
- 24-30 candy eyes (various sizes for personality variation)
Optional Enhancement Supplies:
- Black gel food coloring (for creating spooky mouths)
- Small piping bag or squeeze bottle for precise drizzling
- Parchment paper for easy cleanup
Perfect Serving Accompaniments:
- Cold milk in Halloween-themed glasses
- Warm apple cider with cinnamon
- Vanilla ice cream for temperature contrast
- Hot chocolate with marshmallow “ghosts”
Comprehensive Step-by-Step Mummy Creation
Preparing Your Ancient Tomb (Kitchen Setup)
- Oven Preparation: Preheat oven according to brownie mix package directions, typically 350°F (175°C). Proper preheating ensures even baking from edge to center.
- Pan Preparation: Line a 9×13-inch baking dish with parchment paper, leaving overhang for easy removal. Lightly grease the parchment to prevent sticking, especially in corners where brownies tend to grab.
Creating the Perfect Brownie Base
- Batter Preparation: Follow brownie mix instructions precisely, combining ingredients until just mixed. Overmixing can create tough, cake-like brownies instead of the desired fudgy texture.
- Enhanced Chocolate Option: For extra decadence, fold in ½ cup mini chocolate chips before pouring batter. This addition creates pockets of melted chocolate throughout each brownie.
- Even Distribution: Pour batter into prepared pan, spreading gently to corners with an offset spatula. Avoid overworking the batter, which can affect the final texture.
Achieving Brownie Perfection
- Optimal Baking: Bake according to package directions until a toothpick inserted 2 inches from edge comes out with just a few moist crumbs. The center should still appear slightly underbaked—it will continue cooking as it cools.
- Complete Cooling Phase: Allow brownies to cool completely in the pan for at least 2 hours. Rushing this step results in crumbly cuts and melted decorations when you add the white chocolate.
Strategic Cutting Technique
- Perfect Portioning: Using the parchment overhang, lift entire brownie slab from pan onto cutting board. Use a sharp knife, cleaning between cuts, to create uniform rectangles approximately 3×2 inches.
- Clean Cut Method: For bakery-perfect edges, chill cut brownies for 30 minutes before decorating. This firms them up and prevents crumbing during the drizzling process.
White Chocolate Bandage Application
- Melting Mastery: Combine white chocolate chips with coconut oil in microwave-safe bowl. Microwave in 30-second intervals, stirring between each, until completely smooth and drizzling consistency.
- Bandage Technique: Using a spoon or piping bag, drizzle melted chocolate in irregular zigzag patterns across each brownie. Leave small gaps to mimic authentic mummy bandages—perfection looks less realistic than controlled randomness.
Bringing Mummies to Life
- Eye Placement Strategy: While chocolate is still soft, press candy eyes gently into the white chocolate “bandages.” Vary the placement and use different sized eyes to give each mummy its own personality.
- Final Setting: Allow white chocolate to set completely at room temperature for 20-30 minutes before serving. Refrigeration speeds setting but may cause condensation issues.
Creative Presentation and Serving Ideas
Transform your serving area into an ancient Egyptian tomb by arranging brownies on stone-colored platters surrounded by battery-operated candles and plastic hieroglyphic decorations. The flickering light creates dramatic shadows that enhance the mummy theme while providing perfect photo opportunities.
For school parties, create individual “sarcophagus” containers using small black boxes lined with tissue paper. Place each mummy brownie inside with a small scroll containing fun mummy facts or Halloween jokes, turning each treat into an educational mini-adventure.
Consider arranging them on a tiered cake stand with dry ice (safely contained) creating mysterious fog around the base. This theatrical presentation elevates simple brownies into the centerpiece of your Halloween dessert table.
Mysteriously Delicious Variations
Double Chocolate Mummy Madness
Use dark chocolate brownie mix and add cocoa powder to the white chocolate for gray “aged” bandages. This creates a more sophisticated, archaeological appearance perfect for adult Halloween parties.
Peanut Butter Mummy Hybrid
Swirl peanut butter into brownie batter before baking, then use white chocolate bandages as usual. The peanut butter adds richness while maintaining the classic mummy appearance.
Gluten-Free Ancient Spirits
Substitute gluten-free brownie mix without changing any other ingredients. The decoration process remains identical while accommodating dietary restrictions seamlessly.
Mini Mummy Army
Cut brownies into smaller, bite-sized squares and create an army of mini mummies using the same decorating technique. Perfect for parties where guests prefer smaller portions.
Caramel-Filled Mummy Surprises
Inject each brownie with caramel sauce using a small syringe before decorating. The hidden caramel center creates a delightful surprise that oozes out when bitten.
Strategic Make-Ahead Planning
Up to Four Days Before: Bake brownies completely and store covered at room temperature. The flavor actually improves over 24-48 hours as moisture redistributes throughout the brownies.
Two Days Ahead: Cut brownies and store in airtight containers between parchment layers. This prevents them from sticking together while maintaining optimal texture.
Day Before Party: Complete all decorating and store finished mummies in single layers in covered containers. The white chocolate sets completely and maintains its appearance perfectly.
Transportation Strategy: Use rigid containers with secure lids to prevent bandage smudging during transport. Include a few backup candy eyes for any that might shift during travel.
Important Notes (Notas)
White Chocolate Quality: High-quality white chocolate melts more smoothly and tastes significantly better than lower-grade alternatives. Avoid white chocolate chips labeled “baking chips,” which contain stabilizers that affect melting.
Drizzling Consistency: If white chocolate becomes too thick while working, reheat briefly in 15-second microwave intervals. Too-thick chocolate won’t drizzle properly and can crack when set.
Eye Attachment Timing: Press candy eyes into chocolate while it’s still soft but not completely liquid. This timing ensures they stick securely without sinking completely into the chocolate.
Storage Temperature: Store finished brownies at room temperature in airtight containers. Refrigeration can cause white chocolate to develop condensation and become cloudy or sticky.
Frequently Asked Questions
Why is my white chocolate seizing up during melting? Water is chocolate’s enemy—even tiny amounts from humid air or wet utensils can cause seizing. Use completely dry bowls and utensils, and add coconut oil to help maintain smooth consistency.
Can I use melted white chocolate bark instead of chips? Yes, white chocolate bark often melts more smoothly than chips. Use about 12 oz of bark and still add coconut oil for optimal drizzling consistency.
How do I prevent my brownies from being too cake-like? Don’t overbake—remove them when they’re still slightly underdone in the center. Additionally, avoid overmixing the batter, which develops gluten and creates a cake-like texture.
What if I don’t have candy eyes? Mini chocolate chips work perfectly as alternatives. You can also use white chocolate chips with tiny dots of black gel food coloring for custom eyes.
How long do these decorated brownies stay fresh? Properly stored mummy brownies maintain optimal taste and texture for 4-5 days at room temperature. The white chocolate decoration actually helps preserve moisture in the brownies.
Can I make these ahead and freeze them? Absolutely! Freeze decorated brownies for up to 2 months in airtight containers. Thaw at room temperature for 2-3 hours before serving—the texture remains perfect.
Why do some of my mummy bandages look streaky? Streaky appearance usually indicates the chocolate was too cool when applied. Reheat slightly and ensure it flows smoothly from your spoon or piping bag for even coverage.


