Serves: 10 | Prep Time: 20 minutes | Cook Time: 35 minutes | Chill Time: 4 hours | Total Time: 5 hours
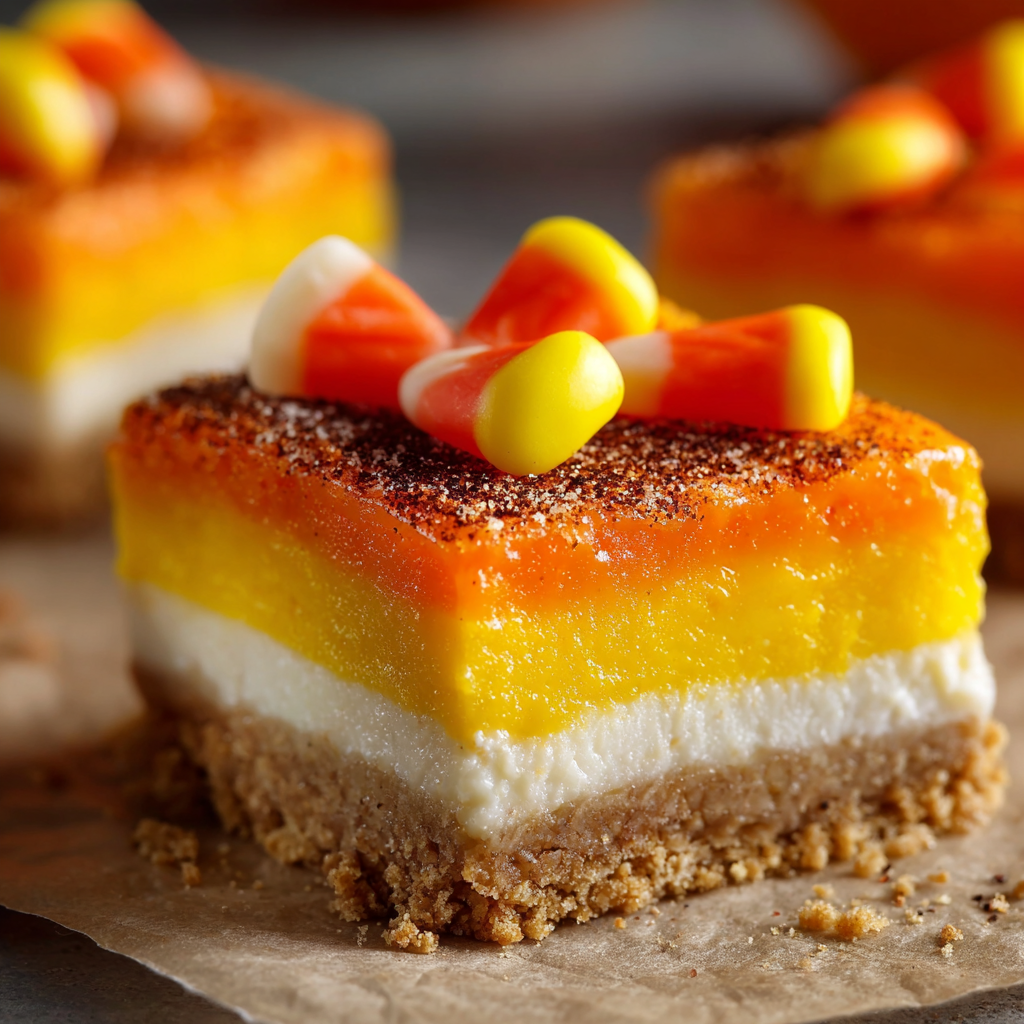
Growing up, candy corn was always my least favorite Halloween candy – that artificial sweetness and waxy texture just never appealed to me. However, everything changed when my sister-in-law brought these incredible Candy Corn Cheesecake Bars to our annual Halloween potluck. The moment I saw those perfect yellow, orange, and white layers sitting on that golden graham cracker crust, I knew I had found something special. One bite completely transformed my relationship with this iconic Halloween symbol.
These bars capture all the visual appeal of candy corn while delivering the rich, creamy satisfaction that only cheesecake can provide. The beauty lies not just in their striking appearance, but in how each colorful layer maintains its own subtle flavor profile while creating a harmonious whole. Since mastering this recipe, these bars have become my signature Halloween contribution, requested at every fall gathering and eagerly anticipated by friends and family.
Why These Cheesecake Bars Are Pure Halloween Magic
Stunning Visual Impact
These bars are absolute showstoppers that perfectly replicate the iconic candy corn appearance with their distinct layered design. Furthermore, the vibrant colors create an instant festive atmosphere that captures the essence of Halloween in dessert form.
Perfect Texture Combination
The creamy, velvety cheesecake layers contrast beautifully with the crunchy graham cracker crust, creating a textural experience that’s both satisfying and elegant. Additionally, the smooth consistency makes these bars easy to slice and serve at parties.
Crowd-Pleasing Appeal
Unlike actual candy corn, these bars appeal to virtually everyone, including those who typically avoid the traditional candy. Moreover, the familiar cheesecake flavor makes them approachable while the festive appearance adds excitement.
Make-Ahead Convenience
These bars actually improve in flavor and texture when chilled overnight, making them perfect for busy Halloween party planning. Consequently, you can prepare them a day ahead and focus on other party preparations.
Essential Ingredients and Quality Tips
Graham Cracker Crust Foundation
- 1½ cups graham cracker crumbs (about 12 whole crackers)
- ¼ cup granulated sugar
- ½ cup unsalted butter, melted and slightly cooled
Creamy Cheesecake Layers
- 3 (8 oz) packages cream cheese, fully softened
- 1 cup granulated sugar
- 3 large eggs, room temperature
- 1 teaspoon vanilla extract
- Yellow and orange food coloring (gel preferred)
- Candy corn for decorative garnish
Ingredient Success Tips
Ensure cream cheese is completely softened for smooth mixing – cold cream cheese creates lumps that are difficult to eliminate. Room temperature eggs incorporate more easily and create a silkier texture. Gel food coloring provides more vibrant colors without thinning the batter.
Step-by-Step Layering Process
Creating the Perfect Crust
Preheat your oven to 325°F (160°C) and line a 9×13-inch baking dish with parchment paper, leaving overhang for easy removal. This preparation ensures clean, professional-looking bars.
In a mixing bowl, combine graham cracker crumbs, sugar, and melted butter, stirring until the mixture resembles wet sand and holds together when pressed. Press this mixture firmly and evenly into the bottom of the prepared baking dish, creating a solid foundation for your cheesecake layers.
Preparing the Cheesecake Base
Using an electric mixer, beat the softened cream cheese and sugar on medium speed until completely smooth and creamy, approximately 3-4 minutes. Scrape down the bowl sides frequently to ensure even mixing and eliminate any lumps.
Add eggs one at a time, beating well after each addition until fully incorporated. This gradual addition prevents the mixture from curdling and ensures a smooth, professional texture.
Stir in the vanilla extract until evenly distributed throughout the mixture, creating your base cheesecake batter.
Creating the Signature Layers
Divide the prepared cheesecake batter into three equal portions using a kitchen scale for accuracy, or estimate by eye if necessary. Each portion should be roughly equivalent to ensure even layers.
Leave one portion completely plain for the white layer that represents the candy corn tip. Add yellow food coloring to the second portion, mixing until you achieve a vibrant corn-like yellow. Tint the third portion with orange food coloring, creating a rich autumn orange that matches traditional candy corn.
Assembly and Baking
Pour the orange batter over the graham cracker crust first, spreading it evenly with a spatula to create a smooth, uniform layer. This forms the bottom section of your candy corn design.
Carefully pour the yellow batter over the orange layer, using a spoon or spatula to spread it gently without disturbing the orange layer beneath. The colors should remain distinct with minimal mixing.
Finally, add the plain white batter as the top layer, spreading it evenly to complete the candy corn appearance. The finished bars should show three distinct color bands.
Bake for 30-35 minutes, or until the center appears set but still slightly jiggly when gently shaken. The bars will continue cooking from residual heat after removal.
Cooling and Finishing
Allow the bars to cool completely at room temperature before transferring to the refrigerator for at least 4 hours or overnight. This chilling time is crucial for proper setting and clean slicing.
Once fully chilled and set, remove from the pan using the parchment paper overhang and slice into neat rectangles using a sharp knife wiped clean between cuts.
Garnish each bar with a few pieces of actual candy corn before serving for the ultimate themed presentation.
Creative Serving and Presentation Ideas
Halloween Party Centerpiece
Arrange these bars on a tiered black and orange serving stand surrounded by mini pumpkins, autumn leaves, and flickering candles for a dramatic Halloween dessert display that guests will remember.
Individual Plating Excellence
Serve each bar on small dessert plates with a dollop of whipped cream and a sprinkle of cinnamon, elevating the presentation from casual party treat to elegant dessert course.
Gift Box Collections
Package individual bars in clear boxes with Halloween-themed ribbons, creating perfect hostess gifts or treats for neighbors that showcase the beautiful layered appearance.
Exciting Recipe Variations
Chocolate Candy Corn Version
Add melted chocolate to one layer instead of food coloring, creating chocolate, orange, and vanilla layers that offer more complex flavor while maintaining the visual appeal.
Spiced Autumn Bars
Incorporate warm spices like cinnamon, nutmeg, and ginger into each layer for a more sophisticated fall flavor profile that complements the festive appearance.
Mini Cheesecake Cups
Prepare individual portions in cupcake tins lined with paper cups, creating perfect single-serving treats that are easier to serve at large gatherings.
Pumpkin Swirl Addition
Add pumpkin puree and pumpkin pie spice to the orange layer for an extra autumn flavor boost that enhances the seasonal theme.
Storage and Make-Ahead Strategies
Advance Preparation
These bars can be prepared up to 3 days in advance and stored covered in the refrigerator. The flavors actually meld and improve over time, making advance preparation beneficial.
Freezing Instructions
Wrapped properly, these bars freeze beautifully for up to 2 months. Thaw overnight in the refrigerator before serving, and add fresh candy corn garnish after thawing.
Serving Day Tips
Remove bars from refrigerator 15-20 minutes before serving to allow them to soften slightly for easier cutting and optimal texture. Clean your knife between cuts for the neatest presentation.
Professional Baking Techniques
Layer Separation: Pour each colored layer slowly over the back of a spoon to minimize mixing between layers and maintain distinct color boundaries.
Temperature Control: Room temperature ingredients mix more easily and create smoother textures. Plan ahead and remove cream cheese from refrigerator 2-3 hours before baking.
Testing Doneness: The center should be set but still slightly jiggly when done. Overbaking can cause cracks and a dry texture that detracts from the creamy appeal.
Clean Slicing: Use a thin, sharp knife dipped in warm water and wiped clean between each cut to achieve professional-looking bars with clean edges.
Frequently Asked Questions
Can I use low-fat cream cheese for this recipe? While you can substitute low-fat cream cheese, the texture won’t be as rich and creamy as the full-fat version. Regular cream cheese provides the best flavor and texture for these bars.
How do I prevent cracks from forming on top? Avoid overbaking and don’t open the oven door during baking, as temperature fluctuations can cause cracking. Additionally, cooling gradually helps prevent surface cracks from forming.
What if my layers mix together during pouring? If layers blend slightly, don’t worry – the bars will still taste amazing and look festive. For cleaner layers next time, pour more slowly and chill each layer briefly before adding the next.
Can I make these without food coloring? Absolutely! The bars will still be delicious in their natural cream color, though they won’t have the signature candy corn appearance. Consider using natural colorings like turmeric for yellow or paprika for orange.
How long do these bars need to chill before serving? Allow at least 4 hours of chilling time for proper setting, though overnight chilling produces the best texture and easiest slicing. Patience with the chilling process ensures perfect results.
What’s the best way to cut clean, even bars? Use a sharp, thin knife dipped in warm water and wiped clean between each cut. Mark your cutting lines lightly first, then cut decisively in one smooth motion for the cleanest edges.


