Introduction
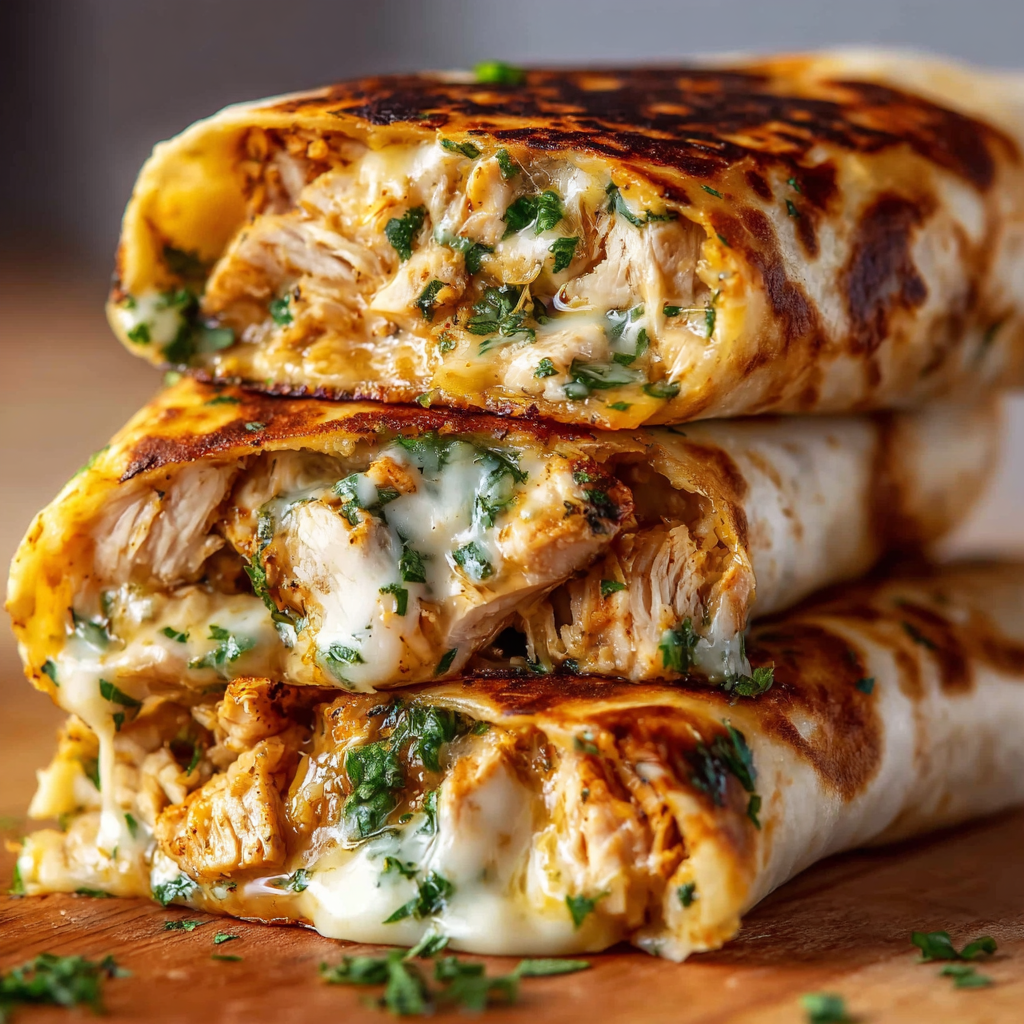
There’s something absolutely magical about the moment you bite into a perfectly toasted wrap and discover that molten cheese stretching between your teeth—pure comfort food bliss. These Ooey-Gooey Cheesy Garlic Chicken Wraps represent everything I love about quick, satisfying meals: they’re indulgent enough to feel like a treat, yet simple enough to whip up on the busiest weeknight.
What makes these wraps truly special isn’t just their incredible flavor combination of juicy chicken, aromatic garlic, and perfectly melted cheese. Instead, it’s how they manage to deliver restaurant-quality satisfaction using ingredients you likely already have in your kitchen. Over the years, I’ve discovered that the secret to exceptional wraps lies in the perfect balance of filling, proper cheese melting technique, and achieving that golden, crispy exterior that gives way to the most luxurious, cheesy interior.
These wraps have become my go-to solution for everything from quick lunches to casual dinner parties. They’re substantial enough to satisfy hungry teenagers, elegant enough for weekend entertaining, and convenient enough for busy parents who need dinner on the table fast. Moreover, the endless customization possibilities mean they never get boring, no matter how often you make them.
Prep Time: 15 minutes
Cook Time: 10 minutes
Total Time: 25 minutes
Servings: 4 wraps
Calories per serving: 360 calories
Difficulty: Easy
Why You’ll Love These Cheesy Wraps
Ultimate Comfort Food Experience
These wraps deliver that perfect combination of crispy exterior and molten, cheesy interior that defines the best comfort food. Furthermore, the garlic-infused chicken creates layers of flavor that make every bite incredibly satisfying.
Quick and Weeknight-Friendly
From start to finish, these wraps take just 25 minutes to prepare, making them perfect for busy schedules. Additionally, most of the ingredients are pantry staples, so you can make them spontaneously when cravings hit.
Endless Customization Options
The basic recipe serves as an excellent foundation for countless variations, allowing you to adapt them to different tastes, dietary needs, or whatever ingredients you have available. Consequently, they never become repetitive or boring.
Perfect Portion Control
Each wrap provides a complete, satisfying meal in a perfectly portioned package. Moreover, they’re easy to eat with your hands, making them ideal for casual dining or on-the-go meals.
Essential Ingredients
The Protein Foundation
- 2 cups cooked chicken breast, diced into bite-sized pieces
- Salt and black pepper to taste
Building the Garlic Base
- 4 cloves garlic, minced
- 1 tablespoon olive oil
The Cheese Magic
- 1 cup shredded mozzarella cheese
- 1 cup shredded cheddar cheese
Wrap Components
- 4 medium flour tortillas
- 1 tablespoon butter for toasting
- 1 tablespoon chopped parsley (optional, for garnish)
Essential Equipment
- Large skillet or sauté pan
- Sharp knife for dicing
- Cutting board
- Spatula for flipping
Step-by-Step Instructions
Preparing the Perfect Chicken Base
If you haven’t already cooked your chicken, start by seasoning it lightly with salt and pepper. You can bake, sauté, or grill the chicken until it reaches an internal temperature of 165°F, then dice it into small, uniform pieces for even distribution in the wraps.
The key to exceptional wraps is having properly seasoned, well-cooked chicken that’s cut into bite-sized pieces. This ensures every bite contains the perfect amount of protein without overwhelming the other flavors.
Creating the Aromatic Garlic Oil
Heat olive oil in a large pan over medium heat until it shimmers but doesn’t smoke. Add the minced garlic and sauté for just 30 seconds to 1 minute until it becomes golden and incredibly fragrant. Be careful not to burn the garlic, as it can turn bitter quickly.
This brief cooking process releases the garlic’s natural oils and mellows its sharpness, creating a sweet, aromatic base that infuses the entire dish with incredible flavor.
Combining Chicken with Garlic Goodness
Add the diced chicken to the pan with the garlic oil, tossing everything together to ensure each piece gets coated with that aromatic mixture. Cook for 2-3 minutes, just long enough to warm the chicken through and allow the flavors to meld.
Remove the pan from heat while the chicken is still hot—this residual heat is crucial for the next step in achieving perfect cheese melting.
Achieving Perfect Cheese Integration
While the chicken mixture is still warm, stir in both the mozzarella and cheddar cheeses. The heat from the chicken will begin melting the cheese immediately, creating a cohesive, creamy mixture that won’t separate when wrapped.
This technique ensures the cheese becomes partially melted before assembly, which prevents it from clumping and creates that signature ooey-gooey texture when the wrap is toasted.
Mastering the Wrap Assembly
Lay each tortilla flat on a clean surface and spoon a generous portion of the cheesy chicken mixture into the center, leaving about 2 inches of space on all sides. The key is being generous with the filling while leaving enough tortilla to create a proper seal.
Fold in the sides first, then roll from the bottom up, tucking the filling as you go to create a tight, secure wrap. The tighter the roll, the less likely it is to fall apart during cooking.
Achieving Golden Perfection
Melt butter in a clean skillet over medium heat until it begins to foam. Carefully place the wraps seam-side down in the pan, which helps seal them shut while creating beautiful golden-brown color.
Cook for 2-3 minutes on the first side, pressing gently with a spatula to ensure even contact with the pan. Flip carefully and cook for another 2-3 minutes until both sides are golden and crispy.
Final Rest and Presentation
Remove the wraps from heat and let them rest for 1-2 minutes before slicing. This brief resting period allows the melted cheese to set slightly, preventing it from oozing out when you cut the wraps.
Slice diagonally to show off the beautiful, cheesy interior and sprinkle with fresh parsley for a pop of color and freshness that balances the rich flavors.
Serving Suggestions
Classic Accompaniments
Serve these wraps with crispy tortilla chips and fresh salsa, guacamole, or sour cream for dipping. The cool, fresh elements provide perfect contrast to the warm, rich wraps.
Healthy Balance Options
Pair with a simple green salad dressed with lime vinaigrette or a cup of fresh fruit to balance the richness of the cheese. Additionally, pickled jalapeños or vegetables add tangy contrast that cuts through the richness.
Comfort Food Pairings
For ultimate indulgence, serve alongside seasoned potato wedges or crispy onion rings. These combinations create a satisfying, restaurant-style meal that’s perfect for casual entertaining.
Light and Fresh Sides
Consider serving with fresh coleslaw, cucumber salad, or even a bowl of tomato soup for dipping—the bright, acidic elements complement the rich, cheesy wraps beautifully.
Recipe Variations
Spice It Up Versions
Add diced jalapeños, crushed red pepper flakes, or pepper jack cheese for heat. Moreover, a dash of hot sauce mixed into the chicken creates a spicy kick that heat lovers will adore.
Veggie-Packed Options
Incorporate sautéed spinach, mushrooms, diced bell peppers, or caramelized onions for added nutrition and flavor complexity. These vegetables should be cooked until tender before adding to prevent excess moisture.
Cheese Alternatives
Experiment with different cheese combinations like gouda for creaminess, pepper jack for heat, or Swiss for a milder flavor. Each cheese brings its own unique melting characteristics and taste profile.
Dietary Modifications
Use low-carb tortillas, whole wheat wraps, or certified gluten-free options to accommodate different dietary needs. Additionally, Greek yogurt can partially replace some cheese for a lighter version.
Make-Ahead Tips
Component Preparation
Cook and dice chicken up to 3 days ahead, storing it in the refrigerator until ready to use. Similarly, the garlic can be minced and stored in olive oil for convenience.
Partial Assembly Strategy
Prepare the chicken and cheese mixture up to 2 days ahead, then assemble and cook the wraps when ready to serve. This method maintains optimal texture while saving precious time.
Complete Make-Ahead Method
Fully assembled wraps can be refrigerated for up to 4 hours before cooking, though they’re best when cooked immediately after assembly to prevent the tortilla from becoming soggy.
Freezing Guidelines
Wrap assembled (but uncooked) wraps individually in plastic wrap and freeze for up to 1 month. Cook directly from frozen, adding 2-3 extra minutes to the cooking time.
Important Notes
Cheese Selection Matters
Use freshly shredded cheese when possible, as pre-shredded varieties contain anti-caking agents that can affect melting quality. Fresh cheese creates that signature stretchy, gooey texture that makes these wraps irresistible.
Temperature Control Tips
Keep heat at medium to prevent the tortilla from burning before the cheese fully melts inside. Additionally, the residual heat method for initial cheese melting is crucial for achieving the perfect texture.
Filling Distribution
Distribute filling evenly and avoid overstuffing, which can cause wraps to burst during cooking. Less is often more when it comes to creating neat, manageable wraps.
Storage Guidelines
Cooked wraps are best enjoyed immediately but can be stored in the refrigerator for up to 2 days. Reheat in a dry skillet or toaster oven to restore crispiness.
Frequently Asked Questions
Can I use rotisserie chicken for this recipe?
Absolutely! Rotisserie chicken is a fantastic time-saving option. Simply remove the skin, dice the meat, and proceed with the recipe. The pre-seasoned chicken often adds extra flavor to the wraps.
What if I don’t have both types of cheese?
You can use just one type of cheese, though the combination of mozzarella and cheddar provides the best texture and flavor. Mozzarella gives stretch while cheddar adds sharp flavor.
Can I make these wraps in advance?
While best served immediately, you can assemble them up to 4 hours ahead and refrigerate. However, cook them just before serving to maintain the crispy exterior and prevent sogginess.
How do I prevent the wraps from falling apart?
Roll them tightly, place seam-side down when cooking, and don’t overfill. Additionally, letting them rest briefly after cooking helps the cheese set and makes slicing easier.
Can I bake these instead of pan-frying?
Yes, brush with melted butter and bake at 400°F for 10-12 minutes, flipping halfway through. While the texture differs slightly, baking is a healthier alternative that still produces delicious results.
What other proteins work well in these wraps?
Turkey, ham, or even leftover steak work beautifully. Additionally, for vegetarian options, try seasoned black beans, grilled vegetables, or plant-based meat alternatives.
How do I keep the garlic from burning?
Use medium or medium-low heat and cook for just 30 seconds to 1 minute until fragrant. Watch carefully, as garlic can go from golden to burned very quickly.
Can I add vegetables to the filling?
Certainly! Pre-cook vegetables like bell peppers, onions, or mushrooms until tender to prevent excess moisture. Spinach should be wilted and well-drained before adding to the mixture.


