Introduction
Growing up, my family had a tradition of making Italian subs for every major gathering—birthdays, holidays, even Sunday football games. But it wasn’t until I discovered the magic of baking them that these sandwiches truly transformed from good to absolutely unforgettable. There’s something about that moment when you unwrap the foil and are hit with the aroma of melted cheese, warm deli meats, and buttery, herb-brushed bread that makes everyone stop what they’re doing and gather around the kitchen.
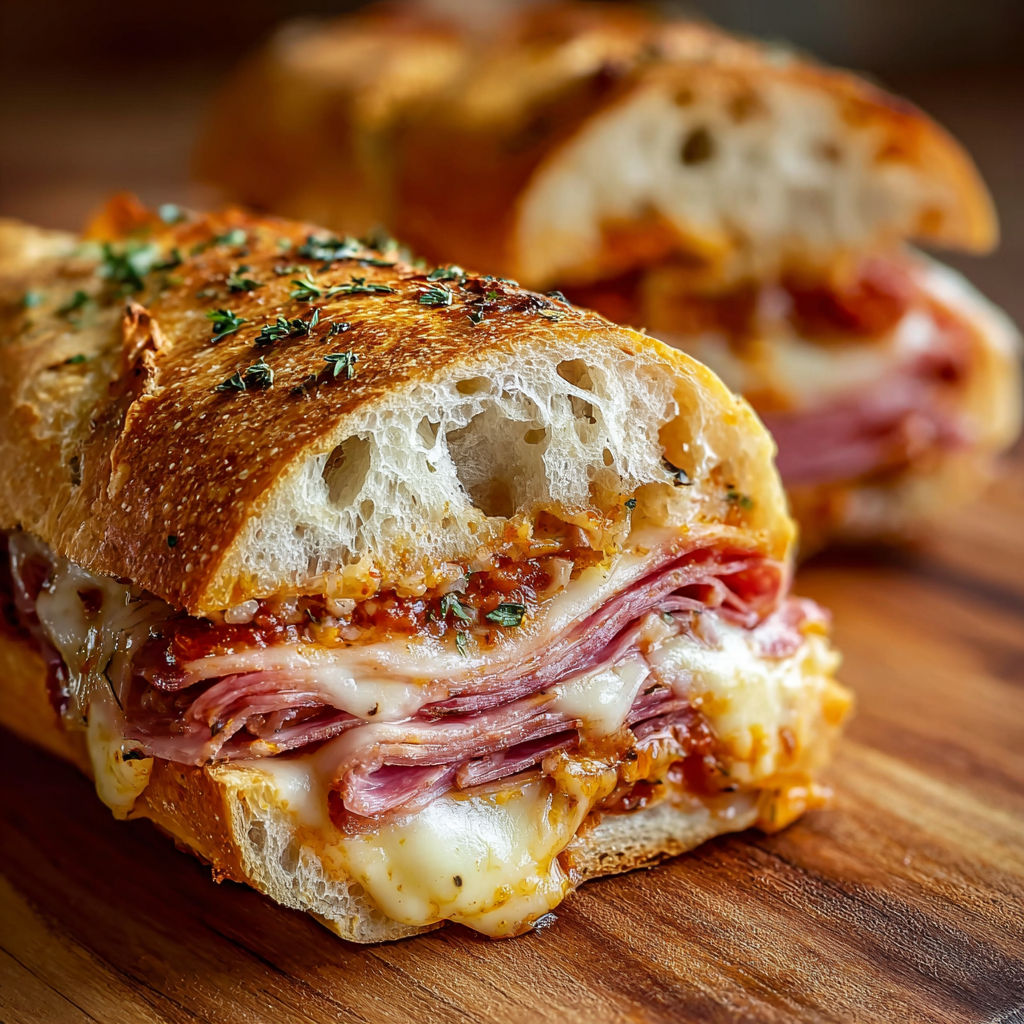
These Baked Italian Sub Sandwiches have become my secret weapon for entertaining. They look impressive, taste like you spent hours preparing them, and come together in just 25 minutes. The best part? Every bite delivers that perfect combination of hot, melty cheese, savory cured meats, tangy peppers, and a crunchy-yet-soft bread that holds it all together beautifully. Whether you’re feeding hungry teenagers after practice or hosting a casual dinner party, these subs never fail to impress.
Why You’ll Love This Recipe
Restaurant Quality at Home: Forget paying premium prices at your local deli or sub shop. This recipe delivers the same crave-worthy flavors you’d get from the best Italian sandwich shops, but you control the quality of ingredients and customize every layer exactly how you like it.
Perfect for Crowds: When you’re hosting game day, a casual get-together, or need to feed a hungry family fast, these subs are your answer. You can easily double or triple the recipe, and everyone loves the interactive element of choosing their own toppings before baking.
Minimal Effort, Maximum Impact: With just 10 minutes of prep work and 15 minutes in the oven, you’ll have a hot, satisfying meal that tastes like you’ve been cooking all day. The oven does most of the work while you relax or prepare other dishes.
Customizable for Everyone: Whether someone prefers extra meat, wants to skip certain ingredients, or needs a spicier kick, this recipe adapts beautifully to different tastes and dietary needs. It’s a crowd-pleaser in the truest sense.
Prep Time: 10 minutes
Cook Time: 15 minutes
Total Time: 25 minutes
Yield: 4 subs
Category: Main Course, Sandwiches
Method: Baking
Cuisine: Italian-American
Ingredients
For the Sandwiches:
- 4 sub rolls or hoagie buns
- ¼ lb salami, thinly sliced
- ¼ lb ham, thinly sliced
- ¼ lb pepperoni or capicola, thinly sliced
- ¼ lb roast beef, thinly sliced (optional for a meatier sub)
- 8 slices provolone or mozzarella cheese
- ½ cup banana peppers or pepperoncini, sliced
- ¼ cup red onion, thinly sliced
- ½ cup Italian dressing
For the Herb Butter Topping:
- 2 tablespoons butter, melted
- 1 tablespoon Italian seasoning
- ½ teaspoon garlic powder
Step-by-Step Instructions
Step 1: Prepare Your Sub Rolls
Preheat your oven to 375°F (190°C) while you work. Carefully slice each sub roll in half lengthwise, but don’t cut all the way through—you want the rolls to stay connected like a hinge so they can hold all those delicious fillings without falling apart. If you prefer extra texture, lightly toast the insides of the rolls for 2–3 minutes before assembling. This creates a slightly crispy barrier that prevents sogginess.
Step 2: Build Your Layers
Now comes the fun part—layering! Start with a base of ham slices, followed by salami, then pepperoni or capicola. If you’re including roast beef for an extra-hearty sub, add it next. The key here is to distribute the meats evenly and fold them loosely rather than laying them flat—this creates pockets and texture in every bite. Tuck slices of provolone or mozzarella between the meat layers so the cheese melts throughout the sandwich rather than just on top.
Step 3: Add the Zesty Toppings
Scatter the sliced banana peppers or pepperoncini over the meat and cheese layers. These tangy, slightly spicy peppers are what give Italian subs their signature kick. Next, distribute the thinly sliced red onion across each sandwich. The onion adds a sharp bite that balances the richness of the meats and cheese beautifully.
Step 4: Create the Herb Butter Brush
In a small bowl, combine the melted butter, Italian seasoning, and garlic powder. Stir until well mixed—this aromatic butter will create that irresistible golden, herb-crusted top that makes these subs special. Using a pastry brush or spoon, generously coat the top of each sub roll with this mixture, making sure to get into all the nooks and crannies.
Step 5: Add the Tangy Dressing
Drizzle about 2 tablespoons of Italian dressing inside each sandwich, right over the meat and vegetable layers. This is what keeps the sandwiches juicy and adds that characteristic Italian sub tang. Don’t skip this step—it makes all the difference between a good sub and an extraordinary one.
Step 6: Wrap and Bake
Wrap each assembled sub individually in aluminum foil, sealing the edges loosely but completely. This traps steam inside, which melts the cheese perfectly and keeps everything moist. Place the wrapped subs on a baking sheet and slide them into your preheated oven. Bake for 15 minutes, or until the cheese is fully melted and everything is heated through.
Step 7: Serve Immediately
Carefully remove the subs from the oven and let them rest for just a minute before unwrapping—be cautious as steam will escape. Unwrap each sandwich, slice it in half diagonally for easier handling, and serve while hot. The melted cheese, warm meats, and toasted bread create an irresistible combination that’s best enjoyed fresh from the oven.
Serving Suggestion
These hearty sandwiches are substantial enough to serve as a complete meal on their own, but they pair wonderfully with classic Italian-American sides. A simple garden salad with Italian vinaigrette provides a fresh, crisp contrast to the rich, warm sandwich. Alternatively, homemade or store-bought pasta salad loaded with vegetables makes a satisfying accompaniment that can be prepared ahead.
For a more casual spread, serve these subs alongside crispy potato chips, pickles, and olives arranged on a large platter. This creates a deli-style experience that’s perfect for game day or casual gatherings. If you’re looking for something lighter, a bowl of minestrone soup or Italian wedding soup turns this into a complete, comforting meal.
Don’t forget the beverages! Ice-cold Italian sodas, lemonade, or beer complement the bold flavors beautifully. For a more upscale touch, serve with a crisp white wine like Pinot Grigio or a light red like Chianti.
Recipe Variations
Spicy Italian Sub
For heat lovers, amp up the spice factor by swapping the mild banana peppers for sliced jalapeños or hot cherry peppers. You can also add a layer of spicy Calabrian chili paste or spread some hot pepper relish on the bread before adding the meats. A drizzle of hot honey over the cheese before baking creates an addictive sweet-heat combination.
Vegetarian Italian Sub
Transform this into a satisfying meatless option by replacing the deli meats with layers of roasted vegetables. Grilled eggplant, zucchini, roasted red peppers, and marinated artichoke hearts create a flavorful, hearty filling. Add fresh mozzarella and basil for that classic Italian touch, and proceed with the same baking method.
Supreme Meat Lover’s Version
Go all-out by including every Italian meat you can find. Add mortadella, soppressata, prosciutto, and even Italian sausage crumbles to the mix. Layer multiple types of cheese—provolone, fresh mozzarella, and even some grated Parmesan—for an over-the-top indulgent experience.
Lighter Version
For a more health-conscious approach, use whole wheat or multigrain sub rolls, choose lower-sodium deli meats, and go lighter on the cheese. Load up on extra vegetables like tomatoes, spinach, and bell peppers to bulk up the sandwich without adding excessive calories. Use a light Italian dressing or substitute with a splash of balsamic vinegar and olive oil.
Make-Ahead Tips
While these subs are best enjoyed fresh from the oven, you can definitely prepare them ahead to save time on busy days. Assemble the sandwiches completely up to the point of wrapping them in foil, then store them in the refrigerator for up to 4 hours before baking. When you’re ready to serve, simply pop them in the oven straight from the fridge, adding an extra 3–5 minutes to the baking time.
For meal prep purposes, you can prep all the ingredients separately—slice the meats and cheese, chop the vegetables, and mix the herb butter—then store everything in separate containers in the refrigerator for up to 2 days. This way, assembly takes just minutes when you’re ready to bake.
Leftover baked subs should be stored in airtight containers or wrapped tightly in foil in the refrigerator for up to 2 days. Reheat them wrapped in foil at 350°F for about 10 minutes until warmed through. While the texture won’t be quite as perfect as fresh, they still taste delicious and make a convenient lunch option.
Notes
Extra Crunch Factor: If you love texture contrast, lightly toast your sub rolls in the oven for 2–3 minutes before assembling. This creates a slightly crispy interior that holds up beautifully against the juicy fillings.
Spice Level Adjustment: The banana peppers provide a mild tang with just a hint of heat. For a spicier version, substitute with pepperoncini, jalapeños, or hot cherry peppers. Conversely, if you prefer mild, simply omit the peppers or use roasted red bell peppers instead.
Gluten-Free Option: This recipe easily adapts to gluten-free diets by using quality gluten-free sub rolls. Just check that all your deli meats and Italian dressing are also certified gluten-free.
Cheese Choices: While provolone and mozzarella are traditional, don’t be afraid to experiment. Sharp provolone adds more flavor, fresh mozzarella creates a creamier texture, and even a combination of both works beautifully.
Perfect for Parties: These subs are ideal for entertaining because they can be assembled ahead and popped in the oven when guests arrive. The foil-wrapped presentation also makes them easy to transport for potlucks or tailgating.
Frequently Asked Questions
Can I use different types of bread?
Absolutely! While classic sub rolls or hoagie buns work best, you can use ciabatta bread, French bread, or even large pretzel rolls for a fun twist. Just make sure whatever bread you choose is sturdy enough to hold all the fillings without getting soggy.
Do I have to wrap them in foil?
The foil is highly recommended because it traps steam and ensures even heating, which melts the cheese perfectly. However, if you prefer crunchier bread, you can skip the foil and bake them open-faced, though you may need to tent them loosely with foil toward the end if the cheese isn’t melting quickly enough.
Can I make these subs cold instead of baked?
Certainly! Traditional Italian subs are served cold. Simply assemble the sandwiches without the herb butter topping, chill them for at least 30 minutes to let the flavors meld, and serve. They’ll have a different character but are equally delicious.
How do I prevent the bread from getting soggy?
The key is not overdoing the Italian dressing—2 tablespoons per sub is plenty. Additionally, if you’re making them ahead, consider keeping the dressing on the side and adding it just before baking. Lightly toasting the bread interior also creates a moisture barrier.
Can I freeze these sandwiches?
While not ideal, you can freeze assembled but unbaked subs for up to 1 month. Wrap them tightly in plastic wrap, then foil. Bake from frozen at 375°F for 25–30 minutes. The texture may be slightly different, but they’ll still be tasty.
What’s the best way to slice these for a party?
For appetizer portions or party servings, cut each full sub into 3–4 smaller pieces. Use a serrated knife and cut at a slight diagonal for the most attractive presentation. Secure each piece with a toothpick if needed.
Nutrition Information
Serving Size: 1 sandwich
Calories: 580 kcal
Sugar: 3g
Sodium: 1460mg
Fat: 32g
- Saturated Fat: 13g
- Unsaturated Fat: 16g
- Trans Fat: 0g
Carbohydrates: 38g
Fiber: 2g
Protein: 28g
Cholesterol: 75mg
These Baked Italian Sub Sandwiches prove that simple ingredients, when combined thoughtfully and baked to melty perfection, create something truly special. The combination of savory cured meats, tangy peppers, melted cheese, and herb-brushed bread is undeniably satisfying and never gets old. Whether you’re making a quick weeknight dinner or feeding a crowd, this recipe delivers every single time. Give them a try, and don’t be surprised when they become your most-requested sandwich!


