Last Halloween, I was scrambling for a dessert that would wow my kids and their friends without keeping me in the kitchen all night. That’s when inspiration struck—what if I could transform the campfire classic into something spooky and shareable? This Ghost S’mores Dip was born from that moment, and it’s been the star of every Halloween party since. Watching those adorable ghost marshmallows puff up and toast in the oven while floating on a sea of melted chocolate never gets old. The squeals of delight from kids (and adults!) make it worth every single time.
Prep Time: 15 minutes
Cook Time: 5 minutes
Total Time: 20 minutes
Servings: 8
Calories: 230 per serving
Course: Dessert
Cuisine: American
Why You’ll Love This Ghost S’mores Dip
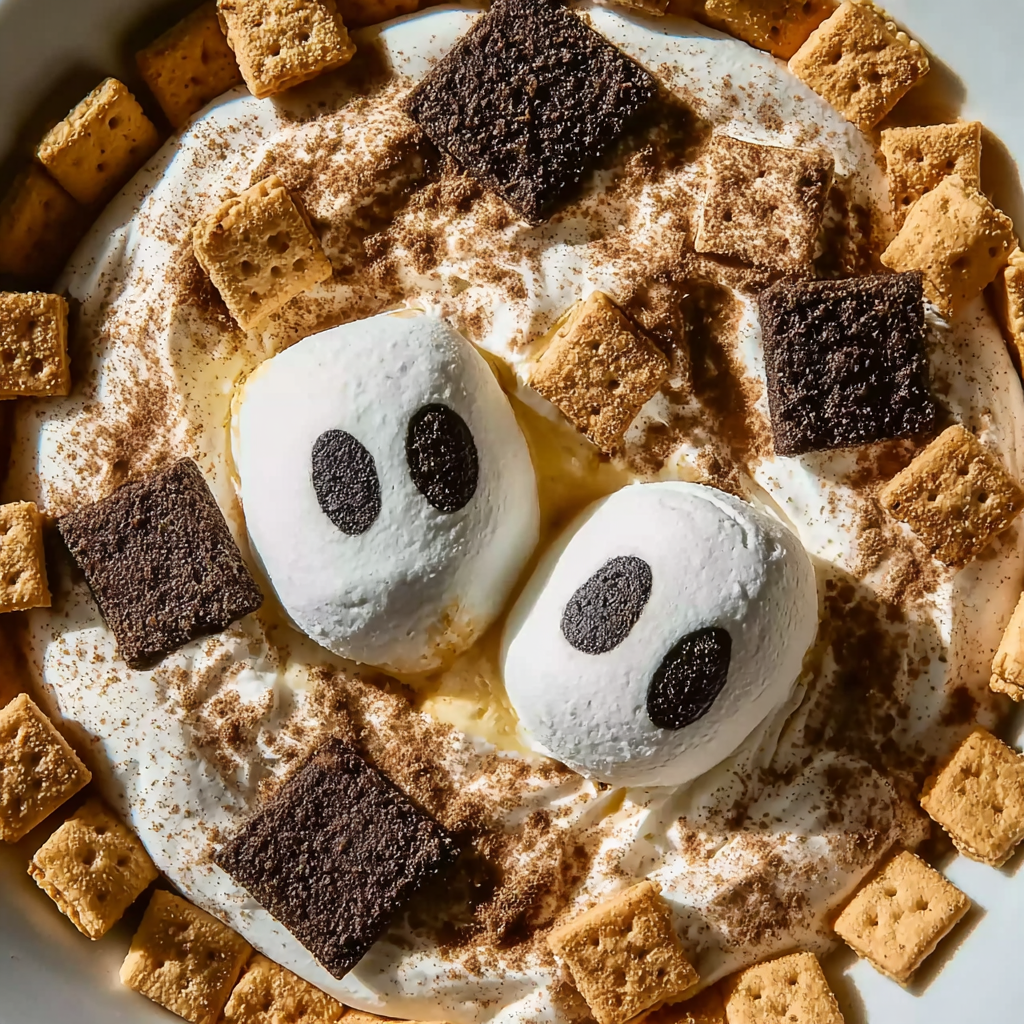
This spooky dessert delivers all the gooey, chocolatey goodness of traditional s’mores without the campfire requirement. Instead of individual treats that take forever to make, you create one spectacular communal dip that everyone gathers around. The visual impact is incredible—those puffy toasted ghost marshmallows with their chocolate chip faces look absolutely adorable bobbing in rich, melted chocolate.
What makes this recipe particularly brilliant is its simplicity. With just three main ingredients and about 20 minutes from start to finish, you can create something that looks professionally crafted. There’s no complicated technique involved, no special skills required, and minimal cleanup afterward. Even kitchen novices can pull this off flawlessly, making it perfect for last-minute party additions.
Beyond the ease of preparation, this dessert is incredibly interactive and fun. Guests love gathering around the skillet, dipping their graham crackers into the warm, melty chocolate, and snagging those toasted marshmallow ghosts. It creates a social centerpiece that encourages conversation and laughter. Plus, the recipe is easily customizable—swap ingredients based on preferences or dietary needs without sacrificing that essential s’mores character.
Ingredients You’ll Need
For the Dip Base
- 1 bag ghost marshmallows – These seasonal treats are the stars of the show; substitute with 4 packages of ghost Peeps if desired
- 2 cups semi-sweet chocolate chips – Creates the rich, melted chocolate layer; milk chocolate works for a sweeter version
- 1 cup heavy cream – Warmed before mixing for the smoothest, most luxurious texture
For Dipping and Decorating
- 1 box graham crackers – The classic s’mores companion; apple slices or pretzels offer delicious variety
- ½ cup mini chocolate chips – Optional decoration for creating adorable eyes and mouths on your ghosts
Equipment Needed
- Oven-safe skillet – Cast iron works beautifully and retains heat wonderfully
- Oven – Preheated to 450°F for quick toasting
Step-by-Step Instructions
Create the Chocolate Base
Begin by warming your heavy cream—this crucial step ensures smooth, silky chocolate without any grainy texture. You can warm it in the microwave for 30-45 seconds or gently heat it in a small saucepan on the stovetop. Meanwhile, pour the semi-sweet chocolate chips into your oven-safe skillet, spreading them evenly across the bottom.
Once your cream is warm (it should feel hot to the touch but not boiling), pour it over the chocolate chips in the skillet. Using a spatula or wooden spoon, stir the mixture continuously until all the chocolate melts completely and combines with the cream. The result should be smooth, glossy, and utterly irresistible. If you encounter stubborn chocolate chunks, place the skillet over low heat on the stovetop for a minute while stirring.
Arrange Your Spooky Ghosts
Now comes the fun part—creating your haunted chocolate landscape! Arrange the ghost marshmallows on top of the melted chocolate, spacing them evenly throughout the skillet. Press them down slightly into the chocolate so they sit securely but don’t submerge completely. You want the ghosts to appear as if they’re floating on a chocolate sea.
Take your mini chocolate chips and carefully place them on each marshmallow to create faces. Two chips for eyes and a few chips arranged in a curved line make perfect ghost expressions. Get creative here—some ghosts can look surprised, others happy, some mischievous. This step is especially fun if you have kids helping, as they love bringing these little ghosts to life.
Toast to Perfection
Preheat your oven to 450°F while you’re arranging the marshmallows—this high temperature ensures quick toasting without overcooking the chocolate base. Once your oven reaches temperature, carefully transfer the skillet to the middle rack. Set a timer for 3-5 minutes and watch closely through the oven window (resist opening the door repeatedly, as this releases heat).
You’ll know they’re ready when the marshmallows puff up beautifully and develop golden-brown toasted edges. Some might develop darker spots, which adds to their rustic charm. The transformation happens quickly at this temperature, so stay vigilant to prevent burning. Remember, you want toasted perfection, not charred disaster.
Serve Immediately for Best Results
The moment those marshmallows achieve golden perfection, carefully remove the skillet from the oven using sturdy oven mitts—it will be extremely hot! Place it on a heat-resistant trivet or cooling rack on your serving table. Arrange graham crackers around the skillet for easy dipping access.
Serve this dip while it’s still warm and the chocolate remains melty and smooth. The contrast between the warm, gooey chocolate and the toasted marshmallows creates pure magic. Encourage guests to scoop up chocolate along with a marshmallow ghost on their graham cracker for the complete s’mores experience.
Serving Suggestions
This Ghost S’mores Dip shines as the centerpiece of your Halloween dessert table. Surround the hot skillet with an assortment of dippers beyond traditional graham crackers. Pretzel rods provide salty-sweet contrast that many guests prefer. Apple slices offer a fresh, crisp alternative that cuts through the richness beautifully. Vanilla wafers, shortbread cookies, or even pound cake cubes all work wonderfully.
Create a festive presentation by setting the skillet on a decorative Halloween platter or board. Arrange orange and black napkins nearby along with small dessert plates for convenience. Battery-operated tea lights scattered around (never real candles near food!) create spooky ambiance. Consider adding plastic spider rings or Halloween confetti around the serving area for extra festive flair.
For larger gatherings, this recipe doubles easily—simply use a larger skillet or make two separate skillets. Stagger their baking times so one stays warm while the other toasts. This ensures your guests always have access to perfectly melty chocolate throughout your party.
Creative Recipe Variations
Chocolate Options
While semi-sweet chocolate provides sophisticated depth, experimenting with different chocolate varieties creates exciting flavor profiles. Milk chocolate delivers sweeter, creamier results that kids especially love. Dark chocolate (70% cacao or higher) offers intense, slightly bitter notes that appeal to adult palates. For the ultimate indulgence, try white chocolate for a completely different aesthetic—those ghosts will appear to float on clouds.
Mix different chocolate types for complexity—combine milk and dark chocolate, or add some white chocolate chips throughout for visual interest. Peanut butter chips create a Reese’s-inspired version that’s absolutely addictive. Butterscotch chips offer caramel-like sweetness that pairs beautifully with the toasted marshmallows.
Marshmallow Alternatives
If you can’t find ghost-shaped marshmallows, regular marshmallows work perfectly well—just use mini marshmallows scattered across the entire surface or regular-sized ones spaced evenly. Ghost Peeps are a fantastic substitute that many people prefer for their stronger vanilla flavor and firmer texture. You can even use regular white marshmallows and draw ghost faces with edible markers before toasting.
For variety, try using flavored marshmallows like strawberry or vanilla bean. Toasted coconut marshmallows add tropical flair. During other seasons, adapt this recipe with themed marshmallows—bunnies for Easter, hearts for Valentine’s Day, or Christmas trees for winter holidays.
Flavor Enhancements
Elevate your dip beyond basic chocolate by adding flavor extracts to the melted chocolate mixture. A teaspoon of peppermint extract creates a refreshing twist. Vanilla extract enhances the overall sweetness. Orange extract pairs beautifully with chocolate for sophisticated Halloween flair. Coffee or espresso powder dissolved in the warm cream adds depth that coffee lovers adore.
Consider layering flavors by drizzling caramel sauce, peanut butter, or Nutella over the chocolate before adding marshmallows. A pinch of sea salt sprinkled over everything before baking balances the sweetness perfectly. For adult gatherings, a tablespoon of bourbon or rum in the chocolate mixture adds warmth and complexity.
Dietary Modifications
Make this dip dairy-free by substituting coconut cream or full-fat canned coconut milk for the heavy cream. Use dairy-free chocolate chips, which are widely available at most grocery stores. Vegan marshmallows exist too, though they’re harder to find—check natural food stores or order online.
For a gluten-free version, simply serve with gluten-free graham crackers or naturally gluten-free dippers like fruit, pretzels made from gluten-free flour, or gluten-free cookies. The dip itself is naturally gluten-free as long as you verify your chocolate chips don’t contain malt flavoring.
Make-Ahead Tips
While this dip tastes best served fresh from the oven, you can prepare components ahead to streamline party-day preparation. Mix the chocolate and cream in your skillet up to two days in advance, then cover and refrigerate. When ready to serve, gently reheat the mixture on the stovetop or in the microwave, stirring until smooth again before proceeding with marshmallow arrangement and toasting.
Decorate your ghost marshmallows with chocolate chip faces several hours ahead and store them in a single layer on a parchment-lined plate at room temperature. This advance preparation saves precious time during your party. When guests arrive, simply arrange the pre-decorated ghosts on your reheated chocolate base and pop everything under the broiler.
For the ultimate convenience, keep all ingredients measured and ready in your pantry. Ghost marshmallows and chocolate chips have excellent shelf life, so stock up when you find them. Having everything prepped means you can whip up this impressive dessert in minutes whenever unexpected guests arrive.
Important Notes
Temperature control is crucial for success with this recipe. Warming the heavy cream before mixing prevents the chocolate from seizing (becoming grainy and clumpy). If your chocolate does seize, don’t panic—add a tablespoon of warm cream at a time while stirring vigorously until it smooths out again.
Watch your marshmallows carefully during toasting. The line between perfectly golden and burnt happens quickly at 450°F. Every oven heats differently, so use the visual cues (puffy marshmallows with golden edges) rather than relying solely on time. Some ovens may require only 3 minutes while others need the full 5 minutes.
Use an oven-safe skillet for this recipe—cast iron is ideal because it distributes heat evenly and retains warmth long after leaving the oven. If you’re unsure whether your skillet is oven-safe, check the manufacturer’s guidelines. Never use non-stick pans with plastic or wooden handles, as these can melt or catch fire at high temperatures.
Storage Tips
While this dip is best enjoyed fresh and warm, leftovers can be stored in an airtight container in the refrigerator for up to three days. The marshmallows will lose their toasted texture and become soft again, but the chocolate base remains delicious. Transfer everything—chocolate and marshmallows—to a storage container once completely cooled.
To reheat leftovers, scoop the desired amount into a microwave-safe bowl and heat in 15-second intervals, stirring between each, until warm and melty again. Alternatively, reheat gently in a small saucepan on the stovetop over low heat, stirring constantly to prevent scorching. The marshmallows won’t regain their toasted appearance, but the flavor remains wonderful.
If you’re planning to serve this dip later the same day, keep it covered at room temperature for up to two hours. Beyond that, refrigerate it for food safety. Reheat as described above when ready to serve. The chocolate will solidify as it cools but returns to creamy perfection with gentle reheating.
Frequently Asked Questions
Can I use a broiler instead of the oven?
Absolutely! Place your skillet on the middle rack and broil on high for 1-2 minutes, watching constantly. The broiler toasts marshmallows even faster than the oven, so stay vigilant to prevent burning. This method works wonderfully when you need results quickly or your oven is otherwise occupied.
What if I can’t find ghost marshmallows?
Regular marshmallows work perfectly—use mini marshmallows scattered across the surface or arrange regular-sized marshmallows in a pattern. You can also draw ghost faces on plain white marshmallows with edible markers or food-safe pens before toasting for a DIY approach that’s surprisingly fun.
Can I make this in the microwave?
Yes, for the chocolate base. Combine chocolate chips and cream in a microwave-safe bowl and heat in 30-second intervals, stirring between each, until smooth. Transfer to a serving dish, add marshmallows, and toast them separately with a kitchen torch for that golden finish. While not identical to the oven method, it produces delicious results.
How do I prevent the chocolate from burning on the bottom?
Avoid placing your skillet directly on the oven’s bottom rack where heat concentrates. Keep it on the middle rack for even heating. Also, remember that the chocolate is already melted before going in the oven—you’re only toasting the marshmallows, not cooking the chocolate further, which is why such a short time works perfectly.
What’s the best way to serve this for a large crowd?
Make multiple skillets or use a larger oven-safe baking dish. You can also transfer the melted chocolate to slow cooker set on warm after toasting the marshmallows, which keeps everything at perfect dipping consistency for hours. Replenish marshmallows as guests devour them throughout your party.
Can I add other toppings to this dip?
Definitely! Before toasting, sprinkle crushed graham crackers, chopped nuts, or toffee bits over the chocolate. After toasting, drizzle with caramel sauce, chocolate syrup, or even marshmallow fluff for extra decadence. Mini M&Ms or Halloween sprinkles add festive color and crunch.
Is there a way to make this less sweet?
Use dark chocolate chips (70% cacao or higher) instead of semi-sweet or milk chocolate. Reduce the amount of chocolate slightly and increase the cream proportionally to maintain the right consistency. You can also add a generous pinch of sea salt to the chocolate mixture, which balances sweetness beautifully.
Can I prepare this in advance and reheat it?
While possible, this dip truly shines when served fresh. The marshmallows lose their appealing toasted texture upon reheating. If you must prepare ahead, make and refrigerate just the chocolate base, then add fresh marshmallows and toast right before serving for optimal results.
What happens if my chocolate gets too thick?
Chocolate naturally thickens as it cools. Simply reheat gently while stirring in a tablespoon or two of warm cream until you achieve the desired consistency again. Keep the skillet warm on a warming tray or over a tea light candle (at a safe distance) if serving for an extended period.
Nutrition Information
Per Serving (based on 8 servings):
- Calories: 230kcal
- Carbohydrates: 30g
- Protein: 3g
- Fat: 12g
- Saturated Fat: 7g
- Polyunsaturated Fat: 1g
- Monounsaturated Fat: 3g
- Cholesterol: 30mg
- Sodium: 150mg
- Potassium: 100mg
- Fiber: 1g
- Sugar: 20g
- Vitamin A: 200IU
- Calcium: 20mg
- Iron: 1mg
This Ghost S’mores Dip proves that Halloween treats don’t have to be complicated to be spectacular. With minimal ingredients, simple preparation, and maximum visual impact, it delivers everything you want in a party dessert—fun, interactive, delicious, and completely Instagram-worthy. Whether you’re hosting a kids’ Halloween bash, an adult costume party, or just want to celebrate the season with something special, this warm, gooey dip creates memories along with satisfying that sweet tooth. Once you serve this at your first gathering, it’ll become a requested tradition year after year.


