Total Time: 1 hour 20 minutes
Yield: 4 servings
Diet: Vegetarian
Introduction
Last Halloween, I was scrambling to come up with a dessert that would be both creepy and kid-friendly for my daughter’s costume party. That’s when inspiration struck—what if I could create something that looked like zombies crawling out of their graves? The result was these absolutely delightful Zombie Pudding Cups, and they were such a hit that kids and adults alike were begging for seconds.
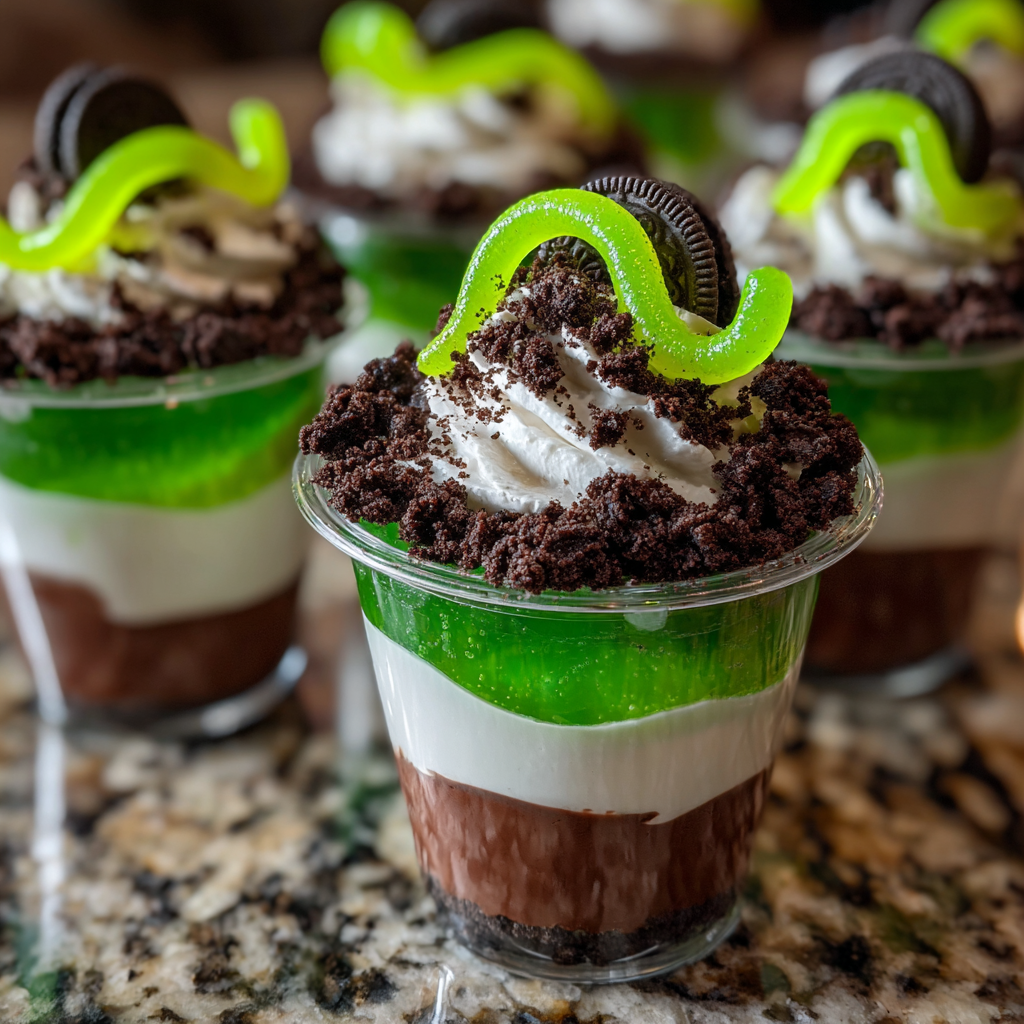
These spooky treats have become my go-to Halloween dessert ever since. They’re wonderfully easy to assemble, require no baking whatsoever, and look absolutely terrifying in the best possible way. The combination of rich chocolate “dirt,” creamy vanilla pudding “corpse filling,” crushed Oreo “graveyard soil,” and vibrant green “zombie slime” creates a dessert that’s as fun to look at as it is to devour. Plus, those gummy worms crawling over the edge? Pure Halloween magic.
Why You’ll Love This Recipe
It’s foolproof and stress-free. There’s no baking involved, which means no worrying about ovens, timers, or things going wrong at the last minute. You simply layer ingredients in cups, and you’re done. This makes it perfect for busy parents or anyone hosting a Halloween party without wanting to spend all day in the kitchen.
Kids absolutely love getting involved. These pudding cups are one of those rare recipes where children can help with almost every step. From crushing Oreos to positioning gummy worms, it’s a fantastic family activity that gets everyone excited about Halloween. My kids now request these every October without fail.
The presentation is seriously impressive. Despite being incredibly simple to make, these cups look like they came straight from a professional Halloween bakery. Your guests will be amazed when you tell them how easy they were to create. The layered effect combined with the creepy-crawly worms creates an instant conversation starter.
They’re budget-friendly and accessible. All the ingredients are readily available at any grocery store, and most are quite affordable. You don’t need any special equipment or hard-to-find items. This means you can whip up a batch for a party without breaking the bank.
Make-ahead convenience saves the day. These cups actually taste better after chilling for a few hours, which means you can prepare them the day before your Halloween event. When party time arrives, you’ll simply grab them from the fridge and watch everyone’s delighted reactions.
Ingredients
- 1 cup chocolate pudding
- 1 cup vanilla pudding
- 1 cup crushed Oreo cookies
- 1 cup gummy worms
- 1 cup green whipped cream
- 4 plastic cups (clear cups work best to show off the layers)
Optional Additions:
- Food coloring for tinting pudding
- Candy eyeballs for extra spookiness
- Crushed graham crackers for texture variation
- Mini chocolate chips for added “dirt” effect
Step-by-Step Instructions
Preparing the Pudding Bases
Step 1: Begin by preparing your chocolate pudding according to the package instructions. Typically, this involves whisking the pudding mix with cold milk for about 2 minutes until it thickens. Pour the mixture into a bowl and set it aside. The pudding will continue to thicken as it sits.
Step 2: Next, prepare the vanilla pudding following the same method. Whisk the vanilla pudding mix with cold milk until smooth and creamy. Place this in a separate bowl. Having both puddings ready before you start assembling makes the layering process much smoother and faster.
Step 3: While the puddings set slightly, crush your Oreo cookies. Place them in a sealed plastic bag and use a rolling pin or the bottom of a heavy glass to crush them into fine crumbs. You want a texture that resembles dirt—some fine crumbs mixed with slightly larger pieces creates the most realistic graveyard effect.
Creating the Green Zombie Slime
Step 4: If you’re using store-bought whipped cream, add green food coloring to achieve that perfect zombie slime appearance. Start with just a few drops and mix thoroughly, adding more until you reach your desired shade of eerie green. Alternatively, you can purchase pre-colored green whipped topping to save time.
Step 5: For the best texture, make sure your whipped cream is well-chilled. If it’s too warm, it might become runny and won’t hold its shape when piped on top of your pudding cups. Keep it refrigerated until you’re ready to use it.
Assembling Your Zombie Pudding Cups
Step 6: Take your clear plastic cups and start with the first layer—the chocolate pudding. Spoon about 1/4 cup of chocolate pudding into the bottom of each cup. This dark layer represents the deep, mysterious earth of a zombie graveyard.
Step 7: Add a generous layer of crushed Oreo cookies on top of the chocolate pudding. Use the back of a spoon to press them down slightly, creating a compact dirt layer. This should be thick enough to create a distinct visual separation between layers.
Step 8: Carefully spoon the vanilla pudding on top of the Oreo layer. Try to create an even layer without disturbing the “dirt” beneath. The vanilla pudding acts as the pale, ghostly middle section that adds visual interest and flavor contrast.
Step 9: Now for the fun part—add a dollop of green whipped cream on top. You can either spoon it on or use a piping bag for a more dramatic, swirled effect. The green color should be vibrant and eye-catching, representing toxic zombie goo or supernatural slime.
Adding the Creepy-Crawly Finishing Touches
Step 10: Drape gummy worms over the edge of each cup, letting them hang down the sides as if they’re crawling out of the zombie grave. Position some worms so they’re partially buried in the green whipped cream, creating the illusion that they’re emerging from the pudding.
Step 11: For extra spookiness, you can add a few more crushed Oreos on top of the green whipped cream to create a “freshly dug” appearance. Sprinkle them lightly so they look like clumps of dirt that have fallen onto the zombie slime.
Step 12: If you’re using candy eyeballs or other decorations, now’s the time to add them. Press them gently into the whipped cream so they peek out eerily. These little touches take your zombie cups from fun to absolutely unforgettable.
Chilling and Serving
Step 13: Cover each cup loosely with plastic wrap, being careful not to smush the whipped cream topping. Place all the cups in the refrigerator and let them chill for at least one hour. This chilling time allows all the layers to set properly and the flavors to meld together.
Step 14: When you’re ready to serve, remove the plastic wrap carefully. If any whipped cream has deflated slightly, you can add a fresh dollop on top. Present your Zombie Pudding Cups on a dark platter or tray for maximum Halloween effect.
Serving Suggestions
These pudding cups are perfect finger food for Halloween parties since each guest gets their own individual serving. Arrange them on a black tablecloth or serving tray decorated with plastic spiders, fake cobwebs, or battery-operated LED candles for an extra spooky presentation.
For a complete Halloween dessert table, pair these zombie cups with other themed treats like ghost-shaped cookies, mummy brownies, or witch hat cupcakes. The variety creates visual interest while giving guests options to satisfy different sweet cravings.
Consider serving these at a kids’ Halloween movie night. They’re mess-free, easy to eat while watching spooky films, and add to the festive atmosphere. Provide small spoons and napkins, though honestly, some kids love eating the gummy worms separately before diving into the pudding layers.
If you’re hosting an adult Halloween gathering, consider setting up a “build your own zombie cup” station. Lay out all the components in separate bowls and let guests create their own versions. It becomes an interactive activity that breaks the ice and gets conversations flowing.
Recipe Variations
Monster Mash Version: Use orange-tinted vanilla pudding instead of regular vanilla to create a pumpkin layer. Add candy corn on top alongside the gummy worms for a more colorful, festive appearance. This version works especially well for younger children who might prefer brighter colors.
Graveyard Scene: Press Milano cookies or rectangular chocolate wafers into the top layer as tombstones. Use black icing to write “RIP” or other spooky messages on them. Position the gummy worms around these edible gravestones for a miniature cemetery effect.
Healthy-ish Zombie Cups: Swap regular pudding for sugar-free varieties and use light whipped topping. Replace some of the Oreo layer with crushed graham crackers mixed with a tiny bit of cocoa powder. You’ll still get that dirt appearance with slightly less sugar.
Bloody Zombie Version: Add a layer of raspberry or strawberry jam between the chocolate and vanilla pudding. This creates a “bloody” layer that adds both visual drama and a fruity flavor contrast. Particularly effective for older kids or adults who appreciate gorier Halloween themes.
Vegan Zombie Treats: Use plant-based pudding mixes prepared with non-dairy milk, vegan Oreos (many varieties are accidentally vegan), and coconut whipped cream tinted green. The result is just as delicious and creepy without any animal products.
Swamp Monster Cups: Add a layer of lime Jell-O between the layers for extra wobbliness and a bright green surprise. Use blue whipped cream on top instead of green to create a swamp water effect. Swedish Fish candy can replace or supplement the gummy worms.
Make-Ahead Tips
These Zombie Pudding Cups are ideal for advance preparation, which is a lifesaver during the busy Halloween season. You can assemble the cups completely up to 24 hours before your event. Simply cover them tightly with plastic wrap and refrigerate until serving time.
If you’re making them even further ahead, prepare all the components separately. Mix the puddings and store them in airtight containers in the refrigerator for up to 3 days. Crush the Oreos and keep them in a sealed bag at room temperature. Prepare the green whipped cream the day before and keep it refrigerated in a piping bag or covered bowl.
For the freshest appearance, add the gummy worms and any candy decorations no more than 4-6 hours before serving. If added too far in advance, the gummy worms can become sticky or start to melt slightly, and their colors might bleed into the whipped cream.
One clever trick is to freeze the gummy worms for about 30 minutes before adding them to the cups. This keeps them firm and prevents them from sinking into the layers too much. Frozen gummy worms maintain their shape better and create that perfect “crawling out” appearance.
Notes
Pudding Preparation Matters: Always use cold milk when preparing instant pudding for the best texture. Warm or room-temperature milk won’t allow the pudding to set properly, resulting in runny layers that won’t hold their shape. Additionally, let the pudding sit for at least 5 minutes after mixing to reach its full thickness.
Clear Cups Are Key: While you can use opaque cups, clear plastic cups showcase all those beautiful layers, making the visual impact much more dramatic. The transparency lets everyone see the “graveyard” effect, which is half the fun of these treats.
Crushed Cookie Consistency: Don’t pulverize your Oreos into a fine powder. You want varied textures—some fine crumbs mixed with small chunks—to create a more realistic dirt appearance. If the cookies are too finely crushed, they’ll look more like cocoa powder than graveyard soil.
Whipped Cream Stability: If you’re making these on a warm day or your kitchen tends to be hot, consider using stabilized whipped cream or a whipped topping like Cool Whip that holds up better at room temperature. Regular whipped cream can deflate or melt if left out too long.
Food Coloring Tips: Gel food coloring creates more vibrant colors than liquid food coloring and won’t thin out your whipped cream as much. Start with a tiny amount and add more gradually until you achieve the perfect zombie-green shade you’re looking for.
Storage Guidelines: These cups will keep in the refrigerator for up to 3 days when properly covered. However, they’re best enjoyed within 24 hours for optimal texture and appearance. The Oreo cookies will gradually soften as they absorb moisture from the pudding.
Serving Temperature: While these can be eaten straight from the fridge, letting them sit at room temperature for about 5-10 minutes before serving enhances the flavors. The pudding becomes slightly softer and creamier, making each bite more enjoyable.
Frequently Asked Questions
Can I make these with homemade pudding instead of instant?
Absolutely! Homemade pudding actually creates an even richer, more delicious result. Just make sure to prepare it several hours ahead so it has time to cool completely and thicken properly. Warm pudding will melt the whipped cream and create a mess, so patience is key when using the from-scratch approach.
What if I can’t find green whipped cream?
No problem at all—simply purchase regular whipped cream or Cool Whip and add green food coloring yourself. Start with 2-3 drops of gel food coloring for every cup of whipped cream, mixing thoroughly. Keep adding drops until you reach your desired shade. Alternatively, stores often carry colored whipped cream around Halloween time.
Are there alternatives to gummy worms?
Definitely! You can use any gummy candy that fits your theme—gummy spiders, snakes, or even insects work wonderfully. Chocolate-covered pretzel sticks can serve as “bones,” and candy eyeballs add a different kind of creepy factor. Let your imagination run wild with whatever Halloween candy you have on hand.
Can I make a large trifle bowl version instead of individual cups?
Yes, this recipe scales up beautifully for a trifle presentation. Use a large glass bowl and follow the same layering technique, multiplying the ingredient quantities as needed. A trifle version creates a stunning centerpiece for your Halloween table, though individual cups are easier for guests to serve themselves.
How do I prevent the layers from mixing together?
The key is patience and a gentle touch. When adding each layer, spoon it carefully over the back of another spoon held close to the surface. This distributes the weight and prevents the new layer from breaking through the one below. Additionally, make sure each pudding layer is thick enough before adding the next component.
My whipped cream deflated. What went wrong?
Whipped cream can deflate if it’s overbeaten, too warm, or if too much liquid food coloring was added. Make sure your whipped cream is cold and stable before tinting it. If using Cool Whip or similar products, they should be kept frozen until ready to use, then thawed in the refrigerator according to package directions.
Can I make these dairy-free for guests with allergies?
Yes! Use dairy-free pudding mixes prepared with almond milk, oat milk, or another plant-based milk. Substitute coconut whipped cream (it whips up beautifully and holds color well) for the regular whipped cream. Many Oreo varieties are surprisingly dairy-free, but always check the label to be certain.
How can I transport these to a party without ruining them?
Place each cup in a cupcake carrier or muffin tin to keep them stable during transport. You can also use a cardboard box with holes cut to hold the cups upright. If possible, add the gummy worm decorations after arriving at your destination to ensure they look fresh and perfectly positioned.
Prep Time: 20 minutes
Chill Time: 1 hour
Total Time: 1 hour 20 minutes
Category: Dessert
Method: No-bake
Cuisine: American
Nutrition Information (per serving):
- Serving Size: 1 cup
- Calories: 250
- Sugar: 18g
- Sodium: 150mg
- Fat: 10g
- Saturated Fat: 5g
- Unsaturated Fat: 3g
- Trans Fat: 0g
- Carbohydrates: 35g
- Fiber: 1g
- Protein: 4g
- Cholesterol: 15mg


