Summer heat waves and broken air conditioning taught me the value of no-bake desserts. One particularly sweltering July afternoon, when the thought of turning on my oven felt unbearable, I created these mini Biscoff cheesecakes out of pure desperation for something sweet and cool. They turned out so incredible that they’ve remained a year-round favorite, even when the oven is perfectly functional.
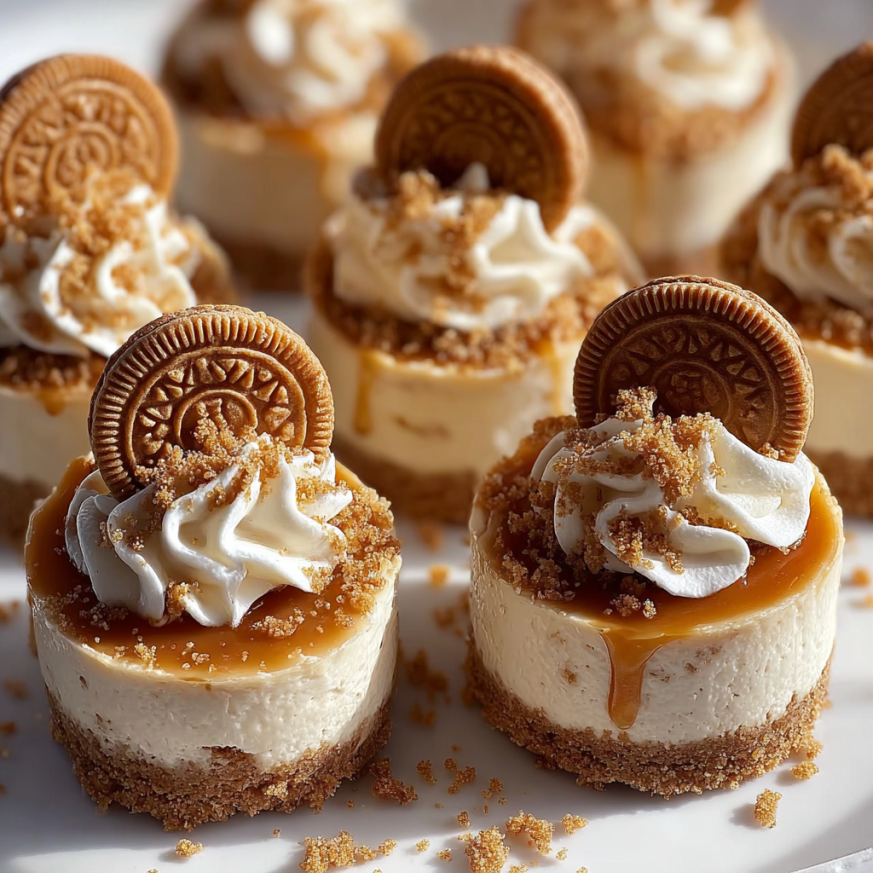
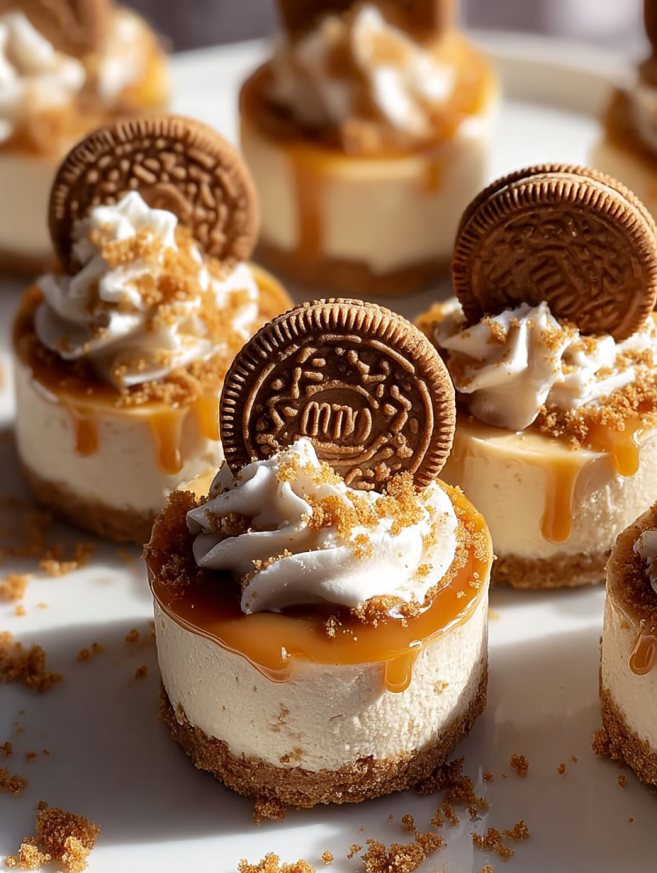
What makes these little beauties so special is their perfect balance of textures and flavors. The buttery Biscoff cookie crust provides a sturdy, spiced foundation. Above it sits a cloud-like cream cheese filling infused with that distinctive caramelized cookie butter flavor. Each bite delivers creamy indulgence with just the right amount of sweetness. Best of all, they look impressively elegant served in individual portions, making them ideal for dinner parties or special occasions.
Why You’ll Love This Recipe
Absolutely no baking required. Your oven can stay off while you create an impressive dessert that rivals anything from a fancy bakery. This makes them perfect for hot summer days, small apartments without ovens, or anytime you want something special without the fuss.
Individual portions mean easy serving. Forget about slicing and plating—these mini cheesecakes are already perfectly portioned. Guests can simply grab one from the tray, and you don’t have to worry about messy cutting or uneven servings.
Make-ahead dessert perfection. These cheesecakes actually require chilling time, which means you can (and should) make them ahead. Prepare them the night before your event, and you’ll have one less thing to stress about when guests arrive.
Beginner-friendly with impressive results. Even if you’ve never made cheesecake before, this recipe is nearly foolproof. There’s no water bath, no risk of cracks, and no worrying about proper baking time. Just mix, chill, and enjoy.
Customizable for any occasion. The basic recipe serves as a blank canvas. Add different toppings, swirl in sauces, or change up the cookie base to match your theme or preferences.
Ingredients You’ll Need
For the Cookie Crust
- 1 cup Biscoff cookies, finely crushed – About 12-14 cookies
- 4 tablespoons unsalted butter, melted – Binds the crumbs together
For the Creamy Filling
- 1 cup cream cheese, softened – Must be at room temperature
- ½ cup powdered sugar – Sweetens without graininess
- 1 teaspoon vanilla extract – Enhances all the flavors
- 1 cup heavy whipping cream – Creates that airy texture
- ½ cup Biscoff spread – The star ingredient
For Garnish
- Extra Biscoff cookies – Whole or broken pieces for decoration
- Whipped cream – Store-bought or homemade
- Optional: Caramel drizzle, chocolate shavings, or crushed cookies
Step-by-Step Instructions
Create the Cookie Crust Base
Begin by crushing your Biscoff cookies into fine crumbs. You can do this in a food processor for the most uniform texture, or place the cookies in a sealed plastic bag and crush them with a rolling pin for a more rustic approach. The crumbs should resemble coarse sand with no large chunks remaining.
Transfer the cookie crumbs to a medium bowl and pour in the melted butter. Stir everything together with a fork until all the crumbs are evenly coated and moistened. The mixture should hold together when pressed—if it feels too dry, add an extra half tablespoon of melted butter.
Divide this mixture evenly among your serving vessels. You can use small cups, ramekins, or a standard muffin tin lined with cupcake liners. Press the crumbs firmly into the bottom of each container using the back of a spoon or a small glass. Creating a compact crust prevents it from crumbling when you eat the cheesecake later.
Place the prepared crusts in the refrigerator while you make the filling. This chilling time helps them firm up and hold their shape better.
Prepare the Cream Cheese Base
In a large mixing bowl, beat the softened cream cheese with an electric mixer on medium speed. Continue beating for about 2-3 minutes until the cream cheese becomes completely smooth, fluffy, and free of any lumps. Scrape down the sides of the bowl periodically to ensure everything gets incorporated.
Gradually add the powdered sugar and vanilla extract to the whipped cream cheese. Beat on medium speed until everything is thoroughly combined and the mixture looks silky. The powdered sugar dissolves more easily than granulated sugar, creating a smooth filling without any grainy texture.
Whip the Heavy Cream
In a separate clean bowl, pour the cold heavy whipping cream. Using clean beaters, whip the cream on medium-high speed. Start slowly to prevent splattering, then increase the speed as the cream begins to thicken.
Continue whipping until the cream forms stiff peaks—this means when you lift the beaters, the cream holds its shape and stands upright rather than drooping. This should take about 3-4 minutes. Be careful not to overwhip, as the cream can become grainy or even turn to butter if beaten too long.
Combine and Add the Biscoff
Gently fold the whipped cream into the cream cheese mixture. Add it in three batches, using a rubber spatula to fold rather than stir. This gentle folding motion preserves the airiness of the whipped cream, resulting in a light, mousse-like texture. Continue folding until you see no more white streaks.
Warm the Biscoff spread in the microwave for about 15-20 seconds until it becomes pourable but not hot. This makes it much easier to incorporate into the filling without creating lumps. Drizzle the warmed Biscoff spread over the cream cheese mixture and gently fold it in until the color is uniform and no streaks remain.
The filling should now be smooth, creamy, and a beautiful caramel color from the Biscoff spread.
Assemble the Mini Cheesecakes
Remove your chilled crusts from the refrigerator. Using a spoon or a piping bag fitted with a large round tip, divide the cheesecake filling evenly among the prepared crusts. Fill each cup almost to the top, leaving just a small space for garnishes.
If you’re using a piping bag, you can create a pretty swirl on top. Otherwise, simply smooth the top with the back of a spoon for a clean, professional appearance.
Chill Until Set
Cover the mini cheesecakes loosely with plastic wrap, being careful not to touch the filling surface. Transfer them to the refrigerator and chill for at least 4 hours. However, for the best texture and flavor, refrigerate them overnight if possible.
During this chilling time, the filling firms up to the perfect consistency—creamy and scoopable but stable enough to hold its shape. The flavors also meld together beautifully as they sit.
Add Final Touches
Just before serving, top each mini cheesecake with a generous dollop of whipped cream. Press a whole Biscoff cookie or a piece of one into the whipped cream at an angle for that bakery-style presentation. You can also sprinkle some crushed cookie crumbs around the edges or drizzle with melted Biscoff spread for extra indulgence.
Serve cold and watch them disappear!
Serving Suggestions
Elegant Dinner Party Dessert: Arrange the mini cheesecakes on a decorative platter with fresh berries scattered around them. The individual portions make serving elegant and easy at formal gatherings.
Coffee Shop Pairing: Serve alongside espresso, cappuccino, or iced coffee. The caramelized flavor of Biscoff complements coffee drinks beautifully, creating a café-worthy experience at home.
Dessert Bar Display: Include these on a dessert table with other finger-friendly sweets like brownies, cookies, and chocolate truffles. The variety allows guests to sample multiple treats.
Seasonal Variations: Top with seasonal fruits—fresh strawberries in summer, caramelized apples in fall, or peppermint bark in winter—to match the occasion.
Gift Presentation: Place each cheesecake in a clear dome container or small gift box for thoughtful homemade gifts that look professionally made.
Recipe Variations
Chocolate Swirl Version
After spreading the filling into the crusts, drizzle melted dark chocolate over the top. Use a toothpick to create decorative swirls. The slight bitterness of dark chocolate balances the sweet Biscoff beautifully.
Salted Caramel Delight
Add a layer of salted caramel sauce between the crust and filling. Additionally, drizzle more caramel on top and finish with a sprinkle of flaky sea salt for a sweet-and-salty masterpiece.
Espresso Enhancement
Mix 1 tablespoon of instant espresso powder into the cream cheese mixture for a coffee-flavored twist. This creates a tiramisu-meets-Biscoff hybrid that coffee lovers will adore.
Berry Topped Beauty
Top each cheesecake with fresh raspberries, blueberries, or sliced strawberries along with the whipped cream. The tartness of fresh berries cuts through the richness perfectly.
Graham Cracker Alternative
Swap the Biscoff cookies in the crust for graham crackers if you prefer a more traditional cheesecake base. You can still use Biscoff spread in the filling for that signature flavor.
Make-Ahead Tips
These mini cheesecakes are the ultimate make-ahead dessert. Prepare them up to 3 days in advance and store them covered in the refrigerator. In fact, they often taste even better on day two as the flavors continue to develop and intensify.
For longer storage, you can freeze the assembled cheesecakes (without the whipped cream and cookie garnish) for up to 2 months. Wrap each one tightly in plastic wrap, then place them in a freezer-safe container. Thaw overnight in the refrigerator before adding the final toppings and serving.
If you’re making these for a party, prepare them the night before and add the whipped cream and cookie garnishes just an hour before guests arrive. This ensures the toppings look fresh and the whipped cream maintains its texture.
The crusts can also be made separately up to a week in advance. Press them into your serving vessels, cover tightly, and refrigerate until you’re ready to make the filling.
Notes
Room temperature cream cheese is crucial. Cold cream cheese creates lumps that are nearly impossible to smooth out, resulting in a grainy filling. Set your cream cheese out at least an hour before starting, or soften it carefully in the microwave using 10-second intervals at 50% power.
Don’t skip the chilling time. While 4 hours is the minimum, overnight chilling produces the best results. The cheesecakes need adequate time to firm up properly, and rushing this step results in filling that’s too soft to hold its shape.
Whipping cream properly matters. Make sure your heavy cream is very cold before whipping—this helps it reach stiff peaks faster. Also, ensure your bowl and beaters are completely clean and dry, as any fat or moisture can prevent proper whipping.
Portion control is flexible. This recipe makes about 8-10 mini cheesecakes depending on the size of your containers. Adjust the amounts accordingly if using larger or smaller vessels.
Warming the Biscoff spread helps. Cold Biscoff spread is thick and difficult to fold into the filling without creating lumps. Warming it slightly makes incorporation much easier and creates a smoother final texture.
Storage considerations. Always cover the cheesecakes when refrigerating to prevent them from absorbing other food odors. If stacking them, place parchment paper between layers to protect the tops.
Frequently Asked Questions
Can I use a different cookie for the crust?
Absolutely! Graham crackers, vanilla wafers, or even Oreos work well. Just maintain the same proportions—1 cup of finely crushed cookies to 4 tablespoons of melted butter. Each cookie type will create a slightly different flavor profile.
What if I don’t have Biscoff spread?
While Biscoff spread is what gives these their signature flavor, you can substitute with peanut butter, almond butter, or even Nutella for a completely different but equally delicious result. Cookie butter from other brands also works well.
Why is my filling too runny?
This usually means the cream cheese wasn’t whipped enough before adding other ingredients, or the whipped cream wasn’t stiff enough. Make sure both components are properly beaten before combining them. Chilling longer also helps firm up a slightly soft filling.
Can I make these dairy-free?
Yes! Use dairy-free cream cheese, coconut cream (chilled overnight and whipped), and dairy-free Biscoff spread. The texture will be slightly different but still delicious. Coconut cream creates a lovely tropical undertone.
How do I get the cheesecakes out of a muffin tin?
Using cupcake liners makes removal incredibly easy—just peel away the paper. If you didn’t use liners, run a thin knife around the edges to loosen them before gently pushing up from the bottom.
Can I make one large cheesecake instead?
Certainly! Use an 8-inch springform pan lined with parchment paper. Press the crust mixture into the bottom, add all the filling, and chill for at least 6 hours or overnight. Release the springform sides before slicing and serving.
What’s the best way to transport these?
Keep them in their muffin tin or transfer to a flat container with a lid. If they’re in cups, arrange them in a box that prevents sliding. Always keep them cold until serving for the best texture.
Difficulty: Beginner
Prep Time: 20 minutes
Chill Time: 4 hours
Total Time: 4 hours 20 minutes
Course: Dessert
Cuisine: American
Servings: 8-10 mini cheesecakes
Keywords: no-bake cheesecake, Biscoff dessert, mini cheesecakes, make-ahead dessert, easy cheesecake recipe
Nutrition (per mini cheesecake):
- Calories: 250 kcal
- Fat: 18g
- Saturated Fat: 11g
- Carbohydrates: 20g
- Sugar: 14g
- Protein: 3g
- Cholesterol: 55mg
- Sodium: 135mg


