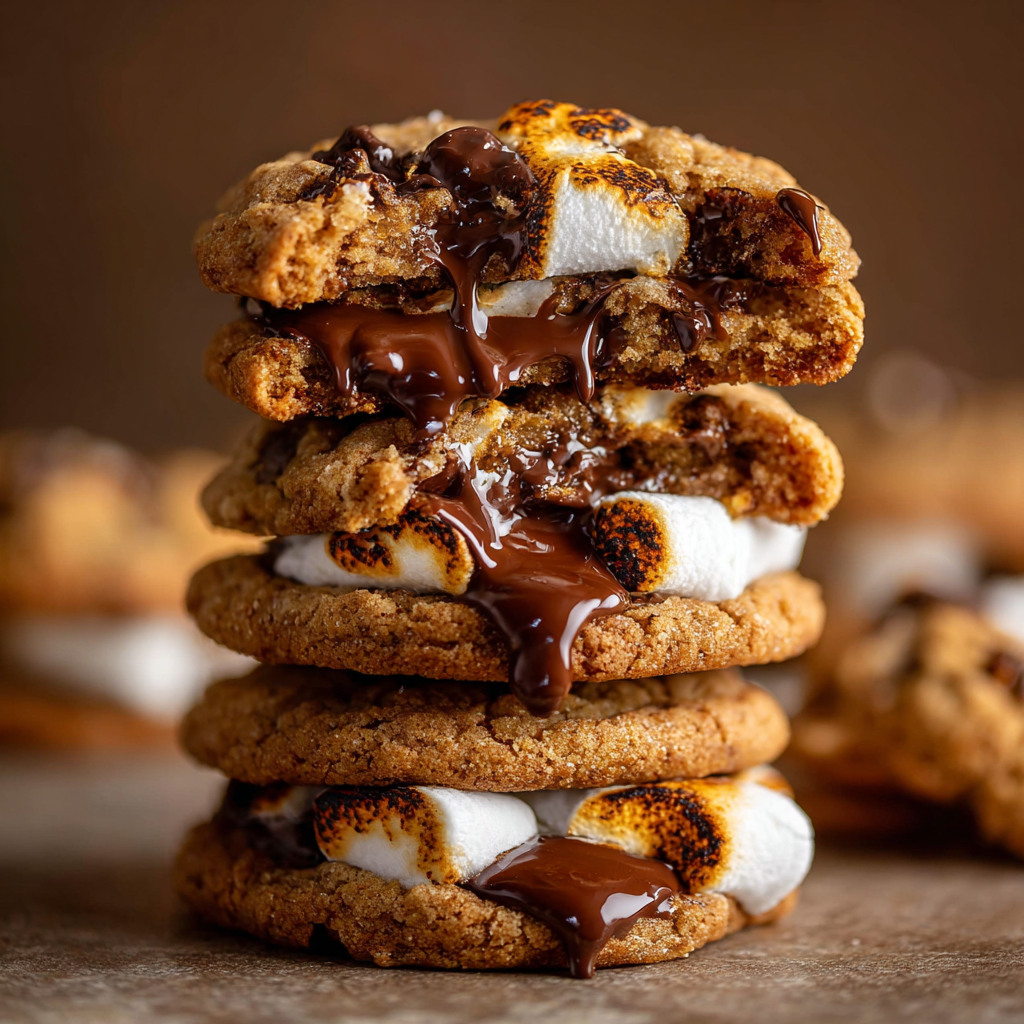
Picture this: the classic campfire s’more meets everything we love about fall baking. These pumpkin s’mores cookies combine the warm spices of pumpkin season with the nostalgic combination of chocolate and marshmallows. The result? Soft, pillowy cookies that taste like autumn wrapped in a cozy blanket.
I stumbled upon this recipe idea during a particularly rainy October weekend when my kids were begging to make s’mores but the weather wasn’t cooperating. With a can of pumpkin puree sitting in my pantry and some leftover marshmallows from our last camping trip, inspiration struck. That first batch disappeared so quickly that I had to make another one the same day! Now, these cookies have become our unofficial start-of-fall tradition, and I’ve made them countless times for school bake sales, Halloween parties, and cozy movie nights.
Why These Cookies Will Become Your New Fall Favorite
They’re incredibly easy to make. Unlike many fall recipes that require multiple steps and complicated techniques, these cookies come together in under 30 minutes from start to finish. There’s no chilling required, no special equipment needed—just mix, scoop, and bake. Even beginner bakers will feel confident making these.
The texture is absolutely perfect. Thanks to the pumpkin puree, these cookies stay soft and cake-like for days. They’re never dry or crumbly, and each bite delivers that satisfying chewiness we all crave in a good cookie. Meanwhile, the melted chocolate chips and gooey marshmallows create pockets of sweetness throughout.
Everyone loves them. I’ve served these to picky kids, health-conscious adults, and serious cookie connoisseurs—everyone asks for the recipe. The familiar s’mores flavor combined with subtle pumpkin spice creates something both comforting and exciting. Plus, they look absolutely adorable with those toasted marshmallow tops!
They’re naturally lower in fat. Because pumpkin puree adds moisture, we can use less butter than traditional cookies without sacrificing texture. This makes them a bit lighter while still being completely satisfying. You can enjoy one (or two!) without the usual cookie guilt.
The aroma is intoxicating. When these bake, your entire house will smell like fall. That combination of cinnamon, nutmeg, chocolate, and toasted marshmallow is better than any candle you could buy. Honestly, I sometimes make these just for the amazing scent that fills my kitchen!
Gathering Your Ingredients
The Base Components
1 cup pumpkin puree – Make sure you’re using pure pumpkin puree, not pumpkin pie filling! The filling contains added sugars and spices that will throw off the recipe. I always keep a few cans in my pantry during fall because we go through them so quickly.
½ cup brown sugar – Packed brown sugar adds moisture and a deeper, almost caramel-like sweetness that pairs beautifully with pumpkin.
½ cup granulated sugar – This balances the brown sugar and helps create that slightly crispy exterior we want.
½ cup unsalted butter, softened – Leave your butter on the counter for about an hour before baking so it’s perfectly soft. It should leave an indent when you press it but still hold its shape.
1 large egg – This binds everything together and adds richness. Room temperature eggs incorporate more easily into the batter.
The Dry Ingredients
2 cups all-purpose flour – The foundation of our cookies, providing structure without making them too dense.
1 teaspoon baking soda – Creates lift and helps achieve that perfect soft texture.
1 teaspoon ground cinnamon – The quintessential fall spice that makes these cookies smell amazing.
½ teaspoon ground nutmeg – Adds warmth and complexity to the spice profile.
¼ teaspoon ground ginger – Provides a subtle spicy kick that enhances the other flavors.
½ teaspoon salt – Essential for balancing sweetness and bringing out all the other flavors.
The Fun Stuff
1 cup chocolate chips – I prefer semi-sweet, but milk chocolate works wonderfully if you like things sweeter. Dark chocolate creates a more sophisticated flavor profile.
1 cup mini marshmallows – Mini marshmallows distribute more evenly throughout the cookies than regular-sized ones. They get beautifully toasted on top and create those signature s’mores vibes.
Step-by-Step Baking Instructions
Setting Up for Success
Before you start mixing, preheat your oven to 350°F (175°C). This ensures your oven reaches the proper temperature by the time your dough is ready. While the oven heats, line your baking sheets with parchment paper. This prevents sticking and makes cleanup incredibly easy.
Position your oven rack in the center position for the most even baking. If you’re planning to bake multiple sheets, you can use two racks, but you’ll need to rotate the sheets halfway through for uniform browning.
Creating the Wet Mixture
In a large mixing bowl, combine the pumpkin puree, brown sugar, granulated sugar, and softened butter. Using an electric mixer on medium speed (or a sturdy wooden spoon and some elbow grease), cream these ingredients together until the mixture is smooth and fluffy. This should take about 2-3 minutes with a mixer.
The mixture might look a bit curdled at first because of the pumpkin’s texture, but keep mixing until everything comes together in a uniform, creamy consistency. Scrape down the sides of the bowl halfway through to ensure everything incorporates evenly.
Once your sugar mixture is smooth, crack in the egg and mix again until it’s completely incorporated. The batter should become lighter in color and very smooth. Beat for another 30 seconds to ensure the egg is fully distributed throughout.
Combining the Dry Ingredients
In a separate medium bowl, whisk together the flour, baking soda, cinnamon, nutmeg, ginger, and salt. Whisking these dry ingredients together first ensures that your leavening agent and spices are evenly distributed throughout the flour. This prevents pockets of spice or uneven rising.
Take a moment to inhale that amazing spice mixture—it’s a preview of how incredible your cookies will smell while baking! This is also a good time to make sure you haven’t accidentally grabbed pumpkin pie spice instead of individual spices (unless you meant to, which is totally fine!).
Bringing It All Together
Gradually add your dry ingredient mixture to the wet ingredients, mixing on low speed or stirring gently by hand. Add the flour mixture in three separate additions rather than all at once. This prevents flour clouds in your kitchen and ensures better incorporation without overmixing.
Mix until the ingredients are just barely combined—you should see no dry flour patches, but don’t mix beyond that point. Overmixing develops gluten, which can make your cookies tough instead of tender. The dough will be quite thick and slightly sticky.
Now for the best part! Fold in the chocolate chips and mini marshmallows using a spatula or wooden spoon. Stir gently until they’re evenly distributed throughout the dough. Some marshmallows might stick to your spoon—that’s completely normal and actually quite fun.
Shaping and Baking
Using a cookie scoop or spoon, drop rounded tablespoons of dough onto your prepared baking sheets. Space them about 2 inches apart to allow for spreading. These cookies don’t spread dramatically, but they do need a bit of room to expand.
If you want uniformly sized cookies, a 2-tablespoon cookie scoop is your best friend. However, if you’re just scooping by hand, try to keep them roughly the same size so they bake evenly. Don’t worry too much about making them perfectly round—rustic-looking cookies have their own charm!
Slide your baking sheet into the preheated oven and bake for 10-12 minutes. You’re looking for edges that are lightly golden while the centers still look slightly soft. They might seem underdone when you pull them out, but remember—they’ll continue cooking on the hot baking sheet after removal.
The marshmallows on top should be lightly toasted with golden-brown spots. If you want extra toasty marshmallows, you can pop the cookies under the broiler for 30-60 seconds at the very end, but watch them carefully so they don’t burn!
Cooling Properly
Let the cookies rest on the baking sheet for about 5 minutes after removing them from the oven. During this time, they’ll firm up just enough to transfer without breaking. Moving them too soon can cause them to fall apart since they’re so soft and tender.
After 5 minutes, carefully transfer the cookies to a wire cooling rack using a thin spatula. Allow them to cool completely before storing, or grab one while it’s still warm for the ultimate gooey experience. That first warm cookie with melted chocolate and soft marshmallows is absolutely worth breaking your own “let them cool” rule!
Serving Suggestions and Presentation Ideas
These pumpkin s’mores cookies are delightful on their own, but there are several ways to make them even more special. Serve them warm with a tall glass of cold milk for the classic cookie experience. The temperature contrast enhances all the flavors and makes the chocolate extra melty.
For a dessert plate, serve two cookies alongside a scoop of vanilla ice cream and drizzle with caramel sauce. The cold ice cream against the warm cookie creates an incredible textural experience. You could also crumble one of these cookies over the ice cream for a deconstructed approach.
Create a fall cookie platter by arranging these alongside other autumn favorites like snickerdoodles and oatmeal raisin cookies. Add some decorative fall leaves or mini pumpkins around the edges for a festive presentation. These always become the star of any cookie assortment!
For parties, set up a cookie decorating station with extra mini marshmallows, chocolate chips, and caramel drizzle. Let guests customize their cookies with additional toppings. Kids especially love this interactive element, and it makes for great entertainment at Halloween gatherings.
Pair these cookies with hot apple cider, pumpkin spice lattes, or hot chocolate for the ultimate fall treat experience. The warm spices in the cookies complement these beverages perfectly. On chilly evenings, this combination is absolute comfort in cookie form.
Creative Variations to Explore
S’mores Overload Version
Want to amplify the s’mores experience? Add ½ cup of crushed graham crackers to the dough along with the chocolate chips and marshmallows. This brings in that authentic s’mores flavor and adds a pleasant crunch. You can also sprinkle some graham cracker crumbs on top before baking for extra visual appeal.
Pumpkin Pie Spice Shortcut
If you have pumpkin pie spice in your pantry, you can replace the individual spices (cinnamon, nutmeg, and ginger) with 1¾ teaspoons of pumpkin pie spice. This simplifies the ingredient list and still delivers that warm, cozy flavor we’re after. I keep both options available because sometimes I prefer the control of individual spices, but the premixed version is perfect for busy baking days.
White Chocolate Autumn Twist
Swap the regular chocolate chips for white chocolate chips to create a sweeter, more delicate flavor profile. White chocolate pairs beautifully with pumpkin and creates a lovely visual contrast against the orange-hued cookies. For extra elegance, drizzle melted white chocolate over the cooled cookies.
Nutty Upgrade
Fold in ½ cup of chopped pecans or walnuts along with the chocolate chips and marshmallows. The nuts add crunch and a sophisticated element that adults particularly appreciate. Toasted pecans work especially well, bringing out their natural sweetness and creating an amazing aroma.
Salted Caramel Drizzle
After the cookies have cooled completely, drizzle them with salted caramel sauce and sprinkle with flaky sea salt. This takes them from delicious to absolutely decadent. The sweet-salty combination elevates these cookies to bakery-worthy status.
Chocolate Lover’s Dream
Double the chocolate by using 1½ cups of chocolate chips and adding 2 tablespoons of cocoa powder to the dry ingredients. This creates an intensely chocolatey cookie that still maintains its pumpkin character. For even more chocolate indulgence, sandwich two cookies together with chocolate buttercream in the middle.
Make-Ahead and Storage Solutions
Preparing Components in Advance
The dry ingredient mixture can be whisked together and stored in an airtight container at room temperature for up to 2 weeks. When you’re ready to bake, simply cream your wet ingredients and add the pre-mixed dry ingredients. This is fantastic for busy weeknights when you want fresh cookies without all the measuring.
You can also prepare the entire dough up to 24 hours in advance. Cover it tightly with plastic wrap and refrigerate. When ready to bake, let the dough sit at room temperature for about 15 minutes to soften slightly before scooping. Cold dough is actually easier to work with and creates cookies with slightly thicker centers.
Freezing Unbaked Dough
Scoop the dough into cookie-sized portions and place them on a parchment-lined baking sheet. Freeze until solid (about 2 hours), then transfer the frozen dough balls to a freezer-safe bag or container. These will keep for up to 3 months in the freezer.
When you’re ready to bake, there’s no need to thaw! Simply place the frozen dough balls on your baking sheet and add 2-3 extra minutes to the baking time. This method means you can have fresh-baked cookies whenever the craving strikes, which is honestly one of the best things ever.
Storing Baked Cookies
Once completely cooled, store your pumpkin s’mores cookies in an airtight container at room temperature. They’ll stay fresh and soft for up to one week. Place a piece of bread in the container with the cookies—this old baker’s trick helps maintain moisture and keeps them extra soft.
If your cookies start to dry out slightly after a few days, pop one in the microwave for 10-15 seconds to revive it. The marshmallows will get gooey again, and the cookie will taste freshly baked. This trick makes even day-old cookies taste amazing!
Long-Term Freezing
For longer storage, freeze baked cookies in an airtight container or freezer bag for up to 3 months. Layer them with parchment paper to prevent sticking. When you want to enjoy one, simply thaw at room temperature for about 30 minutes, or warm in a 300°F oven for 5 minutes to restore that just-baked texture.
Freezing is perfect for making large batches during pumpkin season to enjoy throughout the year. I’ve been known to pull these out in January when I’m missing fall, and they taste just as good as the day I made them!
Essential Tips and Notes
Understanding Pumpkin Puree
Always use 100% pure pumpkin puree for this recipe, not pumpkin pie filling. The pie filling contains added sugars, spices, and other ingredients that will make your cookies overly sweet and throw off the texture. Check the ingredient list—it should only say “pumpkin.”
If your pumpkin puree seems particularly watery (this can happen with some brands), place it in a fine-mesh strainer over a bowl for 30 minutes before using. This removes excess moisture that could make your cookies too soft or cause them to spread too much during baking.
Achieving the Perfect Texture
These cookies should be soft and cake-like, not crispy. If you prefer a slightly crisper edge, bake them for an additional 1-2 minutes. However, be careful not to overbake, as they can quickly go from perfectly soft to dry. Remember, they continue cooking on the baking sheet after you remove them from the oven.
The key to maintaining that soft texture is proper storage. Always make sure cookies are completely cool before storing, and keep them in an airtight container. Any exposure to air will cause them to dry out more quickly.
Marshmallow Melting Concerns
Some of your mini marshmallows will melt during baking, and that’s completely normal and delicious! The melted marshmallows create gooey pockets throughout the cookies that are reminiscent of toasted s’mores. If you want more visible marshmallow pieces, press a few extra mini marshmallows onto the tops of the cookies right before baking.
For maximum visual impact, reserve some marshmallows and press them onto the cookie tops about 2 minutes before the cookies are done. This gives them just enough time to toast on top without completely melting into the cookie.
Spice Customization
Feel free to adjust the spices to your personal preference. If you love ginger, increase it to ½ teaspoon. Not a fan of nutmeg? Reduce it or leave it out entirely. Some people like adding a pinch of cloves or allspice for extra depth. Baking should be flexible and fun, so don’t be afraid to make these cookies your own!
For a more pronounced pumpkin spice flavor, increase the cinnamon to 1½ teaspoons. Cinnamon is the dominant spice in most pumpkin recipes, so boosting it a bit can really amplify that cozy fall feeling.
Ingredient Substitutions
If you need to make these cookies dairy-free, substitute the butter with vegan butter or coconut oil (measured solid). The texture will be slightly different but still delicious. For egg-free cookies, use a flax egg (1 tablespoon ground flaxseed mixed with 3 tablespoons water, left to sit for 5 minutes).
While I haven’t tested gluten-free flour with this recipe, a 1:1 gluten-free baking blend should work. Look for one that contains xanthan gum for the best results. You may need to add an extra tablespoon or two of flour if the dough seems too soft.
Frequently Asked Questions
Can I use fresh pumpkin instead of canned?
Yes, you can! Roast a sugar pumpkin, scoop out the flesh, and puree it in a food processor or blender until completely smooth. However, homemade pumpkin puree tends to be wetter than canned, so you may need to strain it first to remove excess moisture. Many bakers actually prefer canned pumpkin for its consistency and convenience.
Why are my cookies too soft or falling apart?
This usually happens when there’s too much moisture in the dough. Make sure you’re measuring your pumpkin puree correctly (pack it into the measuring cup), and ensure your butter is softened but not melted. If you live in a humid climate, you might need to add an extra 2-3 tablespoons of flour to compensate for the moisture in the air.
Can I make these cookies larger or smaller?
Absolutely! For larger cookies, use a 3-tablespoon scoop and increase the baking time by 2-3 minutes. For mini cookies, use a 1-tablespoon scoop and reduce baking time to 8-9 minutes. Just remember to adjust the spacing on your baking sheet accordingly, and keep an eye on them since baking times will vary.
Do these cookies taste strongly of pumpkin?
Not overwhelmingly so! The pumpkin provides moisture and a subtle flavor that’s more about the overall experience than a strong pumpkin taste. The spices and chocolate are the dominant flavors, with pumpkin playing a supporting role. If you want more pumpkin flavor, add ½ teaspoon of vanilla extract or increase the cinnamon slightly.
Can I use regular-sized marshmallows?
You can, but you’ll need to cut them into smaller pieces first. Mini marshmallows work better because they distribute more evenly throughout the cookies. If you only have regular marshmallows, use about 1½ cups and cut each one into quarters with kitchen scissors sprayed with cooking spray to prevent sticking.
Why did my marshmallows completely disappear?
If your marshmallows completely melted into the cookies, your oven temperature might be running hot. Use an oven thermometer to verify the actual temperature. Additionally, make sure you’re not overbaking—the cookies should come out when the edges are just set and the centers still look slightly soft.
How can I make these cookies more visually appealing?
Press extra chocolate chips and mini marshmallows onto the tops of the cookies right before baking. This creates a more professional bakery look. You can also drizzle melted chocolate over cooled cookies or dust them with powdered sugar for a pretty presentation.
Can I add other mix-ins to these cookies?
Definitely! Toffee bits, butterscotch chips, dried cranberries, or chopped pretzels would all be delicious additions. Just keep the total amount of mix-ins to about 2 cups so the cookies don’t become too loaded and fall apart. Feel free to get creative with your favorite flavor combinations!
Are these cookies good for shipping or gifting?
Yes! These cookies are sturdy enough to ship if packed properly. Place them in an airtight container with parchment paper between layers, then cushion the container well in a shipping box with bubble wrap or packing paper. They hold up beautifully and make a wonderful homemade gift, especially during the fall season.
What’s the best way to reheat these cookies?
Microwave individual cookies for 10-15 seconds for a quick warm-up, or reheat several cookies in a 300°F oven for 5-7 minutes. The oven method is better for maintaining texture, while the microwave is faster and makes the marshmallows extra gooey. Either way, warmed cookies taste almost as good as fresh-baked ones!
Nutrition Information (per cookie):
Serving Size: 1 cookie
Calories: 150 | Sugar: 10g | Sodium: 80mg | Fat: 6g | Saturated Fat: 4g | Unsaturated Fat: 2g | Trans Fat: 0g | Carbohydrates: 22g | Fiber: 1g | Protein: 2g | Cholesterol: 20mg
Prep Time: 15 minutes
Cook Time: 12 minutes
Total Time: 27 minutes
Yield: 24 cookies
Category: Dessert
Method: Baking
Cuisine: American
Diet: Vegetarian


