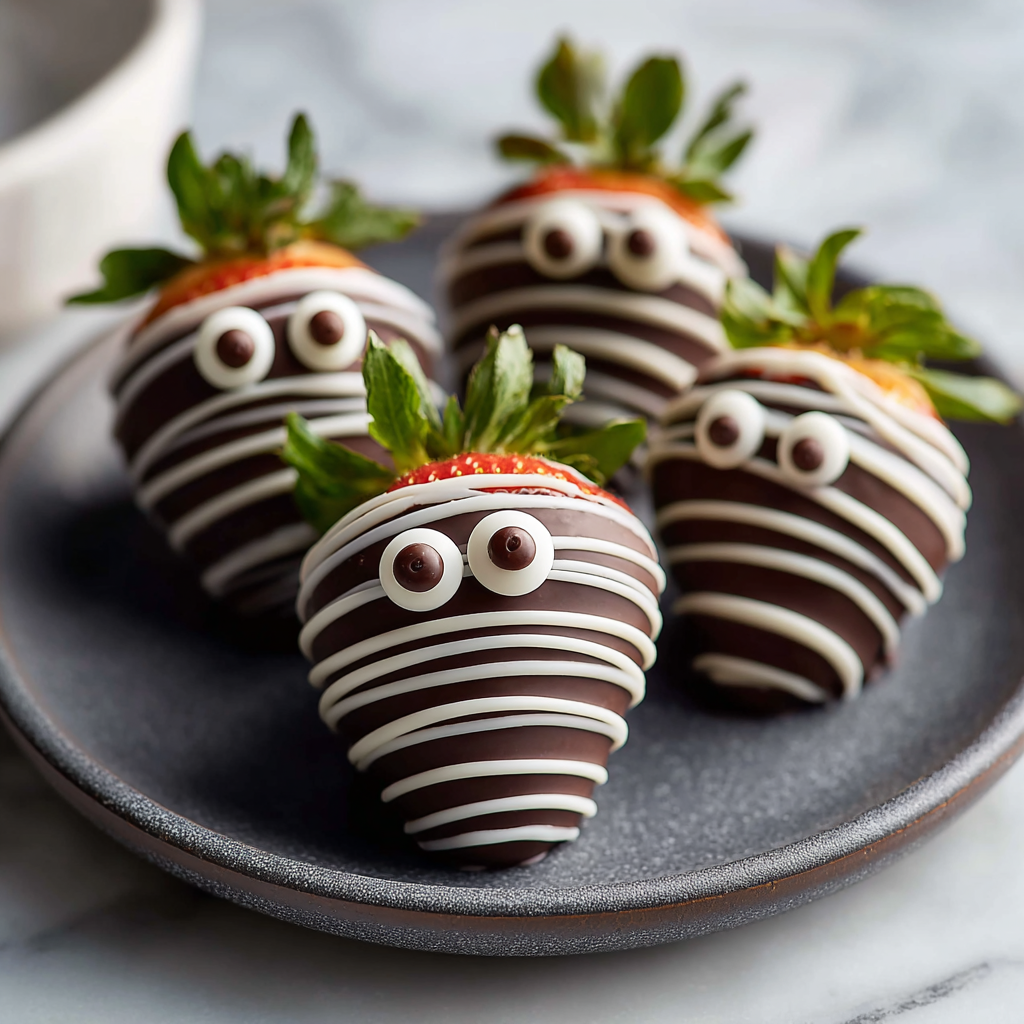
Last Halloween, I volunteered to bring treats to my nephew’s classroom party, and I knew I needed something that looked impressive but wouldn’t require hours of work. These Mummy Chocolate-Covered Strawberries turned out to be the perfect solution. The kids went absolutely wild for them, and several parents quietly asked me for the recipe before the party even ended. What I loved most was watching the children’s faces light up when they spotted those googly candy eyes peeking out from beneath the white chocolate “bandages.”
These adorable treats combine the natural sweetness of fresh strawberries with rich, decadent chocolate in a way that feels both festive and surprisingly elegant. Unlike many Halloween treats that rely on artificial colors and flavors, these strawberries offer a more sophisticated option that appeals to both kids and adults. Plus, they’re incredibly easy to customize and can be made in under 30 minutes from start to finish.
Prep Time: 20 minutes
Setting Time: 10 minutes
Total Time: 30 minutes
Yield: 20 strawberries
Category: Dessert, Snack
Method: Dipping, Decorating
Cuisine: American
Diet: Vegetarian, Gluten-Free
Why You’ll Love These Halloween Strawberries
Quick and Easy Assembly
With only 30 minutes from start to finish, these treats are perfect for last-minute party preparations or when you’re short on time. There’s no baking involved, no complicated techniques to master, and minimal cleanup afterward. Even complete beginners can achieve professional-looking results on their first try.
Kid-Friendly Fun
Children absolutely adore these playful mummy strawberries, making them ideal for classroom parties, trick-or-treat alternatives, or family Halloween gatherings. The candy eyes add an element of whimsy that makes eating fruit feel like a special treat rather than a healthy snack.
Healthier Halloween Option
While most Halloween candy is loaded with artificial ingredients and refined sugar, these strawberries offer actual nutritional value. You’re getting vitamin C, antioxidants, and fiber along with the chocolate coating, making them a dessert you can feel reasonably good about serving.
Crowd-Pleasing Presentation
These mummy strawberries look incredibly impressive on any dessert table, yet they require minimal artistic skill to create. The drizzled white chocolate naturally creates that wrapped bandage effect without requiring any special piping techniques or steady hand.
Ingredients You’ll Need
Main Components:
- 20 fresh strawberries – Choose medium to large berries that are firm, bright red, and free from soft spots; uniform sizes create the most visually appealing presentation
- 1 cup dark or semisweet chocolate chips – Provides the rich base layer; melting wafers work even better as they’re formulated specifically for dipping
- 1 cup white chocolate chips – Creates those iconic mummy bandages; again, melting wafers are ideal for smooth, streak-free results
- 40 candy eyes – Two per strawberry; find these in the baking aisle or craft stores during Halloween season
- 1 teaspoon coconut oil or vegetable shortening (optional) – Thins the chocolate slightly for easier dipping and creates a glossier finish
Equipment Needed:
- Baking sheet
- Parchment paper or silicone baking mat
- Two microwave-safe bowls
- Small piping bag or zip-top plastic bag
- Paper towels
- Toothpicks (helpful for adjusting eyes)
Step-by-Step Instructions
Preparing Your Strawberries
Step 1: Wash and Dry Thoroughly
Begin by rinsing your strawberries under cool running water, handling them gently to avoid bruising. This step is crucial: pat each strawberry completely dry using paper towels, paying special attention to the area around the leaves. Any lingering moisture will cause your chocolate to seize and become grainy, ruining the smooth coating you’re aiming for.
Step 2: Set Up Your Workspace
Line a baking sheet with parchment paper or a silicone baking mat. This prevents the chocolate-covered strawberries from sticking and makes cleanup effortless. Arrange your candy eyes nearby so they’re within easy reach when you need them – timing matters when working with chocolate!
Creating the Chocolate Base
Step 3: Melt the Dark Chocolate
Place your dark chocolate chips in a microwave-safe bowl. Microwave in 20-30 second intervals, stirring thoroughly after each burst of heat. This gradual approach prevents the chocolate from scorching or developing a grainy texture. Continue until the chocolate flows smoothly off your spoon. If desired, stir in the coconut oil at this point for an extra-silky consistency that’s easier to work with.
Step 4: Dip Each Strawberry
Hold a strawberry by its green leaves and dip it into the melted dark chocolate at an angle, submerging about three-quarters of the berry. Gently rotate the strawberry to ensure even coverage, then lift it out slowly. Give it a gentle shake to remove excess chocolate – this prevents pooling at the bottom and creates a cleaner look.
Step 5: Place on Prepared Sheet
Set each chocolate-dipped strawberry on your parchment-lined baking sheet, leaving about an inch of space between berries. Work relatively quickly so the chocolate doesn’t set before you add the eyes.
Adding the Mummy Features
Step 6: Apply the Candy Eyes
While the dark chocolate is still wet and tacky, gently press two candy eyes onto each strawberry. Position them where you want the “face” to appear, typically in the upper third of the chocolate coating. The chocolate acts as edible glue, holding the eyes in place as it sets. If an eye shifts, use a clean toothpick to nudge it back into position.
Step 7: Let the Base Set
Allow the dark chocolate to harden completely before moving to the next step. This typically takes 10-15 minutes at room temperature, or you can speed up the process by refrigerating them for about 5 minutes. The chocolate should be firm to the touch and no longer shiny.
Creating the Mummy Bandages
Step 8: Melt the White Chocolate
Using a clean, dry microwave-safe bowl, melt the white chocolate chips using the same technique as the dark chocolate. Stir in intervals until completely smooth and fluid. White chocolate is more temperamental than dark, so take extra care not to overheat it.
Step 9: Prepare Your Piping Tool
Transfer the melted white chocolate to a piping bag or a heavy-duty zip-top bag. If using a plastic bag, snip off a tiny corner – start smaller than you think you need, as you can always make the hole bigger if needed. A smaller opening gives you more control over your drizzle pattern.
Step 10: Drizzle the Bandages
Working with one strawberry at a time, drizzle the white chocolate back and forth across the berry in random, crisscrossing patterns. This creates the appearance of wrapped mummy bandages. Vary the spacing and direction of your drizzles for a more authentic, wrapped look. Be careful to leave the candy eyes visible – they’re the focal point that brings your mummies to life!
Step 11: Final Setting
Once all strawberries are decorated, allow them to sit at room temperature until the white chocolate hardens completely. Alternatively, refrigerate them for 10 minutes to set quickly. The white chocolate should be firm and matte when ready.
Serving Suggestions
Display Ideas
Arrange these mummy strawberries on a black or orange platter to enhance the Halloween theme. For extra impact, scatter plastic spiders, fake cobwebs, or autumn leaves around the base of your display. A tiered serving stand creates visual interest and makes the strawberries easier for guests to grab.
Party Presentation
For a more elaborate presentation, stand each strawberry upright in small shot glasses or mini cauldrons filled with black sugar or chocolate cookie crumbs. This creates individual servings that look spectacular and keep the chocolate from touching other items on your dessert table.
Timing for Events
Serve these strawberries the same day you make them for optimal freshness. The strawberries remain juicy and the chocolate stays crisp when consumed within 12 hours. If preparing for an evening party, make them in the afternoon so they’re at peak quality.
Pairing Suggestions
These chocolate-covered strawberries pair beautifully with hot apple cider, warm chai tea, or even champagne for adult gatherings. For kids’ parties, serve them alongside orange juice or Halloween-themed punch.
Creative Recipe Variations
Monster Strawberries
Instead of mummy wraps, use green-tinted white chocolate for Frankenstein monsters. Add chocolate chip “hair” and draw stitches with black edible marker. Use candy eyes and a small piece of candy corn for the mouth bolts.
Vampire Strawberries
Dip strawberries in dark chocolate and add two white chocolate chips as fangs once the chocolate sets. Use red food coloring to create “blood” drips and add googly eyes for a vampiric look.
Ghost Strawberries
Cover strawberries entirely in white chocolate, leaving no red showing. Add candy eyes and use melted dark chocolate to pipe on a wavy ghost mouth. These look adorably spooky when displayed upside-down!
Witch Hat Strawberries
Dip strawberries in dark chocolate and top each one with a chocolate cookie (like a Fudge Stripe cookie) to create a witch’s hat. Add a small ribbon of orange frosting as the hat band.
Spider Strawberries
After coating in dark chocolate, add candy eyes and use black licorice strings or chocolate-covered pretzel sticks as legs. Arrange four on each side for authentic spider anatomy.
Glittery Mummies
Before the white chocolate sets completely, dust the bandages with edible gold or silver glitter for a glamorous twist on the classic mummy look. This adds sparkle without overwhelming the design.
Make-Ahead and Storage Tips
Advance Preparation
These strawberries are best made the day you plan to serve them, but you can prepare them up to 24 hours in advance if necessary. The chocolate coating protects the strawberries from oxidizing and turning brown, keeping them looking fresh and appetizing.
Proper Storage
Store your mummy strawberries in a single layer in an airtight container in the refrigerator. Place parchment paper between layers if you need to stack them. The cool temperature keeps the chocolate firm and the strawberries fresh, though you should bring them to room temperature before serving for the best flavor.
Avoiding Condensation
When removing strawberries from the refrigerator, let them sit covered at room temperature for 10-15 minutes before unveiling them. This prevents condensation from forming on the chocolate, which can create an unappealing cloudy appearance and make the chocolate surface sticky.
Freezing Considerations
While technically possible to freeze chocolate-covered strawberries for up to 2 months, I don’t recommend it for these decorated ones. The candy eyes may fall off during thawing, and the strawberries can become mushy. Fresh is always best for this particular treat.
Notes and Tips for Success
Choosing Perfect Strawberries
Select berries that are firm, bright red, and free from any soft spots or blemishes. Medium to large strawberries work best because they provide enough surface area for decorating. The green leaves should look fresh and vibrant rather than wilted or brown.
The Moisture Issue
This cannot be overstated: moisture is chocolate’s enemy. Even tiny water droplets will cause chocolate to seize, becoming thick, grainy, and impossible to work with. Make absolutely certain your strawberries, bowls, and utensils are completely dry before beginning.
Chocolate Temperature Tips
If your chocolate becomes too thick while working, microwave it for just 10 seconds and stir. Overheated chocolate can separate and become unusable, so always err on the side of caution with heating times.
Eye Placement Strategy
Place the candy eyes slightly higher than you might initially think looks right. As you add the white chocolate drizzle, the eyes can appear to shift lower, so starting higher compensates for this optical illusion.
Piping Bag Alternatives
If you don’t have piping bags, a heavy-duty freezer bag works well. Regular sandwich bags may burst under pressure from thick chocolate. You can also use a spoon to drizzle the white chocolate, though piping gives you more precise control.
Chocolate Setting Environment
Avoid refrigerating chocolate-covered strawberries in humid conditions, as this can cause sugar bloom (white spots on the chocolate) or make the coating sticky. Room temperature setting in a cool, dry environment produces the best results.
Frequently Asked Questions
Can I use milk chocolate instead of dark chocolate?
Absolutely! Milk chocolate creates a sweeter base that many people prefer, especially children. The lighter color also provides nice contrast with the white chocolate bandages. Just be aware that milk chocolate is slightly more temperature-sensitive than dark chocolate, so melt it carefully.
Why did my chocolate seize and become grainy?
Seized chocolate almost always results from contact with water or moisture. Even steam from a nearby pot can cause this problem. If it happens, try stirring in a teaspoon of vegetable oil or shortening, which sometimes saves the batch. Prevention is easier than fixing, though, so keep everything completely dry.
How far in advance can I make these?
While best served within 24 hours, these strawberries can be made up to 48 hours ahead if stored properly in the refrigerator. Beyond that, the strawberries begin releasing moisture, which can make the chocolate coating slip off or develop an unappealing sweaty appearance.
Can I use regular chocolate bars instead of chips?
Yes, you can chop quality chocolate bars into small pieces for melting. However, chocolate chips and melting wafers contain stabilizers that help them hold their shape and create a smoother coating, making them more reliable for this type of project.
What if I can’t find candy eyes?
Get creative! You can pipe white chocolate circles with dark chocolate centers to create eyes. Mini chocolate chips also work, or you can use small pieces of white chocolate with a dot of dark chocolate added with a toothpick.
Why is my white chocolate so thick?
White chocolate has a tendency to thicken quickly because of its cocoa butter content. If it becomes too thick to drizzle easily, microwave it for 10 seconds and stir, or add ¼ teaspoon of coconut oil to thin it slightly.
Can I make these dairy-free?
Yes! Use dairy-free chocolate chips (many dark chocolate varieties are naturally dairy-free) and dairy-free white chocolate chips, which are becoming increasingly available in grocery stores. The recipe works exactly the same with these substitutions.
How do I prevent the strawberries from sliding in the chocolate?
Make sure your strawberries are completely dry and at room temperature, not cold from the refrigerator. Cold berries can cause the chocolate to set too quickly, making it crack. Room temperature berries give you more working time and better adhesion.
Nutrition Information (per serving):
Serving Size: 1 strawberry
Calories: 148 kcal
Total Fat: 6g
Saturated Fat: 4g
Trans Fat: 0g
Unsaturated Fat: 2g
Cholesterol: 2mg
Sodium: 13mg
Carbohydrates: 24g
Fiber: 1g
Sugar: 18g
Protein: 1g
Note: Nutrition information is approximate and will vary depending on the size of strawberries and specific chocolate brands used.


