Last summer, my nephew declared that Snickers were his favorite candy bar and cheesecake was his favorite dessert. His birthday was approaching, and inspiration struck—why not combine both? I spent an afternoon developing this Snickers cheesecake, and when I presented it at his party, the room went silent as everyone took their first bite. That silence was quickly followed by enthusiastic requests for the recipe. Since then, this dessert has become my go-to whenever I need to seriously impress someone.
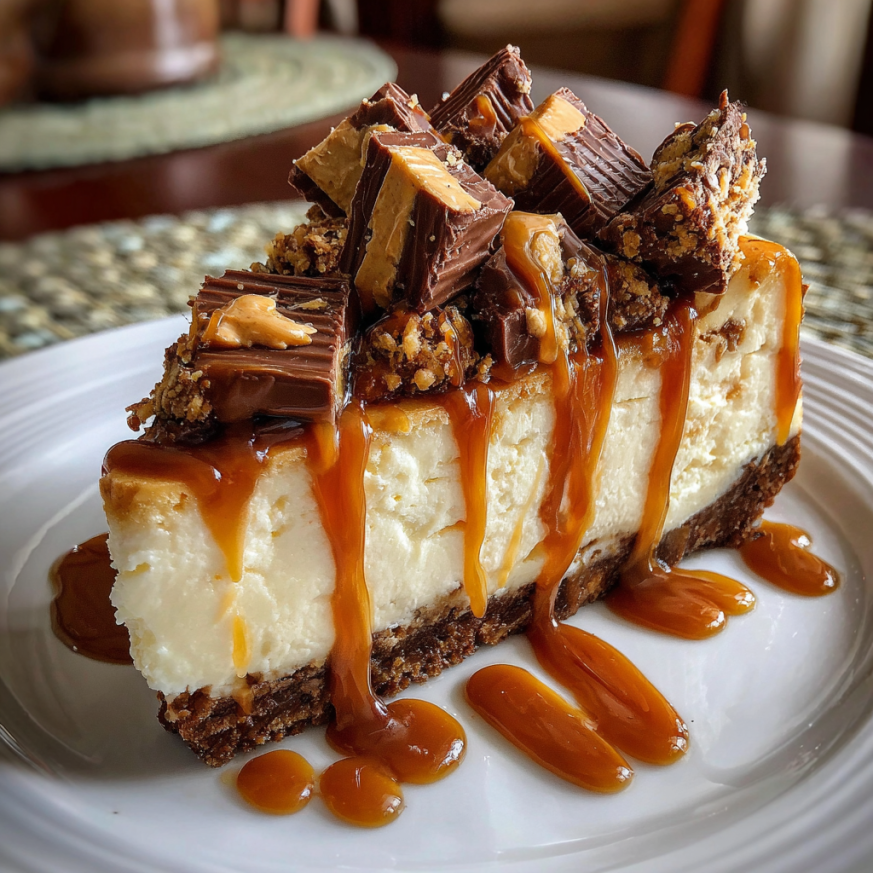
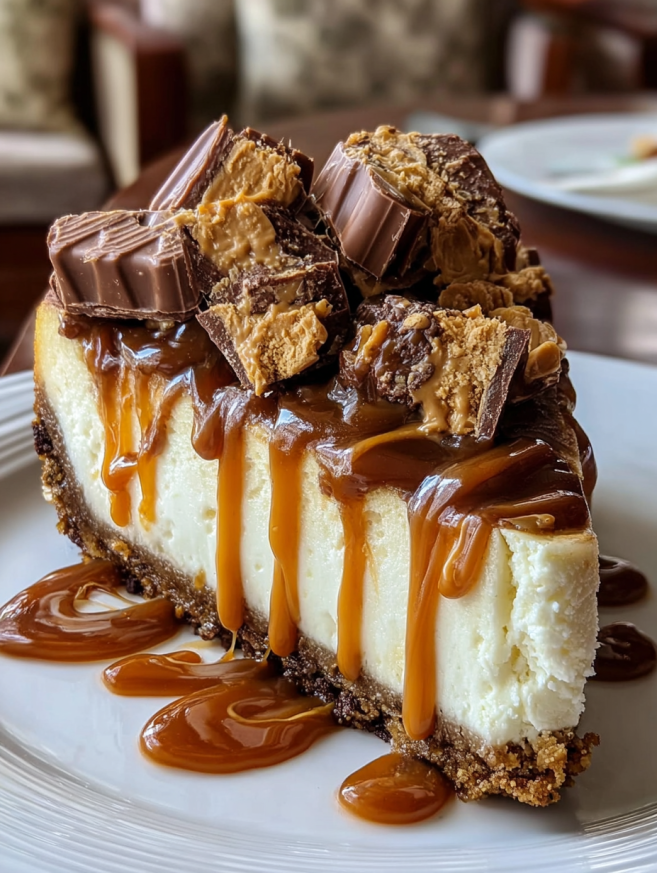
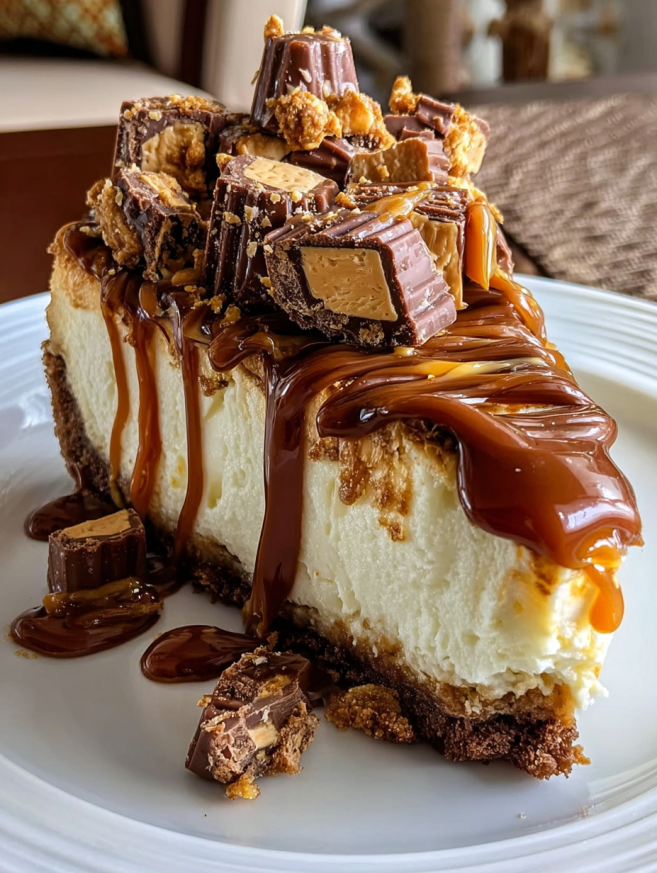
This cheesecake delivers everything you love about Snickers bars—rich chocolate, smooth caramel, crunchy peanuts—in an ultra-creamy cheesecake form. The chunks of actual Snickers throughout the filling create delightful surprises with every forkful. Meanwhile, the drizzles of chocolate and caramel sauce on top make it look like something from a high-end bakery, even though it’s surprisingly simple to make at home.
Why This Recipe Will Become Your New Favorite
This Snickers cheesecake represents dessert perfection for candy bar lovers. First and foremost, it transforms a beloved candy into an elegant dessert that works for any occasion—from casual family dinners to milestone celebrations. The combination of textures keeps every bite interesting, with creamy cheesecake, crunchy nuts, chewy caramel, and smooth chocolate all working together harmoniously.
The recipe itself is refreshingly straightforward. Unlike fussy desserts that require advanced techniques or specialized equipment, this cheesecake comes together using basic baking skills. If you can mix ingredients and use an oven, you can make this show-stopping dessert.
Crowd-Pleasing Appeal
Everyone recognizes and loves Snickers bars, which makes this dessert instantly appealing. Kids get excited about the familiar candy, while adults appreciate the sophisticated cheesecake format. It’s one of those rare desserts that genuinely pleases all ages and taste preferences.
Additionally, this cheesecake serves a crowd generously. One recipe yields 12 substantial slices, making it perfect for parties or gatherings. The richness means a little goes a long way, so even people with smaller appetites feel satisfied after one piece.
Essential Equipment
You’ll need some basic baking tools to create this masterpiece. A 9-inch springform pan is absolutely essential—the removable sides make serving infinitely easier. A hand mixer or stand mixer ensures your cream cheese becomes perfectly smooth without lumps.
Keep a large mixing bowl ready for the filling, along with a separate bowl for combining the crust ingredients. Measuring cups and spoons help maintain accuracy, while a rubber spatula makes folding in the Snickers pieces effortless. Don’t forget aluminum foil for potentially wrapping the pan if you choose to use a water bath.
Ingredients You’ll Need
For the Graham Cracker Crust
- 1½ cups graham cracker crumbs – About 10-12 full graham crackers, finely crushed
- ½ cup unsalted butter, melted – Binds the crumbs together perfectly
- 1 cup sugar – Divided between crust and filling
For the Creamy Cheesecake Filling
- 4 (8-ounce) packages cream cheese, softened – Must be at room temperature
- 1 cup sour cream – Creates incredible creaminess and tang
- 4 large eggs – Provides structure and richness
- 1 teaspoon vanilla extract – Enhances all the other flavors
- 1 cup chopped Snickers bars – About 6-8 fun-size bars, roughly chopped
For the Decadent Toppings
- ½ cup chocolate sauce – Store-bought or homemade works great
- ½ cup caramel sauce – Choose a thick, high-quality variety
The beauty of this recipe lies in its simplicity. Most ingredients are pantry staples, with the Snickers bars being the special addition that transforms ordinary cheesecake into something extraordinary.
Building the Perfect Crust
Begin by preheating your oven to 325°F (163°C). This moderate temperature ensures even baking without burning the edges. While the oven heats, prepare your springform pan by lightly greasing the bottom and sides with butter or non-stick spray.
In a medium bowl, combine the graham cracker crumbs with the melted butter. Stir everything together until the mixture resembles wet sand, with all crumbs evenly coated. The mixture should hold together when squeezed but still crumble apart easily.
Pour the crumb mixture into your prepared springform pan. Using the bottom of a flat glass or measuring cup, press the mixture firmly into an even layer across the bottom of the pan. Apply steady pressure to create a compact crust that won’t crumble when you slice the finished cheesecake.
You don’t need to pre-bake this crust—it will cook perfectly while the cheesecake bakes. Set the pan aside while you prepare the luscious filling.
Creating the Silky Filling
Step 1: Achieve Perfect Cream Cheese Consistency
This step makes or breaks your cheesecake texture. In your large mixing bowl, beat the softened cream cheese on medium speed for 2-3 minutes until it becomes completely smooth and creamy. Stop periodically to scrape down the sides and bottom of the bowl.
The cream cheese absolutely must be at room temperature. Cold cream cheese creates lumps that are nearly impossible to remove, resulting in a grainy texture. If you forgot to set out your cream cheese, cut it into chunks and microwave in 10-second intervals until softened but not melted.
Step 2: Add Sugar and Mix Thoroughly
Add the cup of sugar to your beaten cream cheese. Mix on medium speed for another 2 minutes until the sugar dissolves completely and the mixture becomes light and fluffy. The texture should be noticeably smoother and paler than when you started.
Proper creaming at this stage incorporates just enough air to create a light texture without making the cheesecake prone to cracking. Take your time with this step—it’s foundational to achieving professional results.
Step 3: Incorporate Sour Cream
Add the sour cream to your cream cheese mixture and beat until completely combined. The sour cream adds wonderful tanginess that prevents the cheesecake from tasting too sweet or heavy. It also contributes to that melt-in-your-mouth creaminess everyone loves.
Mix just until the sour cream disappears into the batter and no white streaks remain visible. Overmixing at this stage can incorporate too much air, so stop as soon as everything looks uniform.
Step 4: Add Eggs Carefully
Add the eggs one at a time, mixing on low speed after each addition. Wait until each egg is fully incorporated before adding the next one. This gradual method prevents overmixing while ensuring everything combines evenly.
Beat just until each egg disappears into the batter—about 20-30 seconds per egg. Overmixing eggs creates too much air, which expands during baking and can cause cracks or a curdled texture. Less is more when it comes to mixing eggs into cheesecake batter.
Step 5: Add Vanilla and Fold in Snickers
Stir in the vanilla extract, mixing just until combined. Now comes the fun part—folding in those chopped Snickers pieces. Use a rubber spatula to gently fold the candy chunks into the batter, distributing them evenly throughout.
Don’t overmix at this stage. A few gentle folds should distribute the Snickers perfectly. The less you stir, the better defined your candy chunks will remain, creating those delightful pockets of chocolate, caramel, and peanuts throughout the cheesecake.
Baking Your Cheesecake to Perfection
Pour the Snickers-studded filling over your prepared crust in the springform pan. Use a spatula to smooth the top into an even layer. Gently tap the pan on the counter a few times to release any air bubbles trapped in the batter.
Place the springform pan in the preheated oven on the middle rack. Bake for 55-60 minutes, checking on it after 50 minutes. The cheesecake is done when the edges are set and slightly puffed, while the center still has a gentle jiggle about the size of a quarter.
The center should wobble like just-set Jell-O when you gently shake the pan. Don’t wait for it to be completely firm—it will continue cooking as it cools. Overbaking creates a dry, cracked cheesecake, so trust the jiggle test.
The Critical Cooling Phase
Once baking is complete, turn off the oven but don’t remove the cheesecake. Crack the oven door open about 4 inches and let the cheesecake cool gradually in the oven for 1 hour. This slow temperature change prevents the dramatic shift that causes cracks.
After an hour in the cooling oven, remove the cheesecake and place it on a wire rack. Let it cool to room temperature, which takes about 2 hours. Once completely cool, cover the pan loosely with plastic wrap or aluminum foil.
Transfer the covered cheesecake to the refrigerator and chill for at least 4 hours, though overnight is ideal. During this time, the filling sets completely and the flavors meld together beautifully. Patience at this stage ensures slices that hold their shape perfectly.
Adding the Finishing Touches
Once your cheesecake has chilled thoroughly and is completely set, it’s time for the dramatic finishing touches that make this dessert truly spectacular. Carefully remove the sides of the springform pan by running a thin knife around the edge first to loosen any spots that might be sticking.
Warm your chocolate sauce slightly if it’s too thick to drizzle—10-15 seconds in the microwave should do it. Using a spoon or a squeeze bottle, drizzle the chocolate sauce over the top of the cheesecake in a decorative pattern. You can create zigzags, concentric circles, or random artistic drizzles.
Repeat this process with the caramel sauce, layering it over and around the chocolate. The contrast between dark chocolate and golden caramel looks absolutely stunning. Don’t be shy with the sauces—they’re what give this cheesecake its signature Snickers appeal.
For extra impact, consider topping the cheesecake with additional chopped Snickers pieces, creating a border around the edge or scattering them across the center. Chopped peanuts also make an excellent garnish that reinforces the Snickers theme.
Serving Suggestions
This rich, decadent cheesecake tastes best when served chilled. Remove it from the refrigerator about 10 minutes before slicing to make cutting easier. Use a sharp knife dipped in hot water and wiped clean between each cut for neat, professional-looking slices.
Place each slice on a dessert plate and consider adding a small dollop of whipped cream on the side. A few extra peanuts scattered on the plate add visual interest. If you’re feeling extra indulgent, drizzle additional chocolate and caramel sauce on the plate around the slice.
Perfect Pairings
This cheesecake pairs wonderfully with strong coffee or espresso, which cuts through the richness beautifully. Cold milk is always a classic choice, especially for the kids. For adult gatherings, try serving it with dessert wine or even a peanut butter whiskey for an over-the-top treat.
Creative Variations
Chocolate Cookie Crust
Replace the graham cracker crumbs with chocolate cookie crumbs (like Oreos with the filling removed) for an even more chocolatey experience. The dark chocolate crust complements the Snickers filling beautifully and appeals to serious chocolate lovers.
Peanut Butter Swirl
Before baking, dollop spoonfuls of creamy peanut butter on top of the filling and swirl it through with a knife. This adds another layer of peanut flavor and creates beautiful marbled patterns throughout the cheesecake.
Salted Caramel Upgrade
Use salted caramel sauce instead of regular caramel for a sophisticated twist. The salt enhances all the flavors and prevents the dessert from tasting too sweet. Sprinkle a pinch of flaky sea salt on top before serving for extra impact.
Mini Snickers Cheesecakes
Divide the crust and filling among 12 muffin cups lined with paper liners to create individual portions. Reduce baking time to 20-25 minutes. These mini versions are perfect for parties and eliminate the need for slicing.
Brownie Bottom Layer
Add a thin layer of brownie batter to the bottom of the pan before adding the graham cracker crust for an extra-decadent chocolate base. Use a boxed brownie mix and spread about 1 cup of batter in the pan, bake for 15 minutes, then proceed with the recipe.
Make-Ahead Tips
This cheesecake is ideal for advance preparation, actually tasting better when made a day ahead. The flavors develop and deepen as the cheesecake rests in the refrigerator. Make the entire cheesecake up to 2 days before your event, keeping it covered and chilled.
Hold off on adding the chocolate and caramel drizzle until the day of serving for the freshest appearance. The sauces can soften slightly if they sit on the cheesecake too long, though the flavor remains excellent.
Storage Guidelines
Store any leftover cheesecake covered in the refrigerator for up to 4 days. The Snickers pieces may soften slightly over time, but the dessert remains delicious. Cover it loosely with plastic wrap or place it under a cake dome to prevent it from absorbing refrigerator odors.
This cheesecake freezes reasonably well for up to 1 month. Wrap individual slices tightly in plastic wrap, then aluminum foil. Thaw overnight in the refrigerator. The texture may be slightly different after freezing, but it’s still very enjoyable. Add fresh chocolate and caramel drizzle after thawing.
7 Simple Tips to Impress
Tip 1: Room Temperature Ingredients Are Non-Negotiable
This is the single most important tip for success. Cold cream cheese creates lumps, cold eggs don’t incorporate properly, and the result is a grainy, uneven texture. Set all refrigerated ingredients on the counter at least one hour before beginning.
Tip 2: Don’t Overmix After Adding Eggs
Once eggs enter the picture, switch to low speed and mix just until combined. Overmixing incorporates excess air, which causes cracks and can create a curdled texture. Stop mixing as soon as you see no streaks of egg remaining.
Tip 3: Trust the Jiggle
Learning to recognize when a cheesecake is done takes practice, but the jiggle test is your best friend. The center should wobble gently—if it’s completely firm, you’ve overbaked it. Remember that cheesecake continues cooking during the cooling phase.
Tip 4: Cool Gradually
The gradual cooling method prevents cracks better than any other technique. Never remove a hot cheesecake directly from the oven into a cold kitchen. The dramatic temperature change causes the surface to contract rapidly, creating cracks.
Tip 5: Chill Completely Before Cutting
This requires patience, but it’s essential for clean slices. A warm or partially set cheesecake will ooze and look messy when cut. Plan your timing so the cheesecake has adequate chilling time—overnight is best.
Tip 6: Use Quality Chocolate and Caramel Sauce
The sauces are your garnish and make a big visual impact. Invest in good-quality varieties that taste delicious on their own. Avoid overly sweet or artificial-tasting options. Ghirardelli chocolate sauce and thick caramel sauce work beautifully.
Tip 7: Presentation Matters
Take time to drizzle the sauces artistically rather than just dumping them on top. Add extra Snickers chunks as garnish. Serve on pretty plates with clean edges. These small details transform your cheesecake from homemade to impressive.
Important Notes for Success
Measure Ingredients Accurately: Baking is science, and measurements matter. Level off your measuring cups and spoons for accuracy. Too much or too little of key ingredients affects texture significantly.
Choose Regular Snickers Bars: While fun-size bars are convenient for chopping, regular Snickers bars work too. Avoid Snickers alternatives with different fillings, as they won’t provide the authentic flavor combination.
Check Oven Temperature: Oven thermometers are inexpensive and invaluable. Most ovens run hot or cold, which affects baking time significantly. Knowing your true oven temperature prevents overbaking or underbaking.
Don’t Open the Oven Door: Resist the temptation to peek at your cheesecake frequently. Opening the door causes temperature fluctuations that can lead to cracks or uneven baking. Check only once near the end of the baking time.
Run a Knife Around the Edge: After removing the cheesecake from the oven and before it cools completely, run a thin knife around the edge to separate it from the pan. This prevents cracking as the cheesecake contracts during cooling.
Frequently Asked Questions
Can I make this without a springform pan?
Springform pans make removal much easier, but you can use a regular 9-inch cake pan lined with parchment paper. Leave long “handles” of parchment hanging over the sides to lift out the cheesecake. The presentation won’t be quite as polished, but it works.
My cheesecake cracked. Can I still serve it?
Absolutely! The chocolate and caramel drizzle hides all manner of imperfections. You can also top the entire cheesecake with whipped cream, creating a smooth surface that conceals any cracks. Cracks don’t affect flavor at all.
Can I use low-fat cream cheese?
Regular full-fat cream cheese is strongly recommended for the best texture and flavor. Low-fat versions contain more moisture and less fat, resulting in a cheesecake that’s less creamy and more likely to crack. The extra calories are worth it for special occasions.
How do I know if my cream cheese is soft enough?
It should be soft enough to press your finger into easily, leaving an indentation. It should not be cold to the touch, nor should it be greasy or separated (which indicates it’s too warm). Room temperature is around 70°F.
Can I add more Snickers pieces?
You can add up to 1½ cups of chopped Snickers if you want more candy throughout. However, too many pieces can interfere with the cheesecake’s structure. One cup provides plenty of Snickers flavor while maintaining perfect texture.
The center seems too jiggly. Should I bake it longer?
If the jiggle is larger than a quarter when you gently shake the pan, give it another 5 minutes. But remember that slight jiggle is correct. The cheesecake firms up considerably during cooling and chilling.
Can I make this dairy-free?
Cheesecake relies entirely on dairy for its character and texture. Dairy-free cream cheese alternatives exist, but they behave very differently and won’t produce the same result. For truly dairy-free desserts, consider recipes specifically designed without dairy.
Why is my cheesecake grainy?
Graininess usually results from cold cream cheese that wasn’t beaten enough, or from overbaking. Make sure your cream cheese is fully softened and beat it thoroughly until completely smooth before adding other ingredients.
Can I use a water bath with this recipe?
While not necessary, a water bath creates an even more foolproof cheesecake. Wrap the springform pan tightly in aluminum foil and place it in a larger roasting pan. Add hot water to come halfway up the sides before baking. This humid environment prevents cracks.
How do I transport this cheesecake?
Keep the cheesecake in the springform pan for transport—it’s the safest method. Place it on a flat surface in your vehicle and drive carefully. If it’s warm outside, transport in a cooler with ice packs to keep it chilled.
Recipe Details:
- Total Time: 5 hours 20 minutes (20 minutes prep + 60 minutes baking + 4+ hours chilling)
- Yield: 12 servings
- Category: Dessert
- Method: Baking
- Cuisine: American
- Diet: Vegetarian
Nutrition Information (per serving):
- Calories: 450 kcal
- Fat: 30g (Saturated: 15g, Unsaturated: 10g, Trans: 0g)
- Carbohydrates: 40g
- Fiber: 2g
- Sugar: 30g
- Protein: 5g
- Cholesterol: 80mg
- Sodium: 250mg
Pro Tips Summary:
- Room temperature ingredients prevent lumps
- Minimal mixing after adding eggs prevents cracks
- The jiggle test is your best indicator of doneness
- Gradual cooling prevents surface cracks
- Complete chilling ensures clean slices
- Quality sauces make a visual impact
- Thoughtful presentation elevates the dessert


