Last Halloween, I wanted to create something that felt grown-up and elegant but still captured that playful spooky spirit we all love about the holiday. After experimenting in my kitchen one October evening, these Ghosts in the Graveyard Shooters were born—and they became the surprise hit of my annual Halloween cocktail party. Guests couldn’t stop photographing these adorable little desserts before devouring them in just a few delightful bites!
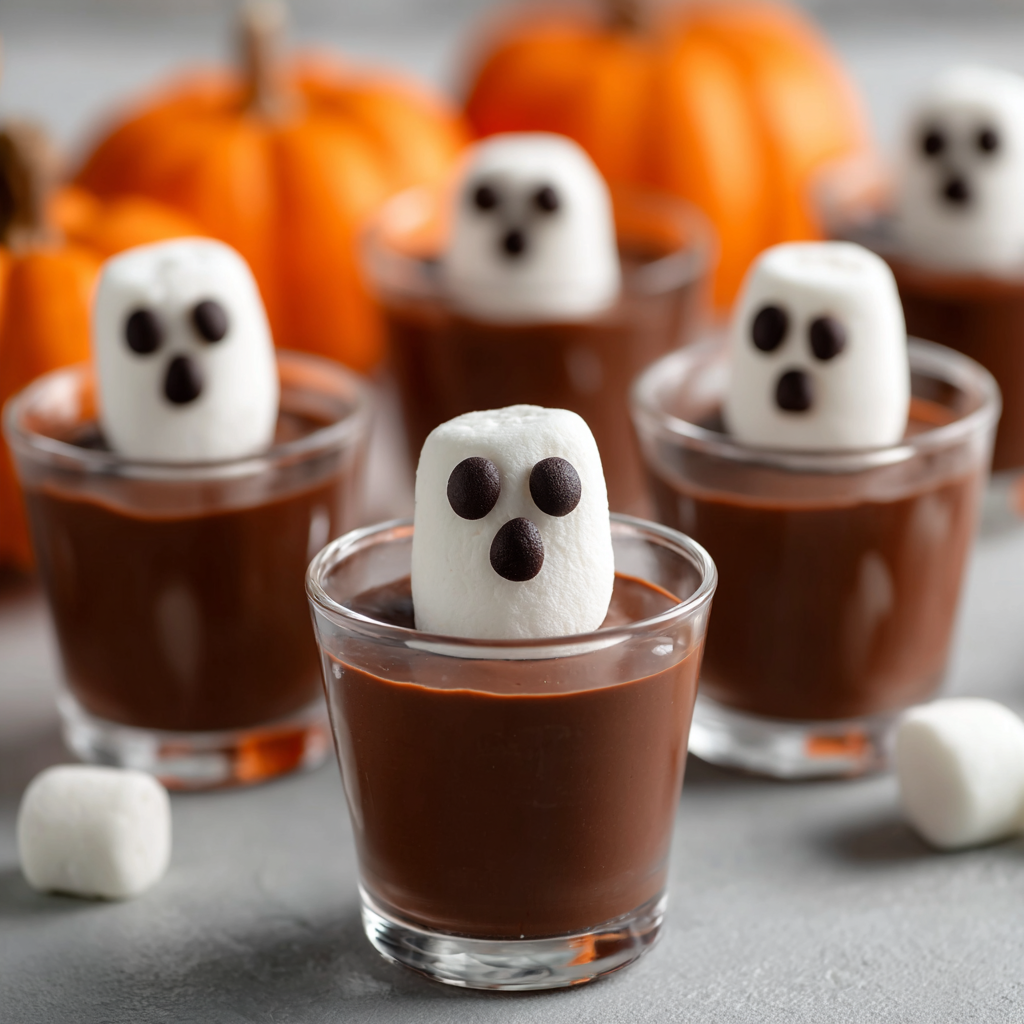
These individual shooters combine rich chocolate mousse with whipped cream ghosts that look almost too cute to eat. Served in transparent shot glasses, they showcase beautiful layers while offering perfect portion control. What I love most is how they feel sophisticated enough for adult gatherings yet whimsical enough to make everyone smile.
Why You’ll Love These Ghosts in the Graveyard Shooters
Portion-Perfect Design – Each shooter delivers just the right amount of sweetness without overwhelming your guests. Unlike full-sized desserts, these allow people to indulge without feeling overly full, which makes them ideal for parties where multiple courses are being served.
Stunning Visual Presentation – The clear shot glasses showcase the distinct layers of chocolate and “dirt,” while the white ghosts create striking contrast. Your guests will be reaching for their phones to snap photos before they even take their first bite.
Easy Crowd Management – These shooters eliminate the need for plates and forks, making them perfect for standing cocktail parties or buffet-style events. Guests can simply grab one and enjoy it with just a small spoon or even eat it directly from the cup.
Customizable Intensity – Depending on your chocolate mousse recipe, you can adjust the richness level to suit your audience. Use a lighter mousse for a more delicate treat, or go with an ultra-rich dark chocolate version for serious chocolate lovers.
Make-Ahead Friendly – You can prepare almost everything in advance, adding only the whipped cream ghosts shortly before serving. This flexibility makes party planning significantly less stressful.
Ingredients You’ll Need
Main Components
Chocolate Mousse or Pudding (2 cups) – This forms the rich, decadent base of your shooters. Homemade chocolate mousse provides the most elegant texture and deepest chocolate flavor, but high-quality instant chocolate pudding works beautifully when you’re short on time. For the best results, choose a recipe that sets firmly rather than remaining runny.
Whipped Cream (1 cup) – Use heavy whipping cream whipped to stiff peaks, or stabilized whipped cream if you’re making these more than a few hours ahead. Store-bought whipped topping can work in a pinch, but freshly whipped cream tastes infinitely better and holds its ghost shape more reliably.
Oreo Crumbs – These create the essential “graveyard dirt” layer. You’ll need approximately 10-12 Oreos, crushed to a fine, soil-like consistency. The dark color provides perfect contrast against both the chocolate base and white ghosts.
Mini Chocolate Chips – These tiny morsels become the ghost eyes. Their small size is important—regular chocolate chips will be too large and throw off the proportions of your cute ghosts.
Clear Plastic Shot Cups – Transparency is key here! The clear cups showcase your beautiful layers. Look for 2-ounce shot glasses, which provide the perfect size for a few indulgent bites.
Optional Enhancements
- White chocolate shavings for extra elegance
- Edible gold or silver glitter for glamorous presentations
- Miniature cookie tombstones (like in dirt cups)
- Chocolate wafer sticks as “fence posts”
- Orange-colored sanding sugar for autumnal sparkle
How to Make Ghosts in the Graveyard Shooters
Step 1: Prepare Your Chocolate Base
Begin by making your chocolate mousse or pudding according to your chosen recipe. If you’re using instant pudding, whisk it with cold milk until it thickens, then refrigerate it for at least 10-15 minutes. For homemade mousse, you’ll need to prepare it several hours ahead or even the night before to ensure it sets properly.
The key here is achieving a firm consistency that will support the layers above it. Your chocolate base should be thick enough to hold its shape when spooned but still creamy and smooth. Once prepared, keep it chilled until you’re ready to assemble your shooters.
Step 2: Crush the Oreos
Place your Oreos (including the cream filling) into a food processor and pulse until they reach a fine, crumbly consistency resembling dirt. Alternatively, seal them in a ziplock bag and crush them with a rolling pin until you achieve the desired texture.
For these shooters, aim for finer crumbs than you might use for dirt cups. The fine texture creates a more elegant presentation and distributes more evenly over the small surface area of shot glasses. Set your Oreo crumbs aside in a bowl where they’ll be easy to access during assembly.
Step 3: Fill the Shot Glasses
Gather your clear shot glasses and arrange them on a tray for easy transport to the refrigerator. Using a small spoon, carefully fill each glass about two-thirds full with your chocolate mousse or pudding. Take your time with this step to keep the insides of the glasses clean—any smudges will be visible through the clear plastic.
If you notice chocolate smudges on the inside walls, gently wipe them away with a slightly damp paper towel before proceeding. Clean edges make a significant difference in the final presentation.
Step 4: Add the “Dirt” Layer
Sprinkle a generous layer of Oreo crumbs over the top of the chocolate in each glass. The crumbs should completely cover the chocolate surface, creating a dark “graveyard dirt” appearance. Use about a teaspoon of crumbs per shooter, adjusting as needed to fully cover the chocolate without overfilling the glasses.
Gently tap each glass on the counter to help the crumbs settle evenly. This creates a level surface for your whipped cream ghosts to sit on, which improves the overall appearance.
Step 5: Prepare the Whipped Cream
If you haven’t already, whip your heavy cream to stiff peaks. Add a tablespoon of powdered sugar and a splash of vanilla extract while whipping for extra flavor and stability. The cream is ready when it holds firm peaks that stand straight up without drooping.
Transfer the whipped cream to a piping bag fitted with a round tip. A medium-sized round tip (around #12 or #1A) works perfectly for creating ghost shapes. If you don’t have piping bags, a ziplock bag with a corner snipped off can work in a pinch, though the ghosts won’t be quite as refined.
Step 6: Create the Ghosts
Now comes the fun part! Hold your piping bag vertically above each shooter and pipe a dollop of whipped cream onto the Oreo crumbs. Start with pressure at the bottom, gradually releasing as you lift upward to create a rounded ghost shape. The goal is to form a tall, rounded mound that tapers slightly toward the top.
For the most convincing ghost shape, apply steady pressure while slowly lifting the piping bag straight up, then quickly release pressure and pull away to create a small peak. Practice on a plate first if you’re new to piping—you’ll get the hang of it quickly!
Step 7: Add the Eyes and Chill
Using tweezers or your fingertips, carefully place two mini chocolate chips onto each whipped cream ghost to create eyes. Position them close together near the top of the ghost for the cutest effect. Slightly pressing them into the cream helps them stay in place.
Once all your shooters are decorated, carefully transfer the tray to the refrigerator. Chill them for at least 30 minutes before serving, or until you’re ready for your guests to arrive. This chilling time allows the whipped cream to firm up slightly, making the shooters easier to handle and eat.
Serving Suggestions
These elegant shooters work beautifully at sophisticated Halloween cocktail parties where you want desserts that match the upscale atmosphere. Arrange them on a sleek black serving tray or mirrored surface for maximum visual impact. Consider adding small battery-operated LED tea lights around the tray to create an eerie glow.
For a buffet-style presentation, set up a dedicated dessert station with these shooters displayed on a tiered stand. The varying heights create visual interest and make it easier for guests to select their treats. Place small dessert spoons nearby, though many guests will find these shooters easy to eat directly from the cup.
At seated dinner parties, place one shooter at each guest’s seat as a pre-dessert amuse-bouche or as the main dessert course. Pair them with a small glass of dessert wine or a cup of coffee for an elegant conclusion to the meal.
If you’re hosting a Halloween brunch, these shooters make an unexpectedly delightful addition to the spread. The portion size feels appropriate for morning consumption, and the chocolate provides that touch of indulgence that makes brunch special.
For adult-only gatherings, consider creating a “graveyard” tablescape by surrounding the shooters with artificial moss, miniature tombstones, and skeleton figurines. This thematic presentation elevates the entire dessert experience.
Recipe Variations to Try
Pumpkin Spice Ghosts
Replace the chocolate mousse with pumpkin-flavored mousse or pudding. Use crushed graham crackers instead of Oreos for lighter “dirt,” and add a tiny sprinkle of cinnamon on each ghost before placing the chocolate chip eyes.
White Chocolate Version
Create white chocolate mousse as your base layer, use vanilla wafer crumbs for “sand,” and add a few drops of blue food coloring to your whipped cream to create blue ghosts floating over a beach scene.
Mint Chocolate Delight
Prepare chocolate-mint mousse by adding peppermint extract to your chocolate base. Keep the Oreo crumbs but use Andes mints crushed finely instead of plain Oreos for an extra minty kick.
Espresso Elegance
Make mocha mousse by incorporating strong espresso into your chocolate mixture. Top each ghost with a single chocolate-covered espresso bean instead of mini chip eyes for a sophisticated, caffeinated treat.
Berry Graveyard
Layer chocolate mousse with fresh raspberry or strawberry pieces before adding the Oreo crumbs. The fruit adds a tart contrast that cuts through the richness beautifully.
Boozy Adult Version
Fold 2 tablespoons of coffee liqueur, Irish cream, or chocolate liqueur into your mousse before assembly. Clearly label these if you’re serving non-alcoholic versions alongside them at your party.
Make-Ahead Tips
These shooters are wonderfully accommodating when it comes to advance preparation. You can prepare the chocolate mousse or pudding up to 48 hours ahead and keep it refrigerated in an airtight container. Similarly, you can crush your Oreos up to 3 days in advance and store them at room temperature in a sealed container.
The assembled shooters (without the whipped cream ghosts) can be made up to 24 hours ahead. Fill the glasses with chocolate and top with Oreo crumbs, then cover the entire tray with plastic wrap and refrigerate. This approach spreads out the work and reduces party-day stress significantly.
However, I recommend adding the whipped cream ghosts no more than 4-6 hours before serving. While the cream holds up reasonably well, it can start to weep or lose its shape after extended refrigeration. If you need to prepare them earlier, consider using stabilized whipped cream, which holds its form much longer.
To stabilize whipped cream, dissolve 1 teaspoon of unflavored gelatin in 2 tablespoons of cold water, then heat it gently until dissolved. Let it cool slightly, then add it to your cream while whipping. This creates whipped cream that stays perfectly formed for 12-24 hours.
When transporting these to another location, keep them on a flat tray with edges to prevent sliding. A covered cake carrier works perfectly for protecting the delicate ghosts during transport.
Important Notes
Shot Glass Selection – Clear plastic shot glasses are ideal because they’re inexpensive, disposable, and showcase your layers beautifully. Glass shot glasses work too but require washing afterward. Whatever you choose, make sure they hold at least 2 ounces to accommodate all the layers comfortably.
Mousse vs. Pudding Choice – Chocolate mousse creates a lighter, more elegant texture that many adults prefer, while chocolate pudding provides denser richness. Mousse also tends to hold layers better due to its airy structure. Choose based on your audience and the formality of your event.
Whipped Cream Consistency – Your whipped cream must reach stiff peaks to create ghosts that hold their shape. Under-whipped cream will slump and spread, losing that adorable ghost silhouette. When the whisk leaves deep trails in the cream and peaks stand straight without drooping, you’re ready to pipe.
Piping Bag Alternatives – If you don’t have a piping bag, you can use a ziplock bag with a corner snipped off. For even simpler assembly, spoon small mounds of whipped cream onto each shooter and gently shape them with the back of the spoon, though this won’t create as refined a ghost shape.
Temperature Matters – These shooters must stay cold until serving time. The whipped cream can deflate and the mousse can soften if left at room temperature. If your party space is warm, consider serving these in smaller batches rather than setting them all out at once.
Mini Chip Alternatives – If you can’t find mini chocolate chips, regular chocolate chips can work, though they’ll be slightly larger. You could also use chocolate sprinkles, black sesame seeds, or even tiny dots of chocolate icing piped directly onto the ghosts.
Allergy Considerations – These shooters contain dairy and likely gluten (from the Oreos). For dairy-free versions, use coconut cream whipped to stiff peaks and dairy-free chocolate mousse. Gluten-free chocolate cookies can replace Oreos.
Frequently Asked Questions
How many shooters does this recipe make?
This recipe typically yields 12-16 shooters, depending on the size of your shot glasses and how full you fill them. Two-ounce shot glasses are standard and work perfectly for this recipe.
Can I use store-bought mousse?
Yes! Pre-made chocolate mousse from the grocery store works well when you’re short on time. Look for brands sold in the refrigerated section, which typically have better texture than shelf-stable versions. You’ll need about 2 cups total.
What if my whipped cream won’t hold its shape?
Several factors can prevent whipped cream from reaching stiff peaks. Make sure your cream is very cold, your bowl is cold, and you’re whipping long enough. Heavy cream (not light cream or half-and-half) is essential. If your kitchen is very warm, try chilling your bowl and whisk in the freezer for 10 minutes before whipping.
Can kids eat these?
Absolutely! While they’re called “shooters,” there’s nothing in them that isn’t kid-friendly (unless you add liqueur). Children often love the cute ghost design and perfect bite-sized portions. Just make sure to provide small spoons.
How far ahead can I pipe the whipped cream ghosts?
For best results, pipe the ghosts no more than 4-6 hours before serving. For longer storage, use stabilized whipped cream (see make-ahead tips), which can hold its shape for up to 24 hours without weeping or deflating.
What’s the best way to transport these to a party?
Place them on a flat tray with raised edges, then cover loosely with plastic wrap, being careful not to let the wrap touch the ghosts. A large, shallow box works well for keeping them stable in the car. Drive carefully and avoid sudden stops!
Can I make these without a food processor?
Definitely! Crushing Oreos in a sealed ziplock bag with a rolling pin works perfectly. You can also place them in a bowl and crush them with the bottom of a heavy glass or meat tenderizer.
Why are my layers mixing together?
This usually happens when the chocolate mousse or pudding isn’t firm enough. Make sure your base has set completely and is chilled thoroughly before adding the Oreo crumbs and whipped cream. Each layer should be firm enough to support the next one.
Can I freeze these shooters?
Freezing isn’t recommended. The whipped cream will weep when thawed, and the texture of the mousse changes significantly. These are best enjoyed fresh or refrigerated for up to 24 hours.
What other decorations could I add?
Beyond the basic ghost eyes, you could add a tiny open mouth using chocolate icing, drizzle chocolate sauce for a “web” effect, sprinkle edible glitter for sparkle, or add miniature candy pumpkins alongside each ghost.
Recipe Details:
- Prep Time: 20 minutes (plus mousse preparation time if making from scratch)
- Chill Time: 30 minutes minimum
- Total Time: 50 minutes (excluding mousse prep)
- Yield: 12-16 shooters
- Course: Dessert
- Cuisine: American
- Diet: Vegetarian (can be made vegan with substitutions)
- Occasion: Halloween parties, sophisticated gatherings, adult celebrations


