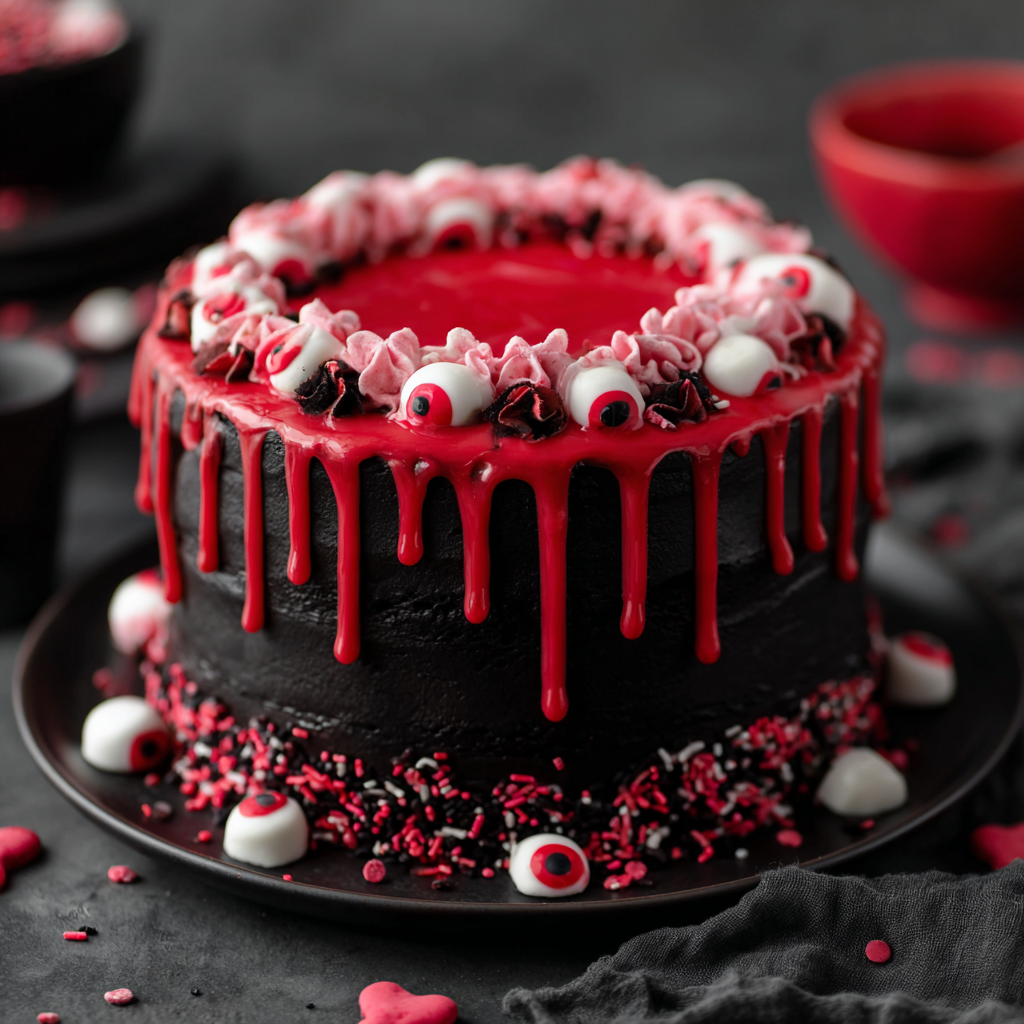
Two years ago, I challenged myself to create a Halloween cake that would genuinely surprise people—something beyond the typical orange and black color scheme. When I sliced into this marble cake at my Halloween dinner party and revealed the dramatic red and black swirls inside, the gasps around the table made all the effort worthwhile. The “blood” dripping down the sides was the perfect finishing touch that had everyone reaching for their phones before reaching for their forks!
This show-stopping cake combines rich chocolate and vibrant red vanilla cake batters marbled together, then covered in dark chocolate buttercream and finished with a glossy red drip. The result is a dessert that looks genuinely spooky while tasting absolutely divine.
Why You’ll Love This Spooky Halloween Marble Cake
Stunning Visual Impact – The contrast between red and black creates an immediately eye-catching effect. When you slice into it, the marbled interior reveals a beautiful pattern that looks different in every piece, making each serving feel unique.
Perfect Balance of Flavors – The slightly bitter bittersweet chocolate cake balances beautifully with the sweet vanilla red cake. Together, they create a complex flavor profile that’s more interesting than a standard single-flavor cake.
Moist and Tender Crumb – The combination of butter and oil in the cake batter ensures a texture that’s both rich and incredibly moist. Even after a day or two, these layers remain soft and never dry out.
Impressive Yet Achievable – While this cake looks like something from a professional bakery, the techniques are straightforward enough for home bakers. The marble effect is surprisingly forgiving—even imperfect swirls look intentionally artistic.
Customizable Decorations – The basic cake is a blank canvas for your creativity. Use the suggested gory decorations for an adults-only party, or substitute friendlier Halloween sprinkles for family-friendly gatherings.
Ingredients You’ll Need
For the Marble Cake Layers
All-Purpose Flour (2¼ cups) – Provides structure to support the moist, tender crumb. Measure carefully by spooning into your measuring cup and leveling off for accuracy.
Baking Powder and Baking Soda – This combination of leaveners creates the perfect rise and tender texture. The small amount of baking soda also helps activate the buttermilk’s acidity.
Salt (½ teaspoon) – Essential for balancing sweetness and enhancing all the other flavors in the cake.
Unsalted Butter (½ cup, room temperature) – Creaming this with sugar creates air pockets that make the cake light and fluffy. Room temperature is crucial for proper incorporation.
Vegetable Oil (½ cup) – Keeps the cake moist and tender even when refrigerated. The combination of butter and oil gives you the best of both worlds—flavor and moisture.
Granulated Sugar (1½ cups) – Sweetens the cake while also contributing to its tender texture through the creaming process.
Vanilla Extract (1 tablespoon) – A generous amount provides warm, aromatic flavor that complements both cake variations.
Large Eggs (4) – Bind everything together while adding richness and structure. Room temperature eggs incorporate more smoothly than cold ones.
Buttermilk (1 cup) – Creates an exceptionally tender, moist crumb with a subtle tang. Powdered buttermilk works beautifully if you prefer to keep it on hand.
Bittersweet Chocolate (5 oz, 60% cacao) – Melted and added to half the batter, this creates deep chocolate flavor. The 60% cacao level provides richness without bitterness.
Black and Red Gel Icing Colors – Gel colors produce vibrant hues without adding excess liquid to your batters. Start with small amounts and add more to reach your desired intensity.
For the Chocolate Buttercream
Unsalted Butter (2¼ cups) – The foundation of silky, rich buttercream. Make sure it’s at room temperature for smooth beating.
Powdered Sugar (8 cups) – Provides sweetness and structure. Sift it if it contains lumps for the smoothest frosting.
Natural Unsweetened Cocoa Powder (1 cup) – Creates deep chocolate flavor and contributes to the dark color. Natural cocoa works better than Dutch-process for this recipe.
Vanilla Extract (2 teaspoons) – Enhances the chocolate flavor and adds aromatic depth.
Water or Cream (5-7 tablespoons) – Thins the buttercream to spreadable consistency. Heavy cream creates richer flavor, while water keeps it lighter.
Salt (¼ teaspoon) – Balances the sweetness and makes the chocolate flavor more pronounced.
Black Gel Icing Color – Deepens the chocolate frosting to a dramatic black shade perfect for Halloween.
For the Red Drip
Red Wilton Candy Melts (4 oz) – These specially formulated melts create the perfect consistency for drips that hold their shape.
Heavy Whipping Cream (2 tablespoons) – Thins the candy melts to the ideal dripping consistency while adding richness.
For Decoration
Halloween Sprinkles – Bloody bones, eyeballs, severed fingers, or crime scene sprinkle mixes all work wonderfully. Choose based on your comfort level with gore and your audience’s preferences.
How to Make Spooky Halloween Marble Cake
Step 1: Prepare for Baking
Preheat your oven to 350°F (176°C). Prepare three 8-inch round cake pans by cutting parchment paper circles to fit the bottoms, then greasing the sides with butter or cooking spray. This dual approach ensures your cakes release perfectly without sticking.
Step 2: Mix the Dry Ingredients
Whisk together the flour, baking powder, baking soda, and salt in a medium bowl. Set this mixture aside where it’s easily accessible—you’ll be adding it in stages, so having it ready streamlines the process.
Step 3: Cream Butter, Oil, and Sugar
Add the butter, vegetable oil, sugar, and vanilla extract to a large mixing bowl. Beat on medium-high speed for 3-4 minutes until the mixture becomes noticeably lighter in color and fluffy in texture. This creaming process is crucial—don’t rush it! The air incorporated during this step creates a lighter cake texture.
Step 4: Add Eggs and Begin Building the Batter
Add the eggs two at a time, beating well after each addition. Scrape down the sides and bottom of the bowl between additions to ensure everything incorporates evenly. The mixture should look smooth and emulsified.
Add half of your dry ingredient mixture and mix on low speed just until combined. Pour in all the buttermilk and mix until incorporated. Finally, add the remaining dry ingredients and mix until the batter is smooth and uniform. Avoid overmixing once flour is added, as this can create a tough cake.
Step 5: Divide and Color the Batter
Divide your batter equally between two separate bowls. Using a kitchen scale makes this process incredibly accurate—simply weigh the full batter, then divide that number in half. If you don’t have a scale, eyeball it as evenly as possible.
To one bowl, add red gel icing color a little at a time, folding gently until you achieve a vibrant red shade. Set this bowl aside. Melt your chopped chocolate (microwave in 30-second bursts works well), then add it to the second bowl along with black gel icing color. Fold these together quickly but gently—you want the chocolate incorporated before it begins to firm up in the cooler batter.
Step 6: Create the Marble Effect
Now for the fun part! Using a large spoon, drop alternating heaping spoonfuls of red and black batter into your prepared cake pans. Don’t worry about being precise—randomness creates the best marble patterns. Once you’ve distributed all the batter among the three pans, gently shake each pan side to side. This spreading motion helps the batter fill the pan evenly while naturally creating beautiful swirls.
Step 7: Bake the Layers
Place all three pans in your preheated oven and bake for 20-25 minutes. The cakes are done when a toothpick inserted into the center comes out clean or with just a few moist crumbs. Start checking at 20 minutes to avoid overbaking.
Remove the pans from the oven and let them cool in the pans for 2-3 minutes. This brief rest helps the cakes set without sticking. Then, carefully turn them out onto wire cooling racks to cool completely. Never frost warm cakes, as the frosting will melt and slide off!
Step 8: Prepare the Chocolate Buttercream
Beat the room-temperature butter in a large bowl until smooth and creamy, about 2 minutes. Add half of the powdered sugar along with all the cocoa powder. Mix on low speed initially to prevent a powdered sugar cloud, then increase speed and beat until well combined.
Add the vanilla extract and 3 tablespoons of water or cream, mixing until smooth. Add the remaining powdered sugar and salt, beating until everything comes together. Assess the consistency—if it seems too thick to spread smoothly, add more liquid one tablespoon at a time. Finally, add black gel icing color gradually until you reach your desired shade of dark chocolate or black.
Step 9: Level and Layer the Cake
Using a large serrated knife, carefully slice off the domed tops of each cake layer to create flat surfaces. Even though these cakes don’t dome much, leveling ensures stable stacking. Place your first layer on a serving plate or cardboard cake round.
Spread approximately 1 cup of chocolate buttercream evenly across the top of the first layer. Add the second cake layer, then another cup of buttercream. Top with the final layer, then use the remaining buttercream to frost the entire outside of the cake. An offset spatula makes this process much easier and creates a smoother finish.
Step 10: Create the Red Blood Drip
Place your red candy melts in a heat-safe bowl. Heat the heavy whipping cream in the microwave or on the stovetop just until it begins to boil. Pour the hot cream over the candy melts and let it sit undisturbed for 2-3 minutes—this allows the heat to begin melting the candy.
Whisk the mixture to combine. It likely won’t be completely smooth yet, so microwave in 15-second increments, stirring between each, until fully melted and glossy. Let it cool for 5-10 minutes until it thickens slightly. The perfect drip consistency should slowly drip off your spoon but not be watery.
Using a spoon or squeeze bottle, drizzle the red mixture around the top edges of the cake, allowing it to drip down the sides naturally. Add a bit more to create pools and drips on the top surface, but leave the center mostly bare for a more realistic blood-splatter effect.
Step 11: Add Final Decorations
While the red drip is still slightly tacky, press your chosen Halloween sprinkles—bones, eyeballs, or severed fingers—into the frosting and drips. This ensures they stick securely and won’t fall off when serving.
Refrigerate the finished cake for at least 30 minutes to set the drips and frosting. Store in an airtight container or covered cake dome at room temperature for up to 3-4 days.
Serving Suggestions
This dramatic cake deserves an equally dramatic presentation. Serve it on a black cake stand or platter to make the colors pop even more. Consider placing the entire display on a bed of dry ice (in a safe container beneath the cake stand) for spooky fog effects at your party.
When slicing, use a sharp knife dipped in hot water and wiped clean between cuts. This creates clean slices that show off the beautiful marble pattern inside. Serve each slice on a black or white plate where the colors will really stand out.
For an adult Halloween party, pair slices with espresso or a dark chocolate liqueur for an indulgent dessert course. The rich chocolate flavors complement coffee-based beverages beautifully.
At family-friendly gatherings, serve with cold milk or vanilla ice cream on the side. The cool, creamy accompaniments balance the rich cake perfectly and appeal to younger guests.
Consider photographing the cake from multiple angles before cutting—both the exterior decorations and the marbled interior are Instagram-worthy! Encourage guests to snap photos of their own slices to share the spooky fun.
Recipe Variations to Try
Orange and Black Classic
Replace the red batter with orange-colored vanilla batter for a more traditional Halloween color scheme. This version feels less gory and more universally appropriate for all-ages celebrations.
Triple Chocolate Decadence
Skip the red batter entirely and make all three layers chocolate. Marble in white cake batter instead for a striking black-and-white pattern that’s elegant rather than spooky.
Pumpkin Spice Twist
Add 2 teaspoons of pumpkin pie spice to the red vanilla batter and use orange food coloring instead of red. This creates an autumn-spiced marble cake with seasonal flavors.
White Chocolate Drip
Replace the red candy melt drip with white chocolate ganache tinted pale green for a ghostly effect. Add ghost-shaped sprinkles instead of gory decorations.
Raspberry Filling Layers
Spread a thin layer of raspberry jam between the cake layers along with the buttercream. The fruity tartness cuts through the richness beautifully and adds another dimension of flavor.
Cream Cheese Frosting
Replace the chocolate buttercream with cream cheese frosting tinted gray or black. The tanginess provides interesting contrast to the sweet cake layers.
Make-Ahead Tips
This impressive cake handles advance preparation beautifully, which helps reduce stress when planning your Halloween event. The cake layers can be baked up to 2 days ahead and stored tightly wrapped at room temperature, or frozen for up to 3 months. To freeze, wrap each cooled layer individually in plastic wrap, then aluminum foil, and place in freezer bags. Thaw overnight in the refrigerator before assembling.
The chocolate buttercream can be made up to 1 week ahead and refrigerated in an airtight container. When ready to use, let it come to room temperature, then re-whip it briefly to restore its fluffy texture. If it seems too stiff, add a tablespoon or two of cream.
You can assemble and frost the entire cake up to 24 hours before your event. Store it covered at room temperature or in the refrigerator depending on your kitchen’s warmth. If refrigerated, let it sit at room temperature for 30-60 minutes before serving for the best flavor and texture.
The red drip and final decorations are best added within 4-6 hours of serving for optimal appearance. The candy melt drip can weep slightly if left too long in humid conditions, so timing this closer to your event ensures the best visual impact.
For transporting this cake to another location, assemble and frost it completely, then chill thoroughly. Add the drip and decorations after arrival if possible. Transport on a flat surface in a covered cake carrier, driving carefully to prevent shifting.
Important Notes
Don’t Skip Creaming Time – The 3-4 minutes of beating butter, oil, and sugar isn’t optional! This crucial step incorporates air that creates the cake’s light texture. Rushing this produces denser results.
Use Bittersweet Chocolate – The recipe specifically calls for 60% cacao bittersweet chocolate for good reason. It provides rich flavor without overwhelming bitterness. Milk chocolate makes the chocolate layers too sweet, while very dark chocolate can taste harsh.
Work Quickly with Melted Chocolate – Once you add melted chocolate to your batter, fold it in promptly. If you work too slowly, the chocolate begins to firm up in the cooler batter, creating lumps that are difficult to smooth out.
Buttermilk Makes a Difference – While regular milk can substitute in a pinch, buttermilk creates noticeably more tender, moist cake. Powdered buttermilk is convenient to keep stocked in your pantry for whenever you need it.
Perfect Drip Consistency – The red drip mixture must be the right temperature and thickness. Too warm or thin, and it runs too fast, potentially dripping all the way to the bottom. Too cool or thick, and it won’t drip at all. Test it on the side of your bowl first—you want slow, controlled drips.
Level Those Layers – Even small domes create unstable stacking. Take the time to level each layer properly for a straight, professional-looking finished cake.
Storage Considerations – This cake contains buttercream, which can be stored at room temperature for 2-3 days in cool conditions. In hot or humid weather, refrigerate it but bring it to room temperature before serving for the best flavor.
Frequently Asked Questions
Can I make this as a sheet cake instead of layers?
Yes! Pour all the marbled batter into a greased 9×13-inch pan and bake for 35-45 minutes. Frost with half the buttercream recipe once cooled. You won’t be able to create the dramatic drip effect on a flat sheet cake, but you can drizzle the red mixture over the top.
What if I can’t find red candy melts?
White candy melts tinted with red gel food coloring work well. You can also make a red white chocolate ganache by heating ⅓ cup heavy cream, pouring it over 4 oz white chocolate, and adding red gel coloring once smooth.
Can I make this cake dairy-free?
The cake layers can be made dairy-free by using plant-based butter and non-dairy milk. However, the buttercream is more challenging—dairy-free versions don’t have quite the same texture. Consider using a dairy-free chocolate ganache instead.
Why is my marble pattern not visible?
This usually happens when the batter portions aren’t different enough in color. Make sure your red is quite vibrant and your chocolate mixture is very dark. Also, avoid overmixing when dropping the batters into the pans, which can muddy the colors together.
How do I know when the drip is the right consistency?
Spoon some onto the side of your mixing bowl and observe how it behaves. Ideal drips move slowly down the side, stopping about halfway or two-thirds of the way down. If it runs immediately to the bottom, it’s too thin—let it cool longer. If it barely moves, it’s too thick—warm it briefly.
Can I use a different size pan?
Three 8-inch pans create a tall, impressive cake. You could use two 9-inch pans for wider, shorter layers (bake 25-30 minutes), but you’ll lose some of the dramatic height. The marbling will work regardless of pan size.
Is this cake very sweet?
This is definitely a sweet, indulgent dessert cake. The bittersweet chocolate helps balance some of the sweetness, and serving smaller slices is recommended. Pairing it with unsweetened whipped cream or black coffee helps cut the richness.
Can kids help make this?
Absolutely! Children can help measure ingredients, drop the marbled batters into pans, and definitely assist with decorating. The dripping blood effect is particularly fun for older kids who enjoy slightly spooky themes.
How do I store leftover cake?
Keep it covered at room temperature for 2-3 days, or refrigerated for up to 5 days. Bring refrigerated cake to room temperature 30-60 minutes before serving. The buttercream may harden when cold, affecting both texture and flavor.
Can I add other flavors to the cake?
Definitely! Add 1-2 teaspoons of almond extract to the red batter for a cherry-almond vibe, or add espresso powder to the chocolate batter for deeper chocolate flavor. Peppermint extract in the chocolate batter creates a chocolate-mint combination.
Nutrition Information (per slice, based on 12-14 slices): Calories: 915kcal | Carbohydrates: 117.3g | Protein: 6.8g | Fat: 50.2g | Cholesterol: 152.1mg | Sodium: 196.1mg | Sugar: 95.6g
Recipe Details:
- Prep Time: 1 hour 45 minutes
- Cook Time: 20 minutes
- Total Time: 2 hours 5 minutes
- Yield: 12-14 slices
- Category: Dessert
- Method: Oven
- Cuisine: American
- Occasion: Halloween Parties, Adult Gatherings


