Introduction
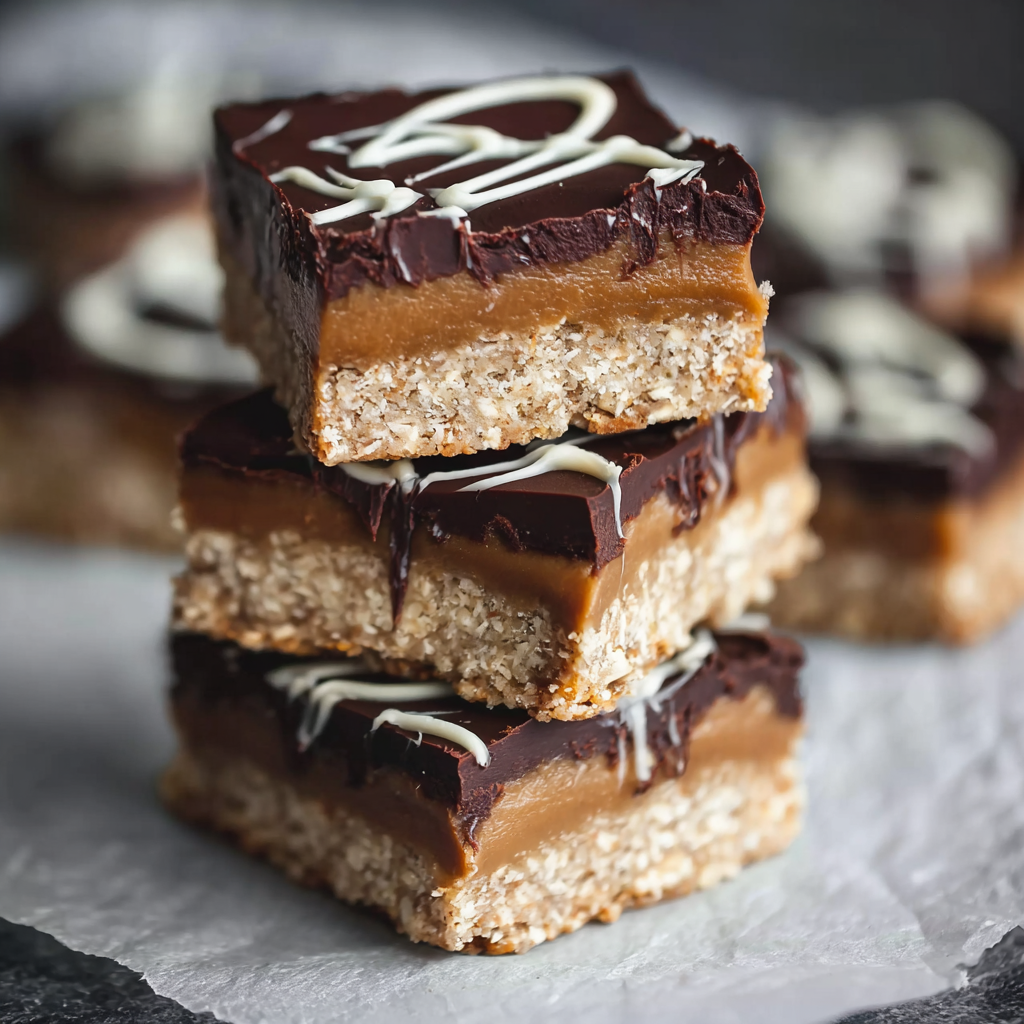
Imagine sinking your teeth into a bar that starts with a crisp, nutty oat‑and‑almond crust, gives way to a smooth and luxuriously creamy hazelnut filling, and finishes with a glossy, dark‑chocolate topping that snaps ever so slightly. Each bite offers layers of texture and flavor: a buttery base, a rich hazelnut centre bursting with toasted nutty warmth, and a chocolate coating that ties it all together with elegance. These bars are perfect for dessert lovers who appreciate a sophisticated treat—everyone from after‑dinner guests to cozy weekend indulgence. They feel special, yet the ingredients are simple and approachable.
Why You’ll Love This Recipe
- The combination of hazelnut butter plus white chocolate in the filling creates a creamy, indulgent centre that feels luxurious yet homemade.
- The base uses grounded oats and almonds for a naturally nutty, wholesome crunch, rather than heavy processed crusts—balance of texture and flavor.
- Topped with dark chocolate and a touch of coconut oil, which gives a sleek finish and slight snap when you bite in.
- Made in a loaf tin or square pan and chilled—makes slicing neat, portable, and ideal for sharing or gifting.
- Health‑conscious tweaks: uses less refined sweetener and includes wholesome ingredients without sacrificing decadent taste.
- Versatile—works as dessert squares, party treats, or a fancy snack with coffee.
Ingredients
For the Base
- 70 g ground oats
- 50 g ground almonds
- ¼ tsp salt
- 1 Tbsp maple syrup
- 3 Tbsp coconut oil, melted
For the Hazelnut Filling
- 100 g hazelnut butter
- 60 g white chocolate (regular or vegan/dairy‑free)
For the Chocolate Topping
- 100 g dark chocolate
- 1 Tbsp coconut oil
Instructions
- Prepare the base: In a medium bowl, mix ground oats, ground almonds and salt. Add melted coconut oil and maple syrup, stir until mixture comes together.
- Set the base: Line a loaf tin (approx 22 × 12 cm) with parchment paper. Press the base mixture firmly into the tin using a spatula. Freeze for about 15 minutes to firm.
- Make the filling: Break the white chocolate into small pieces and melt (microwave in short bursts or use a double boiler). Stir in the hazelnut butter until fully combined and smooth.
- Layer the filling: Spread the hazelnut‑white‑chocolate mixture evenly over the chilled base. Return to freezer for ~30 minutes until set.
- Make the topping: Melt dark chocolate and coconut oil together until smooth. Pour over the hazelnut layer and spread evenly. (Optional: drizzle a little extra white chocolate and use a knife to create a swirl.)
- Chill and slice: Refrigerate until the chocolate topping is fully set. Remove from the tin using the parchment overhang, place on a cutting board and slice into bars or squares.
- Serve: Enjoy right away for that crisp‑chocolate snap and smooth hazelnut layer.
You Must Know
- Pressing the base firmly and chilling it is key—this gives structure so bars slice cleanly rather than crumble.
- Use good quality hazelnut butter made from 100% hazelnuts (no added oils or sweeteners) to get that pure nut flavor.
- Melting chocolate: be careful not to overheat, especially white chocolate—it can seize and ruin the smooth texture.
- Let the topping set fully in the fridge; cutting too early will cause the chocolate to smudge or crack unevenly.
- Store in a cool place; if your climate is warm, keep in the fridge. Coconut oil can soften at higher temperature.
Storage Tips
- Room temperature: If your kitchen is cool (< 20 °C), you can store in an airtight container at room temperature for up to 4 days.
- Refrigerator: For warm environments, store in the fridge for up to 7 days. Bring to near‐room temperature before serving for best texture.
- Freezing: You can freeze the bars for up to 1 month. Wrap individually or layer with parchment paper in a freezer container. Thaw in fridge then come to room temperature before eating.
- Serving from fridge: If chilled, take out ~10 minutes ahead so the filling softens slightly for better mouth‑feel.
Ingredient Substitutions
- Gluten‑free: Already mostly gluten‑free if oats are certified GF. Use certified gluten‑free oat flour or ground oats if needed.
- Dairy‑free / Vegan: Use vegan white chocolate and vegan dark chocolate; ensure hazelnut butter is vegan.
- Lower‑sweet: Reduce maple syrup in base, or use a natural sweetener alternative. Adjust notes to taste.
- Nut‑free alternative: If hazelnuts are an issue, replace hazelnut butter with almond or cashew butter and use corresponding nut meal for the base; note flavor will shift.
- Flavor variation: Add a pinch of sea salt on top of the dark chocolate for salt‑chocolate contrast; or fold in chopped toasted hazelnuts into the filling for crunch.
- Different sizes: You can use a smaller square pan for thicker bars—but adjust chilling time accordingly.
Serving Suggestions
- Serve with a strong espresso or cappuccino—the bitterness of coffee complements the sweet nut‑chocolate layers.
- Pair with a light dessert wine or a small scoop of vanilla bean ice cream for a richer presentation.
- Garnish each bar with a lightly toasted whole hazelnut or sprinkle chopped hazelnuts and sea salt on top.
- Present on a wooden board or slate plate, scatter cocoa nibs or hazelnut skins for rustic charm.
- Ideal for special occasions: wrap individually in parchment paper tied with string to give as gifts.
Pro Tips
- Use parchment paper that overhangs the tin—makes lifting the whole block out easier for neat slicing.
- Keep a sharp knife warm (run under hot water and dry) then wipe clean between cuts for clean edges through chocolate and hazelnut layers.
- Chill after each layer (base → filling → topping) so that each layer sets firmly before the next is added—this keeps defined layers and prevents mixing.
- When melting chocolate, use a heat‑proof bowl over simmering water (double boiler) for more control rather than a high‑heat microwave.
- Before slicing, set the bars back in freezer for ~10 minutes for a firmer cut. Then transfer to fridge/room temperature shortly before serving.
Frequently Asked Questions
→ Can I make this ahead of time?
Yes — You can fully make the bars ahead and store them chilled. They hold well and are ideal for prepping a day or two in advance.
→ Can I use store‑bought hazelnut spread instead of hazelnut butter?
You could, but many store‑bought spreads have added oil, sweeteners or palm oil which may affect texture and setting. If you use one, choose a high‑quality one and be aware the filling may be softer.
→ How firm will the bars be?
They are firm enough to hold shape when cooled—but the hazelnut filling remains creamy, not hard like a candy bar. If you want a firmer texture, slightly reduce coconut oil or increase chill time.
→ Can I add additional mix‑ins like chopped hazelnuts or cocoa nibs?
Absolutely — You can fold in ~⅓ cup chopped toasted hazelnuts into the filling for added crunch, or sprinkle cocoa nibs on top of the chocolate layer before it sets for textural interest.
→ What’s the best way to slice them neatly?
Ensure very firm chilling, use a warm, sharp knife, wipe it between cuts, and consider scoring first. Slicing after they’ve chilled in the fridge (or briefly in freezer) gives clean edges.
These hazelnut cream bars are a decadent meeting of velvety nut‑cream and glossy chocolate—simply irresistible and perfect for treating yourself or impressing your guests.


