Walking into my first sushi-making class, I never imagined that rolling my own Alaska rolls would become one of my favorite weekend activities. The instructor, a patient Japanese chef, taught us that sushi isn’t just about raw fish – it’s about the harmony of flavors, textures, and the meditative process of creating something beautiful with your hands. That first perfectly rolled Alaska roll, with its vibrant salmon exterior and creamy interior, sparked a passion that transformed my kitchen into a sushi sanctuary.
What makes the Alaska roll particularly special is its approachable nature for home cooks. Unlike more complex sushi varieties, this inside-out roll combines familiar flavors – creamy avocado, sweet crab, fresh cucumber, and buttery salmon – in a way that feels both exotic and comfortingly familiar.
Why Alaska Rolls Will Revolutionize Your Home Cooking
Perfect Introduction to Sushi Making
Unlike traditional sushi that requires years of training to master, Alaska rolls are forgiving and achievable for beginners. The inside-out rolling technique hides imperfections while still delivering authentic sushi bar flavors. Moreover, the combination of cooked crab and fresh salmon provides the perfect balance for those still warming up to raw fish preparations.
Impressive Yet Accessible
These rolls look incredibly sophisticated when properly made, making them perfect for dinner parties or special occasions. The vibrant orange salmon draped over each roll creates stunning visual appeal that rivals restaurant presentations. Additionally, guests are always amazed when they discover you made sushi at home, elevating your culinary reputation instantly.
Customizable to Your Preferences
The beauty of making Alaska rolls at home lies in controlling every ingredient. You can adjust the amount of spicy mayo, choose your preferred avocado ripeness, or substitute ingredients based on dietary restrictions. Furthermore, once you master the basic technique, endless variations become possible with different fish, vegetables, and flavor combinations.
Essential Ingredients
Sushi Rice Foundation
- 2 cups uncooked white rice, preferably short-grain sushi rice
- 4 cups water for cooking
- 1/2 cup seasoned rice vinegar
- 1 teaspoon white sugar
- 1 teaspoon salt
Alaska Roll Components
- 6 ounces krab meat sticks or genuine cooked crab meat
- 2 tablespoons Japanese mayonnaise (Kewpie preferred)
- 4 sheets nori (dry seaweed), high-quality for best results
- 1 ripe avocado, perfectly ripe for easy slicing
- 1 English cucumber, seedless variety preferred
- 6 ounces sushi-grade salmon, fresh from a reputable source
Finishing Touches
- Toasted white sesame seeds for garnish
- Pickled ginger for palate cleansing
- Low-sodium soy sauce for dipping
- Wasabi paste for heat lovers
Essential Equipment
- Bamboo sushi mat (makisu)
- Plastic wrap for covering the mat
- Sharp knife for clean cuts
- Rice paddle or large wooden spoon
- Small bowl of water for knife cleaning
Perfecting Sushi Rice
Cooking the Rice Base
Begin by rinsing the uncooked rice under cold water until the water runs clear, typically 3-4 rinses. This removes excess starch that can make the rice too sticky for proper sushi making. Combine the rinsed rice with 4 cups of water in a large, heavy-bottomed pot.
Bring the water to a rolling boil over high heat, then immediately reduce the heat to medium-low and cover tightly. Allow the rice to simmer undisturbed for 20-22 minutes, until all liquid is absorbed and the rice is tender throughout.
Creating the Seasoning Mixture
While the rice cooks, prepare your seasoning mixture by combining the seasoned rice vinegar, sugar, and salt in a small bowl. Stir until the sugar and salt completely dissolve, creating a clear, well-integrated liquid that will flavor your rice perfectly.
This seasoning mixture, called sushi-zu, is what transforms ordinary cooked rice into proper sushi rice with its characteristic slightly sweet, tangy flavor that complements the other roll ingredients.
Seasoning and Cooling Process
Transfer the hot cooked rice to a large, shallow bowl – traditionally a wooden sushi tub, but any large bowl works. Pour the seasoning mixture evenly over the hot rice, then use a rice paddle or large spoon to gently cut and fold the mixture into the rice.
Avoid stirring in circular motions, which can make the rice mushy. Instead, use a cutting and folding motion while fanning the rice to cool it quickly. This technique helps achieve the proper texture and prevents the rice from becoming gummy.
Preparing the Filling Components
Crab Mixture Preparation
Examine the krab meat carefully, removing any shell pieces or cartilage that might have been missed during processing. Using clean hands or two forks, shred the krab meat into bite-sized pieces that will distribute evenly throughout the roll.
Combine the shredded krab meat with Japanese mayonnaise in a small bowl, mixing gently to coat each piece without creating a paste. The mixture should hold together slightly but still maintain distinct pieces of crab for the best texture contrast.
Vegetable Preparation
Cut the avocado in half, remove the pit, and slice each half into thin, even strips while still in the skin. Carefully scoop out the slices with a spoon, keeping them intact for beautiful presentation within the roll.
For the cucumber, peel completely and cut in half lengthwise. Use a spoon to scrape out the seeds, then cut the cucumber into thin strips about 1/4-inch wide. Removing the seeds prevents excess moisture that could make the roll soggy.
Salmon Preparation
Using a very sharp knife, slice the sushi-grade salmon against the grain into thin pieces, approximately 1/8-inch thick. These slices should be large enough to drape over the completed roll while remaining thin enough to conform to the roll’s shape.
Keep the sliced salmon refrigerated until ready to use, and work quickly when handling to maintain food safety and optimal texture.
Rolling Technique Mastery
Setting Up Your Station
Cover your bamboo sushi mat completely with plastic wrap, ensuring no bamboo shows through. This prevents rice from sticking to the mat and makes cleanup significantly easier. Have a small bowl of water nearby for keeping your hands and knife wet during the rolling process.
Place one sheet of nori shiny-side down on the plastic-covered mat, positioning it so the lines of the bamboo run parallel to the shorter edge of the nori sheet.
Rice Application Method
With wet hands to prevent sticking, take about 3/4 cup of seasoned sushi rice and spread it evenly across the nori sheet, leaving a 1/2-inch border at the top edge. The rice layer should be thin but complete, with no nori showing through.
Gently flip the nori sheet so the rice side is down against the plastic-covered mat. The nori should now be facing up, ready for filling placement.
Filling Placement Strategy
Arrange your fillings in a straight line across the center of the exposed nori sheet. Start with a thin layer of the crab mixture, followed by 2-3 avocado slices and several cucumber strips. Don’t overfill, as this makes rolling difficult and can cause the roll to burst.
The key to successful rolling lies in proper filling distribution – each bite should contain all components in balanced proportions.

Rolling and Finishing Process
The Rolling Motion
Using the bamboo mat as a guide, lift the edge closest to you and begin rolling away from your body. Apply gentle, even pressure while rolling, using the mat to shape and compress the roll as you go.
Continue rolling until you reach the far edge of the nori, then use the mat to give the completed roll a final gentle squeeze to ensure it holds together properly. The roll should be firm but not compressed so tightly that filling squeezes out.
Salmon Application Technique
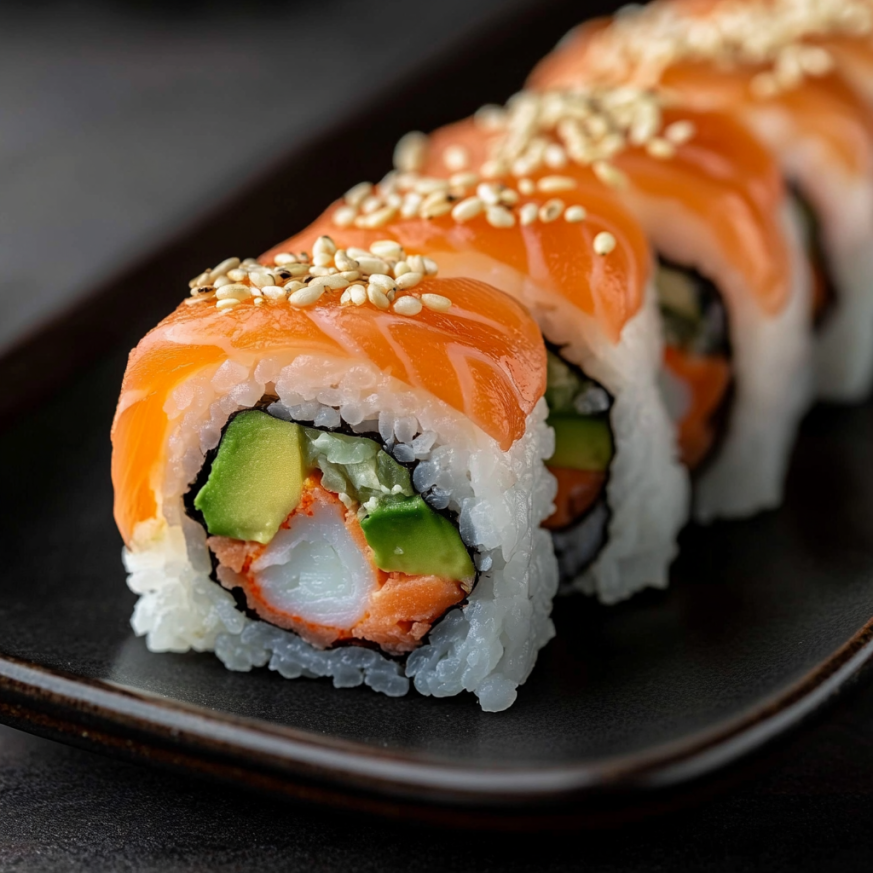
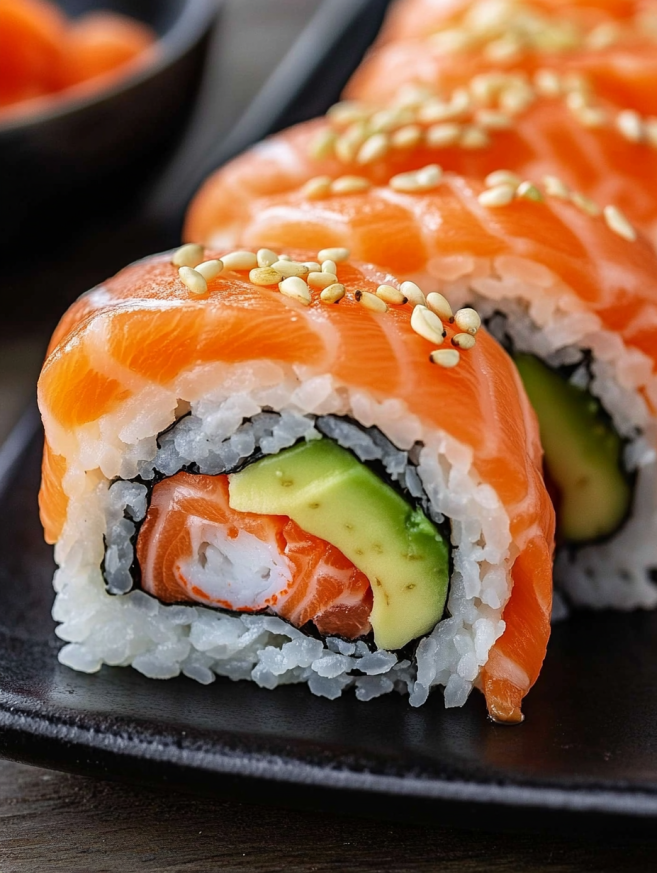
Carefully arrange the sliced salmon over the entire surface of the roll, overlapping pieces slightly to create complete coverage. Place the plastic-covered mat over the salmon-topped roll and gently press to help the fish adhere to the rice exterior.
This step requires a delicate touch – enough pressure to make the salmon stick, but not so much that you compress the roll or tear the delicate fish.
Cutting for Perfect Presentation
Using a very sharp knife dipped in water, cut the roll into 6 equal pieces with a clean, decisive motion. Clean the knife between cuts to prevent dragging rice or salmon, which can make messy, uneven pieces.
Cut straight down without sawing motions, which can damage the roll’s structure and create rough edges that detract from the presentation.
Serving and Presentation
Plating Techniques
Arrange the cut pieces on a clean serving plate with the cut sides showing the beautiful interior layers. Traditional presentation places them in a straight line, but circular arrangements can also create stunning visual impact.
Garnish each piece with a light sprinkle of toasted sesame seeds, which add both visual appeal and a subtle nutty flavor that complements the other ingredients perfectly.
Accompaniment Guide
Serve immediately with small dishes of pickled ginger, soy sauce, and wasabi paste on the side. The pickled ginger cleanses the palate between pieces, while the soy sauce and wasabi allow diners to customize the flavor intensity to their preferences.
For an authentic experience, provide chopsticks alongside small plates for individual servings, though Alaska rolls are also perfectly acceptable to eat with fingers.
Creative Variations
Protein Alternatives
While traditional Alaska rolls use crab and salmon, experiment with cooked shrimp, smoked salmon, or even grilled chicken for different flavor profiles. Each protein brings its own character while maintaining the roll’s essential structure and appeal.
Spice Level Modifications
Add sriracha or spicy mayo to the crab mixture for heat lovers, or incorporate thinly sliced jalapeños for fresh heat that doesn’t overpower the delicate fish flavors. Start conservatively, as you can always add more spice but can’t remove it.
Vegetarian Adaptations
Create stunning vegetarian versions using marinated mushrooms, roasted bell peppers, or additional avocado and cucumber. The rolling technique remains identical, making these variations perfect for mixed groups with different dietary preferences.
Make-Ahead Strategies
Rice Preparation
Sushi rice can be made up to 4 hours ahead and kept at room temperature, covered with a damp towel. Never refrigerate sushi rice, as this changes the texture and makes it unsuitable for rolling.
Component Prep
Prepare all vegetables and the crab mixture up to 2 hours ahead, storing them separately in the refrigerator. However, slice the avocado just before assembling to prevent browning, or brush with lemon juice for longer storage.
Rolling Timeline
Complete rolls should be served within 2 hours of making for optimal texture and food safety. The nori can become chewy if left too long, and the rice quality deteriorates over time.
Notes for Success
The quality of your ingredients directly impacts the final result, so invest in sushi-grade salmon from reputable sources and high-quality nori that isn’t brittle or torn. Fresh, properly seasoned rice makes all the difference between amateur and professional-tasting results.
Keep your hands slightly wet throughout the process to prevent rice from sticking, but don’t use so much water that you dilute the rice seasoning. Practice the rolling motion a few times with just rice and nori before adding expensive fillings.
Temperature control is crucial – serve the rolls at room temperature for the best flavor and texture balance between the cool fillings and seasoned rice.
Frequently Asked Questions
Can I use regular mayonnaise instead of Japanese mayo? While you can substitute regular mayonnaise, Japanese mayo (like Kewpie) has a richer, slightly sweeter flavor and creamier texture that works better with sushi. If using regular mayo, you might want to add a tiny amount of rice vinegar to approximate the flavor.
How do I know if salmon is sushi-grade? Purchase salmon specifically labeled as “sushi-grade” or “sashimi-grade” from reputable fish markets or grocery stores with high turnover. The fish should smell like the ocean, not “fishy,” and have a firm, bright-colored appearance without any dull or slimy areas.
What if my rice is too sticky or too dry? Too sticky usually means you used too much water or stirred too vigorously when adding the seasoning. Too dry often indicates insufficient seasoning mixture or overcooking. Adjust gradually next time, as rice texture improves with practice.
Can I make these rolls without a bamboo mat? While a bamboo mat makes rolling easier and creates better shape, you can use a clean kitchen towel or even roll by hand. The results may be less uniform, but the technique remains the same.
Why does my nori become chewy? Nori becomes chewy when exposed to moisture for too long. Store unused sheets in an airtight container with desiccant packets, and assemble rolls just before serving. High humidity can also affect nori texture.
How thin should I slice the salmon? Aim for slices about 1/8-inch thick – thin enough to conform to the roll’s shape but thick enough to provide substantial flavor and texture. Practice makes perfect with knife skills, so don’t worry if your first attempts aren’t uniform.
Yield: 4 servings (24 pieces total)
Prep Time: 20 minutes
Cook Time: 20 minutes
Total Time: 1 hour
Course: Main Course
Cuisine: Japanese-American
Nutritional Information (per serving):
- Calories: 583kcal
- Carbohydrates: 82g
- Protein: 25g
- Fat: 16g
- Saturated Fat: 3g
- Cholesterol: 44mg
- Sodium: 1023mg
- Potassium: 767mg
- Fiber: 5g
- Sugar: 3g
- Vitamin A: 319IU
- Vitamin C: 11mg
- Calcium: 80mg
- Iron: 2mg


