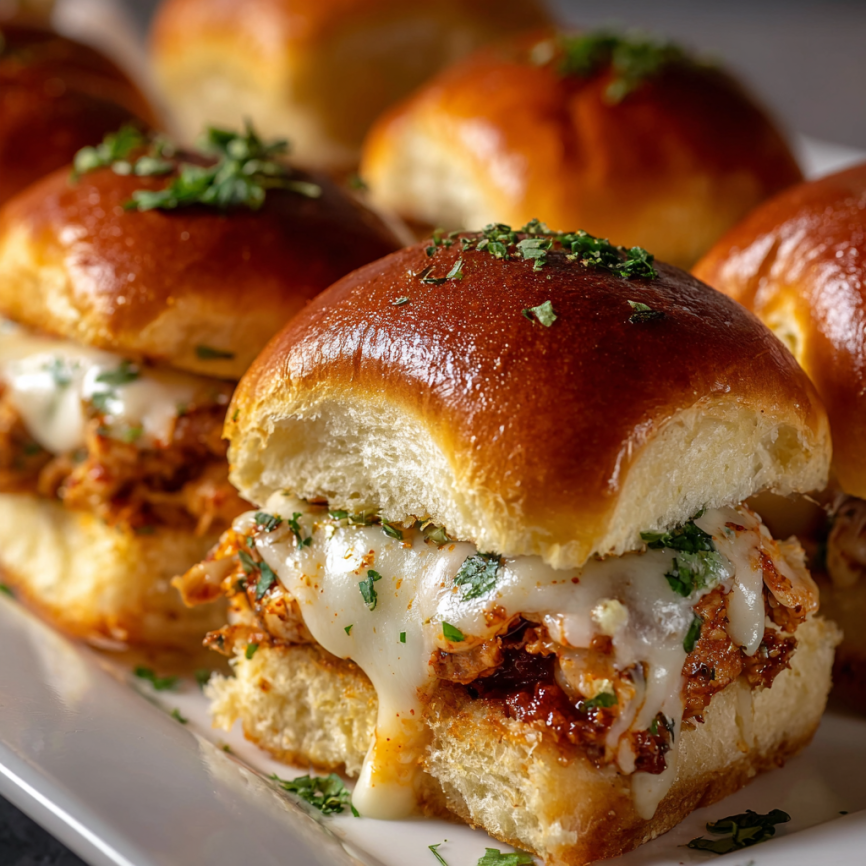
I’ll never forget the look on my teenager’s face the first time I served these sliders for dinner. She’d been begging for “something different” from our usual weeknight rotation, and these little beauties delivered exactly that. What started as an experiment to make chicken parmesan more fun and shareable has become our family’s most-requested meal. There’s something magical about transforming a classic Italian dish into handheld slider form—it feels special enough for company yet casual enough for a Tuesday night. The combination of tender seasoned chicken, tangy marinara, gooey melted cheese, and soft, buttery buns creates pure comfort food magic that appeals to everyone from picky eaters to adventurous foodies.
Prep Time: 15 minutes
Cook Time: 30 minutes
Total Time: 45 minutes
Yield: 12 sliders
Category: Dinner
Method: Baking
Cuisine: Italian
Diet: Gluten Free (with appropriate bun substitution)
Why You’ll Love These Chicken Parmesan Sliders
These sliders solve the eternal question of “what’s for dinner?” with style and minimal effort. Unlike traditional chicken parmesan that requires individual plating and careful assembly, this recipe lets you build everything in one baking dish. The slider format means everyone can grab what they want, making it perfect for casual family dinners or feeding a crowd without the stress.
The make-ahead friendly nature of this dish is a lifesaver for busy schedules. You can prep the entire recipe hours in advance, refrigerate it, and simply pop it in the oven when dinner time rolls around. This flexibility means less last-minute cooking stress and more time to actually enjoy your evening.
Flavor-wise, these sliders deliver all the Italian-restaurant goodness you crave—seasoned chicken, robust marinara, and that irresistible cheese pull—wrapped up in soft, slightly toasted buns. The individual portions make them feel more special than a regular casserole, yet they’re incredibly easy to eat. Kids love the fun size, adults appreciate the sophisticated flavors, and everyone enjoys the interactive nature of slider-style dining.
Finally, this recipe is wonderfully versatile and budget-friendly. Chicken breast is economical, especially when you’re stretching it across twelve servings. The ingredient list uses pantry staples and common items you likely already have on hand, eliminating those frustrating trips to the store for specialty ingredients.
Ingredients You’ll Need
Main Components
- 1 lb boneless, skinless chicken breasts – The protein foundation of your sliders
- 1 cup marinara sauce – Use your favorite jarred sauce or homemade if you’re feeling ambitious
- 1 cup shredded mozzarella cheese – Creates that classic cheese pull
- 1/2 cup grated Parmesan cheese – Adds nutty, salty depth
- 1 teaspoon Italian seasoning – A blend of herbs that brings authentic flavor
- 1/2 teaspoon garlic powder – Enhances the savory profile
- Salt and pepper to taste – Essential seasonings for the chicken
- 12 slider buns – Hawaiian rolls work beautifully for a slightly sweet contrast
- 2 tablespoons olive oil – For cooking the chicken to golden perfection
Note: This recipe scales perfectly! Use the 2x option for larger gatherings or the 3x for parties—these disappear fast!
Step-by-Step Instructions
Prepare and Season the Chicken
Start by preheating your oven to 375°F (190°C), giving it plenty of time to reach the proper temperature while you prepare the chicken. Pat the chicken breasts dry with paper towels—this simple step ensures better browning and helps the seasonings stick.
In a small bowl, combine the Italian seasoning, garlic powder, salt, and pepper. Sprinkle this seasoning mixture generously over both sides of each chicken breast, pressing gently so the spices adhere to the meat. Don’t be shy with the seasoning—this is where your flavor foundation begins.
Beginner Tip: If your chicken breasts are particularly thick (over 1 inch), consider butterflying them or pounding them to a more even thickness. This ensures they cook evenly and slice more easily later. Place the chicken between two pieces of plastic wrap and gently pound with a meat mallet or rolling pin.
Cook the Chicken
Heat the olive oil in a large skillet over medium heat. Once the oil shimmers (after about 2 minutes), carefully add the seasoned chicken breasts. Listen for that satisfying sizzle—it means your pan is at the right temperature. Cook the chicken for 6-7 minutes on the first side without moving it around. This patience rewards you with a beautiful golden-brown crust.
Flip the chicken breasts and continue cooking for another 6-7 minutes on the second side. The chicken is done when it reaches an internal temperature of 165°F and the juices run clear when pierced with a fork. If you’re unsure, a meat thermometer is your best friend—no more guessing!
Once fully cooked, transfer the chicken to a cutting board and let it rest for 3-4 minutes. This resting period allows the juices to redistribute throughout the meat, keeping it moist and tender. After resting, slice the chicken into thin strips, about 1/4-inch thick.
Beginner Tip: Cutting against the grain (perpendicular to the muscle fibers) makes the chicken more tender and easier to bite through when assembled in the sliders.
Assemble the Sliders
Now comes the fun part—building your slider masterpiece! If your slider buns aren’t already connected, arrange them in a 9×13-inch baking dish so they fit snugly together. If using a connected pack of slider buns (like Hawaiian rolls), slice the entire pack horizontally through the middle, keeping the bottom layer intact as one piece.
Place the bottom halves of the buns in your baking dish. Spread the marinara sauce evenly over the bottom buns, ensuring every slider gets its share of saucy goodness. Layer the sliced chicken evenly over the sauce, distributing it so each slider has an equal amount of protein.
Sprinkle the shredded mozzarella cheese over the chicken, followed by the grated Parmesan. The combination of these two cheeses creates the perfect melty, golden topping. Finally, place the top halves of the buns over the cheese layer, pressing down gently to compact everything together.
Beginner Tip: For extra flavor and a beautiful golden finish, brush the tops of the buns with melted butter mixed with a pinch of garlic powder and Italian seasoning before baking.
Bake to Perfection
Cover the entire baking dish tightly with aluminum foil. This trapped steam helps melt the cheese and keeps the buns soft and pillowy. Slide the covered dish into your preheated oven and bake for 15 minutes.
After 15 minutes, carefully remove the foil (watch out for hot steam!) and return the uncovered dish to the oven. Continue baking for an additional 10 minutes. During this final baking phase, the cheese becomes gloriously bubbly, slightly golden, and irresistibly gooey. The tops of the buns will toast to a light golden color, adding texture and visual appeal.
Remove the baking dish from the oven and let the sliders rest for 3-5 minutes before serving. This brief cooling period makes them easier to handle and prevents anyone from burning their mouth on molten cheese—we’ve all been there!
Beginner Tip: Use a sharp serrated knife to cut between the sliders cleanly. A gentle sawing motion works better than pressing straight down, which can squish everything.
Serving Suggestions
These sliders shine as the centerpiece of a casual Italian-inspired meal. For a complete dinner experience, serve them alongside a crisp Caesar salad with homemade croutons and plenty of Parmesan shavings. The fresh, crunchy greens provide a perfect contrast to the rich, cheesy sliders.
Roasted vegetables make another excellent accompaniment. Try roasted broccoli with garlic, Italian-seasoned zucchini, or a medley of bell peppers and onions. These veggie sides add nutritional value and colorful variety to your plate. A simple caprese salad with fresh mozzarella, tomatoes, and basil also complements the Italian theme beautifully.
For a heartier meal, consider serving the sliders with garlic bread or a warm bowl of minestrone soup. If you’re hosting a more casual gathering like game day or a kids’ party, set out marinara sauce for dipping, along with pickles, pepperoncini, and olives for a DIY Italian slider bar.
Beverage-wise, these sliders pair wonderfully with Italian sodas, lemonade, or iced tea for non-alcoholic options. If you’re serving adults, a light Italian red wine like Chianti or a crisp Pinot Grigio complements the flavors perfectly.
Recipe Variations to Try
Spicy Chicken Parmesan Sliders
Transform these into fiery delights by adding crushed red pepper flakes to your chicken seasoning. Use spicy marinara sauce or arrabbiata instead of regular marinara, and top with pepper jack cheese alongside the mozzarella. Finish with sliced jalapeños for those who really love heat.
Pesto Chicken Sliders
Replace half the marinara sauce with basil pesto for a fresh, herbaceous twist. Layer thin slices of fresh tomato between the chicken and cheese for added freshness. The pesto brings bright, summery flavors that feel lighter than traditional marinara.
Supreme Italian Sliders
Load these up with additional toppings for a more substantial meal. Add sautéed mushrooms, bell peppers, and onions between the chicken and cheese layers. Sprinkle crispy bacon pieces over the cheese for a smokier, heartier version that satisfies bigger appetites.
Buffalo Chicken Parmesan Sliders
Toss the cooked, sliced chicken in buffalo sauce before layering it on the buns. Use a mixture of mozzarella and blue cheese crumbles for the topping. Drizzle with ranch dressing after baking for a fun fusion that combines two beloved flavors.
Vegetarian Option
Substitute breaded and baked eggplant slices or portobello mushrooms for the chicken. The eggplant version particularly mimics traditional eggplant parmesan, creating a meat-free alternative that’s just as satisfying. Follow the same assembly and baking instructions.
Make-Ahead and Storage Tips
These sliders are incredibly prep-friendly, making them ideal for busy weeknights or entertaining. Assemble the entire dish up to 24 hours in advance, cover tightly with plastic wrap, and refrigerate. When you’re ready to serve, remove the plastic wrap, cover with foil, and bake as directed. You may need to add 5-10 minutes to the covered baking time if starting from cold.
For even more advance prep, cook and slice the chicken up to 2 days ahead. Store it in an airtight container in the refrigerator, then proceed with assembly when ready. The marinara sauce and cheese can also be measured out and stored separately, making final assembly incredibly quick.
Leftover sliders keep well in the refrigerator for up to 3 days. Store them in an airtight container and reheat individual sliders in the microwave for 30-45 seconds, or warm several at once in a 300°F oven for about 10 minutes. The oven method better preserves the texture of the buns, though microwaving is faster for single servings.
Freezing Instructions
These sliders freeze surprisingly well for future easy meals. Assemble the sliders completely but don’t bake them. Wrap the entire baking dish tightly in plastic wrap, then cover with aluminum foil. Freeze for up to 2 months. When ready to serve, thaw overnight in the refrigerator, then bake according to the original instructions.
Alternatively, you can freeze fully baked sliders. Let them cool completely, wrap individually in plastic wrap, and store in a freezer bag. Reheat from frozen at 350°F for 15-20 minutes, or microwave individual sliders for 1-2 minutes.
Important Notes
- Extra flavor boost: Feel free to add fresh basil leaves, baby spinach, or arugula between the chicken and cheese layers for additional nutrition and a pop of freshness.
- Make-ahead convenience: These sliders can be completely assembled and refrigerated several hours before baking, making them perfect for entertaining or busy evenings.
- Complete meal: Serve alongside a crisp green salad or roasted vegetables for a well-rounded dinner that satisfies everyone at the table.
- Cheese variations: Experiment with different cheese combinations—try provolone, fontina, or a blend of Italian cheeses for varied flavor profiles.
- Bun alternatives: For a gluten-free version, use gluten-free slider buns. For a low-carb option, serve the chicken parmesan mixture over lettuce wraps or use portobello mushroom caps as “buns.”
Frequently Asked Questions
Can I use chicken thighs instead of chicken breasts?
Absolutely! Boneless, skinless chicken thighs work wonderfully and many people prefer them for their juicier texture and richer flavor. They take approximately the same cooking time but are more forgiving if slightly overcooked. Just ensure they reach that safe internal temperature of 165°F.
What if I don’t have slider buns?
No problem! Regular hamburger buns work perfectly—just cut them into smaller portions after baking. Hawaiian sweet rolls are my personal favorite for their subtle sweetness that balances the savory filling. You can also use ciabatta rolls, pretzel buns, or even garlic bread for a fun twist.
How do I prevent the bottom buns from getting soggy?
Great question! A light toasting of the bottom buns before assembly helps create a barrier. You can also spread a thin layer of softened butter or olive oil on the cut sides before adding the marinara. Another trick is to sprinkle a bit of the Parmesan cheese on the bottom buns before the sauce—it creates a protective layer.
Can I make these in advance for a party?
Yes, they’re perfect for entertaining! Assemble them completely up to 24 hours ahead, cover tightly, and refrigerate. Pop them in the oven about 30 minutes before you want to serve them. They’ll emerge hot, melty, and impressive with minimal last-minute effort.
What’s the best marinara sauce to use?
Any good-quality marinara works beautifully. Rao’s Homemade and Victoria are excellent jarred options if you don’t want to make your own. Look for sauces with simple ingredient lists and avoid those with too much added sugar. Of course, homemade marinara takes these to the next level if you have extra time.
Can I add more vegetables to these sliders?
Definitely! Sautéed mushrooms, roasted red peppers, caramelized onions, or fresh spinach all make excellent additions. Layer them between the chicken and cheese or mix them into the marinara sauce. Just be careful not to add too many wet ingredients, which can make the buns soggy.
How do I know when the chicken is fully cooked?
The most reliable method is using an instant-read thermometer—chicken is safe at 165°F. Visually, the juices should run clear when you pierce the thickest part, and the meat should no longer be pink inside. If you slice into it during cooking and it’s still pink, continue cooking and check again in 2-3 minutes.
Can I make a larger batch for a crowd?
Absolutely! This recipe doubles or triples beautifully. Use multiple baking dishes or larger pans to accommodate more sliders. The baking time remains the same—just ensure you’re not overcrowding, which can lead to uneven heating. Prepare two pans rather than one overstuffed dish for best results.
Nutrition Information (Per Slider)
- Calories: 250
- Protein: 15g
- Carbohydrates: 30g
- Fat: 10g (Saturated: 4g, Unsaturated: 6g, Trans: 0g)
- Cholesterol: 60mg
- Sodium: 500mg
- Sugar: 2g
- Fiber: 1g
Did you make this recipe?
Share a photo and tag us — we can’t wait to see your delicious chicken parmesan sliders! Your creations inspire other home cooks to try new recipes and bring joy to their dinner tables.