
When I first served this pie at my neighbor’s birthday party, the entire room fell silent after the first bite. Not an uncomfortable silence, but the kind that happens when people encounter something so unexpectedly delicious that they need a moment to process what just happened. Since that memorable evening, this Peanut Butter Banana Cream Pie has become my secret weapon for special occasions and the dessert that friends specifically request when they know I’m bringing something sweet.
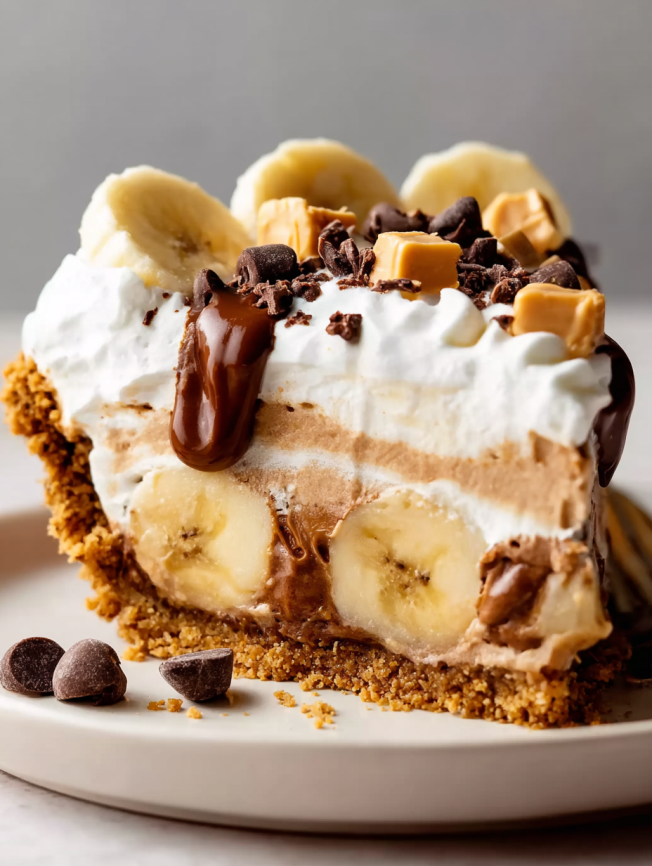
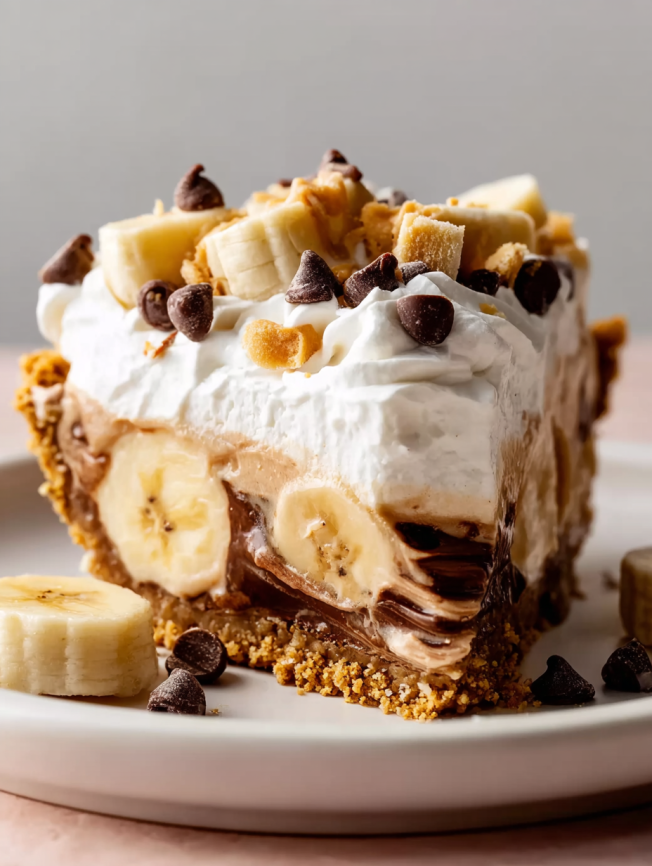
What makes this pie extraordinary isn’t just one element – it’s the brilliant interplay of textures and flavors that creates pure dessert magic. The crunchy Nutter Butter crust gives way to silky chocolate ganache, followed by sweet banana slices nestled in clouds of peanut butter mousse, all crowned with billowy whipped cream. Each forkful delivers a different combination of these layers, ensuring that no two bites are exactly the same.
Why This Pie Will Become Your Signature Dessert
This isn’t your typical cream pie – it’s a masterclass in how complementary flavors can create something greater than the sum of their parts. First, the combination of peanut butter and banana is naturally irresistible, reminding us of childhood lunch boxes and comfort food at its finest. However, the addition of chocolate ganache elevates this nostalgic pairing into sophisticated territory.
Moreover, this pie offers the perfect balance of textures that keeps each bite interesting. The crunchy cookie crust contrasts beautifully with the smooth ganache, while the creamy peanut butter filling provides richness that’s lightened by fresh bananas and airy whipped cream.
Additionally, this recipe is surprisingly forgiving and can be largely prepared in advance, making it ideal for entertaining. Unlike temperamental desserts that require last-minute preparation, this pie actually improves with time as the flavors meld and develop. Finally, it’s guaranteed to please both children and adults, making it the perfect choice for family gatherings where you need to satisfy diverse tastes.
Essential Components & Premium Ingredients
Nutter Butter Cookie Crust:
- 20 Nutter Butter cookies (yields 2½ cups or 290g fine crumbs)
- ¼ cup (4 tablespoons/56g) unsalted butter, melted
Silky Chocolate Ganache Layer:
- 4 ounces (113g) quality semi-sweet chocolate, finely chopped
- ½ cup (120ml) heavy cream (don’t substitute with lighter options)
Creamy Peanut Butter Filling:
- ⅔ cup (160ml) cold heavy cream (essential for whipping)
- 6 ounces (170g) full-fat brick cream cheese, softened to room temperature
- 1 cup (250g) creamy peanut butter (processed brands work best)
- ⅔ cup (80g) confectioners’ sugar (creates perfect sweetness)
- 1 teaspoon pure vanilla extract (enhances all flavors)
- 4 fresh bananas, divided (2 for layering, 2 for topping)
Cloud-Like Whipped Cream Topping:
- 1 cup (240ml) cold heavy cream
- 2 tablespoons (15g) confectioners’ sugar
- ½ teaspoon pure vanilla extract
- Optional garnishes: Extra Nutter Butter cookies and chocolate curls
Timing & Yield:
- Prep Time: 1 hour
- Cook Time: 15 minutes (crust only)
- Total Time: 6 hours (includes essential chilling)
- Yield: One spectacular 9-inch pie (8-10 generous servings)
Step-by-Step Assembly Instructions
Creating the Foundation
Step 1: Prepare Your Workspace Preheat your oven to 350°F (177°C). Having everything at the proper temperature from the start ensures smooth preparation and optimal results throughout the process.
Step 2: Craft the Perfect Crust Using a food processor or blender, pulse the entire Nutter Butter cookies (including the filling) into fine, uniform crumbs. Combine these aromatic crumbs with melted butter, stirring until the mixture resembles wet sand. Press this mixture into an ungreased 9-inch pie dish, using medium pressure to create a compact crust that extends up the sides. Avoid over-packing, which creates an unpleasantly hard texture.
Step 3: Bake to Golden Perfection Bake the pressed crust for exactly 15 minutes until it’s set and lightly golden. Allow it to cool completely while you prepare the remaining components – this prevents the ganache from melting when applied.
Building the Flavor Layers
Step 4: Master the Chocolate Ganache Place your finely chopped chocolate in a medium heatproof bowl. Heat the heavy cream in a small saucepan over medium heat until it just begins to simmer gently – avoid rapid boiling, which can break the ganache. Pour the hot cream over the chocolate and let it sit undisturbed for 2-3 minutes, allowing the heat to gently soften the chocolate. Using a metal spoon or silicone spatula, stir very slowly in small circles, working from the center outward until the mixture becomes glossy and smooth.
Step 5: Create the Peanut Butter Mousse Using a hand mixer or stand mixer with whisk attachment, beat ⅔ cup of cold heavy cream on medium-high speed until stiff peaks form (approximately 3-5 minutes). Transfer this whipped cream to a separate bowl and set aside. Without cleaning the mixing bowl, beat together the softened cream cheese, peanut butter, confectioners’ sugar, and vanilla extract on medium-high speed until perfectly combined and smooth. The mixture will be quite thick at this stage, which is exactly right.
Step 6: Fold with Finesse Gently fold the reserved whipped cream into the peanut butter mixture using slow, deliberate motions. This technique preserves the airiness that makes the filling light and mousse-like rather than dense and heavy.
The Art of Assembly
Step 7: Layer with Precision Spread the cooled chocolate ganache evenly over your prepared crust, creating a smooth, even layer that will serve as a moisture barrier. Slice 2 bananas into rounds and arrange them in a single layer over the ganache – don’t worry about perfect placement, as the rustic look adds charm.
Step 8: Add the Star Component Carefully spread the peanut butter mousse over the banana layer, taking your time to distribute it evenly. The banana slices may shift slightly under the weight of the filling, but patience and gentle spreading will yield beautiful results.
Step 9: The Essential Chill Cover the assembled pie and refrigerate for 5-6 hours, or up to 1 day. This chilling time isn’t optional – it allows the layers to set properly and the flavors to meld into harmonious perfection.
Final Flourishes
Step 10: Prepare the Crown When ready to serve, whip the remaining heavy cream with confectioners’ sugar and vanilla extract until stiff peaks form (4-5 minutes). This fresh whipped cream provides the perfect light contrast to the rich layers below.
Step 11: The Grand Finale Slice the remaining 2 bananas and arrange them artfully over the chilled pie. Top with generous dollops or elegant swirls of fresh whipped cream. For extra elegance, create chocolate curls using a vegetable peeler on a milk chocolate bar, then delicately place them on the whipped cream.
Stunning Presentation Ideas
Elegant Dinner Parties: Serve on chilled dessert plates with a light dusting of cocoa powder and a single perfect chocolate curl for sophisticated presentation.
Family Celebrations: Garnish each slice with a mini Nutter Butter cookie standing upright in the whipped cream for playful charm that delights both children and adults.
Holiday Gatherings: Create height variation by piping the whipped cream using a star tip, then finish with toasted chopped peanuts and a drizzle of melted chocolate for restaurant-quality presentation.
Casual Entertaining: Serve directly from the pie dish with a beautiful pie server, allowing the rustic layers to show their natural beauty.
Creative Recipe Variations
Flavor Adventures
Elvis Inspiration: Add crispy bacon bits between the banana and peanut butter layers for the ultimate Elvis Presley tribute dessert.
Chocolate Peanut Butter Overload: Replace the Nutter Butter crust with an Oreo cookie crust and add mini chocolate chips to the peanut butter filling.
Tropical Twist: Substitute sliced strawberries for half the bananas and add a hint of coconut extract to the whipped cream.
Crust Alternatives
Graham Cracker Classic: Use traditional graham cracker crust for a more neutral base that lets the filling flavors shine.
Pretzel Crust Surprise: Combine crushed pretzels with melted butter for a salty-sweet crust that adds unexpected textural interest.
Chocolate Cookie Base: Use chocolate wafer cookies for the crust to create an all-chocolate foundation.
Make-Ahead Mastery for Effortless Entertaining
Timeline Strategy: This pie is actually better when made a day ahead, as the flavors have time to meld and develop complexity. Complete the pie through the peanut butter filling layer, then add fresh whipped cream and bananas just before serving.
Component Preparation: The chocolate ganache can be made up to 3 days ahead and stored covered at room temperature. The peanut butter filling can be prepared 2 days in advance and refrigerated until assembly time.
Storage Solutions: Store the completed pie (without final banana topping and whipped cream) covered in the refrigerator for up to 2 days. Add the fresh elements just before serving to maintain optimal texture and appearance.
Serving Strategy: Remove the pie from refrigeration about 10 minutes before serving to allow for easier slicing while maintaining the perfect chilled temperature.
Professional Techniques & Success Tips
Ingredient Quality: Use high-quality chocolate for the ganache – grocery store baking bars from brands like Ghirardelli or Baker’s work excellently. Avoid chocolate chips for ganache, as they contain stabilizers that can prevent smooth melting.
Texture Perfection: Room temperature cream cheese is crucial for smooth filling. Plan to remove it from refrigeration 2-3 hours before use, or soften quickly by placing the wrapped package in warm water for 30 minutes.
Whipping Success: Cold heavy cream whips better and faster than room temperature cream. Chill your bowl and beaters in the freezer for 10 minutes before whipping for optimal results.
Banana Selection: Choose bananas that are ripe but still firm – they should be yellow with minimal brown spots for the best texture and appearance.
Frequently Asked Questions
Q: Can I use natural peanut butter instead of processed brands? A: Processed peanut butter (like Jif or Skippy) works best because it has a smoother consistency and better stability. Natural peanut butter can make the filling grainy and may cause separation issues.
Q: How do I prevent my ganache from breaking or becoming grainy? A: The key is temperature control. Heat the cream until it just begins to simmer, not boiling rapidly. Pour it over finely chopped chocolate and let it sit before stirring slowly. If it does break, try whisking in a tablespoon of warm cream.
Q: Can I make this pie without the chocolate ganache layer? A: While the ganache adds wonderful flavor and helps prevent the crust from getting soggy, you can omit it. However, I’d recommend brushing the cooled crust with melted chocolate to create a moisture barrier.
Q: How do I keep the bananas from browning? A: Add the banana topping just before serving for best appearance. If you must add them earlier, lightly brush the banana slices with lemon juice to slow browning.
Q: Can I freeze this pie? A: The pie without fresh bananas and whipped cream topping can be frozen for up to 1 month. Thaw overnight in the refrigerator, then add fresh toppings before serving. Note that the texture may be slightly different after freezing.
Q: What if I can’t find Nutter Butter cookies? A: You can substitute with peanut butter sandwich cookies from another brand, or use regular peanut butter cookies (you’ll need about 24-26 cookies to get enough crumbs).
Q: How do I know when my whipped cream is properly whipped? A: Properly whipped cream holds stiff peaks when you lift the beaters – the peaks should stand upright without drooping. Be careful not to over-whip, which can cause the cream to become grainy and eventually turn to butter.
Q: Can I make individual portions instead of one large pie? A: Absolutely! Use 4-inch tart pans or even mason jars to create individual servings. Adjust the quantities proportionally and reduce the chilling time to about 3-4 hours.
This Peanut Butter Banana Cream Pie represents the pinnacle of comfort food desserts – familiar flavors elevated through thoughtful technique and beautiful presentation. Whether you’re celebrating a special occasion or simply want to create something memorable for the people you love, this pie delivers both visual impact and incredible flavor that will have everyone asking for the recipe!


