Yield: 23 sandwich cookies | Prep Time: 30 minutes | Cook Time: 12 minutes | Total Time: 42 minutes
Last Halloween, I found myself scrambling for the perfect treat to bring to my daughter’s school party. While scrolling through countless complicated recipes, I realized what I really wanted was something that looked absolutely adorable but didn’t require professional decorating skills. That’s when inspiration struck – why not create sandwich cookies that looked like friendly monsters peeking out with their colorful buttercream “guts” showing?
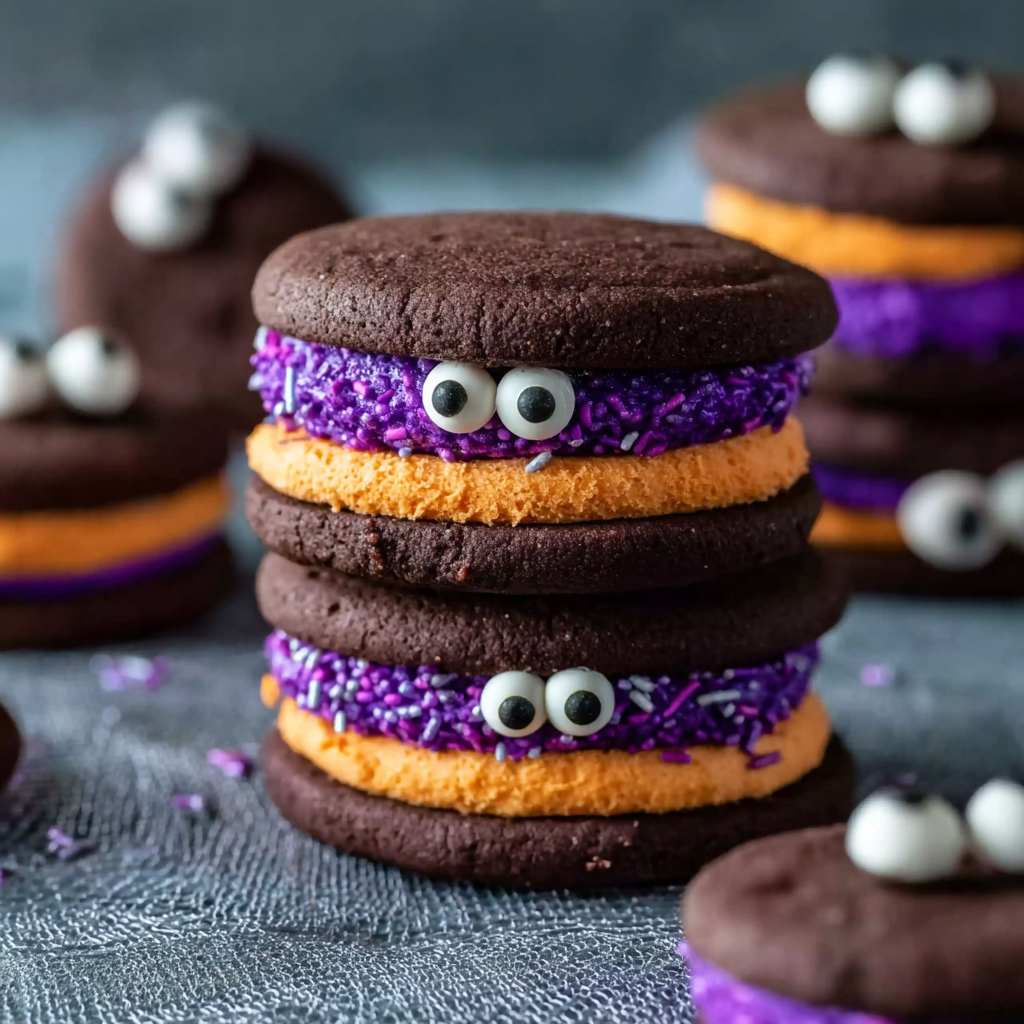
These Chocolate Monster Halloween Cookies became an instant hit, not just with the kids but with every adult who saw them. The beauty lies in their imperfect perfection – each cookie sandwich sits at a playful angle, creating unique monster personalities that make everyone smile. What started as a last-minute solution has become my most requested Halloween recipe, loved for both its charming appearance and incredible taste.
Why These Monster Cookies Will Steal Your Heart
Irresistibly Cute Factor
These cookies are absolutely adorable without being overly complicated to create. The offset sandwich design naturally creates a “monster mouth” effect that reveals the colorful buttercream filling, making each cookie look like it has its own personality and charm.
Perfect Balance of Flavors
The rich, chocolatey cookie base pairs beautifully with the sweet, creamy vanilla buttercream filling. Additionally, the slight saltiness in the buttercream enhances the chocolate flavor, creating a sophisticated taste that appeals to both children and adults.
Foolproof Technique
Unlike many decorated cookies that require precise piping skills, these monsters look better when they’re slightly imperfect. Consequently, even beginning bakers can achieve professional-looking results without stress or special decorating equipment.
Make-Ahead Friendly
Both the cookie dough and buttercream filling can be prepared in advance, making these perfect for busy Halloween schedules. Furthermore, the assembled cookies actually improve in flavor after sitting overnight as the filling softens the cookies slightly.
Essential Ingredients and Measurements
For the Chocolate Cookie Base
- 260g (2 cups/9.2oz) plain all-purpose flour
- 60g (½ cup) Dutch-processed cocoa powder
- ½ teaspoon baking powder
- ¾ cup (150g/5.3oz) white granulated sugar
- 113g (½ cup/1 stick) unsalted butter, cold and cubed
- 1 large egg, cold
- 1 teaspoon vanilla extract
- 1 tablespoon cold milk
For the Vanilla Buttercream Filling
- 1½ cups (195g) powdered sugar (icing/confectioners)
- 80g (⅔ stick) unsalted butter, softened
- 2 teaspoons heavy cream (thickened cream)
- 1 teaspoon vanilla extract
- Pinch of salt
- Purple and orange food coloring
- Monster eye candies and sprinkles for decorating
Ingredient Quality Tips
Use Dutch-processed cocoa powder for the deepest chocolate flavor and darkest color. Cold ingredients are crucial for proper dough formation, so keep your egg and butter refrigerated until ready to use. Gel food coloring works best for achieving vibrant colors without thinning the buttercream.
Step-by-Step Cookie Creation
Preparing the Chocolate Cookies
Begin by preheating your oven to 180°C (350°F/160°C fan-forced) and lining two baking trays with parchment paper. This temperature ensures even baking without over-browning the delicate cookies.
In a food processor, combine flour, baking powder, cocoa powder, and sugar, processing briefly to combine all dry ingredients evenly. Add the cold, cubed butter and process for 20-30 seconds until the butter is finely chopped throughout the mixture. Some small lumps are perfectly acceptable at this stage.
Next, add the cold egg, vanilla extract, and half of the cold milk to the processor. Process for 30-40 seconds until the mixture begins forming large clumps and comes together as dough. If the mixture seems too dry, add the remaining milk and pulse again briefly.
Forming and Rolling the Dough
Turn the dough mixture onto a clean work surface and gently knead with your hands for about one minute until it holds together cohesively. Avoid overworking, as this can result in tough cookies.
Place the dough between two sheets of parchment paper, with one sheet measuring approximately 70cm in length. Roll the dough to 4-5mm thickness, occasionally peeling away the parchment paper to prevent creases from marking the dough surface.
Refrigerate the rolled dough for 30 minutes to firm up, making it easier to cut clean shapes and preventing spreading during baking.
Cutting and Baking
Using a 2-inch round cookie cutter, cut as many cookies as possible from the chilled dough. Carefully transfer each cookie to the prepared baking trays, spacing them about 1 inch apart to allow for slight spreading.
Re-roll any scraps and continue cutting until all dough is used, ensuring consistent cookie sizes for even baking results.
Bake for 6 minutes, then rotate the trays for even browning and bake an additional 6 minutes. The cookies should appear set but not overly dark around the edges.
Transfer immediately to wire racks and allow to cool completely before filling, as warm cookies will melt the buttercream.
Creating the Buttercream Filling
Clean the food processor bowl thoroughly, then combine powdered sugar, softened butter, heavy cream, vanilla extract, and salt. Process on low speed for 2-3 minutes until the mixture becomes smooth, pale, and fluffy.
Divide the finished buttercream between two bowls, then tint one portion with orange food coloring and the other with purple, achieving your desired color intensity.
Assembly Process
Place approximately one teaspoon of colored buttercream slightly off-center on half of the cooled cookies. This offset placement is key to creating the monster mouth effect.
Gently press another cookie on top at a slight angle, allowing the colorful buttercream to peek out like a monster’s mouth or tongue.
Add candy eyes and sprinkles while the buttercream is still soft, pressing gently to ensure they adhere properly.
Creative Serving and Display Ideas
Halloween Party Presentation
Arrange these monster cookies on a tiered black serving stand with dry ice (safely contained) for a spooky fog effect. Create name cards with silly monster names like “Chocolate Chuck” or “Buttercream Betty” to enhance the playful theme.
Gift Box Collections
Package individual cookies in clear boxes tied with Halloween ribbons, creating perfect party favors or teacher gifts that showcase the adorable monster faces while keeping them fresh.
Interactive Decorating Station
Set up a cookie decorating area where guests can add their own candy eyes and sprinkles to pre-assembled cookies, allowing everyone to create their own unique monster personalities.
Delicious Recipe Variations
Mint Chocolate Monsters
Add ½ teaspoon of mint extract to the chocolate cookie dough and tint the buttercream green instead of orange and purple. Use chocolate chip “eyes” for a more sophisticated look.
Peanut Butter Monsters
Replace ½ cup of flour with peanut butter powder in the cookie dough, and create peanut butter buttercream by substituting 2 tablespoons of the butter with smooth peanut butter.
White Chocolate Ghosts
Use white chocolate cookies (substitute cocoa with additional flour) and create white buttercream “ghosts” with mini chocolate chip eyes for an elegant Halloween variation.
Strawberry Pink Monsters
Add freeze-dried strawberry powder to create pink buttercream filling, perfect for creating girly monster cookies that still maintain the Halloween spirit.
Make-Ahead and Storage Solutions
Advance Preparation
Cookie dough can be prepared, rolled, and wrapped tightly in plastic wrap up to 3 days before cutting and baking. Store in the refrigerator until ready to use, allowing it to soften slightly before cutting if very firm.
Component Storage
Baked cookies store well in airtight containers for up to one week at room temperature. Buttercream filling can be prepared 2 days in advance and stored covered in the refrigerator, bringing to room temperature before use.
Assembled Cookie Storage
Completed monster cookies keep their shape and flavor for up to 4 days when stored in single layers in airtight containers. For longer storage, freeze assembled cookies for up to 2 months, thawing at room temperature before serving.
Professional Baking Notes
Temperature Control: Cold ingredients are essential for proper dough formation. The contrast between cold butter and room temperature mixing creates the perfect cookie texture.
Rolling Technique: Using parchment paper for rolling prevents sticking while allowing easy transfer to cutting surface. The 4-5mm thickness ensures cookies hold their shape without becoming too thick or thin.
Buttercream Consistency: Process the buttercream long enough to achieve smoothness, but avoid overprocessing which can cause it to become too soft or separate.
Assembly Timing: Assemble cookies when completely cool but serve within a few hours for the best texture contrast between crisp cookies and creamy filling.
Frequently Asked Questions
Can I make these cookies without a food processor? While a food processor creates the ideal texture, you can make them by hand. Cut cold butter into flour mixture using a pastry cutter or two knives, then mix in wet ingredients with a wooden spoon until dough forms.
How do I prevent the cookies from spreading too much during baking? Ensure your dough is properly chilled before cutting, and don’t skip the 30-minute refrigeration step. Additionally, make sure your oven has reached the correct temperature before baking.
What if my buttercream is too soft to hold its shape? Refrigerate the buttercream for 15-20 minutes to firm it up, or add a bit more powdered sugar gradually until it reaches the desired consistency for piping or spreading.
Can I use regular cocoa powder instead of Dutch-processed? Dutch-processed cocoa creates a darker color and richer flavor, but regular cocoa powder works as a substitute. You may need to add a pinch of baking soda to balance the acidity.
How far in advance can I assemble these cookies? Assembled cookies are best within 24-48 hours, as the buttercream gradually softens the cookies. However, this actually improves the overall texture and flavor combination.
What’s the best way to get even cookie thickness? Rolling guides (wooden strips of equal thickness) placed on either side of your dough help maintain consistent thickness. Alternatively, adjust your rolling pin pressure and check thickness frequently during rolling.


