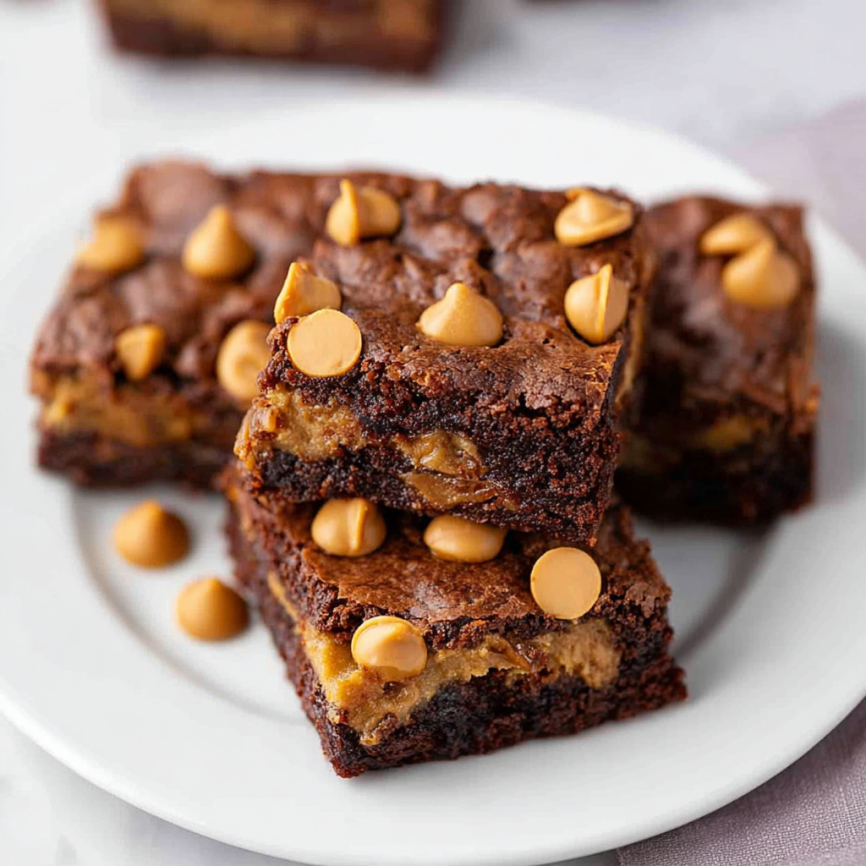
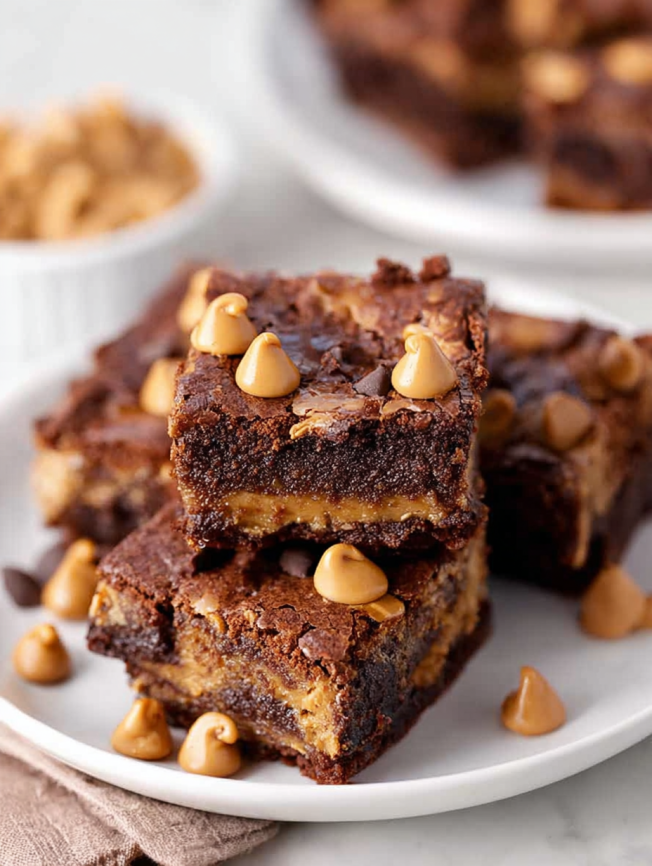
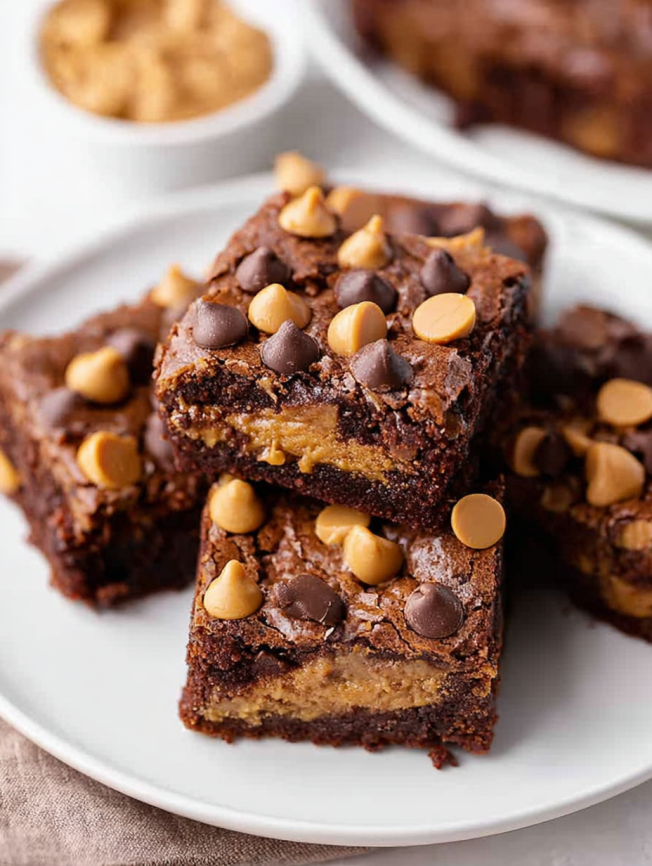
There’s something almost magical about the combination of rich chocolate and creamy peanut butter – it’s like they were meant to be together. These Chocolate Peanut Butter Cup Brownies take that beloved pairing to new heights, creating layers of fudgy brownie surrounding a perfectly smooth peanut butter center. I still remember the first time I bit into one of these beauties – the way the salty-sweet peanut butter filling contrasted with the intense chocolate was pure bliss. They’ve become my go-to dessert when I want to create something truly special.
Prep Time: 15 minutes
Cook Time: 25 minutes
Total Time: 40 minutes
Servings: 16 brownies
Why These Brownies Are Absolutely Irresistible
The Perfect Texture Combination
These brownies deliver the ideal contrast between fudgy chocolate layers and a smooth, creamy peanut butter center. The brownie base stays dense and moist, while the peanut butter filling provides a luxurious, almost truffle-like experience with each bite.
Balanced Sweet and Salty Flavors
The natural saltiness of peanut butter perfectly complements the rich sweetness of chocolate, creating a sophisticated flavor profile that satisfies multiple cravings at once. Additionally, the hint of coffee powder enhances the chocolate’s depth without overpowering the peanut butter.
Bakery-Quality Results at Home
Despite their impressive appearance and complex flavors, these brownies are surprisingly straightforward to make. The layered technique creates professional-looking results that will have people thinking you spent hours in the kitchen.
Customizable Sweetness Levels
With options for both traditional and natural sweeteners, you can adjust the sweetness to your preference while maintaining the perfect texture. This flexibility makes the recipe adaptable to different dietary needs and taste preferences.
Essential Ingredients
For the Fudgy Brownie Base
- ¾ cup plain flour – All-purpose flour works perfectly
- ½ cup unsweetened cocoa powder – Choose high-quality cocoa for best flavor
- 1 tsp instant coffee powder – Enhances chocolate flavor without tasting like coffee
- Pinch of salt – Balances sweetness and enhances all flavors
- ½ cup reduced-fat butter, room temperature – Or substitute with oil for dairy-free option
- 1 cup light brown sugar – Muscovado sugar adds extra depth
- ½ cup natural sweetener – Or sugar of your choice
- ¾ tsp vanilla extract – Pure vanilla preferred
- 2 eggs – Room temperature for better mixing
For the Creamy Peanut Butter Filling
- ¾ cup natural peanut butter – The oilier varieties work best for smoothness
- ½ cup sweetener or powdered sugar – Adjust to taste preference
- Pinch of salt – Only if using unsalted natural peanut butter
- 2 Tbsp maple syrup – Rice malt syrup or agave work as alternatives
- ⅓ cup unsweetened almond milk – Creates the perfect consistency
For the Finishing Touch
- ¼ cup dark or semi-sweet chocolate chips – Quality chocolate makes a difference
- ¼ cup Reese’s chips – Reinforces the peanut butter cup theme
Step-by-Step Instructions
Setting Up for Success
Preheat your oven to 350°F (180°C). Spray an 8×8-inch baking pan with cooking oil spray, then wipe away any excess with a paper towel. This prevents sticking while avoiding too much oil pooling in the pan.
Preparing the Dry Ingredients
In a large bowl, combine the flour, cocoa powder, instant coffee powder, and salt. Whisk these ingredients together thoroughly to ensure even distribution and eliminate any lumps. Set this mixture aside while you prepare the wet ingredients.
Creating the Brownie Base
In a separate medium-sized bowl, whisk together the room-temperature butter, brown sugar, sweetener, and vanilla extract until well combined. The mixture should be smooth and creamy. Add the eggs one at a time, whisking well after each addition until the mixture becomes light and fluffy.
Combining for Perfect Texture
Pour the liquid mixture into the bowl with the dry ingredients. Using a wooden spoon or spatula, mix just until the ingredients are combined. Avoid overmixing, as this can result in tough, dense brownies. The batter should be thick and slightly glossy.
Crafting the Peanut Butter Filling
While the brownie batter rests, prepare the peanut butter filling. In a medium bowl, whisk together the peanut butter, sweetener, salt (if needed), maple syrup, and almond milk until completely smooth and creamy. The consistency should be spreadable but not too thin.
Layering for Maximum Impact
Spread half of the brownie batter evenly into your prepared pan, creating a smooth bottom layer. Carefully spoon the peanut butter filling over this base, spreading it gently to reach the edges of the pan. The filling should form an even layer without mixing too much with the brownie batter.
Completing the Assembly
Pour the remaining brownie batter over the peanut butter filling. Using a spatula, carefully spread the batter to cover the peanut butter layer completely. Don’t worry if some of the peanut butter mixes in – this creates beautiful swirls that enhance the appearance.
Baking to Perfection
Bake for 25-30 minutes, depending on your oven. The brownies are done when they feel set to the touch and a toothpick inserted in the center comes out with just a few moist crumbs. The surface should look slightly matte but not completely dry.
Adding the Final Touch
Immediately after removing from the oven, sprinkle the chocolate chips and Reese’s chips over the warm surface. The residual heat will slightly melt the chips, creating an attractive glossy finish. Allow the brownies to cool completely before cutting.
Perfect Serving Suggestions
Classic Comfort Style
Serve these brownies at room temperature with a tall glass of cold milk. The temperature contrast enhances both the fudgy texture and the creamy peanut butter filling, creating the ultimate comfort food experience.
Elegant Dessert Presentation
For special occasions, dust individual brownies with powdered sugar and serve alongside vanilla ice cream or whipped cream. A drizzle of chocolate or caramel sauce can elevate the presentation even further.
Coffee Shop Vibes
Pair these brownies with a hot cup of coffee or espresso. The bitter notes in coffee complement the sweet chocolate and nutty peanut butter beautifully, creating a sophisticated dessert experience.
Recipe Variations to Explore
Nut-Free Alternative
Replace the peanut butter with sunflower seed butter or almond butter for those with peanut allergies. The texture and flavor will be slightly different but equally delicious. Adjust the liquid content as needed since different nut butters have varying consistencies.
Dark Chocolate Intensity
For chocolate lovers, substitute some of the cocoa powder with melted dark chocolate. Use 6 oz of melted dark chocolate and reduce the cocoa powder to ¼ cup. This creates an even richer, more intense chocolate flavor.
Crunchy Texture Addition
Fold chopped peanuts or chocolate chips into the brownie batter for added texture contrast. About ½ cup of mix-ins works well without overwhelming the base recipe.
Salted Caramel Twist
Add a layer of salted caramel between the brownie layers along with the peanut butter filling. Use about ¼ cup of thick caramel sauce for best results.
Make-Ahead Tips
Preparation Timeline
These brownies can be made up to 3 days ahead and stored covered at room temperature. The flavors actually improve over time as they meld together, making them perfect for party planning.
Freezing for Later
Wrap individual brownies tightly in plastic wrap and freeze for up to 3 months. Thaw at room temperature for about 30 minutes before serving. The texture remains excellent after freezing.
Batch Preparation
Double the recipe and use a 9×13-inch pan for larger gatherings. Increase the baking time by 5-10 minutes and check for doneness with a toothpick. This yields approximately 24 brownies.
Pro Tips for Success
Room Temperature Ingredients
Ensure your butter and eggs are at room temperature before starting. This creates better emulsification and results in a smoother batter that bakes more evenly.
Proper Peanut Butter Selection
Natural peanut butter with oil separation actually works better for this recipe. The oil helps create a smoother, more spreadable filling that won’t tear the brownie layers.
Cooling Patience
Allow the brownies to cool completely before cutting – this usually takes about 2 hours. Cutting too early will result in messy, crumbly pieces that don’t hold their shape.
Clean Cutting Technique
Use a sharp knife wiped clean between cuts for the neatest squares. A gentle sawing motion works better than pressing straight down through the layers.
Storage and Serving
Optimal Storage Conditions
Store the brownies in an airtight container at room temperature for up to 4 days. Layer parchment paper between stacked brownies to prevent sticking.
Refrigeration Benefits
While not necessary, refrigerating the brownies can extend their shelf life to about a week. Cold brownies have a firmer texture that some people prefer, especially during warmer weather.
Serving Temperature Options
These brownies are delicious at room temperature, but you can also serve them slightly warm. A quick 10-second microwave warming brings out the chocolate flavors beautifully.
Frequently Asked Questions
Can I use crunchy peanut butter instead of smooth? While smooth peanut butter creates the silkiest filling, crunchy peanut butter adds interesting texture contrast. If using crunchy, you might need to add an extra tablespoon of almond milk to achieve the right consistency for spreading.
What if I don’t have instant coffee powder? You can substitute with an equal amount of espresso powder, or simply omit it entirely. The coffee enhances the chocolate flavor but isn’t essential to the recipe’s success. If you have strong brewed coffee, use 1 tablespoon of cooled coffee in place of the powder.
Can I make these brownies gluten-free? Yes, substitute the all-purpose flour with a 1:1 gluten-free flour blend. Make sure your other ingredients are also gluten-free. The texture might be slightly different, but the brownies will still be delicious.
How do I know when the brownies are perfectly done? The surface should look set and slightly matte, not shiny. A toothpick inserted in the center should come out with a few moist crumbs but no wet batter. The brownies will continue cooking slightly as they cool.
Can I reduce the sugar content? You can reduce the sweeteners by up to 25% without significantly affecting the texture. Keep in mind that the brownies will be less sweet, and the peanut butter filling might be slightly less smooth. Taste and adjust as needed.
What’s the best way to cut clean squares? Use a sharp, straight-edged knife and wipe it clean between cuts. For extra clean cuts, chill the brownies for 30 minutes before slicing. A gentle sawing motion works better than pressing straight down.
Why is my peanut butter filling too thick? Natural peanut butter consistency varies by brand. If your filling is too thick, add almond milk one tablespoon at a time until you reach the desired spreadable consistency. Conversely, if it’s too thin, add a bit more peanut butter.
Nutritional Information
Per Brownie:
- Calories: 270
- Protein: 5g
- Carbohydrates: 34g
- Fat: 15g
- Fiber: 2g
- Sugar: 24g
These brownies provide a good source of protein from the peanut butter and eggs, while the cocoa powder contributes antioxidants. The portion size is satisfying while remaining reasonable for an indulgent treat.
Troubleshooting Common Issues
Dry or Crumbly Brownies
This usually indicates overbaking. Check your oven temperature with a thermometer and reduce baking time by 3-5 minutes next time. The brownies should still feel slightly soft in the center when done.
Peanut Butter Filling Too Runny
If your filling is too thin, add more peanut butter or a tablespoon of powdered sugar. Different brands of almond milk have varying consistencies, so adjustments may be needed.
Uneven Layers
Take your time when spreading each layer, and use an offset spatula for the smoothest results. If the layers mix together slightly, don’t worry – it creates attractive swirls.
Brownies Sticking to Pan
Ensure you’ve properly greased your pan and used parchment paper if possible. Let the brownies cool completely before attempting to remove them from the pan.
Final Thoughts
These Chocolate Peanut Butter Cup Brownies represent everything wonderful about homemade desserts – rich flavors, satisfying textures, and the joy of creating something special from simple ingredients. The combination of fudgy chocolate and creamy peanut butter creates a dessert that’s both familiar and extraordinary.
The beauty of this recipe lies in its ability to deliver bakery-quality results with approachable techniques. Whether you’re baking for a special occasion or simply treating yourself, these brownies provide that perfect balance of indulgence and satisfaction that makes every bite memorable.
Most importantly, these brownies create those sweet moments that make baking worthwhile – the anticipation as they bake, the satisfaction of achieving perfect layers, and the joy of sharing something delicious with people you care about. They’re the kind of dessert that becomes a signature recipe, requested again and again for their ability to turn any ordinary day into something a little more special.