Prep Time: 30 minutes | Cook Time: 35 minutes | Total Time: 3 hours, 35 minutes | Yield: 24 brownies
Picture this: you’re at your childhood best friend’s birthday party, and someone brings out the most magnificent dessert you’ve ever seen. That’s exactly how I felt when I first encountered these towering cookies and cream brownies at a potluck dinner. They weren’t just brownies – they were architectural marvels of dessert engineering, standing tall like delicious skyscrapers with their four distinct layers creating a symphony of textures and flavors that had everyone asking for the recipe.
Why These Brownies Deserve Legendary Status
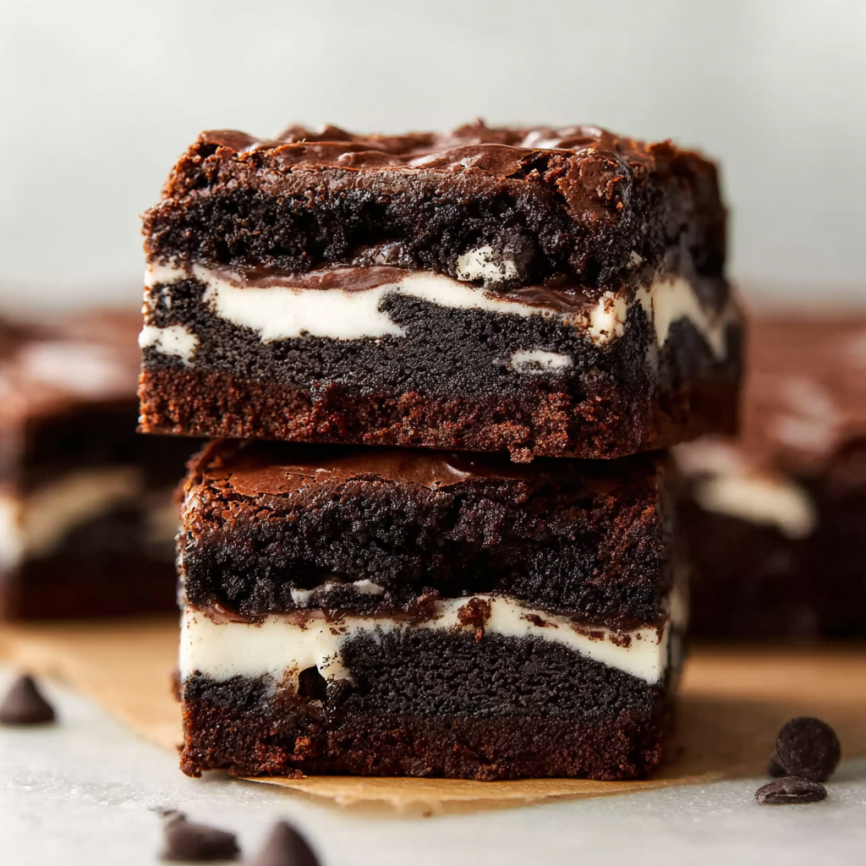
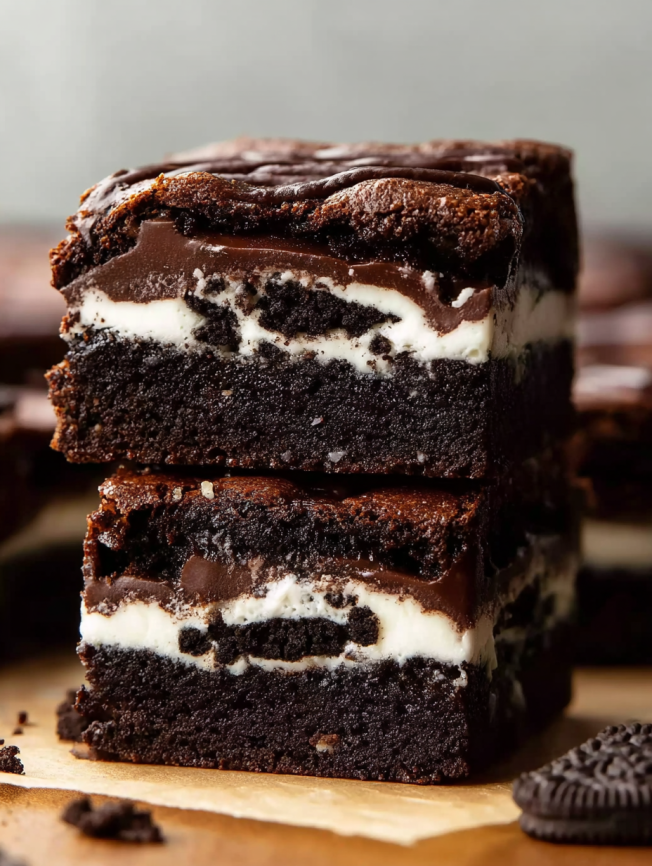
Four Layers of Pure Bliss
These aren’t ordinary brownies – they’re an experience. Starting with rich, fudgy homemade brownies as the foundation, each layer builds upon the last: whole Oreos pressed into the brownie batter, a cloud-like cookies and cream buttercream, and finally, a glossy chocolate ganache that ties everything together in perfect harmony.
Show-Stopping Presentation
When you serve these at any gathering, prepare for gasps of amazement. The impressive height and beautiful layers make them worthy of the most special occasions, yet they’re surprisingly achievable for home bakers willing to invest a little time and love.
Perfect Balance of Textures
Every bite delivers multiple textures – the dense chewiness of brownies, the satisfying crunch of Oreos, the airy sweetness of buttercream, and the smooth richness of chocolate ganache. It’s like having your favorite cookies and cream desserts all in one incredible package.
Essential Ingredients
Brownie Foundation
- Homemade brownie batter or 1 (9×13-inch) pan brownie mix
- 24 Oreos (Double-Stuf recommended for extra indulgence)
Cookies & Cream Buttercream
- ¾ cup (12 Tbsp; 170g) unsalted butter, softened to room temperature
- 3 cups (360g) confectioners’ sugar
- 2 tablespoons milk
- ½ teaspoon pure vanilla extract
- 6 whole Oreos, chopped (about ¾ cup or 70g)
- Pinch of salt
Chocolate Topping
- ½ cup (8 Tbsp; 113g) unsalted butter
- 1 heaping cup (around 200g) semi-sweet chocolate chips
Quality Considerations
Using homemade brownie batter creates the best foundation, but high-quality boxed mix works too. Double-Stuf Oreos provide extra cream flavor, while semi-sweet chocolate chips in the topping balance the sweetness perfectly.
Step-by-Step Instructions
Building the Brownie Base
Begin by preheating your oven to 350°F (177°C). Line a 9×13-inch baking pan with parchment paper, ensuring you leave overhang on the sides – this makes removal much easier later. Prepare your brownie batter according to your recipe or package directions.
Spread the thick brownie batter into your prepared pan, working it toward the edges as evenly as possible. Don’t worry about perfection here; rustic charm adds character. Now comes the fun part: press 24 Oreos directly into the top of the unbaked brownie batter, arranging them in 6 rows of 4 cookies each.
Baking to Perfection
Bake for 32 minutes, then begin testing with a toothpick inserted in the center. You’re looking for moist crumbs, not wet batter – this typically takes about 35 minutes total. Remember that the Oreos on top will affect baking time slightly.
Once baked, transfer the pan to a wire rack and allow the brownies to cool completely in the pan. This patience is crucial for structural integrity. When completely cool, lift the entire slab out using the parchment paper overhang.
Creating the Buttercream Layer
While your brownies cool, prepare the cookies and cream buttercream. Using either a handheld or stand mixer with paddle attachment, beat the softened butter on medium speed for about 2 minutes until it becomes light and creamy.
Add the confectioners’ sugar, milk, and vanilla extract. Start mixing on low speed for 30 seconds to prevent a sugar dust storm, then increase to high speed and beat for 2 full minutes. The frosting should be fluffy and smooth. Gently fold in the chopped Oreos using a spoon or rubber spatula.
Taste your buttercream and add a pinch of salt if it seems too sweet – this balances the flavors beautifully. Spread the buttercream evenly over your cooled brownie slab, then refrigerate uncovered for 30 minutes to set.
Finishing with Chocolate Ganache
For the final layer, cut the butter into pieces and combine with chocolate chips in a small saucepan. Melt together over low heat, stirring constantly until the mixture becomes smooth and glossy. Alternatively, use the microwave in 20-second intervals, stirring between each heating.
Pour the warm chocolate mixture over the chilled buttercream layer, spreading it evenly to create a beautiful, mirror-like finish. Allow the chocolate to set completely at room temperature for several hours or refrigerate for about 1 hour for quicker setting.

Serving Suggestions
Perfect Presentation
These brownies are naturally impressive, but consider serving them on individual dessert plates with a dollop of vanilla ice cream or whipped cream. A light dusting of cocoa powder or extra Oreo crumbs can add an elegant finishing touch.
Occasion Ideas
These brownies are perfect for birthdays, potlucks, bake sales, or any time you want to create something truly memorable. They’re also fantastic for holidays when you want to offer something beyond traditional desserts.
Creative Variations
Seasonal Adaptations
During Halloween, use chocolate sandwich cookies with orange filling. For Christmas, try peppermint-flavored cookies in the buttercream layer. Birthday celebrations call for colorful funfetti-style sandwich cookies mixed throughout.
Flavor Twists
Experiment with different cookie flavors – lemon sandwich cookies create a bright, citrusy version, while peanut butter sandwich cookies appeal to nutty preferences. You can also add a tablespoon of instant espresso powder to the chocolate topping for a mocha variation.
Size Modifications
Make individual brownie bites by cutting the finished product into smaller squares and serving them in mini cupcake liners. Alternatively, create a smaller batch using a 9-inch pan with adjusted ingredient quantities.
Make-Ahead Tips
Component Preparation
The beauty of this recipe lies in its make-ahead potential. Bake the brownie layer up to 3 days in advance, storing it covered at room temperature. The buttercream can be prepared 3 days ahead and stored in the refrigerator – just bring it to room temperature before spreading.
Assembly Strategy
You can complete the brownie and buttercream layers up to 1 day before serving, adding the chocolate topping on the day you plan to serve. This approach ensures the freshest possible presentation while maximizing your time management.
Freezer-Friendly Options
Both individual squares and whole pans freeze beautifully for up to 3 months. Wrap tightly in plastic wrap and aluminum foil before freezing. Thaw at room temperature or in the refrigerator before serving.
Important Notes
Equipment Essentials
A 9×13-inch baking pan is crucial for proper proportions, while parchment paper makes removal foolproof. An offset spatula helps achieve smooth, even layers, and a sharp, large knife is essential for clean cuts through all four layers.
Cutting Technique Mastery
Achieving professional-looking squares requires patience and technique. Wait until the chocolate topping sets completely, use a very sharp knife, make quick, decisive cuts, and wipe the blade clean between each cut to prevent dragging.
Temperature Considerations
Room temperature ingredients blend more easily, particularly the butter in the buttercream. However, keeping the assembled brownies chilled helps maintain structural integrity during cutting and serving.
Frequently Asked Questions
Q: Can I use store-bought brownie mix instead of homemade? A: Absolutely! Any 9×13-inch brownie mix works perfectly. Choose a fudgy variety rather than cake-like for the best texture contrast with the other layers.
Q: How far in advance can I make these brownies? A: The complete brownies can be assembled up to 3 days before serving when stored in the refrigerator. Individual components can be prepared even further ahead and assembled when needed.
Q: Why is my buttercream too stiff or too soft? A: Buttercream consistency depends on butter temperature and mixing time. If too stiff, add milk one teaspoon at a time. If too soft, chill briefly or add more confectioners’ sugar.
Q: Can I substitute the Oreos with other cookies? A: Yes! Any sandwich cookie works, though the size and flavor will affect the final result. Adjust quantities as needed to maintain the layer proportions.
Q: My chocolate topping looks dull instead of shiny. What happened? A: This usually occurs when the chocolate mixture gets too hot or cool before spreading. Aim for a warm, smooth consistency and spread immediately after mixing.
Q: How do I prevent the layers from sliding when cutting? A: Ensure each layer is properly set before adding the next one, and use a very sharp knife with quick, clean cuts. Chilling the completed brownies for 30 minutes before cutting also helps.
Q: Can I make a smaller batch? A: Yes! Use a 9-inch square pan and halve all ingredients. Adjust the baking time to approximately 30 minutes and use 16 Oreos instead of 24.
Q: What’s the best way to store leftover brownies? A: Cover tightly and refrigerate for up to one week. The chocolate topping may develop a slight film, but the taste remains excellent. Bring to room temperature for 15-20 minutes before serving for the best texture.
These cookies and cream brownies represent the pinnacle of indulgent dessert making. While they require some time and patience, the incredible results – four distinct layers creating a harmonious symphony of flavors and textures – make every minute worthwhile. Whether you’re celebrating a special occasion or simply want to create something extraordinary, these brownie skyscrapers will leave a lasting impression on everyone lucky enough to try them.


