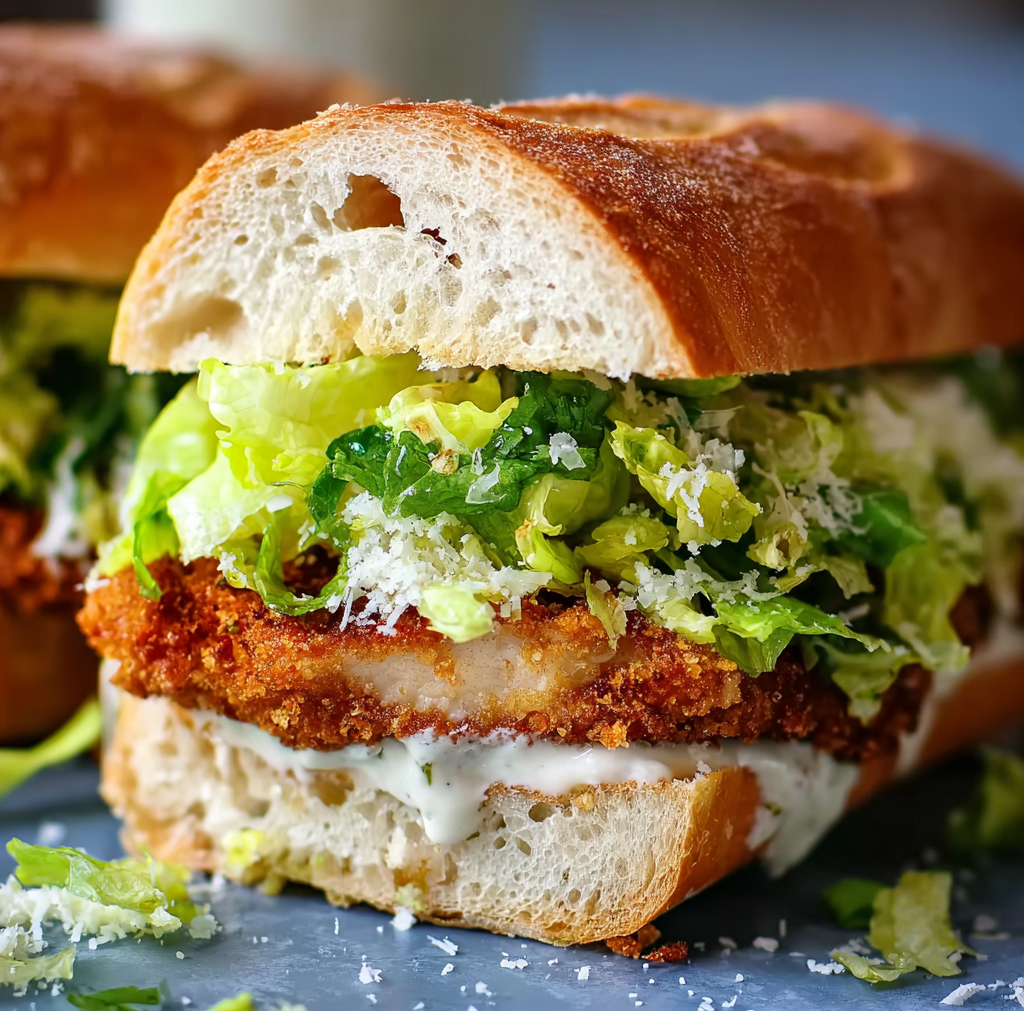
Five years ago, I was working late at my office when I stumbled upon a small Italian deli that served the most incredible chicken Caesar sandwich I’d ever tasted. The combination of perfectly crispy chicken, tangy homemade Caesar dressing, and fresh romaine lettuce on crusty bread was pure magic. After countless attempts to recreate that experience at home, I finally cracked the code to making an even better version in my own kitchen.
This sandwich transforms the classic Caesar salad from a side dish into a hearty, satisfying meal that’s sophisticated enough for dinner yet easy enough for a quick lunch. The secret lies in the triple-coating technique for ultra-crispy chicken and a homemade Caesar dressing that puts any store-bought version to shame.
Why This Sandwich Will Become Your New Obsession
Restaurant-Quality Results at Home Creating this sandwich delivers all the satisfaction of an upscale deli experience without the premium price tag. Moreover, you control every ingredient, ensuring fresher flavors and better quality than most restaurant versions.
Perfect Balance of Textures and Flavors The contrast between crispy chicken, creamy dressing, crunchy romaine, and crusty bread creates a symphony of textures in every bite. Additionally, the tangy Caesar dressing perfectly complements the savory breaded chicken.
Impressive Yet Achievable While this sandwich looks and tastes gourmet, the techniques are straightforward enough for any home cook to master. Furthermore, most of the components can be prepared in advance for stress-free assembly.
Customizable to Your Preferences From spice levels to bread choices, this recipe adapts easily to different tastes and dietary needs while maintaining its essential character.
Essential Ingredients for Maximum Impact
Homemade Caesar Dressing
- ½ cup full-fat mayonnaise – creates the creamy foundation
- 3 tablespoons Greek yogurt – adds tang and protein
- 1 teaspoon Dijon mustard – provides sharp complexity
- 1 teaspoon Worcestershire sauce – delivers umami depth
- 2 tablespoons fresh lemon juice – brightens all flavors
- ¼ cup fresh Parmesan cheese, grated – essential Caesar flavor
- 1-2 garlic cloves, minced – aromatic backbone
- ¼ teaspoon black pepper – gentle heat
- Pinch of sea salt – flavor enhancement
Perfectly Crispy Chicken
- 5 chicken cutlets – uniform thickness is key
- Sea salt and black pepper – basic seasoning
- Oil for frying – vegetable or canola work best
Three-Stage Coating System
Flour Mixture:
- ⅓ cup all-purpose flour – initial coating base
- ½ teaspoon salt – seasoning foundation
- ¾ teaspoon smoked paprika – color and smoky flavor
Egg Mixture:
- 2 large eggs – binding agent
- ¼ teaspoon salt – additional seasoning
Breadcrumb Blend:
- ¾ cup panko breadcrumbs – superior crunch
- ¼ cup regular breadcrumbs – texture variety
- 1 teaspoon dried parsley – fresh color
- ½ teaspoon ground black pepper – spice balance
- ½ teaspoon sea salt – flavor enhancement
- ½ teaspoon dried oregano – Italian herbs
- 1 teaspoon garlic powder – aromatic depth
- ¼ cup fresh Parmesan cheese, grated – extra flavor
Assembly Components
- 2 romaine hearts, chopped – crisp freshness
- 1-2 French baguettes – crusty exterior, soft interior
- Extra Parmesan cheese – finishing touch
Step-by-Step Preparation Instructions
Creating the Perfect Caesar Dressing
Step 1: Combine mayonnaise, Greek yogurt, Dijon mustard, Worcestershire sauce, lemon juice, grated Parmesan, minced garlic, black pepper, and salt in a medium bowl.
Step 2: Whisk all ingredients together until completely smooth and creamy, ensuring no lumps remain. Taste and adjust seasoning as needed – the dressing should be tangy, garlicky, and well-balanced.
Preparing the Caesar Salad Base
Step 3: Reserve 4-5 tablespoons of the prepared dressing in a separate container. Toss the chopped romaine lettuce with the remaining dressing in a medium bowl until evenly coated.
Step 4: Cover both the dressed salad and reserved dressing separately, then refrigerate while you prepare the chicken. This resting time allows flavors to meld beautifully.
Achieving Perfectly Even Chicken
Step 5: Place chicken cutlets on a clean cutting board and examine for thickness variations. Using a meat mallet or rolling pin, gently pound any thicker areas until all cutlets are uniformly thick for even cooking.
Step 6: Season both sides of each cutlet generously with salt and freshly ground black pepper, pressing gently to help the seasoning adhere.
Setting Up the Breading Station
Step 7: Arrange three shallow plates or bowls in a row. Fill the first with flour mixed with salt and smoked paprika, the second with beaten eggs and salt, and the third with the complete breadcrumb mixture.
Mastering the Triple-Coating Technique
Step 8: Working with one cutlet at a time, dredge thoroughly in the seasoned flour, shaking off excess. Next, dip completely in the egg mixture, allowing excess to drip off. Finally, press firmly into the breadcrumb mixture, ensuring complete coverage on all surfaces.
Step 9: Place breaded cutlets on a clean plate and let rest for 10-15 minutes. This resting period helps the coating adhere better during cooking.
Frying to Golden Perfection
Step 10: Heat oil in a large skillet over medium heat until it reaches 350-360°F. Test temperature by dropping in a few breadcrumbs – they should sizzle immediately without burning.
Step 11: Carefully place cutlets in the hot oil, avoiding overcrowding. Fry for 4-5 minutes per side until golden brown and crispy, maintaining consistent oil temperature throughout.
Step 12: Transfer finished chicken to a wire rack set over a baking sheet to drain excess oil while maintaining crispiness.
Assembly and Serving Suggestions
Perfect Sandwich Construction
Slice baguettes into 5-inch portions and cut lengthwise, creating sturdy vessels for the filling. Lightly toast the cut sides for extra texture contrast if desired.
Layering for Maximum Impact
Spread a generous layer of reserved Caesar dressing on both cut surfaces of the bread. Place one crispy chicken cutlet on the bottom half, then top with a generous portion of the dressed Caesar salad.
Finishing Touches
Sprinkle additional fresh Parmesan cheese over the salad before closing the sandwich. The cheese will melt slightly from the warm chicken, creating another layer of flavor.
Serving Presentation
Serve immediately while the chicken remains crispy, accompanied by crispy fries or a simple side salad for a complete meal experience.
Creative Recipe Variations
Bread Alternatives
Ciabatta Upgrade: Use ciabatta rolls for a more rustic presentation with excellent sauce-absorbing qualities.
Whole Grain Option: Substitute whole wheat baguette for added fiber and nutty flavor that complements the Caesar dressing beautifully.
Protein Modifications
Grilled Chicken Version: Skip the breading and use perfectly grilled chicken breast for a lighter but equally satisfying option.
Fish Alternative: Replace chicken with crispy breaded cod or halibut for a seafood twist on the classic Caesar theme.
Flavor Enhancements
Anchovy Addition: Add 2-3 minced anchovies to the Caesar dressing for authentic, traditional flavor depth.
Bacon Boost: Include crispy bacon strips in the sandwich for smoky richness that pairs perfectly with Caesar flavors.
Spice Level Adjustments
Spicy Caesar: Add a pinch of cayenne pepper to the breadcrumb mixture and hot sauce to the dressing for heat lovers.
Herb-Crusted Version: Include fresh herbs like thyme or rosemary in the breadcrumb mixture for aromatic complexity.
Make-Ahead Tips and Storage
Component Preparation Strategy
Day Before: Prepare the Caesar dressing and store covered in the refrigerator. The flavors actually improve overnight, making advance preparation beneficial.
Morning Of: Bread the chicken cutlets and refrigerate on a lined baking sheet until ready to cook. This advance preparation saves significant time during busy meal periods.
Storage Guidelines
Leftover breaded chicken keeps well in the refrigerator for up to 2 days and can be reheated in a 400°F oven to restore crispiness. Store dressing separately for up to one week.
Assembly Timing
For best results, assemble sandwiches immediately before serving to prevent soggy bread. However, all components can be prepared hours in advance for quick assembly.
Important Notes for Success
Oil Temperature Control
Maintaining proper oil temperature is crucial for crispy, non-greasy chicken. Use a thermometer if possible, and adjust heat as needed to keep oil at 350-360°F throughout cooking.
Chicken Safety Guidelines
Ensure chicken reaches an internal temperature of 165°F before serving. The coating should be golden brown and crispy when the chicken is properly cooked.
Preventing Soggy Sandwiches
Toast the bread lightly and assemble just before serving to maintain the perfect texture contrast between crispy coating and fresh vegetables.
Frequently Asked Questions
Q: Can I use store-bought Caesar dressing instead of homemade? A: While homemade tastes significantly better, you can substitute store-bought dressing if time is limited. Choose a high-quality brand and add fresh lemon juice and minced garlic to improve the flavor.
Q: What’s the best way to reheat leftover breaded chicken? A: Reheat in a 400°F oven for 8-10 minutes to restore crispiness. Avoid microwaving, which will make the coating soggy and tough.
Q: Can I bake the chicken instead of frying? A: Absolutely! Place breaded cutlets on a parchment-lined baking sheet, drizzle with oil, and bake at 425°F for 15-20 minutes, flipping halfway through for even browning.
Q: How do I prevent the breading from falling off during cooking? A: Ensure chicken is properly dried, use the three-step coating process, let breaded chicken rest before cooking, and maintain proper oil temperature throughout frying.
Q: Can I make this sandwich gluten-free? A: Yes! Use gluten-free flour and breadcrumbs for the coating, and serve on gluten-free bread. The flavor remains virtually identical with these simple substitutions.
Q: What other greens work well in place of romaine? A: Butter lettuce or mixed greens work well, though romaine provides the best crunch and traditional Caesar flavor. Avoid delicate greens that will wilt from the warm chicken.
Nutritional Information (Per Sandwich):
- Calories: 653
- Total Fat: 28g
- Saturated Fat: 6g
- Cholesterol: 192mg
- Sodium: 1,562mg
- Total Carbohydrates: 45g
- Dietary Fiber: 3g
- Sugar: 5g
- Protein: 51g
- Prep Time: 15 minutes
- Cook Time: 20 minutes
- Total Time: 35 minutes
- Serves: 5 people