Total Time: 30 minutes | Yield: 8-10 cookies | Diet: Vegan
Tim Burton’s “The Nightmare Before Christmas” has always held a special place in my heart, and Jack Skellington remains one of the most iconic Halloween characters ever created. When I decided to create a vegan version of these beloved character cookies, I wanted to capture not just his distinctive appearance but also make them accessible to friends with dietary restrictions. The challenge was creating cookies that were both plant-based and delicious enough to impress even non-vegan guests.
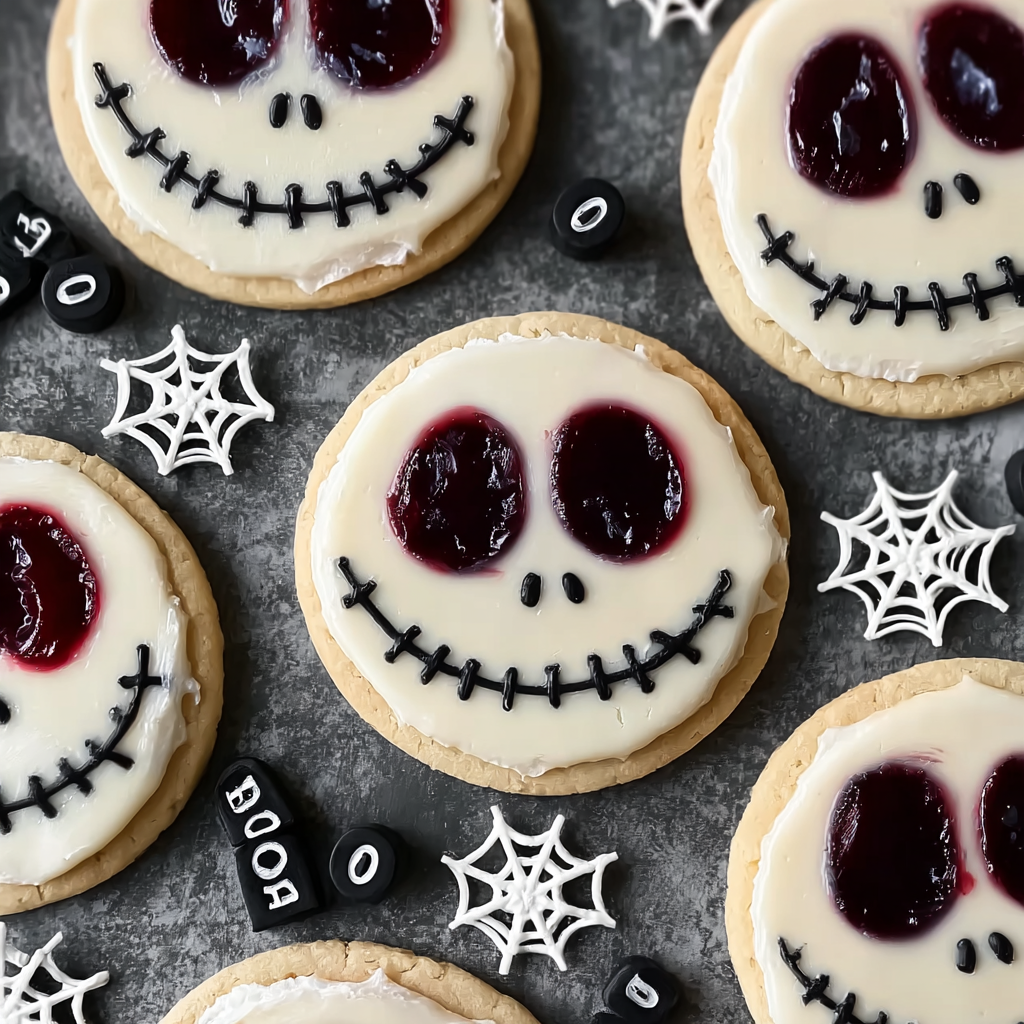
After several kitchen experiments, these Easy Jack Skellington Cookies emerged as the perfect solution. The soft sugar cookie base provides an ideal canvas for Jack’s skeletal features, while the black cherry jam filling adds a delightful surprise that complements the vanilla icing beautifully. What makes these particularly special is how the jam peeks through Jack’s eye holes, creating an almost haunting effect that’s both spooky and charming.
Why These Jack Skellington Cookies Are Simply Magical
Vegan-Friendly Without Compromise
These cookies prove that plant-based baking can be just as delicious and satisfying as traditional versions. The dairy-free butter creates the same rich, tender texture you’d expect from conventional sugar cookies, ensuring no one feels like they’re missing out.
Perfect Character Recognition
The distinctive cut-out design immediately identifies these as Jack Skellington cookies, making them instantly recognizable to fans of all ages. Additionally, the contrast between the white icing and black details creates that signature skeletal appearance that makes Jack so memorable.
Delightful Hidden Surprise
The black cherry jam filling adds an unexpected burst of fruity sweetness that perfectly balances the vanilla cookie and icing flavors. Moreover, the jam’s dark color creates an eerie effect when it shows through the eye holes, enhancing the spooky aesthetic.
Simple Technique with Professional Results
Despite their impressive appearance, these cookies use straightforward techniques that beginning bakers can master easily. Furthermore, the forgiving nature of the decorating process means even imperfect attempts still look charmingly handmade.
Essential Ingredients and Plant-Based Alternatives
For the Cookie Base
- 200g dairy-free block butter, cold and cubed
- 100g caster sugar (superfine sugar)
- 300g all-purpose flour (plain flour)
- Ice water as needed for consistency
For the Filling
- 50g black cherry jam (homemade or store-bought)
For the Icing
- 200g powdered sugar (icing sugar)
- 1 teaspoon vanilla extract
- Black food gel coloring
- Dairy-free milk for consistency
Ingredient Selection Tips
Choose a high-quality dairy-free butter that’s suitable for baking – brands like Earth Balance or Miyoko’s work excellently. For the jam, seedless varieties work best to prevent clumping in the piping process. Gel food coloring provides more intense color than liquid versions without thinning the icing.
Step-by-Step Cookie Creation
Preparing the Cookie Dough
Begin by creaming the cold, cubed dairy-free butter with the caster sugar using an electric mixer on medium speed until the mixture becomes pale and fluffy, approximately 3-4 minutes. This creaming process is crucial for achieving the proper cookie texture.
Sift the all-purpose flour directly into the butter mixture, then mix on low speed until a thick dough forms. If the dough appears too dry or crumbly, add ice water one teaspoon at a time until it holds together properly.
Transfer the completed dough to plastic wrap or parchment paper, wrapping it securely before chilling in the refrigerator for at least 40 minutes to 1 hour. This chilling step firms the dough, making it much easier to roll and cut cleanly.
Shaping and Baking Process
Preheat your oven to 180°C (356°F) fan setting and line a baking tray with parchment paper to prevent sticking and ensure even browning.
Once the dough feels firm to the touch, roll it out on a heavily floured work surface to approximately 1-1.5cm thickness. Generous flouring prevents the dough from sticking and tearing during the rolling process.
Using a round cookie cutter, cut the dough into circles and place them on the prepared baking tray. For half of the cookies, carefully cut out eye holes and a triangular nose shape to create Jack’s distinctive facial features.
Bake in the center of the oven for 10-12 minutes, rotating the tray halfway through for even baking. The cookies should appear lightly golden around the edges when finished.
Allow cookies to cool slightly on the baking tray before transferring to a wire rack for complete cooling.
Creating the Perfect Icing
In a mixing bowl, combine the powdered sugar and vanilla extract. Gradually add dairy-free milk one teaspoon at a time, whisking continuously until the icing reaches a thin, toothpaste-like consistency that will coat the cookies smoothly.
Dip the face-cut cookies top-down into the white icing, allowing excess to drip back into the bowl for a clean finish. Place the iced cookies on a wire rack and allow them to set completely.
Reserve a portion of the white icing and tint it black using food gel coloring. Transfer this black icing to a piping bag or squeeze bottle, snipping a small opening at the tip for detailed piping work.
Assembly and Finishing Touches
Pipe a large curved line across Jack’s face for his signature stitched mouth, adding small perpendicular lines to create the stitching detail that makes him so recognizable.
Spread or pipe a thin layer of black cherry jam onto the plain (non-face) cookies, being careful not to use too much as it will ooze out during assembly.
Gently press the iced face cookies on top of the jam-covered bases, creating delightful sandwich cookies where the jam peeks through Jack’s eyes and nose holes.
Creative Serving and Display Ideas
Halloween Movie Marathon
Serve these cookies alongside hot cocoa or coffee during a screening of “The Nightmare Before Christmas” for the ultimate themed experience that both kids and adults will love.
Gothic Tea Party
Arrange these cookies on elegant black serving plates with silver accents, creating a sophisticated Halloween presentation that elevates the spooky theme.
Interactive Decorating Activity
Provide plain baked cookies with bowls of white and black icing, allowing party guests to create their own Jack Skellington faces while socializing and having fun.
Exciting Recipe Variations
Sally’s Ragdoll Cookies
Create Sally companion cookies using the same base recipe but decorating with colorful stitching patterns and different facial expressions to represent Jack’s beloved partner.
Pumpkin King Version
Add orange food coloring to some of the icing and create Jack’s Pumpkin King persona with orange and black decorating schemes that showcase his dual nature.
Mini Jack Collection
Use smaller cookie cutters to create bite-sized versions perfect for parties where guests want to sample multiple treats without feeling too full.
Chocolate Jack Cookies
Add cocoa powder to the cookie dough to create chocolate base cookies that provide even more contrast with the white icing, making Jack’s features pop dramatically.
Make-Ahead and Storage Solutions
Dough Preparation
Cookie dough can be prepared up to 3 days in advance and stored wrapped in the refrigerator, or frozen for up to 3 months. Thaw frozen dough overnight in the refrigerator before rolling and cutting.
Component Timing
Bake cookies up to 2 days ahead and store in airtight containers. Prepare icing the day of assembly for the best consistency and appearance, as it tends to harden over time.
Assembled Cookie Storage
Completed Jack Skellington cookies maintain their quality for up to 4 days when stored in airtight containers with parchment paper between layers to protect the delicate icing work.
Professional Vegan Baking Notes
Dairy-Free Butter Quality: Use block-style dairy-free butter rather than tub varieties for better baking results. The firmer texture creates superior cookie structure and prevents excessive spreading.
Icing Consistency: Achieve the perfect icing consistency by adding liquid gradually – it’s easier to thin icing than to thicken it once you’ve added too much milk.
Jam Selection: Seedless jams work best for clean piping and prevent clogging in small decorating tips. Strain chunky jams through a fine mesh if necessary.
Temperature Control: Ensure cookies are completely cool before icing to prevent melting and sliding. Similarly, allow white icing to set completely before adding black details.
Frequently Asked Questions
Can I use regular butter instead of dairy-free for non-vegans? Absolutely! Regular unsalted butter works perfectly in this recipe using the same measurements and techniques. The texture and flavor will be virtually identical to the vegan version.
What if I don’t have black cherry jam? Any dark-colored jam or preserve works wonderfully – try blackberry, grape, or even chocolate spread. The key is choosing something dark enough to show through the eye holes effectively.
How do I prevent the icing from being too thick or thin? Add liquid very gradually, just a few drops at a time, until you reach the desired consistency. The icing should coat the back of a spoon but still flow smoothly when dipped.
Can I make these cookies without the filling? Certainly! The cookies are delicious on their own as decorated sugar cookies. Simply ice the face cookies and serve them as individual treats rather than sandwiches.
How far in advance can I decorate these cookies? Decorated cookies are best assembled within 24 hours of serving for optimal texture and appearance. However, you can prepare all components separately up to 2 days ahead and assemble when ready.
What’s the best way to cut clean eye and nose holes? Use small, sharp cookie cutters or clean kitchen scissors to cut the facial features. Work quickly while the dough is still cold and firm, and flour your cutting tools to prevent sticking.


