Total Time: 50 minutes | Serves 8
Sometimes the best recipes come from those moments when you’re staring into the fridge, wondering how to transform ordinary ingredients into something extraordinary. That’s exactly how this taco braid was born—during a particularly hectic Tuesday when my family was craving tacos, but I wanted to create something more special than our usual routine. Combining the beloved flavors of taco night with the impressive presentation of a braided pastry, this recipe has become our go-to for everything from casual family dinners to potluck gatherings where I want to arrive with something that looks like I spent hours in the kitchen.
Why This Recipe Will Become Your New Favorite
Impressive Presentation, Simple Technique
This stunning braided masterpiece looks incredibly sophisticated but requires only basic cooking skills. Furthermore, the braiding technique is surprisingly forgiving, making it perfect for both novice and experienced home cooks.
Ultimate Crowd-Pleaser
Every single ingredient in this recipe appeals to wide-ranging tastes, from kids who love the familiar taco flavors to adults who appreciate the elegant presentation. Additionally, the portable slice format makes it ideal for parties and potlucks.
Customizable Foundation
This versatile base recipe easily adapts to dietary restrictions and personal preferences. Moreover, you can modify the protein, spice level, and toppings to create countless variations that suit your family’s unique tastes.
Perfect Make-Ahead Option
The entire braid can be assembled hours in advance and baked when needed, making it excellent for entertaining. Similarly, leftovers reheat beautifully, providing delicious meals throughout the week.
Essential Ingredients & Serving Options
Main Components
- 13.8 oz tube refrigerated pizza crust (room temperature works best)
- 1 pound lean ground beef (80/20 blend recommended)
- 1.25 oz packet taco seasoning
- 3/4 cup water
- 1 cup refried beans (traditional or fat-free)
- 1 cup chunky salsa (medium heat preferred)
- 2 cups shredded cheddar cheese or Mexican blend
- 2 cups finely diced fresh tomatoes, divided
- 2 tablespoons melted butter for brushing
Fresh Serving Accompaniments
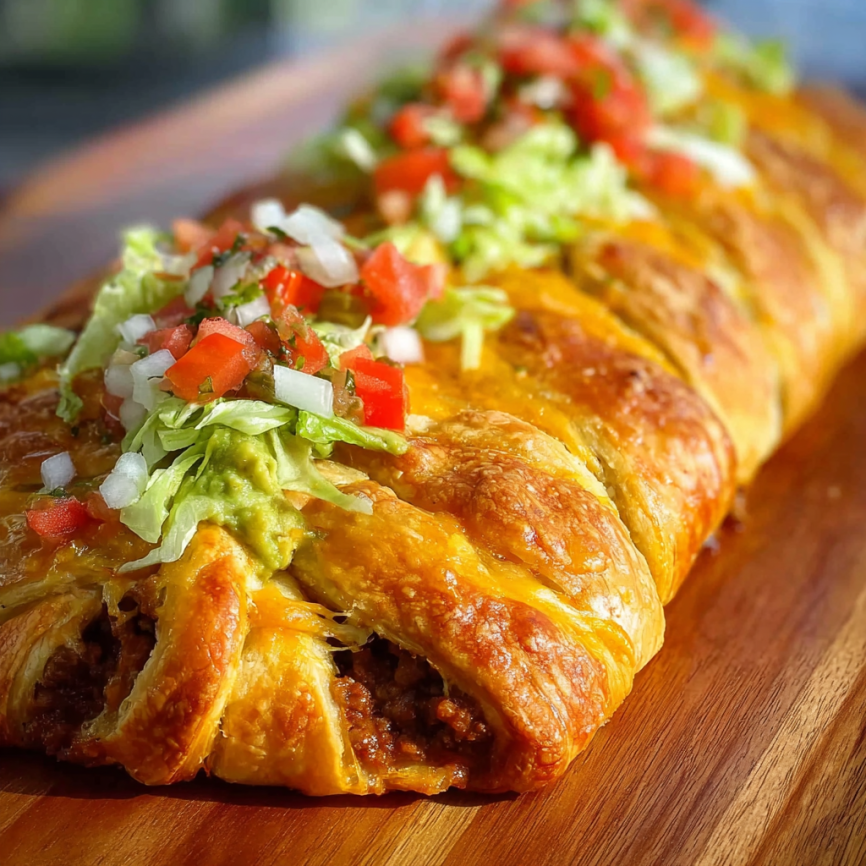
Transform each slice into a complete meal by offering chopped lettuce, diced tomatoes, sour cream, and additional salsa as toppings. Additionally, guacamole, pickled jalapeños, and fresh cilantro make excellent garnishes that elevate the dining experience.
Side Dish Pairings
Complement this hearty braid with Mexican rice, black bean salad, or roasted corn with lime and chili powder. Furthermore, a crisp green salad with avocado and lime vinaigrette provides a refreshing contrast to the rich, cheesy braid.
Detailed Step-by-Step Instructions
Initial Preparation
- Preheat your oven to 375°F (190°C) and line a large baking sheet with parchment paper for easy cleanup and transfer.
Creating the Flavorful Filling
- Brown the ground beef in a large skillet over medium heat, breaking it into small, uniform pieces with a wooden spoon. Cook until no pink remains, approximately 6-8 minutes.
- Drain excess fat thoroughly to prevent the braid from becoming greasy. Use paper towels to blot any remaining grease from the pan.
- Season the meat by stirring in taco seasoning packet and water. Simmer the mixture for 5-7 minutes, stirring occasionally, until the liquid reduces and the beef becomes nicely coated with seasoning.
Preparing the Dough Foundation
- Roll out pizza dough on a sheet of parchment paper, gently stretching it into a 10×15 inch rectangle. Work carefully to maintain even thickness throughout.
- Create braiding strips by using a sharp knife to cut 1.5-inch wide strips along both long sides of the rectangle, leaving about 4 inches uncut down the center for the filling.
Assembly Process
- Warm the refried beans in the microwave for 45 seconds until they become easily spreadable. Then, spread them evenly down the center strip of dough, leaving borders for braiding.
- Layer the filling by distributing seasoned beef evenly over the beans, followed by salsa and a generous layer of shredded cheese. Ensure ingredients are distributed evenly for consistent flavor in every slice.
Braiding Technique
- Create the braid pattern by alternately folding dough strips from each side over the filling, creating a woven appearance. Start from one end and work systematically to the other, ensuring strips overlap slightly.
- Seal and prepare for baking by pinching the ends closed and brushing the entire surface with melted butter for golden color and enhanced flavor.
Final Baking Step
- Transfer and bake the braid on the parchment-lined baking sheet for 20-25 minutes until the crust becomes golden brown and sounds hollow when gently tapped.
- Cool before serving for 5 minutes to allow the filling to set, making slicing easier and preventing burns from hot cheese.

Creative Variations & Customizations
Protein Alternatives
Replace ground beef with seasoned ground turkey, chicken, or even plant-based crumbles for different dietary needs. Additionally, leftover pulled pork or shredded rotisserie chicken work excellently when mixed with taco seasoning.
Vegetarian Version
Create a satisfying meatless version using black beans, corn, bell peppers, and extra cheese. Furthermore, adding sautéed onions and mushrooms provides excellent texture and umami flavor.
Spicy Heat Levels
Adjust the heat by choosing mild, medium, or hot salsa and adding jalapeños, chipotle peppers, or hot sauce to taste. Similarly, pepper jack cheese instead of cheddar creates built-in spiciness throughout.
Breakfast Taco Braid
Transform this into a breakfast dish using scrambled eggs, breakfast sausage, hash browns, and cheese. Moreover, serving with salsa verde and fresh avocado creates a perfect brunch centerpiece.
Smart Make-Ahead Strategies
Assembly Timeline
The entire braid can be assembled up to 4 hours in advance and refrigerated before baking. Cover with plastic wrap to prevent the dough from drying out, then remove 15 minutes before baking.
Filling Preparation
Both the seasoned beef and warmed beans can be prepared a day ahead and stored separately in the refrigerator. This strategy significantly reduces assembly time on busy nights.
Freezing Instructions
Wrap the assembled, unbaked braid tightly in plastic wrap and freeze for up to 2 months. Bake directly from frozen, adding 10-15 minutes to the cooking time and covering with foil if browning too quickly.
Professional Tips & Techniques
Dough Handling Secrets
Allow refrigerated dough to come to room temperature for easier rolling and shaping. Additionally, if the dough springs back while rolling, let it rest for 10 minutes before continuing.
Preventing Soggy Bottoms
Ensure the baking sheet is properly preheated and use parchment paper to promote even browning. Furthermore, avoid overfilling with wet ingredients like salsa to maintain crust integrity.
Perfect Braiding Technique
Work from one end to the other systematically, keeping strips roughly the same length for even coverage. Moreover, don’t worry about perfection—rustic braiding adds to the homemade charm.
Storage Guidelines
Leftover braid keeps well covered in the refrigerator for up to 3 days. Reheat individual slices in a 350°F oven for 5-7 minutes to restore crispiness.

Comprehensive FAQ Section
Can I use homemade pizza dough instead?
Absolutely! Homemade dough works wonderfully, though you may need to adjust rolling and baking times slightly. Additionally, ensure your dough isn’t too thick or thin for optimal results.
What if my braid breaks while braiding?
Don’t panic! Simply pinch any tears together and continue braiding. The rustic, homemade appearance actually adds character, and small imperfections won’t affect the final taste.
How do I know when the braid is fully cooked?
The crust should be golden brown and sound hollow when tapped. Additionally, an instant-read thermometer inserted into the center should read 165°F for food safety.
Can I make individual mini braids instead?
Yes! Divide the dough into 4 portions and create smaller braids using proportionally less filling. Reduce baking time to 15-18 minutes and watch carefully for doneness.
What’s the best way to slice and serve?
Use a sharp serrated knife and cut with a gentle sawing motion to avoid compressing the filling. Additionally, allow the braid to cool for 5 minutes before slicing for cleaner cuts.
How can I prevent the cheese from leaking out?
Don’t overfill with cheese, and ensure the braided strips overlap adequately to contain the filling. Furthermore, sealing the ends properly helps prevent leakage during baking.
Can I add vegetables to the filling?
Definitely! Sautéed bell peppers, onions, or corn make excellent additions. However, cook vegetables first to remove excess moisture that could make the crust soggy.
What if I don’t have taco seasoning packets?
Create homemade seasoning using chili powder, cumin, paprika, onion powder, garlic powder, oregano, salt, and pepper. This allows you to control sodium and customize flavors perfectly.
Nutrition Information (per slice):
- Calories: 320
- Protein: 18g
- Carbohydrates: 30g
- Fat: 15g
- Fiber: 4g
- Sodium: 610mg
Prep Time: 25 minutes | Cook Time: 25 minutes | Category: Main Course | Method: Baking | Cuisine: Mexican-American


