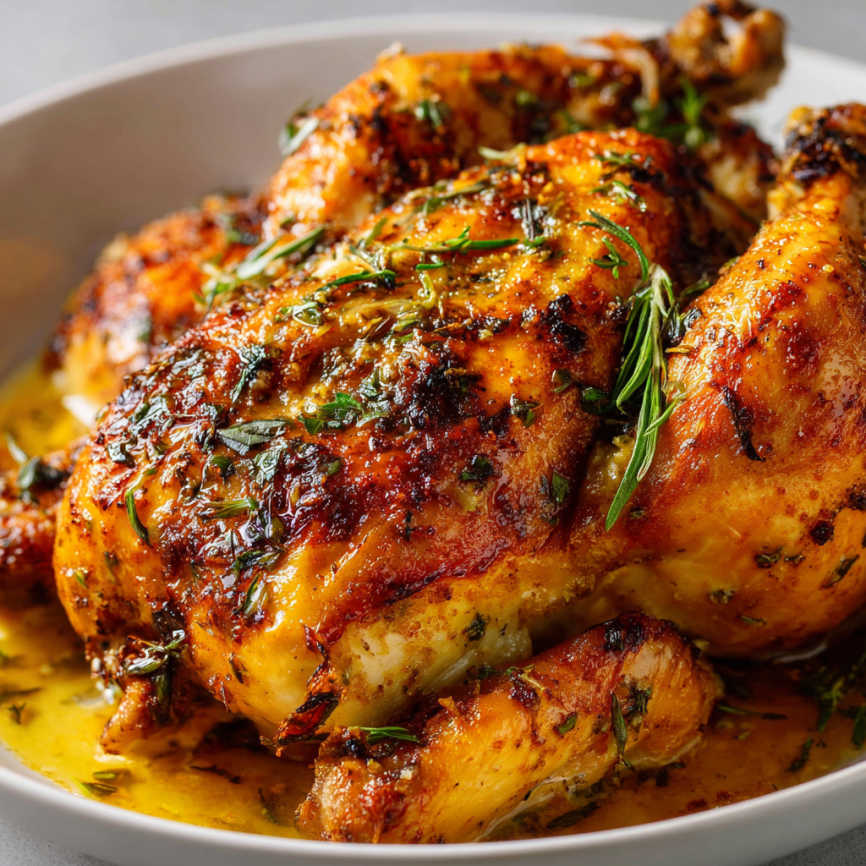
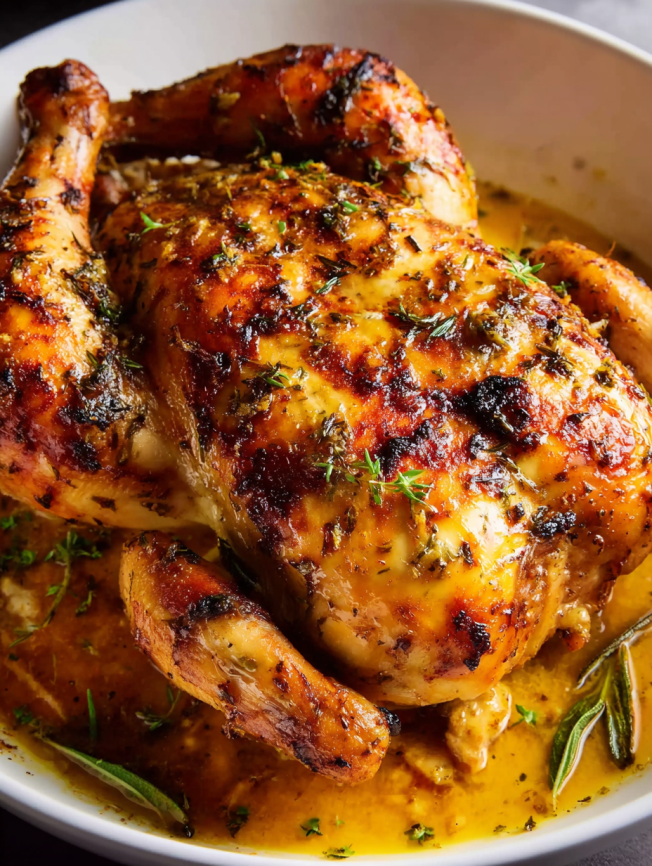
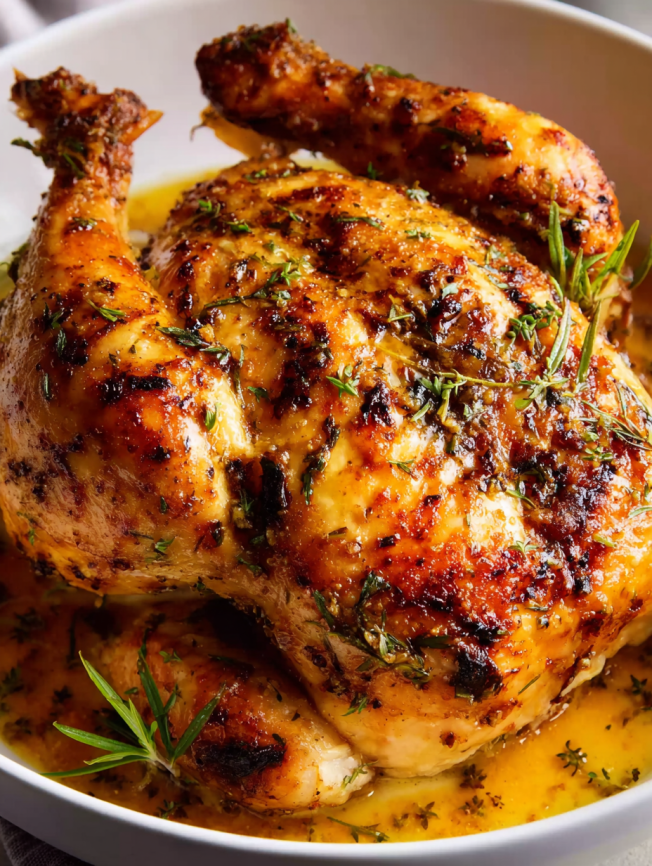
Sunday dinners at my grandmother’s house always centered around her legendary roast chicken. The aroma would fill the entire house, drawing everyone to the kitchen long before dinner was ready. This Garlic Butter Crispy Roast Chicken recipe captures that same magic – golden, crackling skin giving way to incredibly juicy meat infused with aromatic herbs and garlic. It’s the kind of dish that transforms an ordinary evening into something special.
Prep Time: 10 minutes
Cook Time: 1 hour 15 minutes
Total Time: 1 hour 25 minutes
Servings: 4 people
Why This Recipe Will Become Your Go-To
Crispy Skin That Actually Delivers
The combination of high heat, proper seasoning, and strategic basting creates skin so crispy it practically shatters at first bite. Unlike many roast chicken recipes that promise crispy skin but deliver soggy disappointment, this method guarantees results every single time.
Restaurant-Quality Flavor at Home
The garlic butter mixture penetrates deep into the meat, while the cavity stuffing of roasted garlic and rosemary infuses the chicken from the inside out. Additionally, the white wine adds a subtle depth that elevates this from basic roast chicken to something truly extraordinary.
Surprisingly Simple Technique
Despite its impressive appearance and complex flavors, this recipe requires minimal hands-on time. Once you’ve prepared the chicken, the oven does most of the work. Furthermore, the ingredients are straightforward and likely already in your kitchen.
Perfect for Any Occasion
Whether you’re hosting Sunday dinner or need an elegant weeknight meal, this chicken adapts beautifully. The presentation is impressive enough for guests, yet the preparation is simple enough for busy families.
Essential Ingredients
The Star of the Show
- 4 lb whole chicken – Room temperature for even cooking
- Giblets and neck removed – Check the cavity thoroughly
The Flavor Foundation
- ¼ cup unsalted butter, melted – Rich, creamy base
- 3 Tbsp olive oil – Helps achieve golden browning
- ¼ cup white wine – Optional but recommended (Sauvignon Blanc or Chardonnay)
- 1 lemon, halved – Bright acidity and fresh flavor
- Salt and pepper to taste – Essential seasoning
The Aromatic Elements
- 2 Tbsp fresh parsley, chopped – Bright, herbaceous notes
- 4 cloves garlic, minced – Distributed throughout the bird
- 1 head garlic, halved horizontally – For stuffing the cavity
- 3 fresh rosemary sprigs – Woody, pine-like fragrance
Step-by-Step Instructions
Setting Up for Success
Preheat your oven to 430°F (220°C), or 400°F (200°C) if using a fan-forced oven. Line a baking tray with foil or lightly grease a roasting pan. This preparation step ensures even cooking and easy cleanup later.
Preparing the Chicken
Remove the chicken from the refrigerator 30 minutes before cooking to bring it to room temperature. Discard the neck and giblets from the cavity, then remove any excess fat and leftover feathers. Pat the entire bird completely dry with paper towels – this step is crucial for achieving crispy skin.
Creating the Flavor Base
In a small bowl, combine the melted butter, olive oil, white wine (if using), and juice from half the lemon. This mixture will serve as both a marinade and basting liquid. The butter provides richness, while the oil helps with browning and the wine adds complexity.
Seasoning Inside and Out
Pour the butter mixture generously over the chicken, making sure to get some under the skin and inside the cavity. Season the bird liberally both outside and inside the cavity with salt and pepper. The internal seasoning is just as important as the external for fully flavored meat.
Adding the Aromatics
Sprinkle the chopped parsley over the chicken, then rub the minced garlic all over the bird, working it into the butter mixture and under the skin wherever possible. This ensures the garlic flavor penetrates throughout the meat during cooking.
Stuffing the Cavity
Place the halved garlic head, rosemary sprigs, and the squeezed lemon half inside the chicken cavity. These aromatics will steam and infuse the meat from within. Tie the legs together with kitchen string to help the chicken cook evenly and maintain its shape.
Roasting to Perfection
Place the chicken breast-side up in your prepared baking tray or roasting pan. Roast for 1 hour and 15-20 minutes, basting halfway through the cooking time. The chicken is done when juices run clear after piercing the thigh with a skewer, and the internal temperature reaches 165°F (75°C).
The Final Touch
After basting one final time, broil the chicken for 2-3 minutes until the skin turns deep golden brown. This step creates that coveted crispy exterior that makes this recipe special.
Perfect Serving Suggestions
Classic Comfort Pairings
Serve alongside traditional roasted vegetables like carrots, potatoes, and Brussels sprouts. The vegetables can roast in the same oven, absorbing the delicious chicken drippings. Creamy mashed potatoes also make an excellent base for soaking up the flavorful pan juices.
Elegant Dinner Party Options
For a more sophisticated presentation, serve with wild rice pilaf, roasted asparagus, and a fresh arugula salad. The bright, peppery greens provide a nice contrast to the rich, buttery chicken.
Light and Fresh Accompaniments
During warmer months, pair with a crisp cucumber salad, fresh bread, and roasted seasonal vegetables. The lighter sides allow the chicken’s flavors to shine while keeping the meal from feeling too heavy.
Recipe Variations to Explore
Herb Substitutions
While rosemary provides classic flavor, you can experiment with other hardy herbs. Try thyme, sage, or oregano for different flavor profiles. Fresh herbs work best, but dried herbs can be substituted using one-third the amount.
Citrus Variations
Instead of lemon, try using orange or lime for different citrus notes. Orange pairs particularly well with rosemary and creates a slightly sweeter flavor profile. Lime adds a more tropical twist that works beautifully with the garlic.
Wine Alternatives
If you prefer not to use wine, substitute with chicken broth or even apple cider for a different flavor dimension. The liquid helps keep the chicken moist while adding subtle complexity to the final dish.
Make-Ahead Tips
Preparation Timeline
The chicken can be seasoned and prepared up to 4 hours ahead, then kept refrigerated until ready to roast. This advance preparation actually improves the flavor as the seasonings have more time to penetrate the meat.
Day-of Efficiency
On the day of cooking, remove the chicken from the refrigerator 30 minutes before roasting to ensure even cooking. This timing allows the bird to come to room temperature, which is crucial for consistent results.
Leftover Magic
Leftover roast chicken is incredibly versatile. Use it for sandwiches, salads, soups, or chicken pot pie. The meat stays moist for up to 3 days in the refrigerator and can be frozen for up to 3 months.
Pro Tips for Success
Temperature Control
Using a meat thermometer is the most reliable way to ensure perfectly cooked chicken. Insert it into the thickest part of the thigh, avoiding the bone. The internal temperature should reach 165°F (75°C).
Achieving Crispy Skin
The key to crispy skin lies in starting with a completely dry bird and using high heat. Never skip the patting dry step, and resist the urge to lower the temperature too much during cooking.
Resting is Essential
Allow the chicken to rest for 10 minutes after cooking. This resting period lets the juices redistribute throughout the meat, resulting in more tender, juicy slices.
Scaling for Larger Birds
Adjusting for Size
For chickens larger than 4 pounds, start at 430°F (220°C) for one hour, then reduce to 325°F (160°C) and continue cooking. Baste every 20 minutes and cover with foil if the skin browns too quickly.
Timing Guidelines
Calculate approximately 20 minutes per pound for cooking time, but always rely on internal temperature rather than timing alone. Larger birds may need 45 minutes to an hour of additional cooking time.
Frequently Asked Questions
How do I know when the chicken is perfectly done? The most reliable method is using a meat thermometer inserted into the thickest part of the thigh, avoiding the bone. The internal temperature should reach 165°F (75°C). Additionally, the juices should run clear when the thigh is pierced with a skewer, not pink or red.
Can I use a frozen chicken for this recipe? It’s best to use a completely thawed chicken for even cooking and food safety. If your chicken is frozen, thaw it completely in the refrigerator, which typically takes 24-48 hours depending on size. Never thaw chicken at room temperature as this can promote bacterial growth.
What if I don’t have white wine? You can easily substitute the wine with chicken broth, apple cider, or even just omit it entirely. The wine adds depth of flavor, but the chicken will still be delicious without it. If using broth, choose a low-sodium variety to control the salt content.
Why is my chicken skin not crispy? Crispy skin depends on several factors: the bird must be completely dry before seasoning, the oven temperature should be high enough (430°F/220°C), and you shouldn’t overcrowd the pan. Also, avoid opening the oven door too frequently, as this releases heat and steam that can make the skin soggy.
Can I stuff the chicken with other ingredients? While the recipe calls for garlic, rosemary, and lemon in the cavity, you can experiment with other aromatics. Try onion quarters, fresh thyme, bay leaves, or even apple slices. Just remember that whatever you put in the cavity is for flavoring, not for eating, as it won’t reach safe temperatures.
How should I store and reheat leftovers? Store leftover chicken in the refrigerator for up to 3 days or freeze for up to 3 months. To reheat, place in a 325°F (160°C) oven until warmed through, or use individual portions in the microwave. Adding a splash of chicken broth can help maintain moisture during reheating.
Can I make this recipe in a slow cooker? While this recipe is designed for oven roasting to achieve crispy skin, you can adapt it for a slow cooker. However, you won’t get the same crispy exterior. Cook on low for 6-8 hours or high for 3-4 hours, but finish under the broiler for a few minutes to crisp the skin.
Nutritional Information
Per Serving:
- Calories: 693
- Protein: 41g
- Carbohydrates: 4g
- Fat: 55g
- Fiber: 1g
This recipe provides an excellent source of high-quality protein while the herbs and garlic contribute antioxidants and anti-inflammatory compounds. The moderate carbohydrate content makes it suitable for various dietary approaches.
Troubleshooting Common Issues
Uneven Cooking
If parts of the chicken are cooking faster than others, tent those areas with foil to prevent overcooking. This is particularly common with the wing tips and breast meat.
Skin Not Browning
If the skin isn’t browning enough, increase the oven temperature slightly or finish with a few minutes under the broiler. Just watch carefully to prevent burning.
Dry Breast Meat
Dry breast meat usually results from overcooking. Use a meat thermometer and remove the chicken as soon as it reaches 165°F (75°C). The resting period will complete the cooking process.
Final Thoughts
This Garlic Butter Crispy Roast Chicken recipe proves that sometimes the simplest dishes are the most satisfying. With its golden, crackling skin and juicy, flavorful meat, it’s the kind of meal that brings people together around the table. The combination of garlic, herbs, and butter creates layers of flavor that develop beautifully during the roasting process.
Whether you’re cooking for a special occasion or just want to elevate your weeknight dinner, this chicken delivers every time. The technique is forgiving enough for beginners yet sophisticated enough to impress experienced cooks. Most importantly, it creates those memorable moments that make cooking worthwhile – the anticipation as the aroma fills your kitchen, the satisfaction of carving into perfectly cooked meat, and the joy of sharing something delicious with the people you care about.


