Last October, my seven-year-old nephew declared he wanted “clouds that taste like candy” for his Halloween party. After some creative brainstorming, I discovered these ethereal Ghost Meringues were exactly what he had envisioned. Watching his eyes light up as he bit into these airy, melt-in-your-mouth treats was pure magic. The way they dissolve on your tongue while delivering the perfect sweetness makes them feel truly otherworldly.
These delightful little spirits have become my go-to Halloween dessert when I want something impressive yet surprisingly simple to make. Unlike heavy cakes or rich chocolates, these ghostly confections offer a light, refreshing end to any spooky feast while still satisfying that sweet tooth craving.
Why These Spectral Sweets Will Haunt Your Dreams
Impossibly Light Texture: Each ghost literally melts on your tongue, creating an almost mystical eating experience. Furthermore, the contrast between the crispy exterior and soft interior makes every bite a delightful surprise.
Foolproof Success: Despite their elegant appearance, these meringues are surprisingly forgiving for beginners. Even if your piping skills aren’t perfect, the rustic, handmade look actually adds to their ghostly charm.
Naturally Gluten-Free: Made with just egg whites and sugar, these treats naturally accommodate gluten-free diets. Additionally, they’re fat-free, making them a lighter alternative to traditional Halloween candies.
Interactive Fun: Kids absolutely love helping with the decorating process. Moreover, creating different facial expressions for each ghost becomes a delightful family activity that builds anticipation for the final reveal.
Essential Ingredients & Serving Information
Serves: 8-10 people (makes approximately 16-20 small ghosts)
Core Meringue Components:
- 4 large egg whites, at room temperature (crucial for volume)
- 1 cup granulated sugar (superfine works even better)
- ¼ teaspoon cream of tartar
- ½ teaspoon pure vanilla extract
Decoration Essentials:
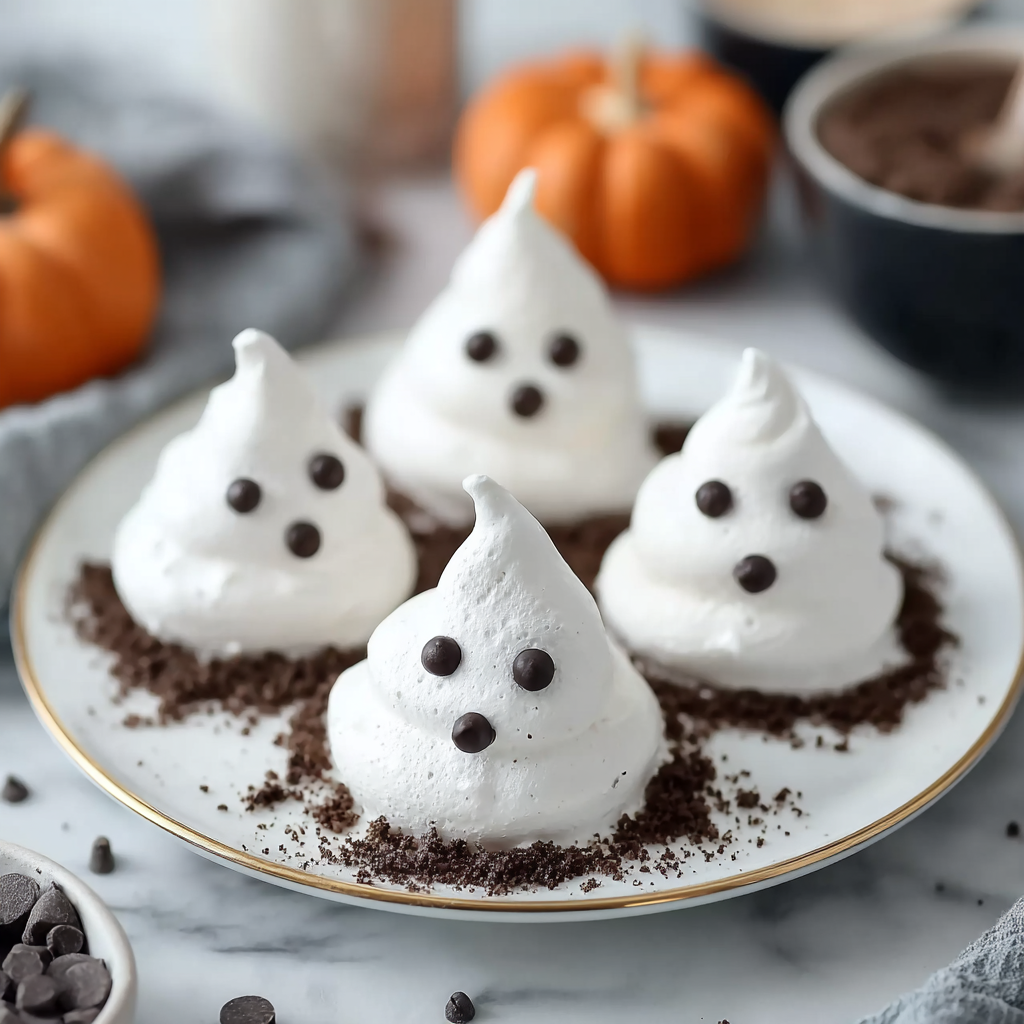
- 2 ounces dark chocolate, melted (for traditional faces)
- Black icing writing pen (easier alternative)
- Mini chocolate chips (for dimensional eyes)
Delightful Serving Companions:
- Hot cocoa with marshmallows
- Spiced apple cider
- Fresh berries for color contrast
- Halloween-themed ice cream flavors
Detailed Step-by-Step Instructions
Preparing Your Kitchen
- Temperature Check: Preheat your oven to 225°F (110°C). This low temperature is essential for proper drying without browning the delicate meringues.
- Perfect Prep Work: Line two large baking sheets with parchment paper. Avoid wax paper, which can stick and ruin your beautiful ghosts.
Creating the Perfect Meringue Base
- Whipping Magic Begins: In a spotlessly clean bowl, beat egg whites and cream of tartar on medium speed. Any trace of grease or yolk will prevent proper whipping, so cleanliness is crucial.
- Achieving Soft Peaks: Continue beating until soft peaks form—they should gently fold over when you lift the beaters. This usually takes 2-3 minutes with a stand mixer.
The Sugar Integration Process
- Gradual Sugar Addition: Add granulated sugar one tablespoon at a time while beating on high speed. This slow incorporation prevents the meringue from deflating and ensures maximum volume.
- Reaching Stiff Peak Perfection: Beat until stiff, glossy peaks form—about 8-10 minutes total. The mixture should hold its shape when the beaters are lifted, and the bowl can be turned upside down without the meringue moving.
- Final Flavor Touch: Gently fold in vanilla extract with a spatula, being careful not to deflate the mixture.
Shaping Your Ghostly Spirits
- Piping Preparation: Transfer meringue to a large piping bag fitted with a ½-inch round tip. Twist the top securely to prevent messy leaks.
- Ghost Formation Technique: Pipe oval shapes about 2 inches tall, starting with a wider base and tapering to a point at the top. Leave small “tails” at the bottom for authentic ghost shapes.
The Long, Slow Bake
- Initial Baking: Place in the preheated oven and bake for 1.5 hours without opening the door. Patience is key—resist the urge to peek!
- Cooling Process: Turn off the oven and prop the door slightly open with a wooden spoon. Allow meringues to cool completely in the oven for at least 2 hours.
Bringing Ghosts to Life
- Face Creation: Once completely cool, use melted chocolate or an icing pen to create simple dot eyes and small oval mouths. Let your creativity shine with different expressions!
Creative Serving and Presentation Ideas
Transform these simple treats into the star of your Halloween display with thoughtful presentation. Arrange them on a black cake stand surrounded by dry ice (safely contained) for a mysteriously foggy effect. Alternatively, nestle them among autumn leaves on a wooden board for a more rustic, harvest-themed approach.
For children’s parties, create a “ghost gathering” by arranging them in groups on individual plates with different facial expressions. This storytelling approach lets kids imagine conversations between their sweet spirits before enjoying them.
Exciting Recipe Variations
Colorful Spirit Meringues
Divide the meringue and tint portions with gel food coloring before piping. Pink ghosts, purple phantoms, or green goblins create a rainbow of supernatural treats.
Chocolate Ghost Meringues
Replace ¼ cup of sugar with unsweetened cocoa powder for chocolate-flavored spirits. These darker ghosts offer a richer flavor profile while maintaining the signature light texture.
Mini Boo Bites
Use a smaller piping tip to create bite-sized ghosts perfect for party favors. Reduce baking time to 1 hour and cool for 1 hour in the turned-off oven.
Spiced Halloween Spirits
Add ¼ teaspoon each of cinnamon and nutmeg to the meringue for warm, autumn-spiced ghosts that pair beautifully with apple cider.
Make-Ahead Strategies for Stress-Free Entertaining
Up to One Week Ahead: Baked meringues store beautifully in airtight containers at room temperature. However, add the chocolate faces just before serving to prevent smudging.
Day Before Serving: Complete the entire recipe including decoration. Store carefully in single layers between parchment paper to prevent sticking or breaking.
Humidity Considerations: Avoid making meringues on humid days, as moisture in the air prevents proper setting. If you must bake on a humid day, extend the cooling time in the oven by an additional hour.
Emergency Rescue Tips: If meringues become slightly soft due to humidity, place them back in a 200°F oven for 10-15 minutes to crisp them up again.
Important Notes (Notas)
Egg White Temperature: Room temperature egg whites whip to greater volume than cold ones. Take eggs out 2-3 hours before baking, or place them in warm water for 10 minutes to speed the process.
Equipment Cleanliness: Any trace of oil, butter, or egg yolk will prevent proper whipping. Wipe bowls and beaters with lemon juice or white vinegar before starting.
Weather Dependency: Meringues are sensitive to humidity. Choose dry days for best results, and avoid making them during rainy or very humid weather.
Storage Secrets: Never refrigerate finished meringues, as the moisture will make them sticky and soft. Room temperature storage in airtight containers keeps them crispy for up to a week.
Frequently Asked Questions
Why didn’t my meringue reach stiff peaks? Several factors can prevent proper whipping: bowl contamination with grease, egg yolks in the whites, or humid weather. Start with spotlessly clean equipment and room-temperature eggs for best results.
Can I make these without cream of tartar? While cream of tartar stabilizes the meringue, you can substitute with ½ teaspoon lemon juice or white vinegar. However, the meringue may be slightly less stable and take longer to reach proper peaks.
How do I know when the meringues are properly baked? They should easily lift off the parchment paper without sticking to the bottom. Additionally, they should feel completely dry to the touch and sound hollow when gently tapped.
What’s the best way to store leftover ghosts? Keep them in airtight containers with parchment paper between layers. Avoid plastic bags, which can trap moisture and make them soggy. Properly stored meringues stay crispy for up to one week.
Can I freeze these meringues? Yes! Freeze them in airtight containers for up to 3 months. Thaw at room temperature for 30 minutes before serving. Never thaw them in the refrigerator, as condensation will make them sticky.
Why do some of my ghosts crack during baking? Cracking usually occurs when the oven temperature is too high or when the meringue is under-whipped. Ensure your oven runs at the correct low temperature and that your meringue reaches proper stiff peaks before piping.
Can I add food coloring without affecting the texture? Use gel food coloring rather than liquid, which can add unwanted moisture. Add coloring after achieving stiff peaks, folding it in gently to avoid deflating the meringue.


