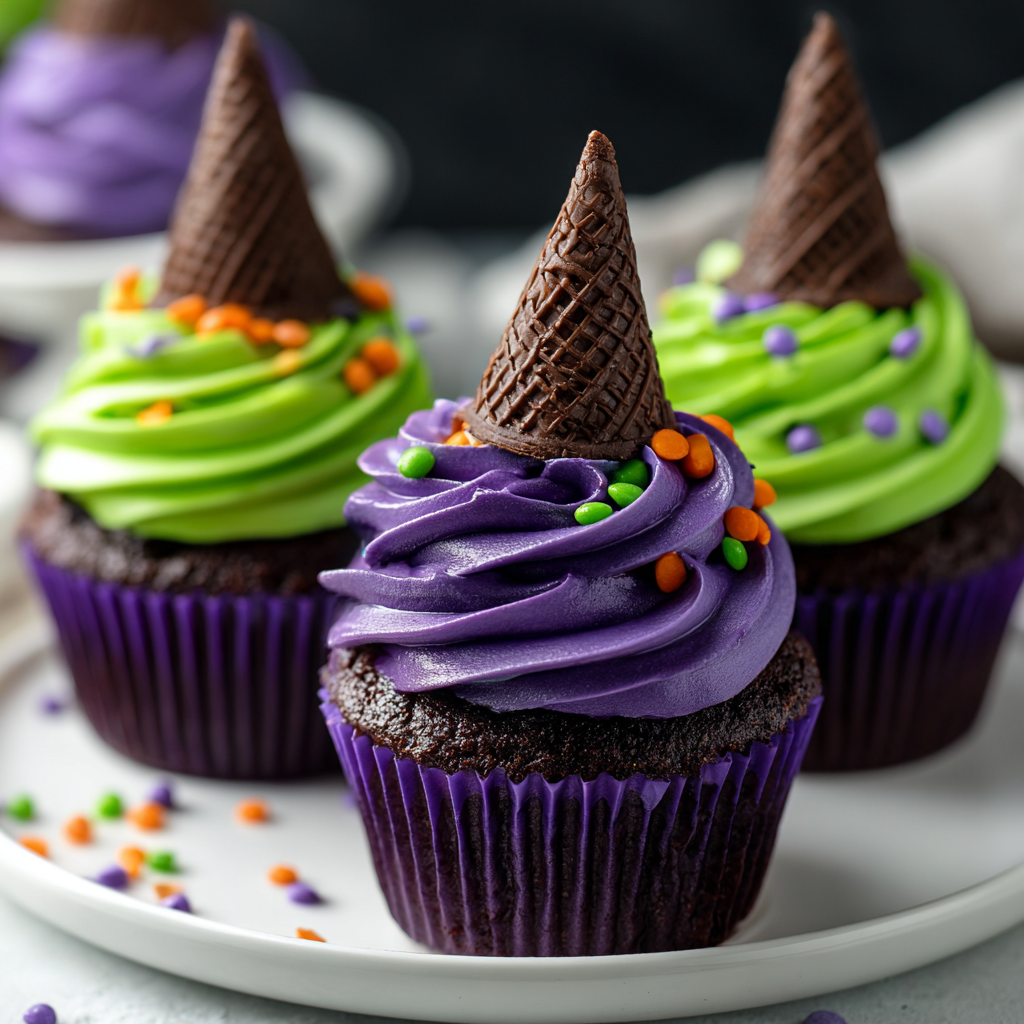
Three years ago, my daughter came home from school with an impossible mission: create “the coolest Halloween treats ever” for her class party. With just two hours until the deadline and a kitchen that looked like a baking supply bomb had exploded, inspiration struck when I spotted a lonely box of sugar cones in my pantry. Those humble ice cream cones became the magical transformation ingredient that turned ordinary cupcakes into spellbinding Witch Hat Cupcakes.
The joy on twenty-five third-graders’ faces when they saw these whimsical creations was absolutely priceless. What started as a last-minute panic has now become our most requested Halloween tradition. These cupcakes prove that sometimes the most memorable treats come from the simplest ideas and a dash of creative thinking.
Why These Bewitching Treats Cast the Perfect Spell
Effortlessly Impressive: These cupcakes look like they came from a professional bakery, yet they require minimal decorating skills. Even baking beginners can achieve stunning results that will have everyone asking for your “secret recipe.”
Kid-Friendly Assembly: Children absolutely love helping with the decoration process, making this an ideal family activity. Moreover, the simple steps allow young helpers to feel genuinely involved without creating kitchen chaos.
Budget-Friendly Magic: Using readily available ingredients keeps costs low while maximizing visual impact. Furthermore, you probably already have most items in your pantry, making this perfect for spontaneous baking sessions.
Customizable Enchantment: The basic concept adapts easily to different flavor preferences and dietary needs. Additionally, the decoration possibilities are endless, allowing each witch hat to have its own unique personality.
Essential Ingredients & Serving Details
Serves: 10-12 people (makes 12 standard cupcakes)
Cupcake Foundation:
- 1 box premium chocolate cake mix (18.25 oz)
- Ingredients called for on cake mix box (typically eggs, oil, and water)
- 12 standard cupcake liners in Halloween colors
Magical Hat Construction:
- 12 mini chocolate-dipped sugar cones (ice cream cones)
- Black gel food coloring (optional, for darkening cones)
Enchanting Decorations:
- 2 cups green buttercream frosting (store-bought or homemade)
- 1 cup purple buttercream frosting
- Assorted Halloween sprinkles (orange, black, and purple work best)
- Edible glitter or sanding sugar for extra sparkle
Perfect Serving Accompaniments:
- Warm apple cider with cinnamon sticks
- Halloween-themed punch or orange soda
- Vanilla ice cream for a temperature contrast
- Fresh orange slices for a citrus palate cleanser
Step-by-Step Spellcasting Instructions
Preparing Your Magical Workspace
- Oven Preparation: Preheat your oven according to the cake mix package directions (typically 350°F/175°C). This ensures even baking from the moment your cupcakes enter the oven.
- Cupcake Setup: Line a standard 12-cup muffin tin with Halloween-themed cupcake liners. Choose colors that complement your planned frosting scheme for maximum visual impact.
Creating the Cupcake Base
- Batter Preparation: Follow the cake mix package instructions precisely, combining all ingredients until just smooth. Overmixing can result in tough, dense cupcakes rather than light, fluffy ones.
- Perfect Portioning: Divide batter evenly among liners, filling each about ⅔ full. This prevents overflow while ensuring properly domed tops for easy decorating.
- Baking Excellence: Bake according to package directions until a toothpick inserted in the center comes out clean. Avoid opening the oven door during the first 15 minutes to prevent collapse.
Cooling and Preparation Phase
- Proper Cooling: Allow cupcakes to cool in the pan for 5 minutes, then transfer to a wire rack. Complete cooling is essential—warm cupcakes will melt your frosting instantly.
- Cone Preparation: While cupcakes cool, examine your sugar cones for any cracks or breaks. Reserve the most perfect ones for your witch hats, using damaged ones for snacking.
The Magical Assembly Process
- Frosting Foundation: Using a piping bag or knife, create generous swirls of green frosting on each cupcake. The frosting should be thick enough to securely hold the weight of the sugar cone.
- Hat Placement: Gently press one sugar cone point-down into the center of each frosted cupcake. The cone should sit securely without toppling over.
Final Enchantments
- Purple Accents: Pipe small dots or swirls of purple frosting around the base of each hat to create decorative bands. This adds color contrast and helps secure the cone.
- Sprinkle Magic: While frosting is still soft, generously apply Halloween sprinkles to the purple frosting areas. Work quickly before the frosting sets completely.
- Final Sparkle: Dust each hat lightly with edible glitter for an extra magical touch that catches the light beautifully.
Creative Presentation and Serving Ideas
Transform your kitchen counter into a witch’s lair by arranging these cupcakes on a black tablecloth surrounded by plastic cauldrons and battery-operated candles. The dramatic lighting enhances the spooky atmosphere while highlighting the intricate details of each witch hat.
For classroom parties, create individual “spell books” by placing each cupcake in a small black box with a handwritten “potion recipe” card. This presentation turns each treat into a memorable keepsake that extends the magic beyond the actual eating experience.
Consider arranging them in a circle around a large cauldron filled with dry ice (safely contained) for photographs. The misty effect creates an otherworldly backdrop that makes these simple cupcakes look truly supernatural.
Bewitching Recipe Variations
Orange and Black Classic
Replace green frosting with bright orange and use black sugar cones for a traditional Halloween color scheme. This variation offers a more classic autumn aesthetic while maintaining the same charming appeal.
Gluten-Free Enchantment
Substitute the regular cake mix with your favorite gluten-free chocolate cake mix. The assembly process remains identical, ensuring everyone can enjoy these magical treats regardless of dietary restrictions.
Funfetti Witch Hats
Use vanilla cake mix with colorful sprinkles baked right into the cupcake base. This creates a delightful surprise when guests bite into what appears to be a chocolate cupcake.
Mini Witch Hat Bites
Use mini cupcake tins and tiny sugar cones to create bite-sized versions perfect for large parties. Reduce baking time to 10-12 minutes and use less frosting for proper proportions.
Spiced Autumn Version
Add 1 teaspoon of pumpkin pie spice to the cake mix before baking. This creates warm autumn flavors that complement the visual Halloween theme perfectly.
Strategic Make-Ahead Tips
Two Days Before: Bake cupcakes completely and store in airtight containers at room temperature. This actually improves their texture and makes frosting application easier.
Day Before Serving: Frost cupcakes and add witch hats, but save the final sprinkle decoration until serving day. Cover loosely with plastic wrap, ensuring the plastic doesn’t touch the cones.
Morning of Party: Add final decorative touches like sprinkles and edible glitter. This timing ensures maximum visual impact when guests arrive.
Transportation Tips: Use cupcake carriers with high domes to protect the witch hat points during transport. If unavailable, consider bringing components separately and assembling on-site.
Important Notes (Notas)
Sugar Cone Selection: Choose the straightest, most pointed cones available for the best witch hat appearance. Slightly curved cones can add character but may not sit as securely on the cupcakes.
Frosting Consistency: Ensure your frosting is thick enough to support the cone’s weight without being so stiff that it tears when piped. Room temperature frosting typically works best.
Humidity Awareness: High humidity can make sugar cones soft and cause them to lose their crisp texture. Store decorated cupcakes in a dry environment whenever possible.
Color Considerations: Gel food coloring creates more vibrant hues than liquid coloring and won’t thin your frosting. Start with small amounts—you can always add more, but you can’t take it away.
Frequently Asked Questions
Can I use homemade cupcakes instead of cake mix? Absolutely! Any chocolate cupcake recipe works beautifully. Just ensure they have a nice dome shape for proper hat placement and that they’re completely cooled before decorating.
What if my sugar cones keep falling over? Make sure your frosting is thick enough and create a small well in the center before placing the cone. You can also insert a toothpick through the cone into the cupcake for extra security, removing it before serving.
How far in advance can I make these cupcakes? Fully assembled cupcakes stay fresh for 2-3 days when stored properly. However, the sugar cones may lose some crispness over time, so day-of assembly is ideal for best texture.
Can I use different colored cones? Regular tan sugar cones work perfectly, but you can brush them with black food coloring mixed with corn syrup for darker witch hats. Let them dry completely before use.
What’s the best way to store leftover decorated cupcakes? Store in single layers in airtight containers with the lids propped open slightly to prevent the cones from getting soggy. Avoid refrigeration, which can make the cones soft.
Can I make these dairy-free? Yes! Use dairy-free cake mix, dairy-free frosting, and ensure your sugar cones are dairy-free (most are, but always check labels). The taste and appearance remain virtually identical.
How do I prevent the frosting from melting during outdoor events? Use buttercream made with butter rather than shortening, as it holds up better in warm weather. Additionally, keep cupcakes in shade and consider using a cooler with ice packs nearby.


