Total Time: 32 minutes | Yield: 24 cookies
Introduction
There’s something magical about baking with children during Halloween season—the excitement in their eyes, the flour-dusted counters, and the sweet aroma of cookies filling the house. Last October, my nephew declared he wanted to become a “cookie wizard,” and together we conjured up these cauldron-inspired cookies. Watching him carefully measure ingredients and proudly place each spoonful of dough on the baking sheet reminded me why Halloween baking has become one of our most cherished family traditions.
These Halloween cauldron cookies are the perfect blend of classic chocolate chip cookie comfort and festive fun. The combination of rich chocolate chips and colorful candy corn creates a delightful surprise in every bite, while the simple preparation makes it accessible even for young bakers. What I love most is how forgiving this recipe is—it’s hard to mess up, and the results always bring smiles. Whether you’re creating memories with little ones or preparing treats for a Halloween party, these cookies deliver both flavor and festive charm.
Why You’ll Love This Recipe
Perfect for Baking with Kids: The straightforward steps and simple mixing make this an ideal recipe for involving children in the kitchen. They can help measure, mix, and place the dough, creating both delicious treats and lasting memories.
Classic Flavor with a Twist: Traditional chocolate chip cookie lovers will appreciate the familiar base, while the candy corn addition brings a playful Halloween element. The cookies taste amazing even if you skip the candy corn entirely.
Quick and Efficient: With just 32 minutes from start to finish, you can have fresh-baked cookies ready for impromptu gatherings or last-minute Halloween parties. The active prep time is minimal, giving you more time to enjoy the holiday.
Crowd-Pleaser Appeal: These cookies appeal to all ages, from toddlers to grandparents. The soft, chewy texture and balanced sweetness make them universally loved at any Halloween celebration.
Versatile Base Recipe: Use this dough as a foundation for endless variations. Swap candy corn for other Halloween treats, add food coloring, or shape them differently to create your own spooky creations.
Ingredients
Wet Ingredients:
- 1 cup unsalted butter, softened to room temperature
- 1 cup granulated sugar
- 1 cup brown sugar, packed
- 2 large eggs
- 2 teaspoons vanilla extract
Dry Ingredients:
- 3 cups all-purpose flour
- 1 teaspoon baking soda
- ½ teaspoon salt
Mix-Ins:
- 1 cup chocolate chips (semi-sweet or milk chocolate)
- 1 cup candy corn
Optional Additions:
- Orange food coloring for festive dough
- Halloween sprinkles
- Mini chocolate chips
- Chopped Reese’s Pieces
- Candy eyeballs for decoration
Step-by-Step Instructions
Preparing to Bake
Step 1: Preheat and Prepare Begin by preheating your oven to 350°F (175°C). While it heats, line two large baking sheets with parchment paper or silicone baking mats. This prevents sticking and makes cleanup effortless. Having everything ready before you start mixing ensures a smooth baking process.
Creating the Cookie Dough
Step 2: Cream the Butter and Sugars In a large mixing bowl, combine the softened butter, granulated sugar, and packed brown sugar. Using an electric mixer on medium speed, cream these ingredients together for 3-4 minutes until the mixture becomes light, fluffy, and pale in color. This crucial step incorporates air into the dough, creating cookies with perfect texture. The mixture should look almost mousse-like when properly creamed.
Step 3: Add Eggs and Vanilla Crack the eggs into the butter-sugar mixture one at a time, beating well after each addition. This gradual incorporation prevents the mixture from separating. Pour in the vanilla extract and mix until everything is thoroughly combined and smooth. The batter should be creamy and cohesive at this stage.
Step 4: Combine Dry Ingredients In a separate medium bowl, whisk together the flour, baking soda, and salt. Whisking aerates the flour and ensures the leavening agent distributes evenly throughout. This step might seem unnecessary, but it prevents lumps of baking soda from creating uneven rise in your cookies.
Mixing and Adding Festive Elements
Step 5: Gradually Incorporate Dry Ingredients With your mixer on low speed, gradually add the flour mixture to the wet ingredients in three separate additions. Mix just until the flour disappears after each addition—overmixing develops gluten and creates tough cookies. The dough should look cohesive but not overworked. If mixing by hand, use a wooden spoon and stir with deliberate, gentle motions.
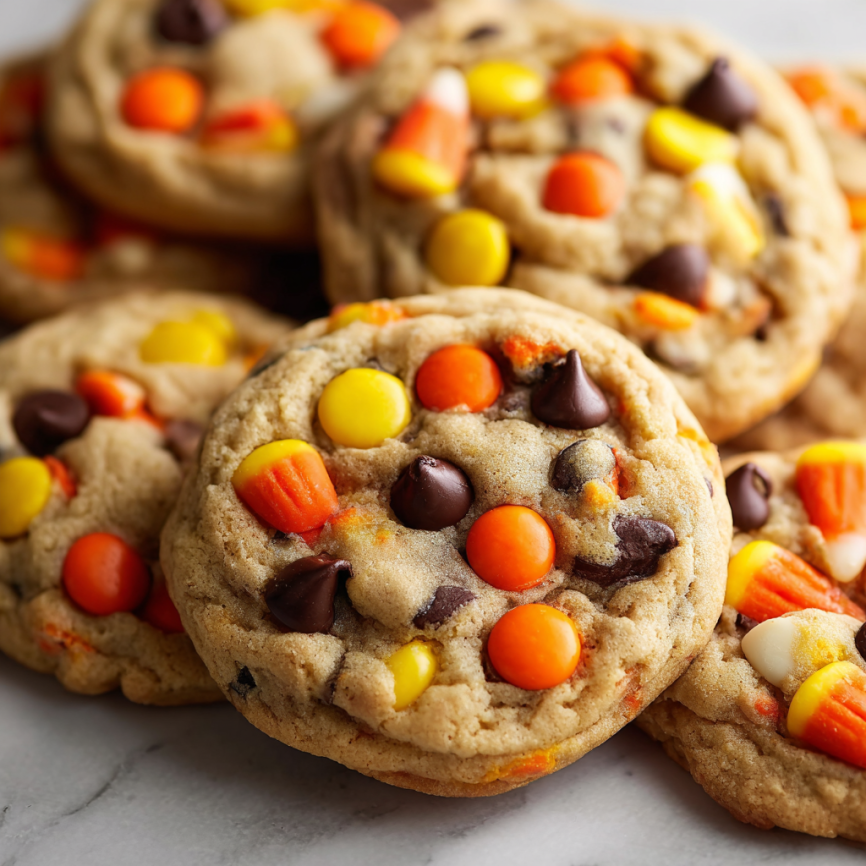
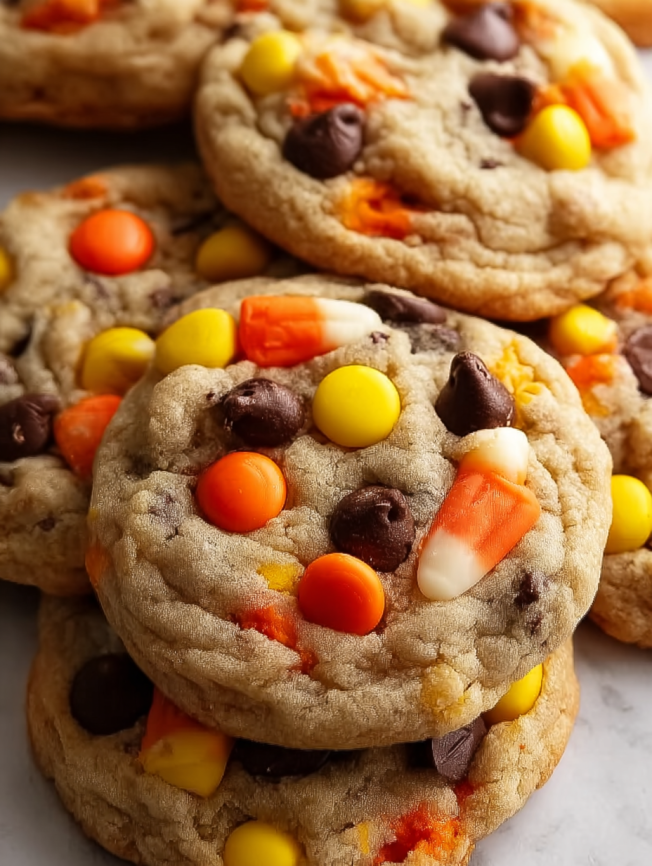
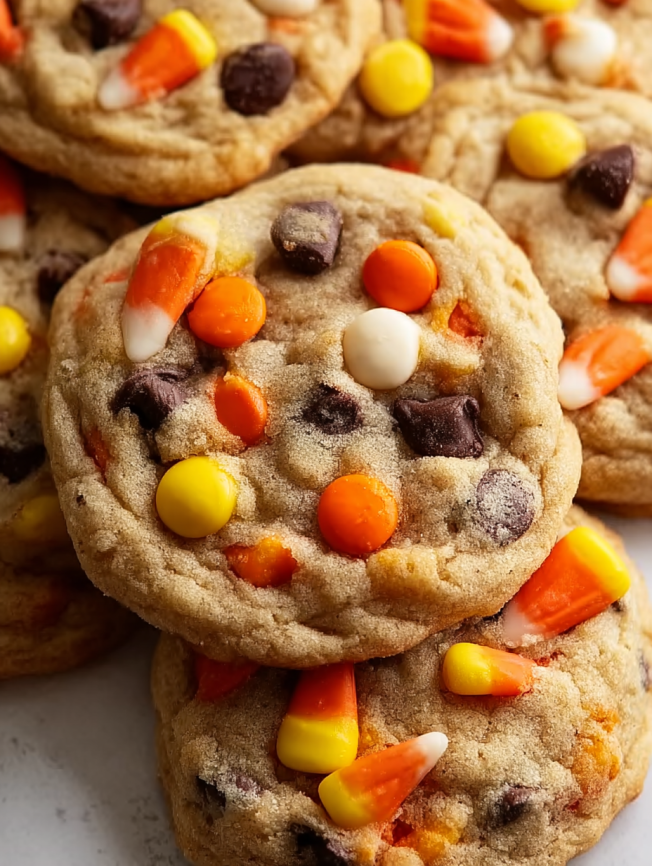
Step 6: Fold in the Fun Stuff Using a spatula or wooden spoon, gently fold in the chocolate chips and candy corn. Distribute them evenly throughout the dough so every cookie gets a good amount of both. The candy corn adds pops of orange, yellow, and white that make these cookies instantly recognizable as Halloween treats. Reserve a few chocolate chips and candy corn pieces for pressing into the tops of cookies before baking for extra visual appeal.
Shaping and Baking
Step 7: Portion the Dough Using a cookie scoop or tablespoon, drop rounded spoonfuls of dough onto your prepared baking sheets. Leave about 2 inches between each cookie to allow for spreading during baking. For uniform cookies, use a 2-tablespoon cookie scoop, which creates consistently sized portions that bake evenly. If you want to get creative, you can slightly flatten each dough ball and shape it to look more like a cauldron.
Step 8: Add Final Touches Before baking, press a few extra chocolate chips and candy corn pieces onto the top of each cookie. This not only makes them look more appealing but also ensures every cookie has visible Halloween colors on top.
Step 9: Bake to Golden Perfection Place the baking sheets in the preheated oven and bake for 10-12 minutes. Watch carefully during the last few minutes—the cookies are done when the edges turn golden brown while the centers still look slightly underbaked. They’ll continue cooking on the hot baking sheet after removal, so don’t overbake. The key to chewy cookies is pulling them out when they look just barely set.
Step 10: Cool and Set Let the cookies cool on the baking sheet for 5 minutes before transferring them to a wire cooling rack. This brief resting period allows them to firm up enough to move without breaking apart. As they cool completely, they’ll develop that perfect chewy texture everyone loves.
Serving Suggestions
These festive cookies are perfect for Halloween parties when arranged on a platter alongside other spooky treats. Stack them in a pyramid shape and surround them with fake spider webs and plastic spiders for dramatic presentation.
Package individual cookies in clear cellophane bags tied with orange and black ribbons for Halloween party favors or trick-or-treat gifts. Add a cute tag that says “Cauldron Cookies” or “Witch’s Brew Bites” for personalized charm.
Serve them warm with cold milk for an after-school snack that kids absolutely adore. The chocolate chips become melty and gooey when the cookies are fresh from the oven, creating an irresistible treat.
Create a cookie decorating station at your Halloween party with these cookies as the base. Provide orange and black frosting, Halloween sprinkles, and candy eyeballs so guests can customize their own spooky creations.
Recipe Variations
Orange Cauldron Cookies
Add 10-15 drops of orange food coloring to the wet ingredients before mixing in the flour. The vibrant orange dough creates stunning cookies that look even more Halloween-appropriate, especially when studded with chocolate chips.
Monster Mash Cookies
Replace candy corn with a mixture of Halloween M&Ms, Reese’s Pieces, and mini marshmallows. This creates a colorful, chunky cookie that’s loaded with different textures and flavors in every bite.
Double Chocolate Cauldron
Substitute ½ cup of flour with unsweetened cocoa powder for rich, dark chocolate cookies. Use white chocolate chips instead of regular chocolate chips for dramatic color contrast against the dark dough.
Peanut Butter Halloween Treats
Replace ½ cup of butter with ½ cup of creamy peanut butter. Add peanut butter chips along with the chocolate chips, and use mini Reese’s peanut butter cups instead of candy corn for peanut butter lovers.
Gluten-Free Version
Substitute the all-purpose flour with a 1-to-1 gluten-free baking flour blend. The cookies will have a slightly different texture but remain delicious and perfect for guests with gluten sensitivities.
Make-Ahead Tips
Dough Preparation: Make the cookie dough up to 3 days ahead and store it tightly wrapped in the refrigerator. Cold dough actually bakes up slightly thicker and chewier, so many bakers prefer this method. Let it sit at room temperature for 10-15 minutes before scooping.
Freezing Dough: Scoop the dough into balls and freeze them on a baking sheet until solid, then transfer to a freezer bag. Frozen cookie dough keeps for up to 3 months. Bake directly from frozen, adding 2-3 extra minutes to the baking time.
Baked Cookie Storage: Store cooled cookies in an airtight container at room temperature for up to 5 days. Layer them between sheets of parchment paper to prevent sticking. They stay soft and chewy when properly stored.
Freezing Baked Cookies: Freeze baked cookies for up to 2 months in a freezer-safe container. Thaw at room temperature for about 30 minutes before serving, or warm them briefly in the microwave for that fresh-baked experience.
Party Planning: Bake these cookies 1-2 days before your event and store them in airtight containers. The flavors actually develop and improve slightly after a day, making them taste even better at your party.
Notes
Butter Temperature: Room temperature butter should be soft enough to leave an imprint when pressed but not greasy or melted. If you forgot to soften it, cut the butter into small cubes and let it sit for 15-20 minutes.
Brown Sugar Packing: When measuring brown sugar, pack it firmly into the measuring cup and level it off. Properly packed brown sugar holds the shape of the cup when turned out, ensuring accurate measurement.
Candy Corn Alternatives: If you’re not a candy corn fan, substitute with orange and black M&Ms, chopped Halloween Oreos, or even dried cranberries for a less sweet option that still adds color.
Cookie Size Consistency: Using a cookie scoop ensures all cookies are the same size, which means they bake evenly and look uniform. This is especially important when baking with kids who might create varying sizes by hand.
Altitude Adjustments: If baking at high altitude (above 3,500 feet), reduce the baking soda to ¾ teaspoon and increase the flour by 2 tablespoons for better results.
Frequently Asked Questions
Why are my cookies spreading too much? This usually happens when the butter is too warm or the dough is too soft. Chill the dough for 30 minutes before baking, and make sure your butter was properly softened, not melted. Also, ensure your baking soda is fresh.
Can I make these cookies ahead for a party? Absolutely! These cookies taste great even after a few days. Store them in an airtight container, and they’ll stay soft and chewy. You can also freeze them and thaw before serving.
What if I don’t have brown sugar? You can substitute with all granulated sugar, though the cookies will be slightly less chewy and have a different flavor profile. For a closer match, mix 1 cup granulated sugar with 1 tablespoon molasses per cup of brown sugar needed.
How do I make my cookies extra chewy? Use more brown sugar than white sugar (which this recipe does), don’t overbake, and pull them from the oven when the centers still look slightly underdone. Chilling the dough before baking also helps create chewier cookies.
Can kids really help make these? Yes! This recipe is wonderfully kid-friendly. Young children can help measure, pour ingredients, and mix. Older kids can handle most steps with supervision. Just be careful around the hot oven and hot baking sheets.
Why do my cookies turn out flat? Flat cookies can result from several issues: butter that’s too warm, insufficient flour, old baking soda, or overmixing the dough. Make sure to measure flour properly (spoon and level method) and don’t skip the chilling step if your kitchen is warm.
Can I use salted butter instead? You can, but reduce the added salt to ¼ teaspoon to compensate for the salt already in the butter. The cookies will have a slightly saltier taste, which some people prefer as it balances the sweetness.
How should I store leftover cookies? Keep them in an airtight container at room temperature for up to 5 days. Add a slice of bread to the container—the cookies will absorb moisture from the bread and stay soft. Replace the bread slice every couple of days.
Prep Time: 20 minutes | Cook Time: 12 minutes | Category: Dessert | Method: Baking | Cuisine: American | Diet: Vegetarian
Nutrition Information (Per Cookie)
- Serving Size: 1 cookie
- Calories: 150
- Sugar: 10g
- Sodium: 75mg
- Fat: 7g
- Saturated Fat: 4g
- Unsaturated Fat: 2g
- Trans Fat: 0g
- Carbohydrates: 20g
- Fiber: 1g
- Protein: 2g
- Cholesterol: 20mg