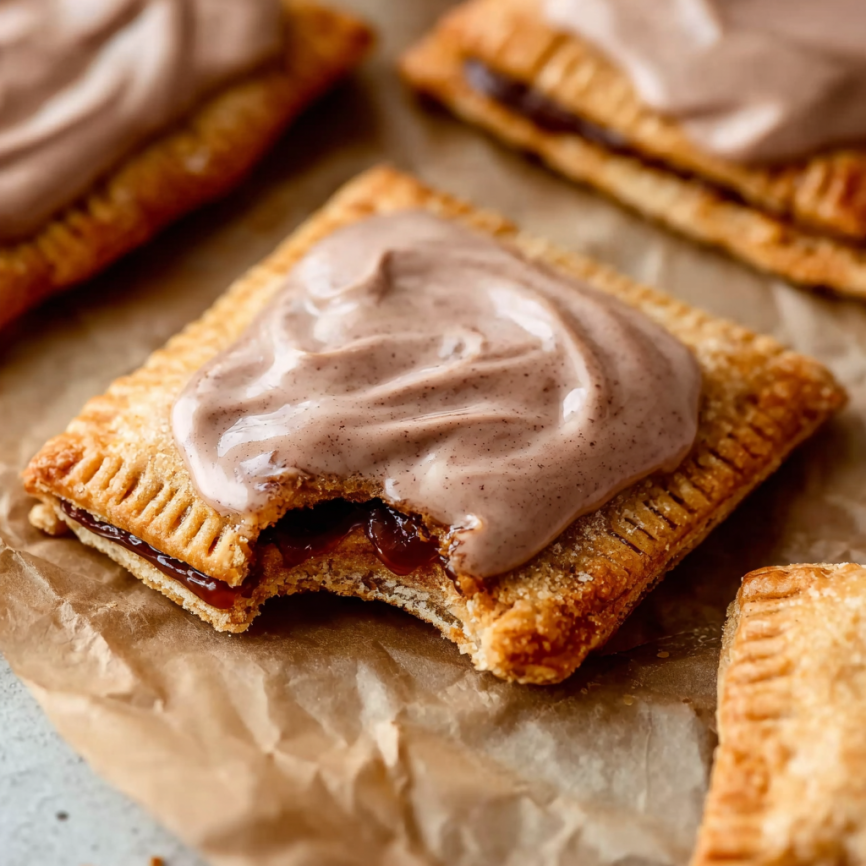
There’s something utterly magical about the moment when homemade pop tarts emerge from the oven, their golden pastry shells filled with warm, cinnamon-spiced sweetness. As a child, I was fascinated by the foil-wrapped packages that promised instant breakfast bliss, but nothing could have prepared me for the revelation of making them entirely from scratch. The first time I bit into a homemade version, with its buttery, flaky crust and real brown sugar filling, I knew I could never go back to the store-bought version.
Creating these pop tarts from scratch might seem daunting initially, but the process is surprisingly meditative and rewarding. Each step builds anticipation, from rolling out the tender pastry dough to carefully sealing each precious pocket of cinnamon goodness. Moreover, the ability to control every ingredient means you’re getting pure, wholesome flavors without any artificial additives or preservatives.
Why These Homemade Pop Tarts Will Change Your Morning Routine
Authentic Flavor Experience
Unlike their commercial counterparts, these pop tarts burst with genuine brown sugar and cinnamon flavors that taste like actual dessert rather than processed sweetness. Additionally, the all-butter pastry creates layers of flaky texture that simply can’t be achieved with mass-produced versions.
Complete Control Over Ingredients
When you make pop tarts from scratch, you know exactly what goes into each bite – real butter, pure vanilla, quality spices, and no mysterious preservatives. Furthermore, you can adjust sweetness levels and customize flavors to suit your family’s preferences perfectly.
Impressive Yet Achievable
While these pop tarts require time and patience, the techniques are straightforward and use basic baking skills. Consequently, they make an excellent project for intermediate bakers looking to expand their repertoire or ambitious beginners ready for a rewarding challenge.
Essential Ingredients & Serving Suggestions
Pastry Foundation
- 2½ cups (313g) all-purpose flour, plus extra for dusting (spooned and leveled)
- 2 teaspoons granulated sugar
- 1 teaspoon salt
- 1 cup (16 tbsp; 226g) unsalted butter, chilled and cubed
- ½ cup (120ml) ice water, plus additional as needed
Brown Sugar Cinnamon Filling
- ½ cup (100g) packed dark or light brown sugar
- 2 teaspoons ground cinnamon
- 1 tablespoon (8g) all-purpose flour
- 1 large egg mixed with 2 teaspoons milk for egg wash
Sweet Cinnamon Glaze
- ¾ cup (90g) confectioners’ sugar, sifted
- 1 tablespoon (15ml) milk, plus more as needed
- ½ teaspoon ground cinnamon
- ¼ teaspoon pure vanilla extract
Perfect Pairings
These pop tarts shine brightest alongside a steaming mug of coffee or a tall glass of cold milk. For special weekend breakfasts, serve them with fresh fruit and scrambled eggs for a balanced meal that feels both indulgent and complete.
Step-by-Step Instructions
Creating the Perfect Pastry Base
Begin by whisking together flour, sugar, and salt in a large bowl. Using a pastry cutter or two forks, cut the chilled butter into the flour mixture until it resembles coarse meal with pea-sized butter bits scattered throughout. This texture is crucial for achieving flaky layers.
Drizzle ice water over the mixture one tablespoon at a time, stirring gently with a spatula after each addition. Continue until the dough begins forming large clumps, being careful not to add excess water, which can make the pastry tough.
Forming and Chilling the Dough
Transfer the shaggy dough to a lightly floured work surface. Using floured hands, gently gather the mixture into a cohesive ball, avoiding overworking which can develop too much gluten. If the dough feels too dry, dip your fingers in cold water and continue bringing it together. Conversely, if it’s too sticky, sprinkle additional flour as needed.
Using a sharp knife or bench scraper, divide the dough in half. Gently flatten each portion into a 1-inch-thick disc, then wrap tightly in plastic wrap. Refrigerate for at least 2 hours, though overnight chilling produces even better results.
Rolling and Shaping the Pastry
Remove one chilled disc from the refrigerator and let it rest at room temperature for 5 minutes to make rolling easier. Meanwhile, keep the second disc refrigerated. On a lightly floured surface, roll the dough into a 9×12-inch rectangle approximately ⅛ inch thick, turning the dough 90 degrees periodically to ensure even thickness.
Using a pizza cutter or sharp knife, trim the edges to create clean lines, then cut the rectangle into nine equal 3×4-inch rectangles. A ruler helps ensure consistent sizing. Transfer these rectangles to a parchment-lined baking sheet and refrigerate while you repeat the process with the second dough disc.
Preparing the Aromatic Filling
In a small bowl, combine brown sugar, cinnamon, and flour, whisking until evenly distributed. The flour helps thicken any juices that may develop during baking, preventing soggy bottoms.
Assembling Your Pop Tarts
Remove one baking sheet of pastry rectangles from the refrigerator – these will serve as your pop tart bottoms. Brush egg wash over the entire surface of each rectangle, paying special attention to the edges where sealing will occur.
Place a heaping tablespoon of filling in the center of each rectangle, spreading it gently with the back of a spoon while leaving a ¼-inch border around all edges. This border is essential for proper sealing.
Retrieve the second baking sheet of rectangles for your pop tart tops. Brush egg wash over each top piece, then carefully place them egg-wash-side-down onto the filling-covered bottoms. Using your fingertips, press firmly around each filled pocket, ensuring complete sealing on all sides.
Final Assembly Steps
Using a toothpick, poke 6-8 small holes in each pop tart’s top surface to allow steam to escape during baking. Alternatively, make several small slits with a knife. Crimp the edges firmly with a fork to create an attractive border while ensuring a tight seal.
Refrigerate the assembled pop tarts, uncovered, for at least 20 minutes. This final chill helps maintain their shape during baking.
Baking to Golden Perfection
Preheat your oven to 350°F (177°C). Remove the chilled pop tarts from the refrigerator and brush their tops with remaining egg wash for beautiful golden color. Bake for 25-30 minutes, rotating the pan halfway through to ensure even browning.
The finished pop tarts should be golden brown and feel set when gently touched. Allow them to cool on the baking sheet for 5 minutes before transferring to a wire rack to cool completely before glazing.
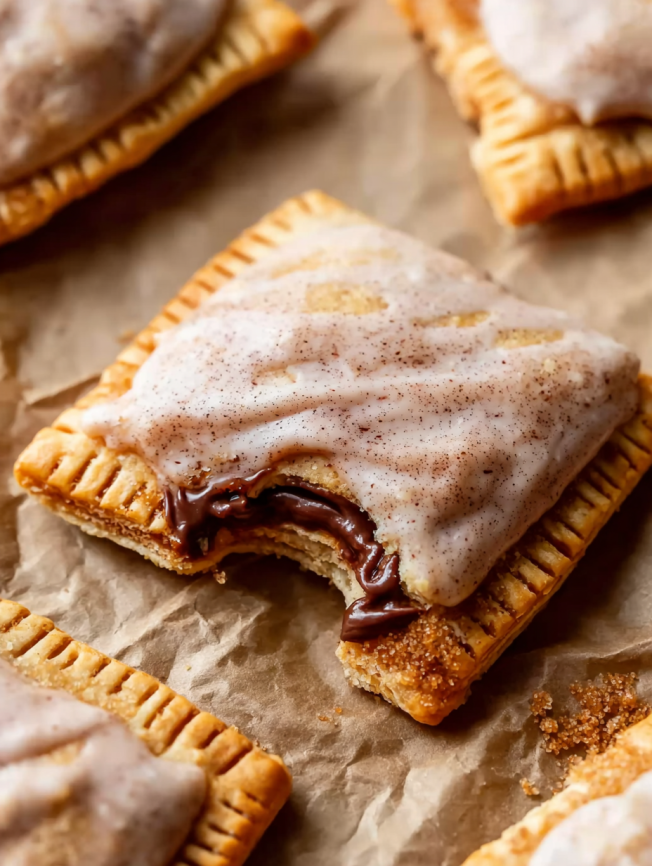
Creating the Signature Glaze
Whisk together confectioners’ sugar, milk, cinnamon, and vanilla until smooth. The consistency should be thick enough to coat the back of a spoon but thin enough to spread easily. Adjust with additional milk if too thick, or more powdered sugar if too thin.
Spoon glaze generously over each cooled pop tart, using the back of the spoon or an offset spatula to spread evenly. The glaze will set within about an hour, creating that classic pop tart finish.
Creative Serving Ideas
Breakfast Presentation
Transform these pop tarts into an elegant brunch centerpiece by arranging them on a wooden cutting board alongside fresh berries, whipped cream, and artisanal coffee. The rustic presentation highlights their homemade quality while creating an inviting breakfast spread.
Dessert Transformation
Serve warm pop tarts with a scoop of vanilla ice cream and a drizzle of caramel sauce for an unexpected but delightful dessert that bridges childhood nostalgia with grown-up sophistication.
Exciting Recipe Variations
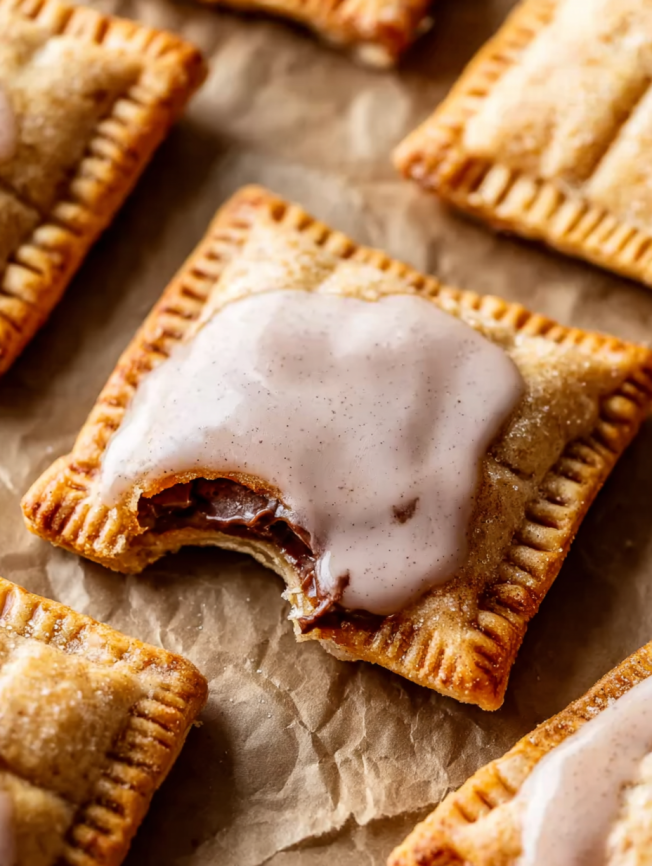
Chocolate Lover’s Dream
Replace the brown sugar filling with a mixture of ½ cup Nutella and 1 tablespoon flour for rich, chocolatey pop tarts that rival any store-bought chocolate variety. The glaze can be enhanced with cocoa powder for double chocolate indulgence.
Fruit-Forward Options
Substitute thick fruit preserves or jam for the cinnamon filling – raspberry, strawberry, or apricot work beautifully. Add a tablespoon of flour to prevent excessive juiciness, and adjust the glaze to complement your chosen fruit flavor.
Seasonal Spice Blends
During autumn months, enhance the filling by replacing plain cinnamon with a blend of cinnamon, nutmeg, and allspice for a more complex, warming flavor profile that captures the essence of fall baking.
Make-Ahead Tips for Busy Mornings
Dough Preparation
The pastry dough can be prepared up to 5 days in advance and stored in the refrigerator, or frozen for up to 3 months. This flexibility allows you to tackle the most time-consuming step when convenient, then assemble and bake fresh pop tarts as desired.
Batch Baking Strategy
Consider making a double batch of assembled but unbaked pop tarts. Freeze them individually wrapped, then bake directly from frozen, adding 5-10 minutes to the baking time. This approach provides fresh pop tarts with minimal morning effort.
Storage Solutions
Baked pop tarts without glaze freeze beautifully for up to 3 months. Thaw at room temperature or in the refrigerator, then add fresh glaze before serving for that just-made appearance and taste.
Important Recipe Notes
Pastry Success Tips
Keeping ingredients cold is crucial for flaky pastry – use ice water, chilled butter, and don’t skip the refrigeration periods. Additionally, avoid overworking the dough, which can develop too much gluten and create tough pastry.
Sealing Techniques
Proper sealing prevents filling from leaking during baking. Press edges firmly and use enough egg wash to create a good bond between top and bottom layers. The fork crimping isn’t just decorative – it reinforces the seal.
Temperature Control
Allow pop tarts to cool completely before glazing, as warm pastry can melt the icing and create a messy appearance rather than the clean, professional finish you’re aiming for.
Frequently Asked Questions
Can I use store-bought pie dough instead? Absolutely! While homemade pastry provides superior flavor and texture, quality store-bought pie dough works well in a pinch. You’ll need two standard pie crust packages to yield the same number of pop tarts.
Why do my pop tarts leak during baking? Leaking typically results from insufficient sealing, overfilling, or inadequate chilling before baking. Ensure you press edges firmly, use only a heaping tablespoon of filling, and don’t skip the pre-baking refrigeration step.
How can I prevent soggy bottoms? The tablespoon of flour in the filling helps absorb excess moisture, but also ensure your oven is fully preheated and consider baking on the lower third of the oven to promote bottom browning.
Can I make mini pop tarts instead? Certainly! Cut your pastry into smaller rectangles (about 2×3 inches) and reduce filling to 1-2 teaspoons per pop tart. Decrease baking time to 18-22 minutes and watch carefully to prevent overbrowning.
What’s the best way to reheat leftover pop tarts? For optimal texture, reheat in a 350°F oven for 8-10 minutes rather than using the microwave, which can make the pastry soggy. The oven method restores crispiness while warming the filling perfectly.
Can I make these dairy-free? Yes! Substitute vegan butter for regular butter in the pastry, and use plant-based milk in both the egg wash (or omit entirely) and glaze. The results will be slightly different in texture but still delicious.
How far in advance can I glaze the pop tarts? Glazed pop tarts are best enjoyed within 2-3 days, as the glaze can become sticky or absorb into the pastry over time. For longer storage, keep pop tarts unglazed and add fresh icing before serving.


