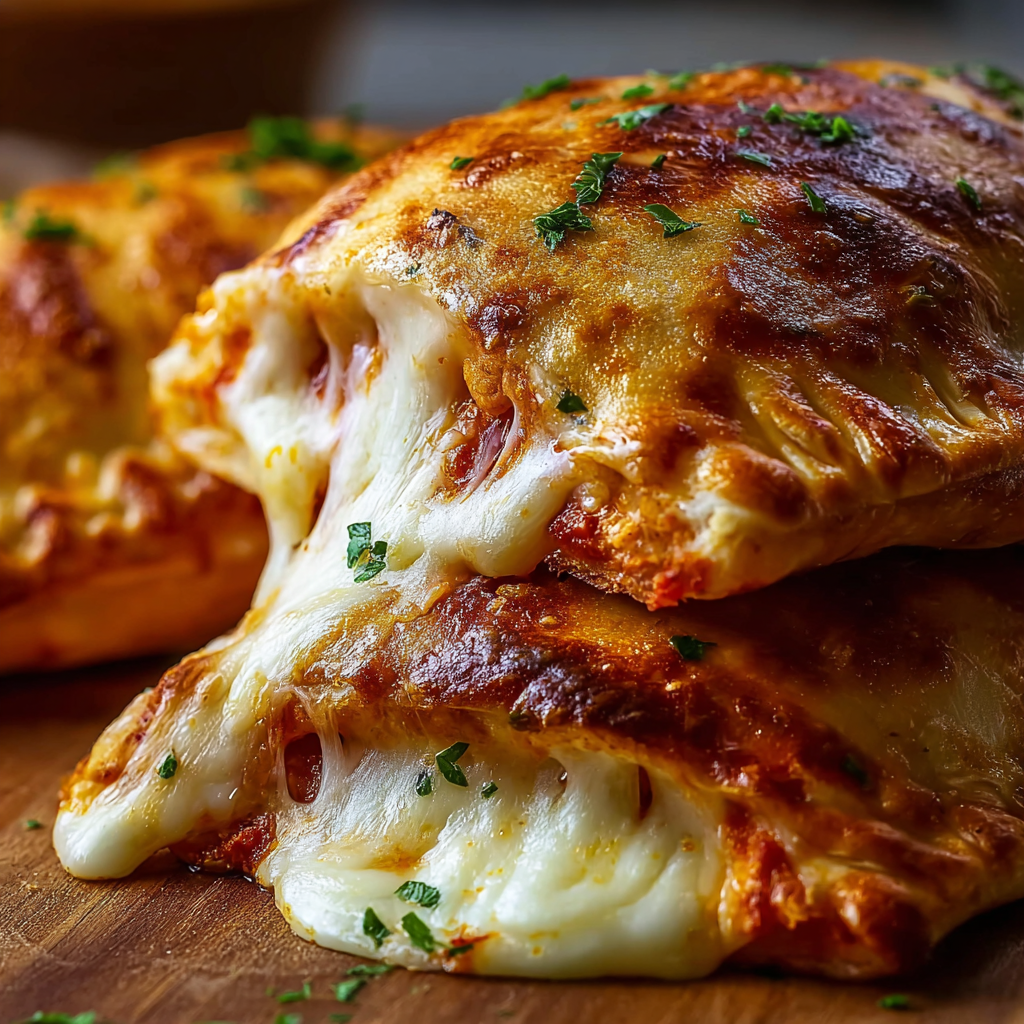
Three years ago, during a particularly chaotic weeknight when my kids were begging for pizza but I had no time to order delivery, I stumbled upon this brilliant solution hiding in my refrigerator. A package of pizza dough and some basic cheese transformed into these incredible handheld pizza pockets that not only satisfied everyone’s cravings but actually tasted better than any store-bought version we’d tried. What started as a desperate dinner solution has become our family’s favorite snack, perfect for everything from after-school hunger pangs to weekend movie nights.
These crispy, golden pockets pack all the satisfaction of pizza into a convenient handheld format that’s impossible to resist. The beauty lies in their simplicity – with just a few ingredients and minimal prep time, you can create something that feels special enough for guests yet easy enough for busy weeknights when you need a quick win.
Why These Pizza Pockets Will Become Your Go-To Comfort Food
Kid-Approved, Adult-Loved Perfection These pockets bridge the gap between kid-friendly finger foods and sophisticated appetizers, making them perfect for family meals where everyone’s happy. Furthermore, the handheld format eliminates messy pizza eating and makes them ideal for parties and gatherings.
Lightning-Fast 30-Minute Solution From start to finish, these pockets are ready in just 33 minutes, making them faster than pizza delivery and infinitely more satisfying. Additionally, most of the ingredients are pantry staples you likely already have on hand.
Customizable to Every Taste Unlike frozen pizza pockets with predetermined fillings, you control every ingredient, allowing for endless variations that accommodate dietary preferences and family favorites. Moreover, the basic technique works with virtually any pizza topping combination.
Budget-Friendly Family Feeding One package of pizza dough and basic cheese ingredients create six substantial servings, making this an economical way to feed a hungry family without breaking the budget.
Essential Ingredients for Perfect Results
Crispy Dough Foundation
- 1 package chilled pizza dough – store-bought convenience (alternatively, Danish pastry or croissant dough for extra flakiness)
Classic Pizza Filling
- 120ml tomato or pizza sauce – provides authentic pizza flavor base
- 180g grated mozzarella cheese – melts beautifully for stretchy goodness
- 25g fresh Parmesan cheese, grated – adds sharp, nutty complexity
- 1 tsp Italian herbs – essential pizza seasoning blend
Optional Flavor Boosters
- 30g mini pepperoni or diced cooked sausage – for meat lovers
- 30g chopped bell peppers, mushrooms, or olives – vegetable variety
- Pinch of chili flakes – gentle heat for spice lovers
Golden Finishing Touches
- 1 egg, beaten – creates beautiful golden brown exterior
- Dried oregano or garlic powder – aromatic finishing garnish
Step-by-Step Preparation Instructions
Setting Up for Success
Step 1: Preheat your oven to 200°C (392°F) with standard top and bottom heating, or set your air fryer to 190°C (374°F). Line a large baking sheet with parchment paper to prevent sticking.
Step 2: Remove pizza dough from refrigerator and let it come to room temperature for 5-10 minutes, making it easier to roll without tearing.
Creating Perfect Dough Portions
Step 3: On a lightly floured surface, roll out the pizza dough evenly to about ¼-inch thickness. Using a pizza cutter or sharp knife, cut into 6 equal rectangles approximately 10 × 15 cm each.
Step 4: Arrange the dough rectangles on your work surface, ensuring you have enough space to work with each piece individually during the filling process.
Building Flavorful Fillings
Step 5: Place exactly 1 tablespoon of tomato sauce in the center of each dough rectangle, leaving adequate border space for sealing. Avoid overfilling, which can cause messy spillage during baking.
Step 6: Sprinkle each sauce portion generously with mozzarella cheese, followed by a light dusting of Parmesan. Add your chosen optional ingredients (pepperoni, vegetables, herbs, chili flakes) sparingly to prevent overstuffing.
Sealing and Finishing Techniques
Step 7: Carefully fold each dough rectangle over the filling, creating a neat pocket. Press the edges firmly together, then use a fork to crimp and seal the borders thoroughly, ensuring no filling can escape.
Step 8: Brush the top surface of each pocket with beaten egg for that perfect golden-brown finish. Sprinkle lightly with oregano or garlic powder for extra aromatic appeal.
Achieving Perfect Doneness
Step 9: Arrange the prepared pockets on your parchment-lined baking sheet, spacing them evenly to allow proper heat circulation during baking.
Step 10: Bake for 15-18 minutes until the pockets are golden brown and crispy. For air fryer cooking, work in batches for 8-10 minutes, flipping halfway through for even browning.
Safe Serving Protocol
Step 11: Remove from oven and let cool for 5 minutes before serving – the cheese filling will be extremely hot initially. Serve warm with extra marinara sauce for dipping.
Serving Suggestions That Enhance the Experience
These versatile pockets work beautifully in various serving contexts and pair well with complementary sides.
Perfect Accompaniments
Serve alongside a fresh green salad with Italian vinaigrette to balance the rich cheese filling, or offer roasted vegetables for a more substantial meal experience.
Dipping Sauce Varieties
While classic marinara is traditional, try serving with garlic aioli, ranch dressing, or even a spicy arrabbiata sauce for adults who enjoy more complex flavors.
Party Presentation Ideas
Arrange on a platter with various dipping sauces in small bowls, creating an interactive appetizer spread that encourages socializing and sharing.
Creative Recipe Variations
Meat Lover’s Paradise
Pepperoni Supreme: Double the pepperoni and add crumbled cooked bacon for an indulgent version that satisfies the biggest appetites.
Italian Sausage Special: Use spicy Italian sausage instead of pepperoni, adding sautéed onions and bell peppers for a complete flavor experience.
Vegetarian Delights
Margherita Style: Use fresh mozzarella, cherry tomatoes, and fresh basil leaves for an elegant vegetarian option that rivals restaurant versions.
Mediterranean Medley: Include sun-dried tomatoes, Kalamata olives, and crumbled feta cheese for sophisticated international flavors.
Breakfast Pizza Pockets
Morning Glory: Fill with scrambled eggs, breakfast sausage, and cheddar cheese for a portable breakfast solution that’s perfect for busy mornings.
Dessert Variations
Sweet Surprise: Create dessert versions using Nutella, marshmallows, and sliced bananas, or try apple pie filling with cinnamon for sweet treats.
Make-Ahead Tips and Storage Solutions
Freezing Strategy
Raw Preparation: Assemble pockets completely but don’t bake. Freeze on baking sheets, then transfer to freezer bags for up to 3 months. Bake directly from frozen, adding 5-7 extra minutes.
Cooked Storage: Baked pockets can be refrigerated for up to 3 days and reheated in a 350°F oven for 8-10 minutes to restore crispiness.
Meal Prep Applications
These pockets are excellent for weekly meal prep, providing grab-and-go options for lunches or after-school snacks that just need quick reheating.
Important Notes for Perfect Results
Dough Handling Tips
Keep pizza dough cold until ready to use, as warm dough becomes sticky and difficult to work with. If the dough springs back while rolling, let it rest for 10 minutes before continuing.
Filling Distribution Guidelines
Less is more when it comes to filling these pockets. Overstuffing leads to burst seams and messy cleanup, while proper portioning creates perfectly sealed, golden pockets.
Temperature Control Importance
The egg wash not only creates beautiful color but also helps seal any small gaps in the dough edges, preventing cheese leakage during baking.
Frequently Asked Questions
Q: Can I make these with homemade pizza dough? A: Absolutely! Homemade dough works perfectly and often tastes even better. Just ensure it’s well-rested and easy to roll without tearing.
Q: Why do my pockets sometimes burst open during baking? A: This usually happens from overfilling or inadequate sealing. Use less filling and ensure edges are firmly pressed and crimped with a fork for better security.
Q: Can I use different types of cheese? A: Yes! Try cheddar, provolone, or even cream cheese. Just ensure your chosen cheese melts well and won’t make the filling too wet.
Q: How do I prevent soggy bottoms? A: Avoid using too much sauce and ensure your oven is fully preheated. A pizza stone or inverted baking sheet can also help create a crispier bottom.
Q: Can these be made dairy-free? A: Substitute dairy-free cheese and skip the egg wash (or use plant-based milk for brushing). The results will be slightly different but still delicious.
Q: What’s the best way to reheat leftover pockets? A: Reheat in a 350°F oven for 8-10 minutes rather than microwaving, which can make the dough soggy. Air fryers also work excellently for reheating.
Nutritional Information (Per Pocket):
- Calories: 240
- Total Fat: 9g
- Total Carbohydrates: 26g
- Protein: 10g
- Prep Time: 15 minutes
- Cook Time: 18 minutes
- Total Time: 33 minutes
- Serves: 6 people (6 pockets)
- Difficulty Level: Easy for beginners
- Cuisine Style: Italian-inspired
Essential Equipment:
- Baking sheet with parchment paper
- Rolling pin
- Fork for sealing
- Pastry brush
- Pizza cutter (optional but helpful)
- Oven or air fryer
Allergen Information:
- Contains milk, eggs, and gluten
- May contain traces of celery and mustard
- Check all ingredient labels for specific allergen concerns