Total Time: 30 minutes | Prep Time: 10 minutes | Cook Time: 20 minutes | Cuisine: American
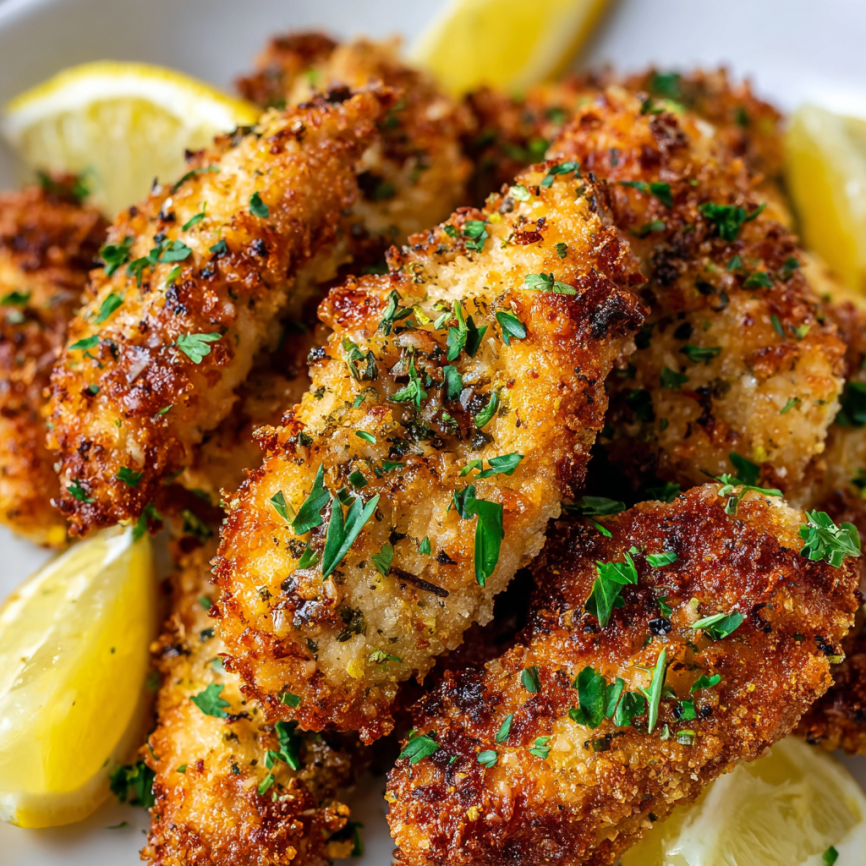
There’s something magical about the combination of golden, crispy chicken tenders with the bright zing of lemon and the savory richness of garlic and parmesan. As someone who’s always searching for that perfect balance between convenience and flavor, I discovered this recipe during one of those hectic weeknight moments when I needed something that would please both kids and adults alike. The result? These absolutely irresistible Lemon Garlic Parmesan Chicken Tenders that have become our family’s go-to comfort food.
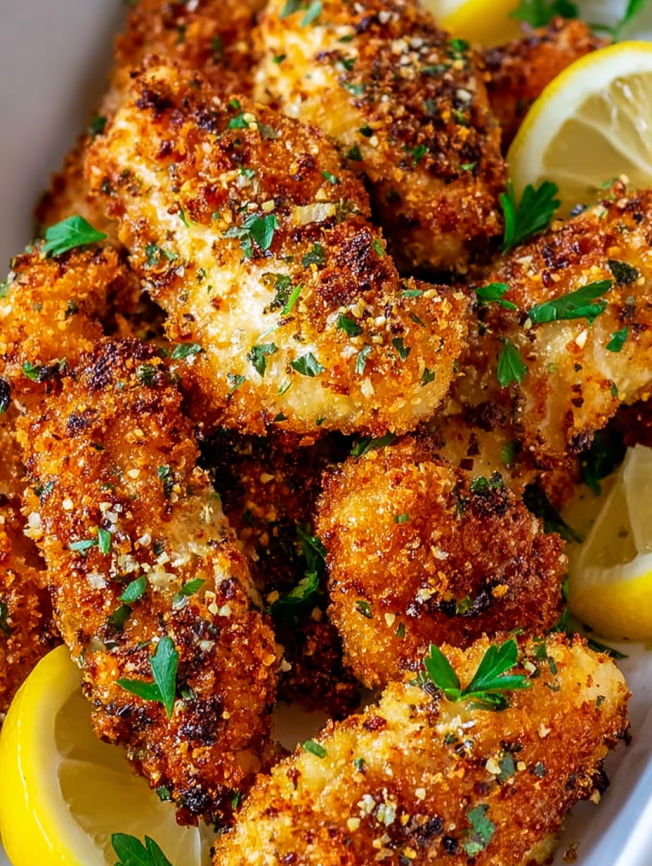
What started as a simple attempt to jazz up basic chicken tenders turned into our most requested dinner. The secret lies in the triple-coating method and that final burst of fresh lemon juice that transforms ordinary chicken into something restaurant-worthy.
Why You’ll Fall in Love with This Recipe
Perfect Texture Every Time
These chicken tenders achieve that coveted crispy exterior while maintaining incredibly juicy meat inside. The panko breadcrumbs create an almost crunchy shell that stays crisp even after cooling slightly.
Versatility at Its Best
Whether you’re hosting a party, preparing a quick weeknight dinner, or looking for kid-friendly meal prep options, these tenders adapt to any occasion seamlessly. They work equally well as appetizers with dipping sauces or as the star of a complete meal.
Healthier Cooking Methods
Unlike traditional fried chicken tenders, this recipe offers both baked and air-fried options, allowing you to enjoy all the flavor with significantly less oil. The air fryer method, in particular, creates an exceptionally crispy coating that rivals deep-frying.
Family-Friendly Appeal
Even picky eaters gravitate toward these tenders. The familiar comfort of chicken combined with the subtle garlic flavor and bright lemon notes creates a sophisticated yet approachable dish that bridges generational taste preferences.
Essential Ingredients
Main Components
- 1 lb chicken tenders (or boneless, skinless chicken breasts cut into strips)
- 1 cup panko breadcrumbs (for maximum crispiness)
- ½ cup grated parmesan cheese
- 2 eggs (for coating)
- 1 tablespoon milk
- ½ cup all-purpose flour
Flavor Enhancers
- 1 teaspoon garlic powder
- ½ teaspoon onion powder
- ½ teaspoon paprika
- ½ teaspoon salt
- ¼ teaspoon black pepper
- Zest of 1 lemon
- 2 tablespoons lemon juice
- 1 tablespoon fresh parsley, chopped (optional)
- 2 tablespoons olive oil or melted butter (for brushing or spraying)
Serving Suggestions
Consider pairing these tenders with crispy sweet potato fries, a fresh garden salad, or classic coleslaw. For dipping sauces, ranch dressing, honey mustard, or marinara sauce complement the flavors beautifully.
Step-by-Step Instructions
Preparation Phase
Step 1: Preheat and Prepare Your Cooking Surface
For baking enthusiasts, preheat your oven to 400°F (200°C) and line a baking sheet with parchment paper. This prevents sticking and ensures even browning. Alternatively, if you’re using an air fryer, preheat it to 375°F (190°C) for optimal crispiness.
Step 2: Create Your Breading Station
Organization is key to achieving perfectly coated tenders. Set up three separate bowls in an assembly line fashion:
- First bowl: Whisk together eggs and milk until well combined
- Second bowl: Mix flour, salt, black pepper, and paprika
- Third bowl: Combine panko breadcrumbs, parmesan cheese, garlic powder, onion powder, and lemon zest
Coating Process
Step 3: Master the Triple-Coating Technique
Begin by patting each chicken tender dry with paper towels. This crucial step ensures better adhesion of the coating. Next, dredge each tender in the flour mixture, shaking off any excess to prevent clumping.
Subsequently, dip the floured tender into the egg mixture, ensuring complete coverage on all surfaces. Finally, press the tender firmly into the breadcrumb mixture, using your hands to pack the coating evenly around the chicken.
Cooking Methods
Step 4: Choose Your Cooking Adventure
For Oven Baking: Arrange the coated tenders on your prepared baking sheet, ensuring they don’t touch each other. Lightly brush or spray each tender with olive oil or melted butter to promote browning. Bake for 18-20 minutes, flipping halfway through the cooking time until they achieve a beautiful golden color and reach an internal temperature of 165°F (74°C).
For Air Frying: Place the tenders in a single layer within your air fryer basket, avoiding overcrowding which can lead to uneven cooking. Lightly spray with olive oil for enhanced crispiness. Air fry for 10-12 minutes, flipping halfway through, until they’re crispy and fully cooked.
Final Touches
Step 5: Add the Signature Lemon Garlic Finish
Once your tenders are perfectly golden and cooked through, transfer them to a serving platter. While they’re still hot, drizzle the fresh lemon juice over the tenders and sprinkle with chopped parsley for a pop of color and freshness. For extra indulgence, add a final sprinkle of parmesan cheese.
Creative Serving Ideas
Appetizer Presentation
Transform these tenders into elegant party fare by cutting them into bite-sized pieces and serving with multiple dipping sauces in small bowls. Arrange them on a wooden board with fresh lemon wedges and herb garnishes for an Instagram-worthy presentation.
Complete Meal Solutions
Pair your tenders with roasted vegetables like Brussels sprouts or asparagus for a balanced dinner. Alternatively, serve over a bed of mixed greens with cherry tomatoes and cucumber for a satisfying salad that feels both light and filling.
Sandwich and Wrap Options
These tenders make exceptional sandwich filling when paired with crisp lettuce, tomato, and a creamy sauce on brioche buns. They also work wonderfully in wraps with fresh vegetables and a drizzle of ranch or caesar dressing.
Delicious Recipe Variations
Mediterranean Twist
Replace the lemon zest with dried oregano and add sun-dried tomatoes to the breadcrumb mixture. Serve with tzatziki sauce for an authentic Mediterranean flavor profile.
Spicy Kick Version
Incorporate cayenne pepper and hot paprika into your breadcrumb mixture. Finish with a squeeze of lime juice instead of lemon for a zesty heat that builds gradually.
Herb-Crusted Alternative
Mix fresh herbs like thyme, rosemary, and sage into your breadcrumb coating. This variation pairs exceptionally well with roasted root vegetables and creates a more sophisticated flavor profile.
Asian-Inspired Fusion
Add sesame seeds to the breadcrumb mixture and finish with a drizzle of honey and soy sauce. Serve with steamed rice and stir-fried vegetables for an East-meets-West experience.
Make-Ahead Tips for Busy Schedules
Prep-Ahead Strategy
Coat your chicken tenders completely through the breadcrumb stage, then arrange them on a baking sheet lined with parchment paper. Freeze for 2 hours until solid, then transfer to freezer bags for up to 3 months. This method prevents the tenders from sticking together and allows you to cook only what you need.
Refrigerator Storage
Coated but uncooked tenders can be refrigerated for up to 24 hours before cooking. Cover them loosely with plastic wrap to prevent the coating from becoming soggy while maintaining freshness.
Reheating Excellence
Leftover cooked tenders maintain their crispiness best when reheated in a 375°F oven for 5-7 minutes or in an air fryer for 3-4 minutes. Avoid microwaving, as this will make the coating soggy and compromise the texture.
Professional Notes and Tips
Ingredient Selection Secrets
Choose panko breadcrumbs over regular breadcrumbs for superior crispiness. The larger, flakier texture creates more surface area for browning and maintains crunch longer after cooking.
Temperature Control Matters
Never skip checking the internal temperature with a meat thermometer. Chicken should reach 165°F (74°C) for food safety, but be careful not to overcook as this leads to dry meat despite the crispy exterior.
Oil Application Technique
When using olive oil or melted butter, apply it sparingly but evenly. Too much will make the coating soggy, while too little won’t promote proper browning. A spray bottle or brush works best for controlled application.
Lemon Zest Maximization
Use a microplane or fine grater for the lemon zest to avoid bitter white pith. Roll the lemon on the counter while pressing down before zesting to release more oils and maximize flavor.

Frequently Asked Questions
Can I use regular breadcrumbs instead of panko?
While regular breadcrumbs will work, panko creates a significantly crispier texture due to its larger, flakier structure. If you only have regular breadcrumbs, consider toasting them lightly in a dry pan before use to enhance crispiness.
How do I prevent the coating from falling off during cooking?
Ensure each tender is completely dry before coating, and allow the coated tenders to rest for 10-15 minutes before cooking. This resting period helps the coating adhere better and reduces the likelihood of it separating during the cooking process.
What’s the best way to know when they’re done?
Use a meat thermometer to check for an internal temperature of 165°F (74°C). Visually, the coating should be golden brown and crispy, and the juices should run clear when the thickest part is pierced.
Can I make these dairy-free?
Absolutely! Substitute the parmesan cheese with nutritional yeast for a similar umami flavor, or simply omit it and increase the garlic powder slightly. Use plant-based milk in the egg wash for a completely dairy-free version.
How long do leftovers last?
Properly stored in the refrigerator, cooked chicken tenders will maintain quality for 3-4 days. For best results, store them in an airtight container and reheat using the methods mentioned in the make-ahead tips section.
Can I double the recipe for meal prep?
Certainly! This recipe scales beautifully. When doubling, you may need to cook in batches depending on your oven or air fryer capacity. Maintain the same cooking times and temperatures for consistent results.