Total Time: 35 minutes | Prep Time: 15 minutes | Cook Time: 20 minutes | Cuisine: Mexican-Inspired
Introduction
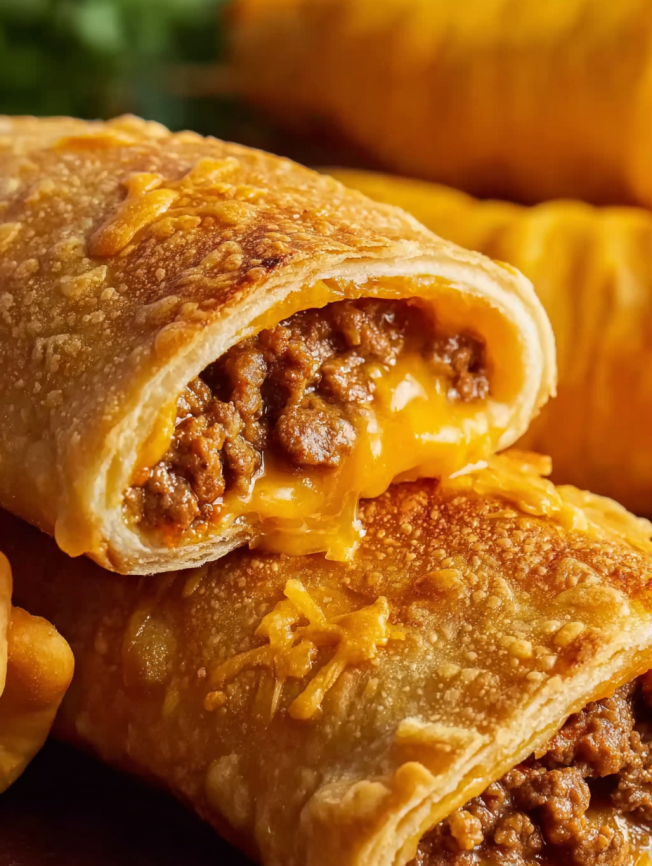
There’s something magical about the first bite of a perfectly crispy, golden-brown pocket that reveals a treasure of melted cheese and savory seasoned beef. These Loaded Cheesy Pocket Tacos have become my go-to recipe whenever I want to surprise my family with something special yet wonderfully familiar. Born from a happy accident during a busy weeknight when I ran out of taco shells, these delightful pockets quickly became a household favorite that combines the best of tacos and comfort food in one irresistible package.
Why You’ll Love This Recipe
Perfect for Any Occasion
These versatile pocket tacos work brilliantly for busy weeknight dinners, weekend gatherings, or even game day parties. Unlike traditional tacos that can get messy, these handheld pockets keep all the delicious filling securely wrapped inside.
Incredibly Customizable
The beauty of this recipe lies in its flexibility. Whether you prefer spicy jalapeños, extra cheese, or want to sneak in some vegetables, these pockets adapt to your family’s preferences effortlessly.
Kid-Friendly Appeal
Children absolutely love these pocket tacos because they’re fun to eat and not messy like traditional tacos. Additionally, the mild flavors can be easily adjusted to suit younger palates while still satisfying adult taste buds.
Ingredients
Scale: 1x | 2x | 3x
Main Components
- 1 lb ground beef (or ground turkey for a lighter option)
- 1 small onion, finely chopped
- 1 packet taco seasoning mix (or homemade taco seasoning)
- 1/2 cup water
- 2 cups shredded cheddar cheese (or Mexican cheese blend)
- 1 can (8 oz) refrigerated crescent roll dough (or pizza dough for thicker pockets)
For Serving and Garnish
- 1/2 cup sour cream (optional)
- Fresh salsa (optional)
- Chopped lettuce, diced tomatoes, and fresh cilantro
- 1/4 cup jalapeño slices (optional, for heat lovers)
Hungry for more? Subscribe now and have this recipe sent directly to your inbox—along with exclusive foodie updates!

Step-by-Step Instructions
Step 1: Prepare the Beef Filling
Begin by heating a small amount of oil in a large skillet over medium heat. Add the finely chopped onion and sauté for 2-3 minutes until it becomes translucent and fragrant. Next, add the ground beef (or turkey) to the skillet, breaking it apart with a wooden spoon as it browns completely.
Once the meat is fully cooked, drain any excess fat if necessary. Then, stir in the taco seasoning mix along with the water, creating a flavorful base for your pockets. Allow the mixture to simmer for approximately 5 minutes until it thickens and the seasonings are well incorporated.
Step 2: Prepare Your Workspace
While the beef mixture cools slightly, preheat your oven to 375°F (190°C). Line a large baking sheet with parchment paper to prevent sticking and ensure easy cleanup.
Step 3: Work with the Dough
Carefully unroll the crescent roll dough onto your prepared baking sheet. Gently pinch the perforations together to form one cohesive sheet of dough. Alternatively, if you’re using pizza dough, roll it out to your desired thickness for a heartier pocket.
Using a sharp knife or pizza cutter, divide the dough into 4-6 rectangles, depending on your preferred pocket size. Larger rectangles create more substantial servings, while smaller ones work perfectly for appetizers or children’s portions.
Step 4: Assemble the Pockets
Place a generous spoonful of the seasoned beef mixture in the center of each dough rectangle, leaving enough border around the edges for sealing. Sprinkle a hefty amount of shredded cheese over the beef filling—don’t be shy with the cheese, as it helps bind the filling together while creating that irresistible gooey center.
Carefully fold the dough over the filling to create a pocket shape. Press the edges firmly together, then use a fork to crimp the seams for an extra-secure seal that prevents any filling from escaping during baking.
Step 5: Achieve the Perfect Golden Finish
For an extra-beautiful presentation, brush the top of each pocket with beaten egg wash, which will give them a gorgeous golden-brown color. However, this step is completely optional if you prefer to keep things simple.
Place the assembled pockets in your preheated oven and bake for 12-15 minutes, or until they turn golden brown and the cheese inside is completely melted. The pockets should sound hollow when lightly tapped and feel firm to the touch.
Step 6: Serve with Style
Remove the pockets from the oven and allow them to cool for 2-3 minutes before serving—the filling will be extremely hot initially. Arrange them on a serving platter and top each pocket with fresh chopped lettuce, diced tomatoes, fragrant cilantro, and a dollop of cool sour cream.
Serving Suggestions
Classic Mexican-Style
Serve these pockets alongside traditional Mexican rice, refried beans, and a fresh avocado salad. Furthermore, offer various salsas ranging from mild to spicy so everyone can customize their heat level.
Party Appetizer Style
Cut the pockets in half diagonally and arrange them on a large platter with small bowls of different toppings. This presentation works wonderfully for parties where guests can build their own perfect bite.
Family Dinner Approach
Pair these hearty pockets with a simple side salad and some roasted vegetables for a complete, balanced meal that satisfies both kids and adults alike.
Recipe Variations
Chicken and Black Bean Version
Replace the ground beef with seasoned shredded chicken and add a can of drained black beans for extra protein and fiber. This variation creates a lighter yet equally satisfying option.
Vegetarian Delight
Substitute the meat with a mixture of sautéed bell peppers, onions, mushrooms, and black beans. Add some corn kernels and extra cheese to maintain the hearty texture that makes these pockets so appealing.
Breakfast Pocket Twist
Transform this recipe into a breakfast treat by using scrambled eggs, breakfast sausage, hash browns, and cheese. These morning versions pair perfectly with salsa verde and hot sauce.
Make-Ahead Tips
Prep and Freeze Method
Assemble the pockets completely but don’t bake them. Instead, place them on a baking sheet and freeze until solid, then transfer to freezer bags. When ready to serve, bake directly from frozen, adding 5-10 extra minutes to the cooking time.
Partial Prep Strategy
Cook the beef filling up to two days in advance and store it in the refrigerator. When you’re ready to make the pockets, simply reheat the filling slightly and proceed with assembly and baking.
Storage Solutions
Baked pockets can be stored in the refrigerator for up to three days and reheated in a 350°F oven for 5-8 minutes until warmed through and crispy again.
Notes
Customization Tips
Feel free to experiment with your favorite taco ingredients such as diced bell peppers, sweet corn, black olives, or green chiles. The key is to avoid overly wet ingredients that might make the dough soggy.
Heat Level Adjustments
For those who enjoy spicier food, add jalapeños, chili flakes, or a dash of hot sauce directly to the beef mixture. Conversely, reduce or omit the taco seasoning for milder palates.
Dough Alternatives
While crescent roll dough works beautifully, pizza dough creates thicker, more substantial pockets. Puff pastry is another excellent option that creates an incredibly flaky, buttery exterior.
Frequently Asked Questions
Can I make these pockets ahead of time?
Absolutely! You can assemble the pockets completely and refrigerate them for up to 24 hours before baking. This makes them perfect for meal planning or entertaining since most of the work is done in advance.
What’s the best way to prevent the pockets from leaking?
The secret lies in proper sealing techniques. Make sure to leave adequate border space around the filling, press the edges firmly together, and use a fork to crimp the seams securely. Additionally, avoid overfilling the pockets, which can cause them to burst during baking.
Can I use different types of cheese?
Definitely! While cheddar and Mexican cheese blends work wonderfully, you can experiment with Monterey Jack, pepper jack, or even cream cheese mixed with herbs. Just ensure the cheese melts well and complements the other flavors.
How do I know when the pockets are fully cooked?
The pockets are ready when they’re golden brown on the outside and sound hollow when lightly tapped. The internal temperature should reach 160°F if you want to use a meat thermometer for accuracy.
What should I do if my dough tears while assembling?
Don’t worry if the dough tears slightly—simply pinch it back together or patch small holes with extra dough pieces. The forgiving nature of this recipe means small imperfections won’t affect the final result.
Are there any gluten-free options for this recipe?
Yes! You can substitute the crescent roll dough with gluten-free pizza dough or even use large corn tortillas, though the texture will be different. For corn tortillas, brush them with oil and bake until crispy for the best results.