Prep Time: 10 minutes
Cook Time: 12 minutes
Total Time: 22 minutes
Yield: 12 servings
Category: Appetizers
Method: Baking
Cuisine: American
Diet: Vegetarian
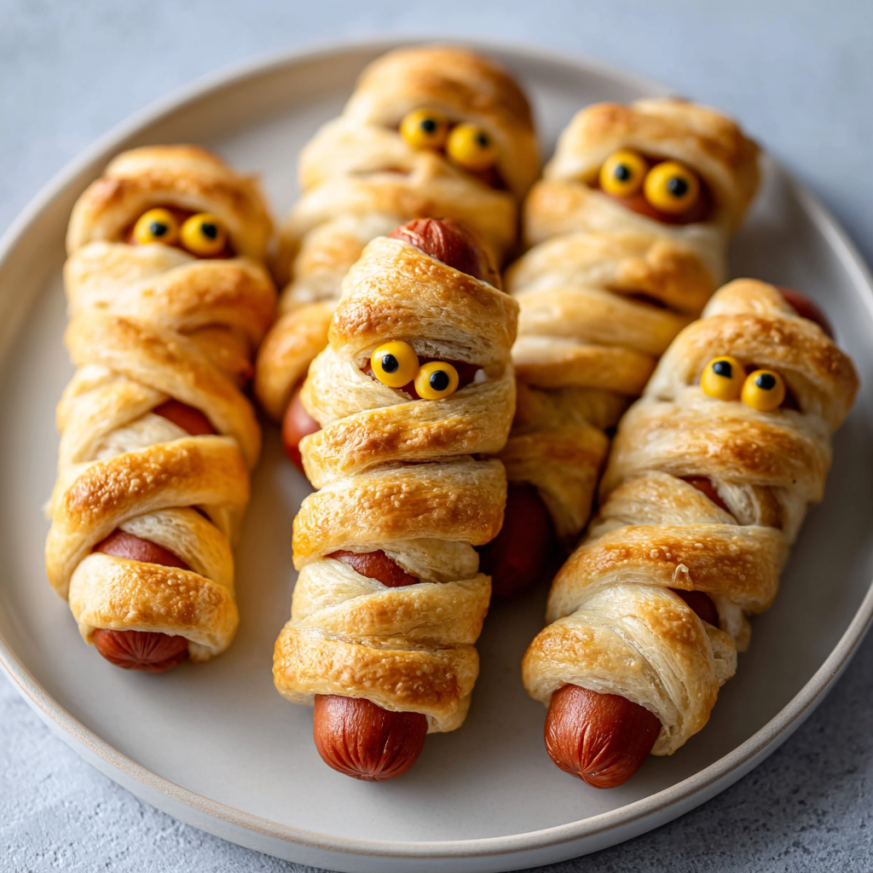
Three years ago, my daughter’s elementary school Halloween party needed volunteers to bring spooky snacks. I panicked at first—my baking skills are decent, but decorating has never been my strong suit. Then I remembered the classic pigs in a blanket from my childhood and wondered if I could give them a Halloween makeover. Armed with crescent dough and mini hot dogs, I created these adorable mummy wraps that became the hit of the party. Kids were literally lining up for seconds, and parents kept asking how I made them look so perfect.
The beauty of these Mummy Pigs in a Blanket lies in their deceptive simplicity. They look intricate and time-consuming, like something you’d order from a fancy bakery. In reality, you’re working with just two main ingredients and a technique so easy that children can help with assembly. The wrapped dough strips naturally create those authentic mummy bandage wrinkles as they bake, doing most of the decorative work for you.
Why These Spooky Bites Will Disappear Fast
Kid-approved Halloween fun makes these the perfect party appetizer when you’re feeding a mixed crowd. Even the pickiest eaters who normally avoid “weird” Halloween food will happily grab these familiar-looking treats. The mummy theme is spooky enough to feel festive without being scary, striking that perfect balance for younger children.
Minimal ingredients mean maximum convenience when you’re already juggling costume preparations and party planning. You’ll need just three items from the grocery store—mini hot dogs, crescent roll dough, and condiments you probably already have. There’s no hunting for specialty ingredients or making special trips to kitchen supply stores.
Assembly-line preparation speeds everything up and makes this an ideal recipe for getting kids involved. Set up your workspace with dough strips, hot dogs, and a baking sheet, then let little hands wrap away. My own kids can now make these independently, which means I can focus on other party tasks while they handle appetizer duty.
Customizable faces give each mummy personality, turning a simple snack into an interactive experience. Some mummies get wide, surprised eyes while others look sleepy or mischievous. Kids especially love creating different expressions and often name their creations before eating them, adding an element of play to snack time.
Make-ahead friendly design saves your sanity on busy Halloween day. Wrap these mummies the night before, refrigerate them on the baking sheet, and pop them in the oven when guests arrive. The house will smell amazing right when people walk through the door, creating that welcoming atmosphere every host wants.
Ingredients You’ll Need
Main Components
- 1 package mini hot dogs (12 count) – Also called cocktail franks or mini smokies; choose beef, pork, or turkey varieties
- 1 can crescent roll dough – The refrigerated kind from the dairy section; brands like Pillsbury work perfectly
- Mustard or ketchup for serving – Doubles as decoration and dipping sauce
Optional Enhancements
While the classic version requires only three ingredients, consider these additions for variety:
- Black sesame seeds or poppy seeds for textured “eyes”
- Ranch dressing or honey mustard for alternative dipping
- Everything bagel seasoning sprinkled on dough before wrapping
- Small pretzel sticks to create mummy “arms”
Step-by-Step Instructions
Prepare Your Workspace
Begin by preheating your oven to the temperature specified on the crescent roll package—typically 375°F. Line a baking sheet with parchment paper or a silicone baking mat to prevent sticking and make cleanup effortless. Having everything ready before you start wrapping ensures smooth, efficient assembly without interruptions.
Unroll and Cut the Dough
Pop open the crescent roll can and carefully unroll the dough onto a clean cutting board. Rather than separating it into triangles, keep it as one large sheet. Using a sharp knife or pizza cutter, slice the dough into thin strips approximately 1/4 inch wide. A pizza cutter makes this step incredibly quick and creates perfectly straight lines with minimal effort. You should get about 24-30 strips from one can, which is more than enough for wrapping 12 mini hot dogs with some extras.
Master the Mummy Wrapping Technique
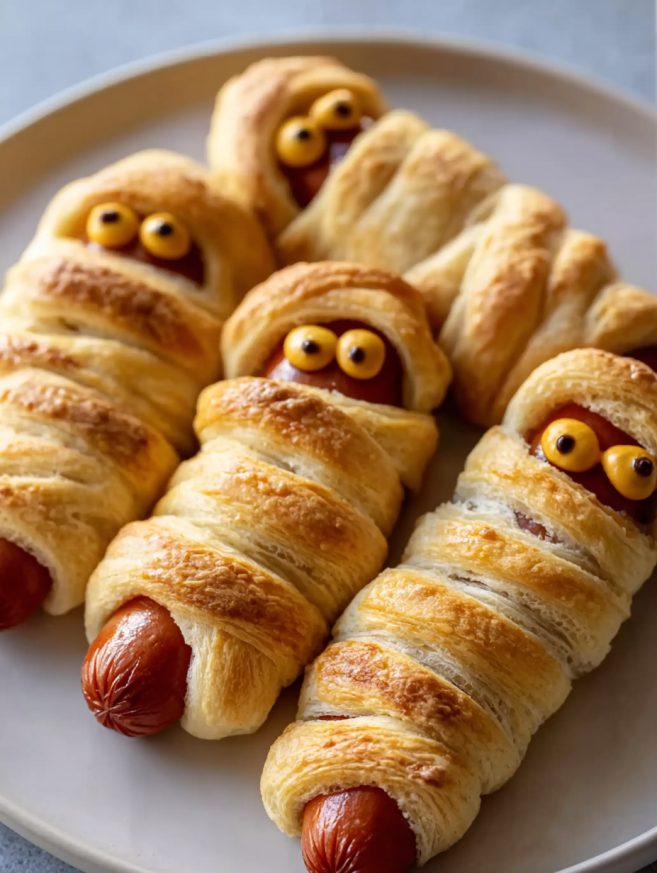
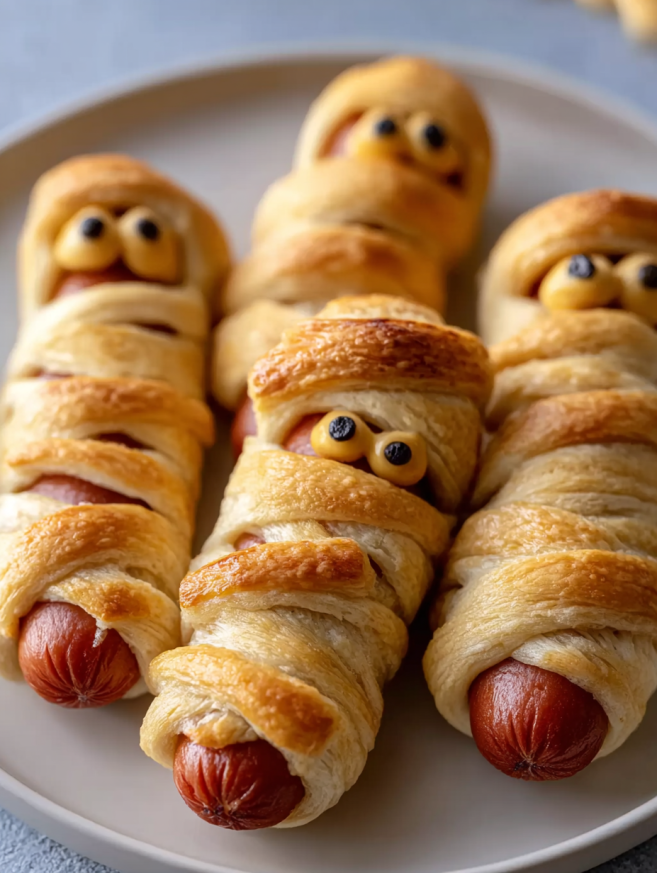
Take one mini hot dog and one strip of dough. Starting near one end of the hot dog, wrap the dough strip around at an angle, leaving a small gap about 1/3 of the way down—this becomes the face area where you’ll add eyes later. Continue wrapping the strip around the hot dog, slightly overlapping each rotation to create that authentic bandaged mummy look. The wrapping doesn’t need to be perfect or uniform; irregular spacing actually looks more realistic and adds character. When you reach the end of the strip, gently press the dough to seal it against the hot dog.
Create Facial Features
Once wrapped, examine your mummy to ensure there’s a clear face area visible between the dough strips. If needed, gently adjust the wrapping to create a wider gap. This space should be roughly 1/2 inch tall—just enough room for two tiny eyes. Don’t worry if some hot dogs have larger or smaller gaps; the variety makes them look more interesting on the serving platter.
Arrange on Baking Sheet
Place each wrapped mummy on your prepared baking sheet, leaving about 1 inch of space between them. The dough will puff slightly as it bakes, so adequate spacing prevents them from touching and sticking together. Arrange them in neat rows for even baking and a professional presentation.
Bake to Golden Perfection
Slide the baking sheet into your preheated oven and bake according to the crescent roll package directions—usually 10-12 minutes. Watch for the dough to turn a beautiful golden brown color, indicating it’s fully cooked and flaky. The wrapped strips will puff up slightly and develop those lovely browned edges that add visual appeal. If some mummies brown faster than others due to oven hot spots, rotate the pan halfway through baking.
Add the Finishing Touches
Remove the baking sheet from the oven and let the mummies cool for 2-3 minutes—they’re extremely hot straight from the oven. Using a toothpick or the tip of a knife, carefully add two small dots of mustard or ketchup in the face area to create eyes. You can also use a squeeze bottle for more control. Some cooks prefer adding eyes before baking, but I find that post-baking application keeps the colors vibrant and prevents the condiments from browning or spreading.
Serving Suggestions for Maximum Impact
Arrange your mummy pigs in a blanket on a black serving platter for dramatic contrast that makes the golden dough really pop. Scatter fake spider rings or plastic eyeballs around the platter for extra Halloween atmosphere. This simple styling trick transforms a basic appetizer into a conversation piece.
Create a dipping station with small bowls of various sauces—honey mustard, BBQ sauce, ranch dressing, and spicy ketchup. Label each bowl with Halloween-themed name cards like “Poison Potion” or “Vampire Blood” for added fun. Guests appreciate having options, and the variety ensures everyone finds a flavor they love.
Serve these alongside other finger foods like cheese cubes, grapes, and veggie sticks to create a complete snack spread. The mummies become the star attraction, but having lighter options available balances out the richness of the wrapped hot dogs.
For adult gatherings, pair these with craft beer or festive cocktails. The salty, savory flavors complement hoppy IPAs beautifully, while the portable format makes them perfect party food that guests can enjoy while mingling.
Set up a Halloween buffet table with these mummies as part of a larger spread featuring witch finger cookies, monster eyeball pasta salad, and jack-o’-lantern stuffed peppers. The themed presentation creates a cohesive party experience that guests will remember long after Halloween ends.
Creative Variations to Try
Cheese-Stuffed Mummies
Slice a small piece of cheddar or mozzarella cheese and place it alongside the hot dog before wrapping. The melted cheese oozes out slightly during baking, creating an extra indulgent version. This variation particularly appeals to cheese lovers and adds protein to the appetizer.
Jalapeño Popper Mummies
Use jalapeño sausages instead of regular mini hot dogs and add a small piece of cream cheese before wrapping. These spicy mummies bring serious flavor for adult palates while maintaining the cute Halloween aesthetic. Serve with cooling ranch dip to balance the heat.
Pretzel-Wrapped Version
Replace crescent roll dough with refrigerated pretzel dough for a slightly different texture and saltier flavor profile. The pretzel wrapping develops an even deeper golden color and pairs wonderfully with beer cheese dipping sauce. Brush with melted butter and sprinkle with coarse salt before baking.
Breakfast Mummies
Swap mini hot dogs for breakfast sausage links and serve with maple syrup for dipping. This sweet-and-savory combination makes a fun Halloween morning treat that kids absolutely adore. The maple syrup adds an unexpected twist that somehow works perfectly.
Vegan-Friendly Alternative
Use plant-based mini sausages and vegan crescent roll dough to create a version suitable for vegan guests. Many grocery stores now carry excellent plant-based hot dogs that cook and taste remarkably similar to traditional versions. Your vegan friends will appreciate being included in the Halloween fun.
Everything Bagel Mummies
Brush the wrapped dough with beaten egg wash, then sprinkle generously with everything bagel seasoning before baking. This adds incredible flavor complexity and textural interest. The sesame seeds and garlic in the seasoning create a more sophisticated appetizer that adults particularly enjoy.
Pizza Mummies
Use pizza dough cut into strips and wrap around pepperoni sticks or string cheese instead of hot dogs. Serve with warm marinara sauce for dipping. These Italian-inspired mummies offer a completely different flavor profile while maintaining the fun mummy aesthetic.
Make-Ahead Tips for Stress-Free Entertaining
Prepare these mummies completely up to 24 hours in advance by wrapping them and arranging on your baking sheet. Cover tightly with plastic wrap and refrigerate until you’re ready to bake. Cold dough actually wraps more easily and holds its shape better, so this make-ahead method can improve your results.
For even longer advance prep, wrap and freeze unbaked mummies on a baking sheet until solid. Transfer the frozen mummies to a freezer bag where they’ll keep for up to one month. Bake directly from frozen, adding just 2-3 minutes to the cooking time. This makes them perfect for impromptu gatherings or when you’re hosting multiple Halloween events.
The crescent dough strips can be cut up to 2 hours ahead and kept covered at room temperature. This breaks up the work into smaller tasks, making the final assembly faster when you’re ready to wrap. Just ensure the dough stays covered so it doesn’t dry out.
Baked mummies can be reheated in a 300°F oven for 5-7 minutes if made earlier in the day. While they’re best served fresh from the oven, this option works when you need to time multiple dishes for a party. The texture remains acceptably flaky, though not quite as perfect as just-baked.
Store leftover mummies in an airtight container in the refrigerator for up to 3 days. Reheat in the oven rather than the microwave to maintain some crispness in the dough. They make excellent after-school snacks throughout Halloween week.
Important Notes for Best Results
Using a pizza cutter makes preparation significantly faster and creates cleaner, straighter dough strips than using a knife. The rolling motion glides through the dough effortlessly without dragging or tearing. If you don’t own a pizza cutter, this recipe alone justifies buying one—it’s incredibly inexpensive and useful for countless other kitchen tasks.
Don’t wrap the dough too tightly around the hot dogs, as it needs room to expand during baking. Overly tight wrapping can cause the dough to tear or the hot dog to burst through. A slightly loose wrap actually creates better visual texture with those appealing wrinkles and gaps.
Room temperature dough wraps more easily than cold dough straight from the refrigerator. If your dough is very cold and stiff, let it sit at room temperature for 5-10 minutes before cutting. This prevents tearing and makes the whole process more enjoyable.
Experiment with different dipping sauces to keep things interesting if you make these frequently. Beyond the classic mustard and ketchup, try sriracha mayo, sweet chili sauce, or even peanut sauce for unexpected flavor combinations. Each sauce transforms the experience.
Eye placement matters more than you’d think for creating personality in your mummies. Eyes close together make them look surprised or worried, while wider-spaced eyes create a calmer expression. Asymmetrical eyes add humor and character. Let kids experiment with different placements for maximum creativity.
Frequently Asked Questions
Can I use full-size hot dogs instead of mini ones?
Yes, but you’ll need to cut them into thirds or quarters and adjust your serving count accordingly. Full-size hot dogs require more dough strips to wrap completely, so one can of crescent rolls might only cover 6-8 pieces. The wrapped sections also become quite large—closer to a meal than an appetizer.
What if my crescent roll dough tears while wrapping?
Simply pinch the torn edges back together and continue wrapping. Small tears are completely normal and won’t affect the final result. The dough seals itself during baking, and most imperfections disappear once golden brown. Embrace the rustic, handmade look!
How do I prevent the dough from sliding off during baking?
Pat the hot dogs completely dry with paper towels before wrapping, as excess moisture prevents adhesion. Press the end of each dough strip firmly against the hot dog to seal. If problems persist, try refrigerating the wrapped mummies for 15 minutes before baking to help the dough set.
Can I make these gluten-free?
Absolutely! Several brands now make gluten-free crescent roll dough or biscuit dough that works perfectly for this recipe. The texture and flavor are remarkably similar to traditional versions. Just follow the baking instructions on your specific gluten-free dough package.
What’s the best way to transport these to a party?
Bake them at home, let them cool completely, then transport in a single layer in a covered container. Reheat at your destination for 5 minutes in a 300°F oven. Alternatively, wrap them at home and bake them fresh at the party location for the best texture and that incredible just-baked aroma.
Why did my mummies turn out soggy?
Soggy mummies usually result from not baking long enough or using hot dogs with very high moisture content. Make sure the dough is completely golden brown before removing from the oven. Letting them cool on the baking sheet instead of a wire rack can also trap steam and create sogginess.
Can I add cheese inside the wrapping?
Definitely! Small cheese cubes or shredded cheese tucked alongside the hot dog before wrapping creates delicious cheese-stuffed mummies. Be aware that the cheese may ooze out slightly during baking, which looks rustic and delicious but can stick to the pan if you’re not using parchment paper.
How many mummies should I plan per person?
For appetizer portions at a party with other foods, plan on 2-3 mummies per adult and 3-4 per child. If these are the main snack, increase to 4-5 per person. Kids especially tend to eat more than expected because they’re so fun and approachable.
Nutrition Information (per serving – 1 piece):
Calories: 100 | Sugar: 1g | Sodium: 300mg | Fat: 7g | Saturated Fat: 2g | Unsaturated Fat: 5g | Trans Fat: 0g | Carbohydrates: 8g | Fiber: 0g | Protein: 3g | Cholesterol: 15mg
Pro Tips for Success:
- Make extra—they disappear faster than you expect!
- Use different colored mustards (yellow and Dijon) for varied eye colors
- Let kids help with wrapping for a fun pre-party activity
- Take photos before serving because they look so adorable on the platter