I still remember the first time I made this No Bake Biscoff Cheesecake for a family gathering. My aunt, who’s notoriously picky about desserts, took one bite and immediately asked for the recipe before she’d even finished her slice. That’s the kind of magic this cheesecake creates – it transforms simple ingredients into something that tastes absolutely luxurious and bakery-worthy.
There’s something irresistible about the combination of tangy cream cheese and caramelized Biscoff cookie butter. Each creamy forkful delivers that distinctive spiced flavor that Biscoff lovers crave, while the buttery cookie crust provides the perfect crunchy contrast. Best of all, this show-stopping dessert comes together without ever turning on your oven, which means you can make it even during the hottest summer months without heating up your kitchen.
Prep Time: 20 minutes
Chill Time: 6 hours (or overnight)
Total Time: 6 hours 20 minutes
Yield: 12 servings
Category: Dessert
Method: No-Bake, Chilling
Cuisine: American-inspired
Diet: Vegetarian
Why You’ll Love This Biscoff Cheesecake
No-Bake Convenience
Forget about water baths, precise oven temperatures, and the anxiety of preventing cracks. This cheesecake requires nothing more than your refrigerator to set perfectly. It’s the ideal solution when you need an impressive dessert but want to keep your cooking stress-free and simple.
Make-Ahead Perfection
Planning is a breeze with this recipe because it actually needs to be made in advance. Prepare it the day before your event, and you’ll have one less thing to worry about when guests arrive. The overnight chill time allows all the flavors to meld beautifully while you focus on other preparations.
Crowd-Pleasing Flavor
Even people who claim they’re not dessert fans find themselves reaching for seconds. The Biscoff cookie butter provides a warm, caramelized sweetness that feels nostalgic and comforting. Meanwhile, the creamy cheesecake filling balances the richness with just the right amount of tang, creating a perfectly harmonious bite.
Customizable Sweetness
Everyone’s sweet tooth is different, and this recipe accommodates various preferences easily. The powdered sugar can be adjusted up or down without affecting the texture, allowing you to create a dessert that matches your ideal sweetness level perfectly.
Ingredients You’ll Need
For the Biscoff Cookie Crust:
- 2 cups Biscoff cookies, finely crushed – About 30-35 cookies, processed until they resemble fine crumbs; this forms the foundation of your cheesecake
- 6 tablespoons unsalted butter, melted – Acts as the binding agent that holds your crust together; make sure it’s fully melted for even distribution
For the Creamy Filling:
- 16 ounces cream cheese, softened – Two standard 8-ounce blocks; must be at room temperature for smooth, lump-free mixing
- ¾ cup Biscoff cookie butter – The star ingredient that infuses every bite with that signature caramelized flavor
- ½ cup powdered sugar – Also called confectioners’ sugar; dissolves easily and creates silky smoothness
- 1 teaspoon pure vanilla extract – Enhances the overall flavor profile and adds depth
- 1 cup heavy whipping cream, cold – Must be well-chilled for proper whipping; this creates the airy, mousse-like texture
For the Optional Topping:
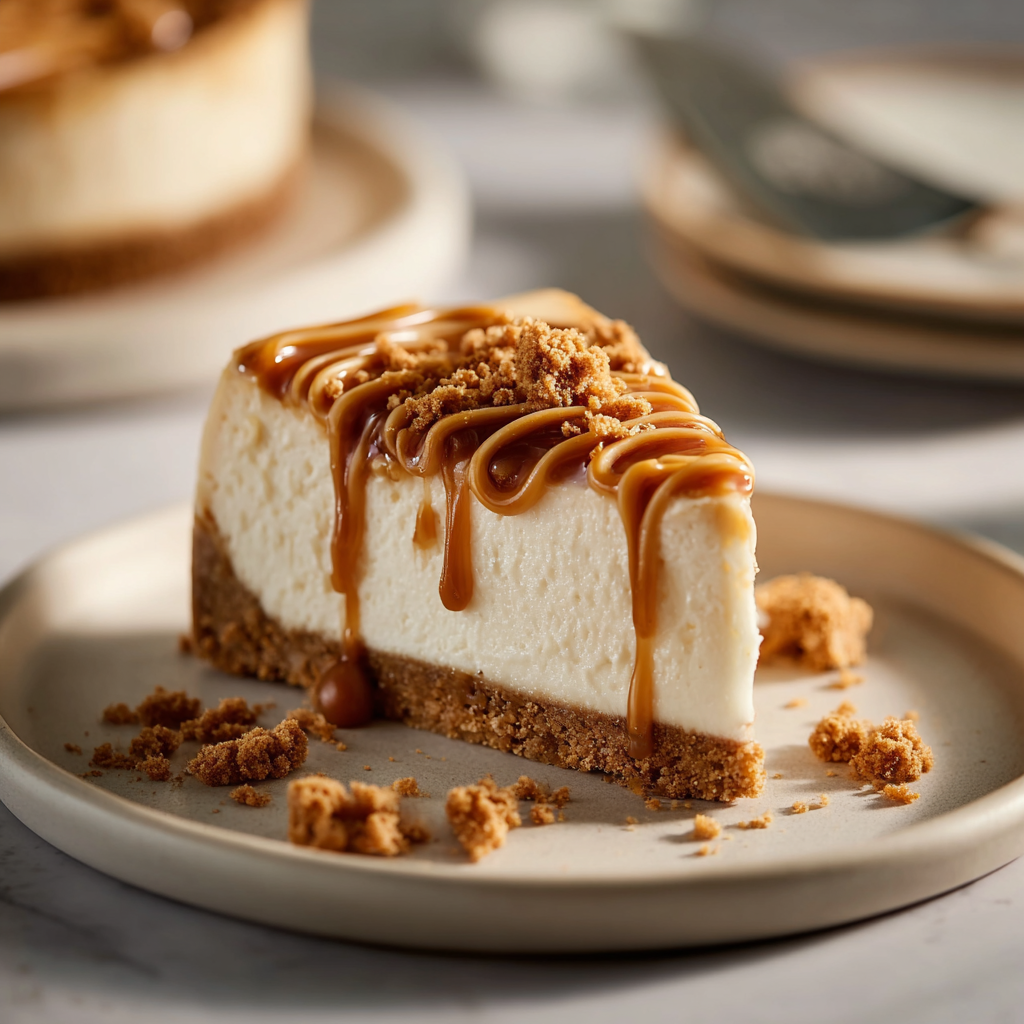
- ¼ cup Biscoff cookie butter, melted – For elegant drizzling that adds visual appeal and extra flavor
- Crushed Biscoff cookies – A handful for garnishing; provides textural contrast and beautiful presentation
Equipment Needed:
- 9-inch springform pan
- Food processor or rolling pin for crushing cookies
- Large mixing bowls (at least two)
- Electric hand mixer or stand mixer
- Rubber spatula
- Measuring cups and spoons
Step-by-Step Instructions
Creating the Perfect Crust
Step 1: Crush Your Cookies
Begin by placing your Biscoff cookies in a food processor and pulse until they form fine, uniform crumbs. Alternatively, place the cookies in a sealed plastic bag and crush them with a rolling pin until you achieve a sand-like consistency. The finer your crumbs, the more cohesive your crust will be.
Step 2: Combine with Butter
Transfer the cookie crumbs to a medium bowl and pour the melted butter over them. Using a fork or your hands, mix thoroughly until every crumb is moistened with butter. The mixture should resemble wet sand and hold together when squeezed – if it seems too dry, add an extra tablespoon of melted butter.
Step 3: Press into Pan
Pour the buttery crumb mixture into your 9-inch springform pan. Using the bottom of a measuring cup or glass, press the mixture firmly and evenly across the bottom of the pan. Work your way up the sides slightly (about half an inch) if desired, creating a neat edge. The more firmly you press, the sturdier your crust will be when you slice the cheesecake later.
Step 4: Chill the Crust
Place your prepared crust in the refrigerator while you make the filling. This 15-20 minute chill helps the butter solidify, which ensures your crust stays intact when you add the creamy filling.
Making the Luscious Filling
Step 5: Beat the Cream Cheese Base
In a large mixing bowl, add your softened cream cheese. Using an electric mixer on medium speed, beat it for 2-3 minutes until it becomes completely smooth and fluffy with no lumps remaining. Scrape down the sides of the bowl periodically to ensure everything incorporates evenly.
Step 6: Add the Biscoff Elements
Add the cookie butter, powdered sugar, and vanilla extract to your whipped cream cheese. Continue beating on medium speed for another 2-3 minutes until everything is thoroughly combined and the mixture looks silky and uniform. The cookie butter should be completely incorporated with no streaks visible.
Step 7: Whip Your Cream
In a separate, clean bowl, pour the cold heavy whipping cream. Using clean beaters, whip the cream on high speed until stiff peaks form – this typically takes 3-4 minutes. You’ll know it’s ready when the cream holds its shape firmly and doesn’t droop when you lift the beaters. Be careful not to over-whip, or you’ll end up with butter!
Step 8: Fold Everything Together
Here’s where the magic happens: gently fold the whipped cream into your Biscoff cream cheese mixture using a rubber spatula. Use a folding motion (cutting down through the center, scraping along the bottom, and bringing it up along the sides) rather than stirring, which preserves the airiness. Continue folding until no white streaks remain and the mixture is uniformly creamy and light.
Assembling Your Cheesecake
Step 9: Add Filling to Crust
Remove your chilled crust from the refrigerator. Spoon the filling mixture over the crust, distributing it evenly. Use an offset spatula or the back of a spoon to spread the filling smoothly to the edges, making sure it reaches all sides of the pan.
Step 10: Smooth the Top
Take your time creating a smooth, level surface on top of your cheesecake. Run your spatula across the top in long, even strokes, turning the pan as you go. A smooth top not only looks professional but also makes adding toppings easier later.
Step 11: Refrigerate Until Set
Cover your cheesecake loosely with plastic wrap (make sure it doesn’t touch the surface) or aluminum foil. Refrigerate for at least 6 hours, though overnight is ideal. This extended chill time allows the cheesecake to firm up properly and gives the flavors time to develop and meld together beautifully.
Adding the Finishing Touches
Step 12: Prepare Your Toppings
Shortly before serving, microwave the remaining cookie butter in a small bowl for 15-20 seconds, stirring until it’s smooth and drizzle-able. If using crushed cookies for garnish, have them ready in a small bowl.
Step 13: Decorate and Serve
Remove your cheesecake from the refrigerator and carefully release the springform pan sides. Using a spoon or a piping bag with a small opening, drizzle the melted cookie butter over the top in artistic swirls or straight lines. Sprinkle the crushed cookies over the surface for added texture and visual interest. Allow the cheesecake to sit at room temperature for 10-15 minutes before slicing – this makes it easier to cut clean pieces.
Serving Suggestions
Slicing Like a Pro
For picture-perfect slices, use a sharp knife dipped in hot water and wiped dry between each cut. This technique melts through the cheesecake smoothly, preventing the filling from sticking to the blade and creating clean, professional-looking portions.
Plating Presentation
Serve each slice on a white plate to make the golden Biscoff color pop. Add a dollop of freshly whipped cream on the side, or place a whole Biscoff cookie at an angle against the slice for an elegant presentation that hints at what’s inside.
Complementary Beverages
This rich cheesecake pairs wonderfully with strong coffee or espresso, which cuts through the sweetness beautifully. For a fancier occasion, serve it alongside a glass of dessert wine like Moscato or a sweet Riesling. Hot tea, particularly chai or English breakfast, also complements the spiced notes in the Biscoff cookies perfectly.
Portion Sizes
Given the richness of this dessert, smaller slices go a long way. Cut the cheesecake into 12-14 slices rather than the typical 8-10, which makes it go further at parties and prevents anyone from feeling too full after dessert.
Creative Recipe Variations
Chocolate Biscoff Swirl
Melt ½ cup of dark chocolate chips and drizzle it over the filling before refrigerating. Use a toothpick or knife to swirl the chocolate through the top layer, creating a beautiful marbled effect that adds rich chocolate flavor.
Salted Caramel Biscoff
Drizzle salted caramel sauce over each slice just before serving instead of (or in addition to) the cookie butter topping. The salt enhances the caramel notes in the Biscoff and creates an even more complex flavor profile.
Mini Cheesecake Cups
Rather than one large cheesecake, divide the crust and filling among 12 cupcake liners in a muffin tin. These individual portions are perfect for parties and eliminate the need for slicing and serving.
Graham Cracker Hybrid
Mix half Biscoff cookies and half graham crackers for the crust to create a slightly different flavor profile. This combination offers a more traditional cheesecake base while still incorporating that beloved Biscoff taste.
Biscoff Oreo Fusion
Add ½ cup of crushed Oreo cookies to your filling for cookies-and-cream lovers. The combination of Biscoff and Oreo creates an interesting flavor complexity that appeals to those who love mix-ins.
Peanut Butter Addition
Swirl 3 tablespoons of creamy peanut butter into the filling along with the cookie butter for a nutty twist. The peanut butter complements the caramelized flavor of Biscoff surprisingly well.
Make-Ahead and Storage Tips
Advance Preparation Timeline
This cheesecake is an ideal make-ahead dessert that actually improves with time. Prepare it 1-2 days before you plan to serve it for optimal flavor and texture. The extended refrigeration allows the filling to firm up completely and gives all the flavors time to meld together harmoniously.
Proper Storage Methods
Store your cheesecake in the refrigerator, covered with plastic wrap or in an airtight container, for up to 4 days. The springform pan base works well as a serving plate, or you can carefully transfer the cheesecake to a cake stand using a large, flat spatula.
Freezing Instructions
This cheesecake freezes beautifully for up to 2 months! To freeze, prepare the cheesecake completely but hold off on adding the decorative toppings. Once fully set, wrap the entire cheesecake (still in the springform pan) tightly in plastic wrap, then cover with aluminum foil. When ready to serve, thaw overnight in the refrigerator and add your toppings just before serving.
Individual Slice Storage
If you want to freeze individual slices for quick desserts later, cut the cheesecake into portions and wrap each slice individually in plastic wrap. Stack them in a freezer-safe container with parchment paper between layers to prevent sticking.
Notes and Tips for Success
Cream Cheese Temperature
The single most important factor in achieving a smooth, lump-free filling is using properly softened cream cheese. Remove it from the refrigerator at least 2 hours before you begin, or microwave it in 10-second bursts on low power. The cream cheese should be soft enough to press your finger into easily but not melted or greasy.
Cookie Butter Consistency
Biscoff cookie butter can vary in consistency depending on storage conditions. If yours seems very thick or has separated oil on top, microwave it for 15-20 seconds and stir well before adding it to your cream cheese mixture. This ensures smooth incorporation without lumps.
Achieving Stiff Peaks
For the fluffiest cheesecake texture, make sure your heavy cream is very cold before whipping. Some bakers even chill their mixing bowl and beaters in the freezer for 10 minutes beforehand. Stiff peaks should stand straight up without drooping – this structure is what gives your cheesecake its light, airy quality.
Firmer Texture Option
If you prefer a firmer, more traditional cheesecake texture, place your finished cheesecake in the freezer for 1-2 hours before slicing and serving. This creates a denser consistency while still maintaining the smooth, creamy mouthfeel.
Sweetness Adjustments
Taste your filling before adding to the crust – yes, it’s safe since there are no raw eggs! If you prefer less sweetness, reduce the powdered sugar to ⅓ cup. For those with a serious sweet tooth, increase it to ⅔ cup. Remember that the cookie butter already contains sugar, so adjust accordingly.
Preventing a Soggy Crust
Ensure your crust is firmly pressed and well-chilled before adding the filling. The cold butter needs to solidify completely, creating a barrier between the moist filling and the cookie crumbs. This prevents the dreaded soggy bottom that can ruin an otherwise perfect cheesecake.
Frequently Asked Questions
Can I use low-fat cream cheese for this recipe?
While you technically can, I strongly recommend against it. Low-fat or reduced-fat cream cheese contains more moisture and less fat, which means your cheesecake won’t set properly and will lack the rich, creamy texture that makes this dessert special. Regular, full-fat cream cheese is essential for the best results.
What if I don’t have a springform pan?
You can use a regular 9-inch cake pan or pie dish, but removing slices will be trickier. Line your pan with parchment paper extending up the sides, creating “handles” you can use to lift the entire cheesecake out before slicing. Alternatively, serve it directly from the pan like a pie.
How do I know when my cheesecake is set enough?
The cheesecake should feel firm to the touch and not jiggle excessively when you gently shake the pan. If it still seems very wobbly in the center after 6 hours, give it a few more hours or overnight. No-bake cheesecakes take patience, but the wait is always worth it!
Can I make this with a different type of cookie?
Absolutely! While Biscoff cookies provide that distinctive caramelized flavor, you can substitute graham crackers, Oreos, gingersnaps, or vanilla wafers for the crust. Keep in mind that changing the cookie will alter the flavor profile significantly, so choose something that complements the cookie butter filling.
Why is my filling grainy or lumpy?
Lumpy filling almost always results from cream cheese that wasn’t softened enough before mixing. The cream cheese must be at room temperature to blend smoothly. If you encounter lumps, try beating the mixture longer on higher speed, or press it through a fine-mesh strainer before adding the whipped cream.
Can I make this dairy-free?
Creating a true dairy-free version is challenging since cream cheese and heavy cream are fundamental to the texture. However, you can experiment with dairy-free cream cheese alternatives and coconut cream in place of heavy whipping cream. The texture and flavor will differ from the original, but it can still be delicious.
How far in advance should I add the toppings?
Add decorative drizzles and crushed cookie garnishes no more than 2-3 hours before serving. If added too early, the melted cookie butter can become dull-looking, and the crushed cookies may soften and lose their appealing crunch.
What’s the best way to transport this cheesecake?
Keep the cheesecake in its springform pan with the sides still attached for maximum protection. Place it on a flat, stable surface in your vehicle, preferably in a cooler with ice packs if traveling more than 20 minutes. The firmer you can keep it, the better it will maintain its shape during transport.
Nutrition Information (per serving):
Serving Size: 1 slice (⅟₁₂ of cheesecake)
Calories: 385 kcal
Carbohydrates: 31g
Protein: 4g
Fat: 28g
Saturated Fat: 16g
Trans Fat: 0g
Cholesterol: 75mg
Sodium: 220mg
Fiber: 1g
Sugar: 22g
Note: Nutrition information is approximate and will vary based on specific ingredients and brands used.