The first time I made Oreo Sushi, I wasn’t sure what to expect. My daughter had seen a video of it online and absolutely insisted we try making it together. What started as a rainy Saturday afternoon project quickly became one of our favorite kitchen adventures. Watching her face light up as we sliced into those rolls to reveal the swirled layers was pure magic. Now, whenever we have guests over—especially families with kids—this playful dessert makes an appearance, and it never fails to spark conversations and wide-eyed wonder. The best part? It requires only two ingredients and about 20 minutes of your time, yet delivers a wow factor that rivals desserts taking hours to prepare.
Prep Time: 15 minutes
Total Time: 20 minutes (plus optional chilling)
Yield: Approximately 12-16 pieces
Category: Desserts
Cuisine: Fusion/American
Calories: 326 per serving
Why You’ll Love Oreo Sushi
This creative dessert perfectly bridges the gap between familiar comfort food and exciting novelty. For one thing, it transforms an everyday cookie into something that feels special and Instagram-worthy without requiring any advanced culinary skills. The presentation alone makes people do a double-take—these little rolls genuinely look like sushi at first glance, which creates a delightful moment of surprise when they taste that unmistakable Oreo flavor.
Beyond the visual appeal, Oreo Sushi offers a wonderful hands-on activity that’s perfect for engaging kids in the kitchen. There’s something deeply satisfying about crushing cookies, mixing the paste, and rolling everything up like you’re a sushi chef. Children feel accomplished creating something that looks so professional, and parents appreciate having a no-bake dessert that doesn’t heat up the kitchen.
The texture combination is what really makes this treat special. Each bite delivers the familiar taste of Oreos but with an entirely new mouthfeel—the cookie crumbs create a dense, fudgy base while the cream filling adds smoothness and richness. It’s reminiscent of cookie dough but with a more refined, rolled structure that holds together beautifully.
Moreover, this recipe is incredibly forgiving and adaptable. You can make it with any type of Oreo flavor, adjust the consistency to your preference, and customize it with endless variations. Whether you’re hosting a birthday party, need a quick dessert for unexpected guests, or simply want to try something different, Oreo Sushi fits the bill perfectly.
Ingredients You’ll Need
The beauty of this recipe lies in its simplicity—you only need two main ingredients:
- Oreos (1 standard package, about 36 cookies)
- Milk (any variety—whole, 2%, almond, or oat milk all work wonderfully)
Optional Additions and Toppings
- Chocolate sauce (for dipping)
- Whipped cream (for serving)
- Vanilla or cream cheese frosting (as an alternative dip)
- Fresh fruit slices (strawberries, bananas, or kiwi)
- Melted chocolate (for drizzling)
- Sprinkles, crushed nuts, or coconut flakes (for garnish)
Equipment Needed
- Large zip-top bag
- Rolling pin or heavy can
- Two mixing bowls
- Spatula or spoon
- Plastic wrap
- Sharp knife
- Flat work surface
- Serving plate
Step-by-Step Instructions
Separating the Cookies from the Cream
Start by opening your package of Oreos and getting ready for a bit of assembly-line work. Take each cookie and gently twist it to separate the two chocolate wafers from the cream filling. This process is oddly therapeutic, and if you have kids helping, they’ll absolutely love this step.
As you separate the cookies, scrape the cream filling into one bowl using a butter knife or small spatula if it sticks to the wafer. Place all the chocolate cookie wafers into a large zip-top bag. Don’t worry about being too precise—any bits of cream that remain on the cookies will just add extra flavor to your mixture.
Creating the Cookie Crumb Base
Once all your cookies are in the zip-top bag, press out as much air as possible before sealing it completely. This prevents the bag from popping open when you start crushing. Now comes the fun part that’s perfect for working out any stress—grab your rolling pin and firmly roll it over the bag, crushing the cookies into fine crumbs.
Work systematically across the entire bag, ensuring you break down any large pieces. The goal is to achieve a texture similar to coarse sand or graham cracker crumbs. If a few slightly larger pieces remain, that’s perfectly fine—they’ll add pleasant texture to your finished rolls.
Transfer the cookie crumbs into a mixing bowl. Now you’ll gradually add milk, starting with just a tablespoon or two. Stir the mixture thoroughly after each addition, watching as it transforms from dry crumbs into a cohesive paste. You’re aiming for a consistency similar to play dough or thick cookie dough—moldable and slightly sticky but not wet or soupy. This usually takes about 3-4 tablespoons of milk, though the exact amount can vary depending on humidity and how finely you crushed your cookies.
Preparing the Cream Filling
While your cookie base rests for a moment, turn your attention to the cream filling you set aside earlier. Using a spoon or spatula, stir the cream filling until it becomes smooth and spreadable. If it seems too thick or chunky, you can add a tiny splash of milk (about a teaspoon) to loosen it up slightly. The consistency should resemble soft frosting that spreads easily without tearing.
Assembling Your Oreo Sushi Roll
Clear a space on your counter and lay out a large piece of plastic wrap, roughly 12-14 inches long. Transfer your cookie paste to the center of the plastic wrap. Using your hands or a spatula, spread and press the mixture into a rough rectangle, approximately 8 inches wide by 6 inches tall. The thickness should be about a quarter to half an inch—thick enough to hold together but thin enough to roll easily.
Next, take your prepared cream filling and spread it evenly across the entire surface of the cookie layer, leaving a small border (about half an inch) along the edge farthest from you. This border helps prevent the filling from squeezing out when you roll. Work gently to avoid disturbing the cookie base underneath.
Rolling and Shaping
Here’s where your creation really starts to look like sushi! Starting from the edge closest to you, use the plastic wrap to help lift and roll the cookie mixture away from you, similar to how you’d roll a sushi mat. Apply gentle, even pressure as you roll to ensure the log stays tight and compact without squeezing out too much filling.
Continue rolling until you’ve formed a complete log, then wrap the entire thing snugly in the plastic wrap. Twist the ends of the plastic wrap like a candy wrapper to seal everything in. For best results, refrigerate the roll for at least 30 minutes to an hour. This chilling time firms everything up, making it much easier to slice cleanly.
Slicing and Serving
When you’re ready to serve, unwrap your chilled Oreo sushi log and place it on a cutting board. Using a sharp knife, slice the log into rounds about three-quarters of an inch thick. Wipe your knife clean between cuts to maintain neat edges and prevent the pieces from sticking to the blade.
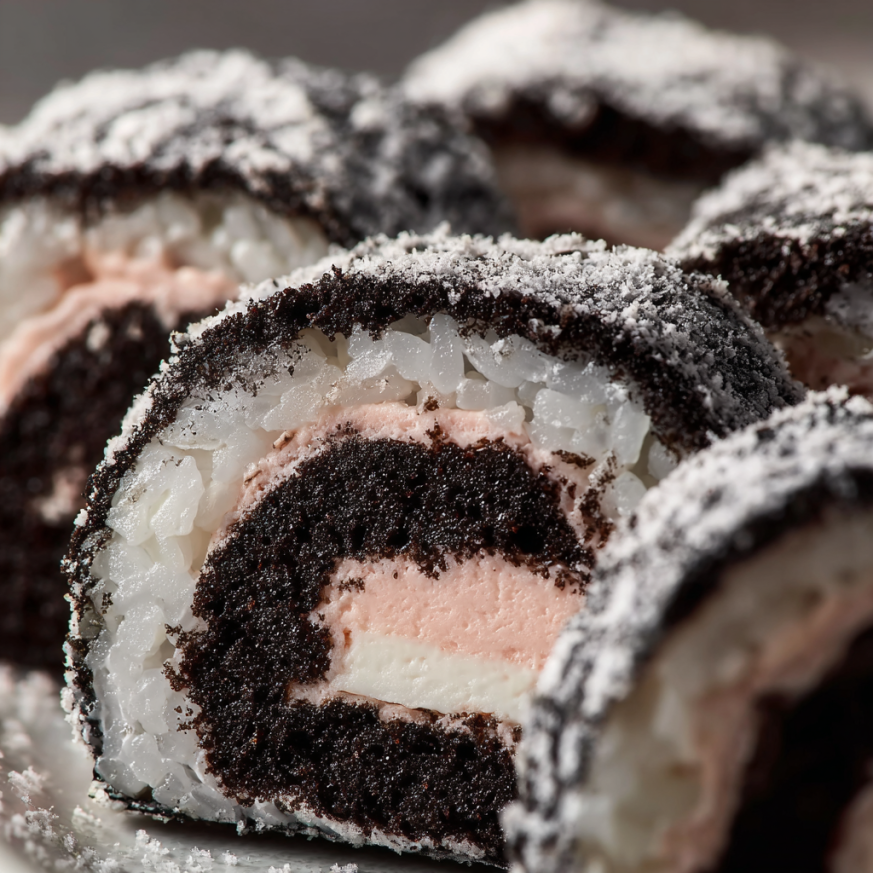
Arrange your Oreo sushi pieces on a serving plate, standing them up or laying them flat to showcase the beautiful spiral pattern inside. The contrast between the dark cookie layer and the white cream filling creates a striking visual that truly resembles sushi rolls.
Serving Suggestions
Presentation plays a huge role in making Oreo Sushi special. Arrange the pieces on a long rectangular plate or wooden board to mimic traditional sushi presentation. You can even use small square plates for individual servings, making each person feel like they’re getting their own special dessert course.
Provide small bowls of dipping sauces on the side—chocolate sauce is the most popular option, offering a rich, decadent complement to the Oreo flavor. Whipped cream provides a lighter, airier contrast, while cream cheese frosting adds tangy sweetness. Setting out multiple dipping options lets everyone customize their experience.
For an extra-impressive presentation, garnish the plate with fresh mint leaves, a dusting of cocoa powder, or even edible flowers. These touches elevate the dessert from fun novelty to something that feels genuinely special and thoughtful.
If you’re serving Oreo Sushi at a party, consider creating a DIY station where guests can make their own rolls. Set out bowls of the cookie paste, cream filling, and various add-ins like fruit slices or candy pieces. This interactive element turns dessert into entertainment, especially for kids’ birthday parties or family gatherings.
Creative Variations to Try
Fruity Fresh Twist
Incorporating fresh fruit transforms Oreo Sushi into something that feels slightly healthier (though let’s be honest, it’s still decadent). Lay thin slices of strawberries, bananas, or kiwi on top of the cream filling before rolling. The fruit adds natural sweetness, bright color, and a pleasant juicy burst that contrasts beautifully with the rich Oreo flavors.
Berries work particularly well because their tartness cuts through the sweetness. Raspberries, thinly sliced strawberries, or even a layer of seedless jam create a delicious filling that makes each bite more complex and interesting.
Flavor Variations with Different Oreos
The world of Oreo flavors has expanded dramatically in recent years, opening up endless possibilities for your sushi. Golden Oreos create a lighter-colored base with vanilla flavor that’s perfect for spring or summer gatherings. Mint Oreos bring a refreshing quality that’s especially nice after a heavy meal.
Peanut butter Oreos offer rich, nutty undertones that pair wonderfully with chocolate dipping sauce. Birthday cake Oreos add festive sprinkles throughout the roll, making them perfect for celebrations. Even seasonal flavors like pumpkin spice or gingerbread can be used to create holiday-themed versions.
Decadent Toppings and Coatings
Once you’ve sliced your rolls, the fun continues with toppings and coatings. Dip each piece halfway into melted chocolate for a sophisticated look, or drizzle caramel sauce across the top for glossy, professional presentation. Rolling the edges in crushed nuts, mini chocolate chips, or colorful sprinkles adds texture and visual interest.
For a truly indulgent version, roll the entire log in melted white chocolate before slicing, creating a candy coating that hardens into a delicious shell. Alternatively, coat them in crushed graham crackers or additional Oreo crumbs for extra crunch.
Frozen Oreo Sushi
On hot summer days, try freezing your Oreo Sushi rolls for 2-3 hours before serving. The frozen version has a firmer, almost ice cream cake-like texture that’s incredibly refreshing. The contrast between the frozen cookie layer and the slightly softer cream center creates an interesting textural experience that regular Oreo Sushi doesn’t offer.
Frozen versions hold their shape beautifully, making them easier to transport to picnics or outdoor gatherings. Just remember to let them sit at room temperature for 5 minutes before serving so they’re not too hard to bite into.
Make-Ahead Tips
Oreo Sushi is an excellent make-ahead dessert that actually improves with some resting time. The rolls can be prepared completely and stored in the refrigerator for up to 3 days when wrapped tightly in plastic wrap. In fact, letting them chill overnight allows the flavors to meld together and the texture to become even more cohesive.
If you’re making these for a party, prepare the rolls the night before and slice them just before guests arrive. This approach gives you one less thing to worry about on the day of your event while ensuring the slices look fresh and neat.
For longer storage, you can freeze the wrapped rolls for up to 2 months. When you’re ready to serve them, transfer the frozen roll to the refrigerator to thaw gradually over several hours. Avoid thawing at room temperature, as this can make the outside too soft while the inside remains frozen.
You can also prep components separately if you’re short on time. The cookie crumb mixture and cream filling can both be prepared and stored in separate airtight containers in the refrigerator for up to 5 days. When you’re ready, simply assemble and roll as directed.
Important Notes and Tips
Achieving the Perfect Consistency
The most critical aspect of successful Oreo Sushi is getting your cookie paste consistency just right. Too dry, and it will crumble apart when you try to roll it. Too wet, and it will be sticky and difficult to work with, potentially squishing out from the plastic wrap.
Add milk very gradually—you can always add more, but you can’t take it away. If you accidentally add too much milk and the mixture becomes too wet, simply crush a few more Oreos and stir in the additional crumbs to absorb the excess moisture.
Working with Plastic Wrap
Using plastic wrap as your rolling surface is key to success. It provides a non-stick surface and helps you manipulate the cookie paste without it sticking to your hands or counter. Make sure your piece of plastic wrap is large enough to accommodate the rolled log with plenty of excess on all sides.
When rolling, use the plastic wrap to guide and shape the log rather than touching the cookie mixture directly with your hands. This technique keeps everything cleaner and helps you maintain a tighter, more uniform roll.
Slicing Techniques
A sharp knife is essential for clean cuts. Before each slice, wipe the blade clean with a damp paper towel to remove any sticky residue. Some people find that slightly warming the knife blade under hot water (then drying it) helps it glide through the roll more smoothly.
Use a gentle sawing motion rather than pressing straight down, which can squash the roll and distort its shape. If you notice the roll starting to flatten as you slice, pop it back in the refrigerator for 15 minutes to firm up again.
Frequently Asked Questions
Can I make Oreo Sushi without milk for a dairy-free version?
Absolutely! Any non-dairy milk alternative works wonderfully—almond milk, oat milk, soy milk, or coconut milk all create the same dough-like consistency. You can even experiment with using melted coconut oil or dairy-free cream cheese instead of milk for a richer, more binding texture. Just remember to check that your Oreos are also dairy-free if you’re accommodating allergies, as regular Oreos contain milk products in the filling.
Why is my cookie mixture too crumbly to roll?
Crumbliness indicates you need more moisture. Add milk one teaspoon at a time, mixing thoroughly between additions until the mixture holds together when you squeeze it. Environmental factors like low humidity can require more liquid, so don’t be afraid to add an extra tablespoon if needed. The mixture should feel similar to moldable clay or play dough.
Can I use other cookies besides Oreos?
Definitely! While Oreos are traditional and work perfectly, you can experiment with other sandwich cookies. Nutter Butters create a peanut butter version, while vanilla sandwich cookies offer a lighter flavor profile. Even Girl Scout cookies like Thin Mints or Samoas can be transformed into sushi rolls, though you’ll need to adjust the milk amount based on how the specific cookies absorb moisture.
How far in advance can I make these for a party?
Oreo Sushi can be made up to 2 days ahead and stored in the refrigerator while still maintaining excellent quality. For optimal presentation, however, slice them on the day you plan to serve them—pre-sliced pieces can dry out slightly and lose their clean edges. If you must slice in advance, store the pieces in an airtight container with parchment paper between layers.
What’s the best way to transport Oreo Sushi?
The unsliced roll travels much better than individual pieces. Wrap it securely in plastic wrap, then place it in a rigid container to prevent crushing. Transport it in a cooler with ice packs if it’s warm outside. Slice the roll at your destination for the freshest appearance and best texture.
My cream filling is too thick to spread smoothly. What should I do?
If your cream filling is stiff and difficult to spread, warm it slightly by microwaving it for just 5-10 seconds, stirring well after heating. Alternatively, beat it with a hand mixer for 30 seconds to whip air into it, making it lighter and more spreadable. Adding a tiny amount of milk or heavy cream can also help achieve a smoother consistency.
Can kids make this recipe on their own?
With adult supervision, children aged 8 and up can successfully make Oreo Sushi with minimal help. Younger children will need assistance with separating the cookies, achieving the right paste consistency, and using the knife to slice. However, the crushing and rolling steps are perfectly suited for kids of all ages, making this an excellent family cooking project.
Is there a way to make this less sweet?
Oreo Sushi is inherently sweet since it’s made entirely from cookies and cream filling. However, you can reduce the sweetness slightly by using less of the cream filling or substituting part of it with plain cream cheese. Serving it with fresh berries or a slightly bitter dark chocolate dipping sauce also helps balance the sweetness with contrasting flavors.
Oreo Sushi represents everything that’s wonderful about creative cooking—it takes familiar ingredients and transforms them into something unexpected and delightful. Whether you’re making it to impress party guests, bond with your kids in the kitchen, or simply satisfy a creative craving, this playful dessert delivers joy in every bite. The combination of simplicity, visual appeal, and delicious flavor makes it a recipe you’ll return to again and again. So grab a package of Oreos, clear some counter space, and get ready to create your own batch of these whimsical treats. Trust me, once you make them, you’ll find yourself looking for excuses to make them again!