Total Time: 30 minutes | Yield: 12 sandwich cookies
Introduction
Some of my most cherished summer memories involve sitting around a crackling campfire, perfectly toasting marshmallows and assembling s’mores with friends. But what if you could capture that nostalgic campfire magic and combine it with the irresistible appeal of peanut butter cookies? That’s exactly what inspired these peanut butter s’mores sandwich cookies. I created this recipe on a rainy afternoon when camping plans were cancelled, and my kids were desperately craving s’mores. The result exceeded all expectations—soft, chewy peanut butter cookies sandwiching melted chocolate and fluffy marshmallow create an experience that’s somehow even better than the original.
These cookies deliver everything we love about s’mores but in a more elegant, portable format. The peanut butter cookies provide a rich, nutty base that complements the sweet marshmallow and chocolate filling perfectly. Unlike traditional graham crackers that can be dry and crumbly, these cookies stay soft and chewy, creating a delightful textural contrast with the gooey filling. Whether you’re hosting a party, need a show-stopping dessert, or simply want to recreate that campfire experience indoors, these sandwich cookies deliver pure joy in every bite.
Why You’ll Love This Recipe
Campfire Flavor Without the Fire: Enjoy all the nostalgic s’mores taste without needing a campfire, camping trip, or even good weather. These cookies bring the magic indoors any time you crave it.
Quick and Simple: With just 30 minutes from start to finish, you can have impressive homemade sandwich cookies ready to serve. The straightforward process makes them accessible even for novice bakers.
Crowd-Pleasing Combination: The pairing of peanut butter, chocolate, and marshmallow appeals to virtually everyone. It’s a flavor trinity that consistently wins over both kids and adults at any gathering.
Perfect for Entertaining: These beautiful sandwich cookies look professionally made and sophisticated enough for dinner parties, yet fun enough for children’s birthdays. They strike the perfect balance between elegant and playful.
Naturally Gluten-Free: The cookies contain no flour, making them naturally gluten-free when you use certified gluten-free ingredients. This means more people can enjoy them without modifications.
Ingredients
For the Peanut Butter Cookies:
- 1 cup creamy peanut butter
- ½ cup granulated sugar
- ½ cup packed light brown sugar
- 1 large egg
- 1 teaspoon pure vanilla extract
- ½ teaspoon baking soda
- ¼ teaspoon salt
For the S’mores Filling:
- 1 cup semi-sweet chocolate chips, melted
- 1 cup marshmallow fluff
Optional Enhancements:
- Mini chocolate chips for sprinkling
- Graham cracker crumbs for rolling edges
- Sea salt flakes for topping
- Kitchen torch for toasting marshmallow
Step-by-Step Instructions
Preparing to Bake
Step 1: Preheat and Prep Begin by preheating your oven to 350°F (175°C). Line a large baking sheet with parchment paper or a silicone baking mat to prevent sticking and ensure easy cleanup. Having everything ready before mixing creates a smoother baking experience.
Making the Cookie Dough
Step 2: Mix the Dough In a large mixing bowl, combine the creamy peanut butter, granulated sugar, and packed light brown sugar. Using an electric mixer or sturdy wooden spoon, beat these ingredients together until they’re well blended and slightly fluffy. Add the egg and vanilla extract, mixing until fully incorporated. The mixture should be smooth and cohesive.
Step 3: Add Leavening and Salt Sprinkle the baking soda and salt over the mixture. Mix thoroughly until these dry ingredients are completely distributed throughout the dough. The baking soda helps the cookies rise slightly while maintaining their chewy texture, and the salt balances the sweetness perfectly.
Shaping and Baking
Step 4: Form Cookie Balls Using a tablespoon or small cookie scoop, portion out the dough into uniform balls—you should get about 24 balls total for 12 sandwich cookies. Roll each portion between your palms to create smooth, round balls. Place them on your prepared baking sheet, spacing them approximately 2 inches apart to allow for spreading during baking.
Step 5: Create the Classic Pattern Take a fork and dip it lightly in sugar to prevent sticking. Gently press down on each dough ball to flatten it slightly, creating a crisscross pattern on top. This classic peanut butter cookie design isn’t just decorative—it helps the cookies bake evenly by creating uniform thickness.
Step 6: Bake to Perfection Transfer the baking sheet to your preheated oven and bake for 8-10 minutes. Watch carefully during the last couple of minutes—the cookies are done when the edges turn lightly golden while the centers still look slightly soft. They’ll continue to firm up as they cool, so don’t overbake. Remove from the oven and let them rest on the baking sheet for 5 minutes before transferring to a wire cooling rack.
Preparing the Filling
Step 7: Melt the Chocolate While your cookies cool completely, place the semi-sweet chocolate chips in a microwave-safe bowl. Microwave in 30-second intervals, stirring thoroughly between each round, until the chocolate is completely melted and smooth. Alternatively, use a double boiler for more controlled melting. The chocolate should be fluid and glossy, perfect for spreading.
Assembling the Sandwiches
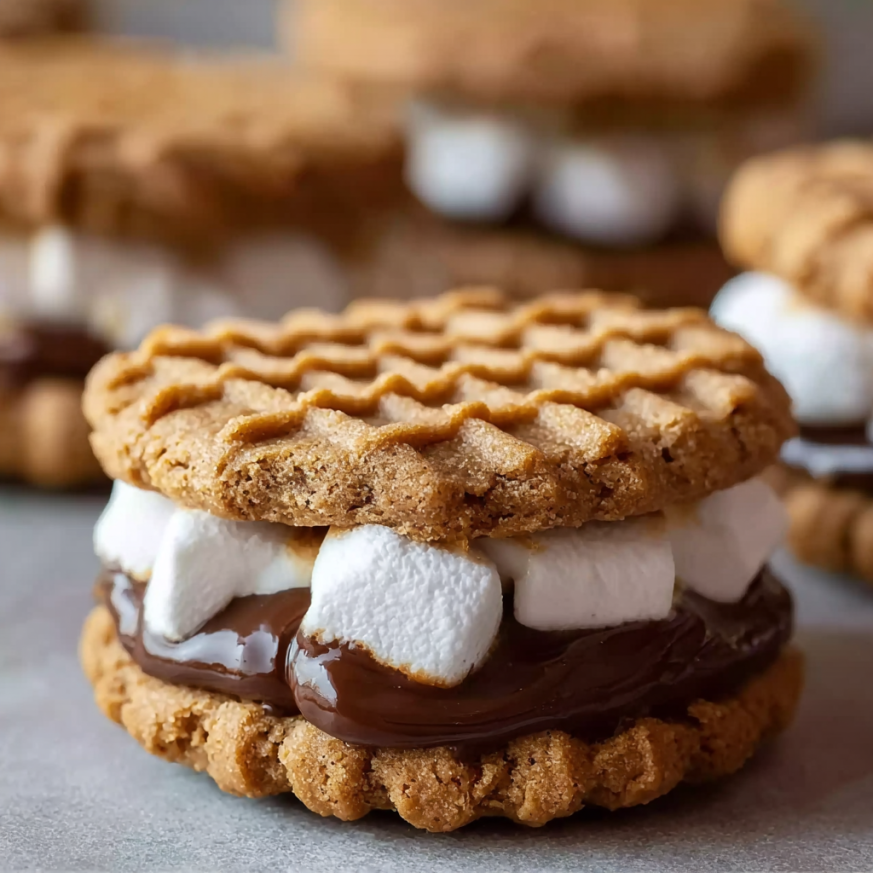
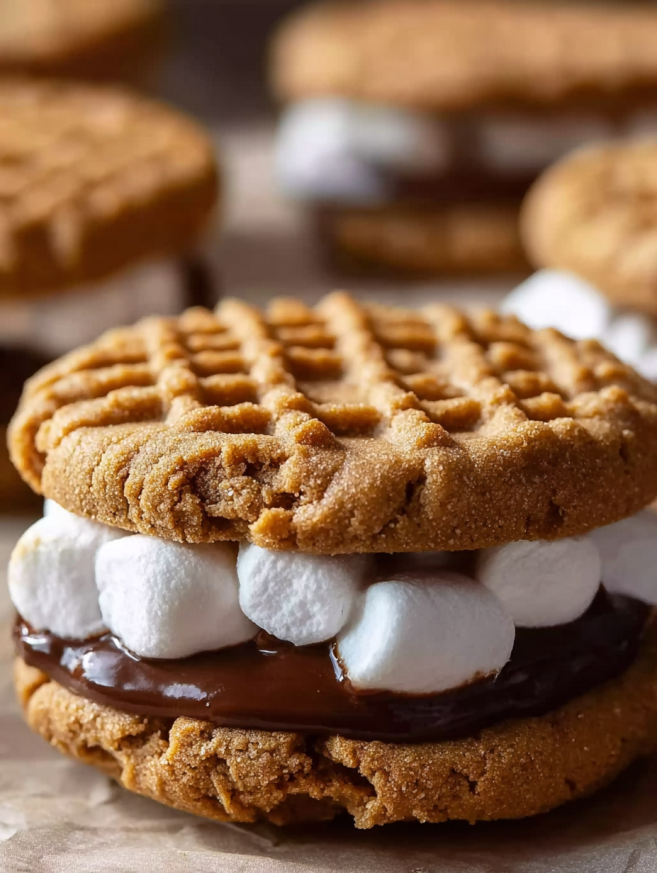
Step 8: Build Your S’mores Once the cookies have cooled to room temperature, it’s time to create your sandwiches. Turn half of the cookies upside down so the flat bottoms face up. Spread a thin, even layer of melted chocolate on each bottom cookie—about a tablespoon per cookie works perfectly. The chocolate acts as both filling and adhesive.
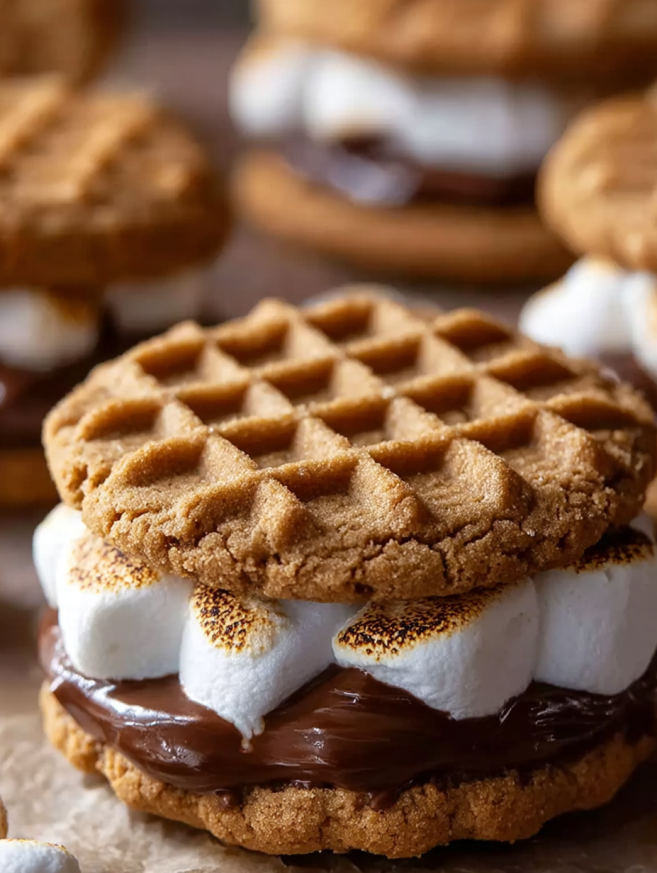
Step 9: Add Marshmallow Magic Place a generous dollop of marshmallow fluff (about 1-2 tablespoons) in the center of the chocolate layer on each cookie. Use the back of a spoon to spread it gently if needed, but leaving it slightly mounded creates that authentic s’mores look when you sandwich them together.
Step 10: Complete the Sandwiches Take a second cookie and place it on top of the marshmallow-covered cookie, flat side down. Press gently but firmly to spread the filling toward the edges without squishing it all out. The marshmallow fluff should peek out slightly from the sides, creating that irresistible gooey appearance.
Final Touches
Step 11: Optional Toasting For an extra-special campfire touch, use a kitchen torch to lightly toast the marshmallow fluff that’s visible around the edges of each sandwich. This caramelizes the marshmallow slightly and adds authentic toasted flavor and appearance. Work carefully and keep the flame moving to avoid burning.
Step 12: Set and Serve Let the assembled cookies sit for about 10 minutes to allow the chocolate to set slightly. This makes them easier to handle and less messy to eat. Serve immediately for the ultimate gooey experience, or store for later enjoyment.
Serving Suggestions
These impressive sandwich cookies deserve a beautiful presentation. Arrange them on a rustic wooden board or vintage cake stand for parties, stacking them in a casual pyramid for visual impact.
For casual gatherings, serve them alongside tall glasses of cold milk or mugs of hot chocolate. The classic beverage pairings enhance the nostalgic s’mores experience and help balance the sweetness.
Create an interactive dessert station by providing all the components separately. Let guests assemble their own sandwich cookies, choosing how much chocolate and marshmallow they prefer. This works wonderfully for children’s parties.
Package individual cookies in clear cellophane bags tied with twine for party favors or gifts. Add a small tag that says “S’mores Without the Fire” for a cute, personalized touch that explains the concept.
Recipe Variations
Dark Chocolate S’mores
Replace semi-sweet chocolate chips with dark chocolate (70% cacao) for a more sophisticated, less sweet version. The bitter chocolate pairs beautifully with the sweet marshmallow and rich peanut butter.
White Chocolate Strawberry Version
Use white chocolate chips for the filling and add a thin layer of strawberry jam between the chocolate and marshmallow. This creates a PB&J meets s’mores hybrid that’s absolutely delicious.
Nutella Hazelnut Twist
Spread Nutella instead of melted chocolate for a hazelnut-forward flavor. Use chocolate hazelnut spread on one cookie and marshmallow on the other before sandwiching for maximum spread distribution.
Crunchy Peanut Butter Style
Substitute crunchy peanut butter for smooth in the cookie dough for extra texture. Add chopped peanuts to the melted chocolate layer for even more crunch throughout.
Graham Cracker Crusted
Roll the edges of assembled sandwiches in crushed graham crackers before the chocolate sets. This adds the traditional s’mores graham flavor and creates a beautiful finished appearance.
Make-Ahead Tips
Cookie Preparation: Bake the cookies up to 3 days in advance and store them in an airtight container at room temperature. They’ll stay soft and fresh, ready for filling when you need them.
Dough Freezing: Portion and shape the raw cookie dough into balls, then freeze on a baking sheet until solid. Transfer to a freezer bag and store for up to 3 months. Bake directly from frozen, adding 1-2 minutes to the baking time.
Assembled Storage: Filled sandwich cookies keep well in an airtight container at room temperature for up to 3 days. Layer them between sheets of parchment paper to prevent sticking.
Filling Components: Melt the chocolate just before assembly for best results. Marshmallow fluff stays fresh at room temperature, making it always ready to use without advance preparation.
Party Planning: For large gatherings, bake the cookies the day before and assemble them 2-4 hours before serving. This timing ensures they’re fresh but gives the filling time to set properly.
Notes
Peanut Butter Choice: Use commercial creamy peanut butter like Jif or Skippy for best results. Natural peanut butter with separated oils creates a different texture and may result in crumbly cookies.
Sugar Measurement: When measuring brown sugar, pack it firmly into the measuring cup. Properly packed brown sugar should hold its shape when turned out of the cup.
Cookie Size Consistency: Using a cookie scoop ensures all cookies are the same size, which means they bake evenly and create perfect sandwich pairings. Uniform size matters more than you might think.
Chocolate Setting: If your kitchen is warm, refrigerate assembled cookies for 10 minutes to help the chocolate firm up faster. Just bring them back to room temperature before serving for optimal texture.
Marshmallow Alternative: If you can’t find marshmallow fluff, you can use marshmallow cream or even place mini marshmallows in the center and briefly microwave to soften them before assembling.
Frequently Asked Questions
Can I use natural peanut butter? While you can try, natural peanut butter with separated oils doesn’t work as well in flourless cookies. The texture will be different and potentially crumbly. Stick with commercial brands for reliable results.
Why did my cookies spread too much? This typically happens if the dough is too warm or if the cookies are placed too close together. Make sure your dough is at room temperature (not warm) and space cookies 2 inches apart on the baking sheet.
Can I make these without eggs? Yes! Replace the egg with 1 tablespoon of ground flaxseed mixed with 3 tablespoons of water (let sit for 5 minutes). The cookies will be slightly denser but still delicious.
How do I prevent the cookies from being too crumbly? Make sure you’re measuring the peanut butter correctly (packed into the measuring cup) and not overbaking the cookies. They should still look slightly underdone when you remove them from the oven.
Can I use milk chocolate instead of semi-sweet? Absolutely! Milk chocolate creates a sweeter filling that many people prefer. Dark chocolate also works beautifully for those who want less sweetness and more complex chocolate flavor.
Why are my cookies too flat? This usually indicates the dough is too warm or there’s not enough peanut butter. Make sure you’re measuring accurately and consider chilling the dough for 30 minutes if your kitchen is very warm.
How do I store these so they don’t get soggy? Store in an airtight container at room temperature with parchment paper between layers. The cookies themselves won’t get soggy, but the marshmallow filling will keep them moist.
Can I freeze assembled sandwich cookies? Yes! Freeze them in a single layer on a baking sheet until solid, then transfer to a freezer container with parchment between layers. They’ll keep for up to 2 months and thaw at room temperature in about 30 minutes.
Prep Time: 20 minutes | Cook Time: 10 minutes | Course: Dessert | Cuisine: American | Servings: 12 sandwich cookies
Nutrition Information (Per Sandwich Cookie)
- Calories: 280 kcal
- Carbohydrates: 34g
- Protein: 5g
- Fat: 14g
- Saturated Fat: 6g
- Sodium: 150mg
- Fiber: 2g
- Sugar: 22g
These cookies are naturally gluten-free when made with certified gluten-free ingredients.


