When I first encountered tarte tatin at a small bistro in Paris, I was mesmerized by its rustic elegance and caramelized perfection. The server gracefully inverted the skillet at our table, revealing golden pears nestled in glossy caramel beneath a flaky pastry crust. I knew immediately that I had to master this iconic French dessert, though I’ll admit the traditional method initially intimidated me.
After countless attempts and kitchen mishaps, I’ve finally perfected a simplified version that captures all the magic of the original without the stress. This Pear Tarte Tatin maintains the sophisticated flavors and stunning presentation while streamlining the technique for home cooks. Best of all, it transforms humble pears into something truly spectacular.
Why This Simplified Version Will Win Your Heart
Classic Technique Made Accessible
Traditional tarte tatin can be notoriously finicky, with temperamental caramel and tricky timing. However, this simplified approach breaks down each step into manageable parts, ensuring success even for novice bakers.
Stunning Visual Impact
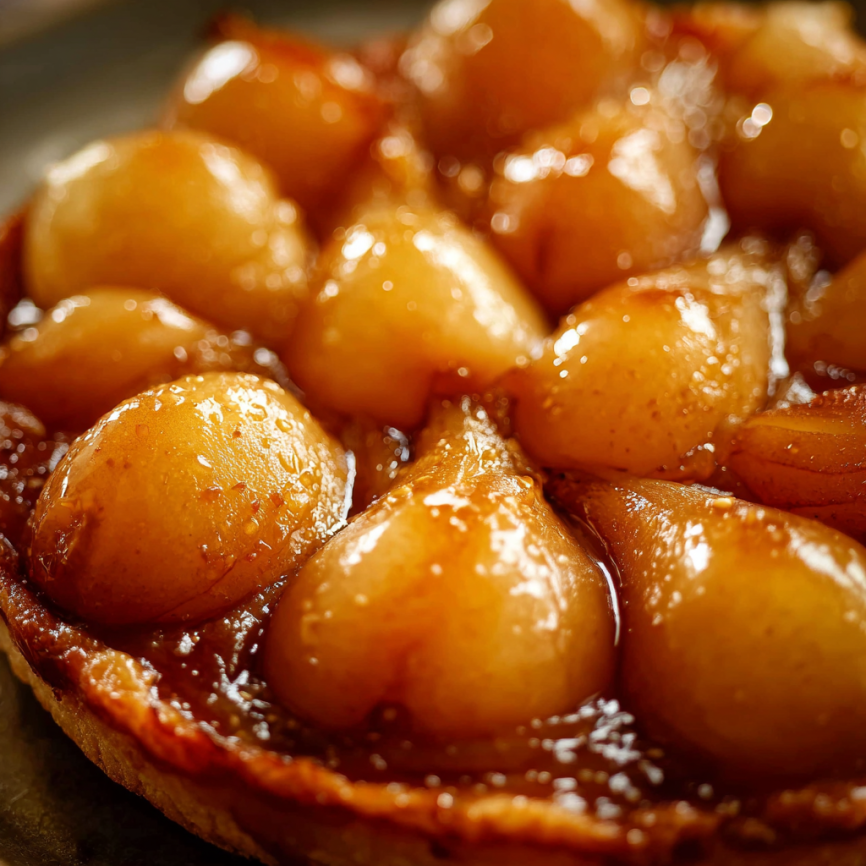
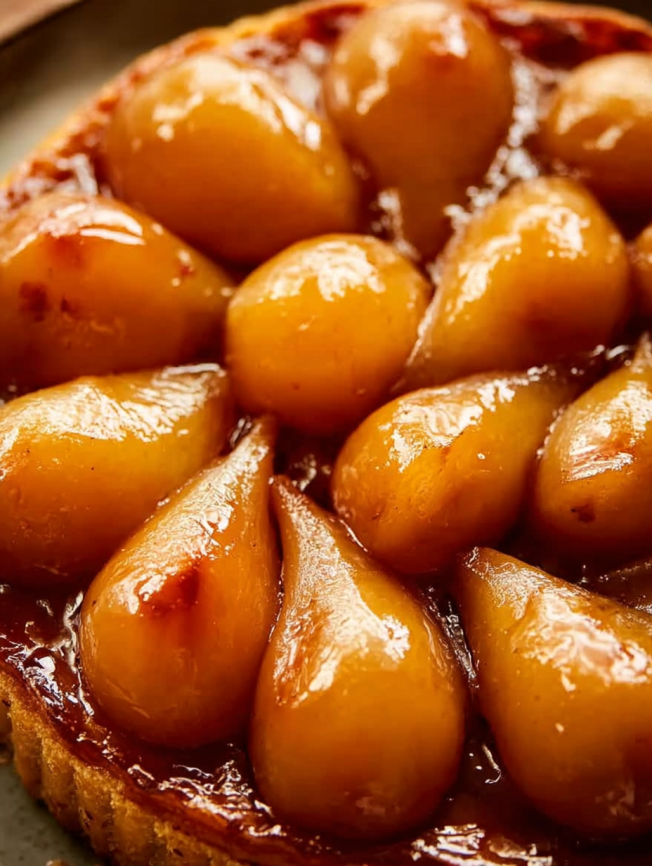
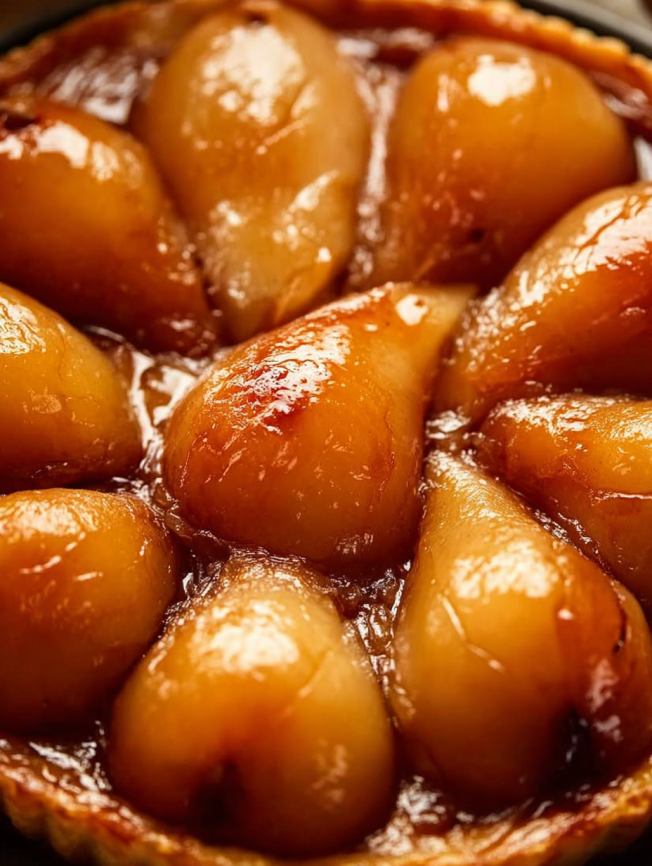
Few desserts create the same “wow factor” as a perfectly inverted tarte tatin. Moreover, the caramelized pears create a beautiful mosaic pattern that looks like it came from a professional patisserie.
Perfect Balance of Flavors
The combination of buttery caramel, warm spices, and tender pears creates a harmonious blend that’s both comforting and elegant. Additionally, the contrast between the crisp pastry and soft fruit provides wonderful textural interest.
Make-Ahead Friendly Components
While best served fresh, many components can be prepared in advance, making this an excellent choice for dinner parties and special occasions.
Essential Ingredients & Their Important Roles
For the Perfect Pastry Crust
- 1½ cups all-purpose flour – Provides structure and flakiness
- 2 tablespoons granulated sugar – Adds subtle sweetness and helps with browning
- ¼ teaspoon salt – Enhances all flavors and balances sweetness
- ½ cup cold unsalted butter, cubed – Creates the flaky texture through proper layering
- ¼ cup ice-cold water – Binds ingredients without developing tough gluten
For the Caramelized Pear Topping
- 5-6 small, semi-firm pears – Anjou, Bartlett, or Bosc varieties work beautifully
- 1 tablespoon fresh lemon or orange juice – Prevents browning and adds brightness
- ¼ teaspoon ground cinnamon – Warm spice that complements pears perfectly
- ⅛ teaspoon ground nutmeg – Adds depth and complexity
- ⅛ teaspoon ground ginger – Provides subtle heat and aromatic notes
For the Rich Caramel Base
- ¼ cup unsalted butter – Creates richness and helps caramelize the sugar
- ½ cup packed brown sugar – Forms the luscious caramel sauce
Step-by-Step Instructions for Perfect Results
Creating the Foundation Crust
Begin by whisking together flour, sugar, and salt in a medium bowl. Using a pastry cutter or two forks, cut in the cold, cubed butter until the mixture resembles coarse pea-sized crumbs. This step is crucial for achieving the perfect flaky texture.
Gradually add the ice-cold water, stirring just until the flour is moistened. If the dough seems too dry, add one or two additional tablespoons of water. Turn the mixture onto a lightly floured surface and gently work it into a ball with your hands, being careful not to overwork the dough.
Flatten the dough into a thick disc, wrap tightly in plastic wrap, and refrigerate for at least one hour. This chilling period allows the gluten to relax and ensures easier rolling later.
Preparing the Star Ingredient
While the dough chills, prepare your pears by peeling them carefully and halving them lengthwise. Remove the core and stem completely, creating clean, uniform pieces. Place the prepared pears in a medium bowl and gently toss with lemon juice, cinnamon, nutmeg, and ginger until evenly coated.
Refrigerate the seasoned pears until ready to use. This preparation can be done several hours ahead, and don’t worry if the pears brown slightly – they’ll cook beautifully regardless.
Mastering the Caramel Technique
In a 10-inch oven-safe skillet, melt the butter over medium heat. Once melted, whisk in the brown sugar. Initially, the mixture will look separated and unwilling to combine, but this is completely normal. Continue whisking patiently for about three minutes until it forms a cohesive caramel.
Remove from heat and allow the caramel to cool slightly while you prepare the crust. This brief cooling period prevents the pastry from melting when placed on top.
Assembly and Baking Process
Preheat your oven to 400°F (204°C). Roll the chilled dough into a circle approximately 11-12 inches in diameter – perfection isn’t necessary for this rustic dessert.
Arrange the pear halves cut-side up in the skillet over the caramel, creating an attractive pattern. Drape the pastry round over the pears and gently tuck the edges around the fruit using a spoon. Pierce the crust with a fork in several places to allow steam to escape.
Bake for 20 minutes, then reduce the temperature to 375°F (191°C) and continue baking for 25 more minutes, or until the crust achieves a beautiful golden-brown color.
The Dramatic Finale
Allow the tarte to cool for exactly 10 minutes on a cooling rack – this prevents the caramel from being too fluid while still allowing for clean removal. Carefully run a knife around the edges to loosen any stuck bits.
Place a large serving plate over the skillet and, in one confident motion, invert the entire tart. Work over the sink to catch any potential spills, and use extreme caution as the caramel will be extremely hot.
Serving Suggestions That Complete the Experience
Classic Accompaniments
Serve warm slices with vanilla ice cream or freshly whipped cream. The cool, creamy contrast against the warm, caramelized fruit creates the perfect balance of temperatures and textures.
Elegant Presentation Ideas
For dinner parties, consider serving individual portions with a drizzle of crème anglaise or a dollop of mascarpone. Furthermore, a light dusting of powdered sugar adds visual appeal without overwhelming the flavors.
Wine Pairing Perfection
This dessert pairs beautifully with dessert wines like Sauternes or late-harvest Riesling. Alternatively, a glass of Champagne provides a delightful contrast to the rich, caramelized flavors.
Recipe Variations to Explore
Apple Tarte Tatin
Substitute firm apples like Granny Smith or Honeycrisp for the pears. Add a pinch of cardamom to the spice mixture for an interesting twist that complements the apple flavor beautifully.
Mixed Stone Fruit Version
During summer months, try using a combination of peaches, plums, and apricots. Reduce the cooking time slightly as these fruits tend to be more tender than pears.
Savory Adaptation
Create a savory version using caramelized onions instead of fruit, adding fresh thyme and goat cheese. This makes an excellent appetizer or light lunch option.
Gluten-Free Alternative
Replace the all-purpose flour with a high-quality gluten-free flour blend. The texture will be slightly different but equally delicious for those with dietary restrictions.
Make-Ahead Tips for Stress-Free Entertaining
Advance Preparation Strategies
The pastry dough can be prepared up to three days ahead and stored in the refrigerator. For longer storage, wrap tightly and freeze for up to three months, thawing overnight before use.
Day-of Timeline
Prepare the caramel and arrange the pears several hours before serving. Cover and keep at room temperature – browning won’t affect the final result since the pears will cook anyway.
Storage and Reheating
Leftover tarte tatin keeps in the refrigerator for up to four days. Reheat individual slices in the oven at 350°F for 5-7 minutes to restore the pastry’s crispness.
Important Notes for Guaranteed Success
Choosing the Right Pears
Select pears that are semi-firm rather than fully ripe. Anjou pears are ideal, but Bartlett, Bosc, and Comice varieties also work well. Overly ripe pears will break down during cooking and create a mushy texture.
Temperature Control Matters
Keep the butter extremely cold for the pastry – I recommend chilling cubed butter in the freezer for 15 minutes before incorporating it into the flour mixture. This ensures maximum flakiness in the finished crust.
Caramel Consistency Tips
Don’t panic if the caramel looks separated initially. Patient whisking will bring it together beautifully. If it seems too thick, add a tablespoon of cream or butter to smooth it out.
Safe Inversion Technique
The 10-minute cooling period is crucial for safe inversion. Too hot, and the caramel will be dangerously fluid; too cool, and it may stick to the pan. Practice confidence in your inversion motion – hesitation often leads to spills.
Frequently Asked Questions
Can I use a different type of pan if I don’t have a cast-iron skillet? While cast-iron is ideal for even heat distribution, you can use a heavy-bottomed oven-safe saucepan or make the caramel separately and pour it into a 9-10 inch pie dish before adding the pears and pastry.
Why did my caramel turn out grainy? Grainy caramel usually results from crystallization, often caused by stirring too vigorously or having moisture in the pan. Using brown sugar instead of granulated sugar helps prevent this issue, and patient whisking will smooth out minor graininess.
What should I do if some pears stick to the pan after inverting? Simply remove any stuck pieces with a spatula and arrange them back on the tart. The rustic nature of tarte tatin means small imperfections actually add to its charm and authenticity.
Can I make this dessert completely ahead of time? While best served fresh, you can make the entire tart up to one day ahead. Store covered at room temperature and reheat gently in a 300°F oven for 10-15 minutes before serving.
How do I know when the pears are the right ripeness? Ideal pears should yield slightly to gentle pressure but still hold their shape. They should have good color but not be overly soft or mushy when pressed.
Can I use frozen pears for this recipe? Fresh pears are strongly recommended as frozen pears release too much moisture and become mushy during cooking. If you must use frozen, thaw completely and pat very dry before using.
What’s the best way to reheat leftover slices? Individual slices reheat beautifully in a 350°F oven for 5-7 minutes, which restores the pastry’s crispness. Avoid microwaving as it will make the crust soggy.
Can I add other spices to the pear mixture? Absolutely! Try adding a pinch of cardamom, allspice, or even a small amount of vanilla extract. Star anise also pairs beautifully with pears for a more exotic flavor profile.
Prep Time: 1 hour, 40 minutes (includes crust chilling) | Cook Time: 55 minutes | Total Time: 2 hours, 45 minutes
Calories: 285 kcal per serving | Servings: 8 servings


