Every December, my kitchen transforms into a festive wonderland filled with the sweet aroma of peppermint and butter. Among all the holiday treats I bake, these peppermint meltaway cookies hold a special place in my heart. The first time I made them, I was amazed by their unique texture – they literally dissolve on your tongue like the most delicate snowflake, leaving behind a trail of cool peppermint and rich butter.
What started as an experiment to recreate a childhood memory has become my most requested holiday cookie. Friends and family now expect these delicate treats at every gathering, and I’ve watched countless faces light up with that first bite. There’s something truly magical about a cookie that melts away so completely, leaving only pure flavor and joy.
Prep Time: 1 hour
Cook Time: 13 minutes
Total Time: 1 hour, 30 minutes
Yield: 30-32 cookies
Why These Cookies Will Become Your Holiday Tradition
Unique Melt-in-Your-Mouth Texture
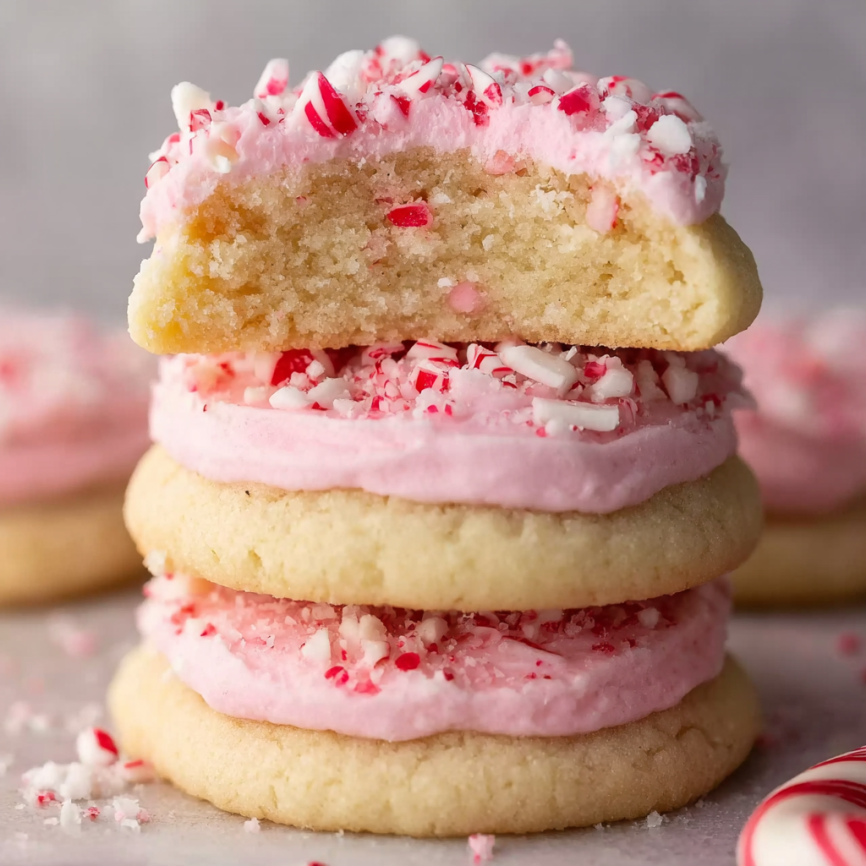
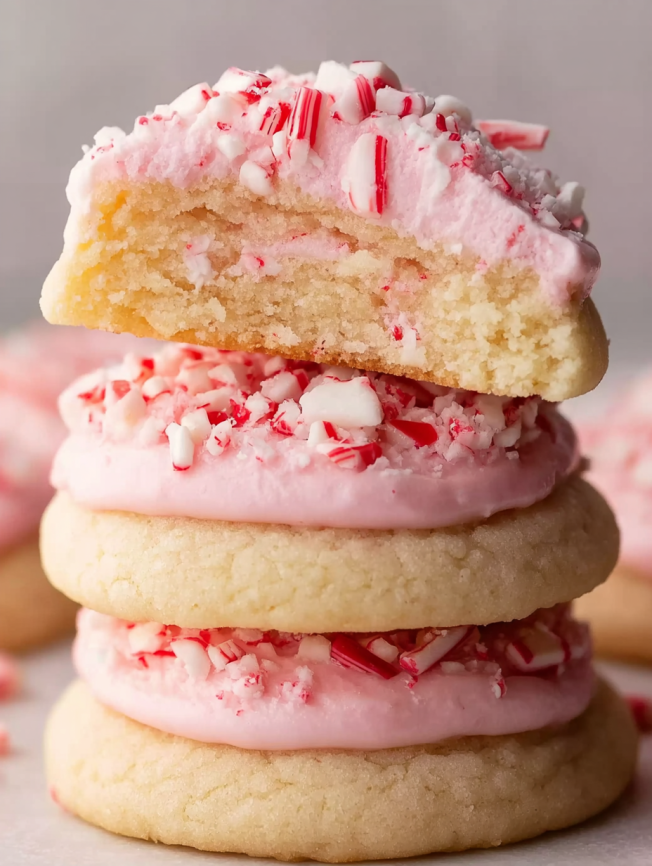
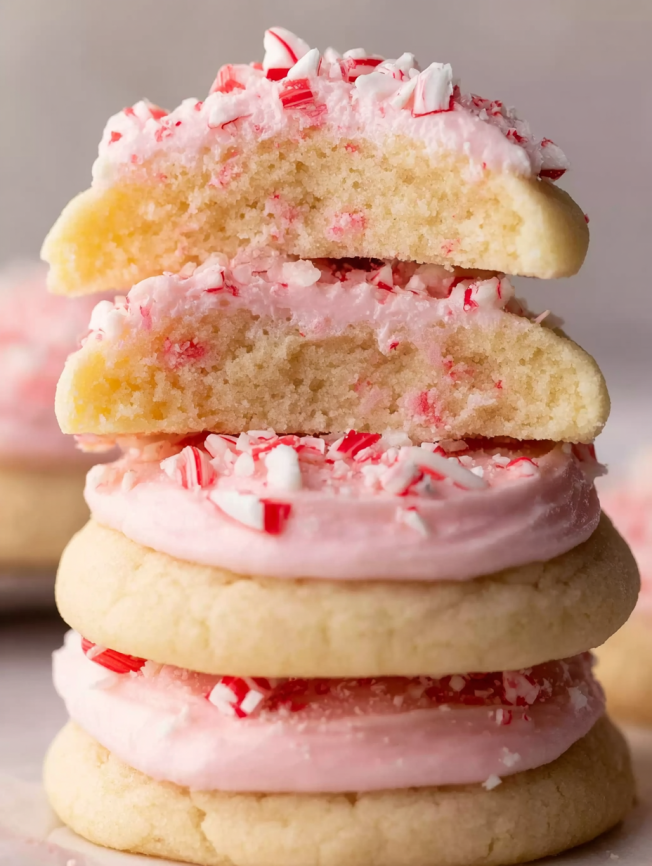
Unlike any other cookie you’ve ever experienced, these treats occupy a special space between shortbread and cake. The secret lies in the perfect combination of cornstarch and confectioners’ sugar, which creates an incredibly tender crumb that literally dissolves as you eat it. Furthermore, this distinctive texture makes them feel more like a confection than a traditional cookie.
Perfect Holiday Flavor Profile
The combination of vanilla and peppermint creates a sophisticated flavor that’s festive without being overwhelming. Additionally, the optional pink tinting and crushed candy cane topping make these cookies as beautiful as they are delicious. They embody everything wonderful about the holiday season in one perfect bite.
Impressive Yet Achievable
Despite their bakery-quality appearance and unique texture, these cookies are surprisingly straightforward to make. The key techniques – proper chilling and gentle flattening – ensure success every time. Moreover, the buttercream frosting adds an elegant finishing touch that makes them worthy of the fanciest cookie exchange.
Essential Ingredients
For the Cookies
- 1 cup (16 tbsp; 226g) unsalted butter, softened – Creates the rich, melt-away base
- 2/3 cup (80g) confectioners’ sugar – Provides sweetness and tender texture
- 1 egg yolk, at room temperature – Adds richness and binding
- 1 teaspoon pure vanilla extract – Enhances overall flavor depth
- 1/2 teaspoon peppermint extract – Delivers that signature holiday taste
- 2 cups (250g) all-purpose flour (spooned & leveled) – Forms the cookie structure
- 1/4 cup (30g) cornstarch – Creates the signature meltaway texture
- 1 teaspoon baking powder – Provides gentle lift
- 1/4 teaspoon salt – Balances sweetness and enhances flavors
For the Peppermint Buttercream
- 6 tablespoons (85g) unsalted butter, softened – Forms the creamy frosting base
- 1 and 1/2 cups (180g) confectioners’ sugar – Creates smooth, sweet coating
- 1-2 tablespoons milk, at room temperature – Achieves perfect consistency
- 1/2 teaspoon pure vanilla extract – Adds complexity to the frosting
- 1/4 teaspoon peppermint extract – Reinforces the holiday theme
- 1 drop red or pink food coloring (optional) – Creates festive appearance
- 1/4 cup (40g) crushed candy canes – Adds beautiful garnish and extra crunch
Step-by-Step Instructions
Creating the Perfect Cookie Dough
Begin by placing the softened butter in a large bowl. Using either a handheld or stand mixer fitted with a paddle attachment, beat the butter on medium speed for about 1 minute until it becomes creamy and light in color.
Next, add the confectioners’ sugar to the creamed butter. Start mixing on low speed for 30 seconds to prevent a sugar cloud, then increase to medium-high speed. Beat for a full 2 minutes until the mixture becomes noticeably light and fluffy. Don’t rush this step – proper creaming is essential for the cookies’ tender texture.
Incorporating the Flavor Elements
Scrape down the sides and bottom of the bowl to ensure even mixing. Add the egg yolk, vanilla extract, and peppermint extract to the butter mixture. Beat on high speed until all ingredients are completely combined, stopping to scrape the bowl as needed.
The egg yolk adds richness while the extracts provide that signature holiday flavor profile. Make sure these ingredients are at room temperature for easier incorporation.
Combining the Dry Ingredients
Add the flour, cornstarch, baking powder, and salt to the wet ingredients. Beat on low speed just until the mixture comes together. The resulting cookie dough will be thick and creamy – this is exactly what you want for meltaway cookies.
Avoid overmixing at this stage, as it can lead to tough cookies. The dough should be cohesive but still soft and pliable.
Essential Chilling Step
Cover the dough tightly with plastic wrap or transfer it to an airtight container. Chill in the refrigerator for at least 30 minutes, though it can stay chilled for up to 3 days. This chilling step is absolutely mandatory – it firms up the butter and makes the dough easier to handle while ensuring the cookies maintain their shape during baking.
Shaping and Preparing for Baking
Preheat your oven to 350°F (177°C) and line large baking sheets with parchment paper or silicone baking mats.
Using a cookie scoop or spoon, portion the chilled dough into balls of about 1 tablespoon or 20-22g each. Place these dough balls 3 inches apart on the prepared baking sheets – they need plenty of room as they’ll spread during baking.
Here’s the crucial step: gently flatten each dough ball with the palm of your hand until they’re just under 2 inches in diameter. This flattening ensures even baking and helps create that perfect meltaway texture.
Baking to Perfection
Bake the cookies for 13-14 minutes, watching carefully for the edges to appear set. These cookies won’t brown or darken significantly, so don’t use color as your doneness indicator. Instead, look for edges that appear firm and centers that no longer look wet or shiny.
Avoid overbaking, as this will compromise the delicate, melt-in-your-mouth texture that makes these cookies special.
Cooling Process
Remove the cookies from the oven and allow them to cool on the baking sheet for 10 minutes. This initial cooling period is important – the cookies are very delicate when hot and need time to firm up slightly before moving.
After 10 minutes, carefully transfer the cookies to a cooling rack and let them cool completely before frosting. Attempting to frost warm cookies will result in melted buttercream.
Creating the Perfect Peppermint Buttercream
Building the Base
In a clean bowl, beat the softened butter with a handheld or stand mixer fitted with a paddle attachment. Beat on medium speed for about 1 minute until the butter becomes light and creamy.
Achieving the Ideal Consistency
Add the confectioners’ sugar, milk, vanilla extract, and peppermint extract to the creamed butter. Begin mixing on low speed for 30 seconds to prevent sugar from flying everywhere, then increase to medium-high speed and beat for 2 full minutes.
The buttercream should be smooth, creamy, and easily spreadable. If it’s too thick, gradually add more milk, one teaspoon at a time. If it’s too thin, beat in additional confectioners’ sugar until you reach the desired consistency.
Optional Color and Final Assembly
For a festive pink tint, add just one tiny drop of food coloring and beat until evenly distributed. Gel food coloring works best as it won’t thin the frosting, but liquid coloring is fine for such a small amount.
Using a knife or icing spatula, spread the buttercream evenly onto each cooled cookie. Work gently to avoid breaking the delicate cookies. Finally, sprinkle each frosted cookie lightly with crushed candy canes for that perfect holiday finish.
Serving Suggestions
Holiday Cookie Platters
These elegant cookies deserve a place of honor on your holiday dessert table. Arrange them on a tiered serving stand alongside other festive treats, or present them on their own beautiful platter. The pink frosting and candy cane garnish make them naturally eye-catching.
Gift Giving Excellence
Package these cookies in decorative tins or clear boxes tied with festive ribbons. Their professional appearance and unique texture make them impressive gifts for teachers, neighbors, or anyone who appreciates homemade treats. Consider including the recipe card – recipients often request it!
Special Occasion Centerpiece
Whether it’s a cookie exchange, holiday party, or family gathering, these meltaway cookies always steal the show. Their delicate nature makes them feel special and luxurious, perfect for celebrating important moments.
Creative Recipe Variations
Flavor Variations
While peppermint is classic for the holidays, you can easily adapt this recipe for other occasions. Try almond extract and sliced almonds for a sophisticated twist, or lemon extract with lemon zest for a spring version. Orange extract with chocolate chips creates a delightful citrus-chocolate combination.
Frosting Alternatives
Instead of peppermint buttercream, consider these variations: vanilla buttercream with different colored sugars, cream cheese frosting for tang, or even a simple dusting of confectioners’ sugar for an elegant, minimalist approach.
Seasonal Adaptations
For Valentine’s Day, use pink or red food coloring and heart-shaped sprinkles. Summer versions could feature pastel colors and fresh fruit flavors. The versatile base recipe adapts beautifully to any season or celebration.
Make-Ahead Tips
Dough Preparation
The cookie dough is incredibly make-ahead friendly. After mixing, you can store it in the refrigerator for up to 3 days before baking. For longer storage, portion and flatten the dough balls, then freeze them on baking sheets. Once solid, transfer to freezer bags for up to 3 months.
Baking from Frozen
Frozen dough balls can be baked directly from the freezer – simply add an extra minute or two to the baking time. This makes it easy to have fresh cookies whenever you need them during the busy holiday season.
Frosting Considerations
The buttercream can be made up to 3 days ahead and stored in the refrigerator. Bring it to room temperature and re-whip before spreading on cookies. However, once frosted, the cookies should be consumed within 1-5 days depending on storage method.
Important Notes
The Cornstarch Secret
Cornstarch is absolutely essential to achieving the signature meltaway texture. It creates a more tender crumb than flour alone and contributes to that unique dissolving quality. Never substitute or omit this ingredient – it’s what makes these cookies truly special.
Temperature Matters
Room temperature ingredients blend more easily and create a smoother dough. Cold egg yolks and butter won’t cream properly, while too-warm ingredients can make the dough difficult to handle. Plan ahead to bring ingredients to the right temperature.
Storage Guidelines
Frosted cookies can be stored at room temperature for up to 1 day, or refrigerated for up to 5 days. The frosting will develop a slight skin after a few hours, which actually helps protect the delicate cookies underneath. However, these cookies don’t freeze well once baked – the texture changes significantly after thawing.
Frequently Asked Questions
Why is chilling the dough so important?
Chilling serves multiple purposes for these delicate cookies. First, it firms up the butter, which prevents excessive spreading during baking. Second, it makes the dough much easier to handle and shape. Finally, chilled dough bakes more evenly, ensuring that perfect meltaway texture throughout each cookie.
My cookies are spreading too much during baking. What went wrong?
Excessive spreading usually indicates that the dough wasn’t chilled long enough or your butter was too warm when mixing. Make sure to chill the dough for the full 30 minutes minimum, and ensure your butter is softened but not melted when creaming.
Can I make these cookies without the frosting?
Absolutely! While the peppermint buttercream adds visual appeal and extra flavor, these cookies are delicious on their own. You might consider rolling them in confectioners’ sugar before baking for a simple, elegant finish.
How can I tell when the cookies are done baking?
Since these cookies don’t brown significantly, look for edges that appear set and firm. The centers should no longer look wet or shiny. Remember that they continue cooking slightly on the hot pan after removal from the oven.
What’s the best way to crush candy canes?
Place unwrapped candy canes in a sealed plastic bag and gently crush them with a rolling pin or meat mallet. For more uniform pieces, pulse them briefly in a food processor. Aim for small, irregular pieces rather than powder.
Can I use different extracts?
Yes! While peppermint is traditional, you can substitute equal amounts of other extracts like almond, lemon, or orange. Just remember that some extracts are stronger than others, so taste and adjust as needed.
These peppermint meltaway cookies represent the perfect marriage of technique and tradition. Their unique texture and festive flavor make them an instant classic that will have everyone asking for the recipe. Whether you’re continuing a family tradition or starting a new one, these magical cookies are sure to create lasting memories and smiles around your holiday table.


