Prep Time: 20 minutes | Cook Time: 30 minutes | Total Time: 50 minutes | Yield: 4 servings
Category: Main Course, Dinner | Method: Grilling, Baking, Sautéing, Blending | Cuisine: Peruvian, Latin American
My introduction to Peruvian cuisine happened at a tiny restaurant in Lima where the owner insisted I try her pollo a la brasa with aji verde. One bite of that perfectly seasoned chicken paired with the vibrant green sauce changed everything I thought I knew about simple chicken and rice dishes. The combination of smoky cumin, bright citrus, and that creamy, herbaceous sauce created flavors so complex yet approachable that I knew I had to recreate it at home.
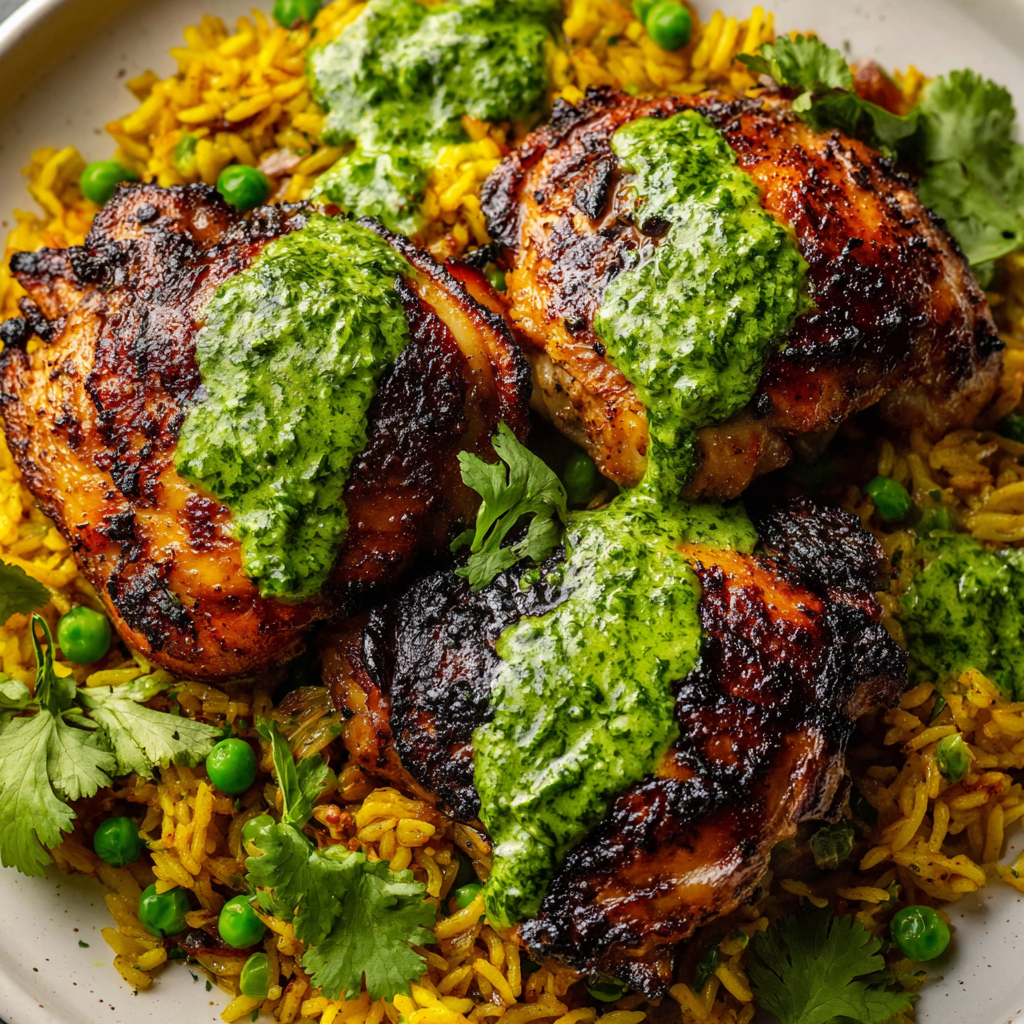
What makes this dish truly special is how it transforms everyday ingredients into something extraordinary. The golden-hued rice studded with sweet peas, the tender spice-rubbed chicken with its caramelized edges, and that addictive green sauce that somehow makes everything taste better—it’s comfort food elevated to restaurant quality. My family now requests this meal at least twice a month, and I’ve made it for countless dinner parties where guests inevitably ask for the recipe.
Why You’ll Love This Peruvian Chicken and Rice
The flavors are unforgettable – This isn’t your standard chicken and rice dinner. The marinade penetrates deep into the meat, infusing it with warmth from cumin and smokiness from paprika, while the lime juice adds brightness that cuts through the richness. Meanwhile, turmeric gives the rice its signature golden color and earthy undertones that complement the chicken perfectly.
That green sauce is absolutely addictive – Known as aji verde in Peru, this creamy, herby condiment is what takes the dish from good to extraordinary. Fresh cilantro, spicy jalapeños, and tangy lime create a sauce so good you’ll want to put it on everything. Seriously, I’ve caught myself eating it with a spoon straight from the bowl.
It’s surprisingly simple to make – Despite tasting like you’ve spent hours in the kitchen, this meal comes together in under an hour. The active prep time is minimal—most of the work involves letting the chicken marinate while you prep the other components. Even novice cooks can achieve impressive results with this straightforward recipe.
Meal prep friendly with incredible leftovers – Unlike many dishes that lose their appeal after a day or two, this one actually improves as the flavors meld together. The marinated chicken stays moist and flavorful, the rice reheats beautifully, and the green sauce keeps for nearly a week in the refrigerator. Pack it for lunches, and your coworkers will definitely be jealous.
Adaptable to any cooking method – Whether you’re firing up the grill for that authentic charred flavor or using your oven for convenience, both methods yield delicious results. You can even use an air fryer if that’s your preferred cooking tool. The recipe accommodates whatever equipment you have available without compromising on taste.
Ingredients You’ll Need
For the Chicken Marinade
- 1.5-2 lbs chicken – Bone-in, skin-on thighs deliver the most flavor and stay incredibly juicy during cooking. However, boneless thighs or chicken breasts work well if you prefer white meat. Different cuts will require slight timing adjustments, so keep an instant-read thermometer handy.
- 2-3 cloves garlic, minced – Fresh garlic is essential here, providing pungent depth that mellows beautifully during cooking. Mince it finely so it distributes evenly throughout the marinade and doesn’t create overpowering pockets of garlic flavor.
- 2 tbsp lime juice or white vinegar – The acidity tenderizes the chicken while adding brightness to balance the warm spices. Fresh lime juice offers the best flavor with its floral citrus notes, though white vinegar works as a more economical alternative.
- 2 tbsp oil – Use a neutral oil like vegetable or canola oil for the marinade. The oil helps the spices adhere to the chicken and keeps it from sticking to your grill or baking sheet during cooking.
- 1 tbsp cumin – This earthy, warm spice is the backbone of the marinade’s flavor profile. Ground cumin provides convenience, though toasting whole cumin seeds and grinding them yourself takes the flavor to another level.
- 1 tsp smoked paprika – This adds subtle smokiness without heat, giving the chicken that characteristic roasted flavor. Regular paprika can substitute, but you’ll lose some of that depth.
- 1 tsp salt and ½ tsp pepper – Kosher salt provides the best control over seasoning. Freshly cracked black pepper adds aromatic spice that enhances rather than overwhelms the other flavors.
For the Green Sauce (Aji Verde)
- 1 cup cilantro leaves – Fresh cilantro is non-negotiable for authentic flavor. Use the leaves and tender stems, discarding only the thick, woody portions. If you’re one of those people who thinks cilantro tastes like soap due to genetics, try substituting half with fresh parsley.
- ½ cup mayonnaise – This creates the creamy base that makes the sauce so irresistible. Full-fat mayo delivers the best texture and flavor, though light versions work if you’re watching calories.
- ¼ cup sour cream – Adds tanginess and helps thin the sauce to the perfect drizzling consistency. Greek yogurt makes an excellent substitute that adds extra protein and reduces the overall fat content.
- 2 jalapeños, chopped – Remove the seeds and membranes for a milder sauce, or leave them in if you enjoy serious heat. The amount of spice varies significantly between individual peppers, so start with one and taste before adding the second.
- 2 cloves garlic – Raw garlic in the sauce provides a sharp, pungent kick that mellows slightly after blending with the other ingredients. It adds depth without competing with the cilantro’s bright flavor.
- 1 tbsp olive oil and 1 tbsp lemon/lime juice – These ingredients help emulsify the sauce and add richness and acidity respectively. Extra virgin olive oil contributes fruity notes, while the citrus brightens everything.
For the Peruvian Yellow Rice
- 1 cup jasmine rice – Jasmine rice provides a subtle floral aroma and slightly sticky texture that works perfectly for this dish. Long-grain white rice or basmati can substitute, though cooking times may vary slightly.
- 1 tbsp butter or oil – Butter adds richness and helps create a flavorful base for sautéing the aromatics. Oil works for a dairy-free version, though you’ll sacrifice some of that buttery depth.
- ¼ cup onion, diced – Yellow or white onion provides savory sweetness when sautéed. Dice it finely so it practically melts into the rice, adding flavor without obvious texture.
- 2-3 garlic cloves, minced – More fresh garlic infuses the rice with aromatic flavor as it toasts with the grains. This creates layers of garlic throughout the dish without being overwhelming.
- 1 tsp turmeric – This golden spice gives the rice its characteristic yellow color and subtle earthy flavor. Turmeric stains easily, so be careful with your cooking utensils and clothing.
- ¼ tsp cumin, onion powder, salt, and pepper – These supporting spices round out the rice’s flavor profile, creating complexity without competing with the main dish.
- 2 cups chicken stock – Using stock instead of water adds significant depth and richness. Homemade stock is wonderful, but quality store-bought versions work perfectly fine.
- 1 cup frozen peas – These add pops of sweetness and color to the golden rice. Frozen peas are actually preferable to fresh since they’re flash-frozen at peak freshness and won’t overcook.
Step-by-Step Instructions
Preparing the Chicken Marinade
Begin by gathering all your marinade ingredients in a medium mixing bowl. Add the minced garlic, lime juice or white vinegar, oil, ground cumin, smoked paprika, salt, and black pepper. Whisk everything together vigorously until the spices are evenly distributed throughout the liquid. The mixture should look slightly pasty and emit a wonderful aromatic fragrance from the combined spices.
Before adding the chicken, transfer about ¼ of this marinade to a small separate bowl and set it aside. This reserved portion will be used later for basting the chicken during cooking, which is an important food safety practice since it won’t come into contact with raw chicken. This extra brushing step adds another flavor layer and keeps the meat moist during the cooking process.
Place your chicken pieces in the bowl with the remaining marinade, using your hands to massage the mixture thoroughly into every surface. Make sure to work the marinade under any skin if using skin-on pieces, as this is where maximum flavor absorption happens. Cover the bowl with plastic wrap or transfer everything to a resealable plastic bag, then refrigerate for at least one hour, though overnight marinating produces even better results.
Cooking the Chicken to Perfection
If grilling: Start by preheating your grill to medium-high heat, around 400-425°F if using a gas grill. Clean the grates thoroughly with a wire brush and oil them lightly to prevent sticking. Remove the chicken from the marinade, letting excess drip off, then place the pieces on the hot grill.
Cook without moving the chicken for 5-7 minutes to develop beautiful grill marks and allow proper searing. Flip the pieces using tongs and continue cooking for another 5-7 minutes, though timing varies based on thickness. Brush the chicken with the reserved marinade during the last few minutes of cooking to add shine and extra flavor.
If baking: Preheat your oven to 450°F and line a rimmed baking sheet with aluminum foil for easy cleanup. Arrange the marinated chicken pieces on the prepared pan, ensuring they don’t touch each other to allow proper air circulation and browning. Bake for 30 minutes, brushing with the reserved marinade halfway through cooking.
Regardless of cooking method, always verify doneness with an instant-read thermometer inserted into the thickest part of the meat without touching bone. The internal temperature should reach 165°F for safe consumption. Let the chicken rest for 5 minutes before serving, which allows the juices to redistribute throughout the meat rather than running out when cut.
Making the Peruvian Yellow Rice
Start by washing your jasmine rice thoroughly under cold running water, swishing it with your hands until the water runs clear rather than milky. This essential step removes excess surface starch that would otherwise make your rice gummy and clumped together. After washing, let the rice soak in fresh cold water for 10-15 minutes, then drain it completely through a fine-mesh strainer.
Heat your butter or oil in a medium pot over medium heat until it shimmers. Add the diced onion and sauté for 3-5 minutes, stirring occasionally, until it becomes translucent and slightly golden. The onion should soften completely and smell sweet rather than sharp and raw.
Add the minced garlic to the pot and sauté for just one minute, stirring constantly to prevent burning. Garlic burns quickly and becomes bitter, so watch it carefully during this step. Once fragrant, add the drained rice along with the turmeric, cumin, onion powder, salt, and pepper.
Stir the rice constantly for about one minute, coating every grain with the butter and spices. The rice should start to turn golden from the turmeric and smell wonderfully toasted. This toasting step, though brief, adds significant depth to the final dish.
Pour in the chicken stock and increase the heat to bring everything to a rolling boil. Once boiling vigorously, immediately reduce the heat to the lowest setting, cover the pot with a tight-fitting lid, and set a timer for 15 minutes. Resist the temptation to peek or stir during this time, as lifting the lid releases crucial steam needed for proper cooking.
After 15 minutes, quickly remove the lid and scatter the frozen peas over the surface of the rice. Replace the lid immediately and turn off the heat, letting the pot sit undisturbed for another 5-10 minutes. The residual heat gently cooks the peas without turning them mushy. Finally, fluff the rice with a fork before serving, separating the grains for a light, fluffy texture.
Creating the Vibrant Green Sauce
Preparing this sauce couldn’t be simpler—just gather all the ingredients and add them to your blender. Start with the cilantro leaves, mayonnaise, sour cream or Greek yogurt, chopped jalapeños (seeds removed for less heat), garlic cloves, olive oil, and fresh lemon or lime juice. If using a less powerful blender, you might want to add the ingredients in the order listed to help the blades catch everything efficiently.
Begin by pulsing the mixture 4-5 times to roughly chop the larger ingredients like cilantro and jalapeños. This initial pulsing prevents the blender from getting jammed with whole cilantro leaves. After pulsing, blend continuously on medium-high speed for 30-60 seconds until the sauce becomes completely smooth and uniformly green with no visible herb pieces remaining.
Scrape down the sides of the blender jar with a spatula if needed, then blend for another 10-15 seconds to ensure everything is incorporated. The final consistency should be thick yet pourable—similar to ranch dressing. If the sauce seems too thick, add a tablespoon of water or extra lime juice and blend again.
Taste the sauce and adjust the seasoning as needed. You might want more salt for savoriness, extra lime juice for tanginess, or another jalapeño if you’re craving more heat. The beauty of this sauce is its adaptability to personal preference. Transfer to a jar or squeeze bottle for easy drizzling, and refrigerate until ready to serve.
Serving Suggestions
This Peruvian feast looks stunning when served family-style on a large platter. Create a bed of the golden rice, arrange the chicken pieces artistically on top, and drizzle the green sauce in a zigzag pattern across everything. Garnish with fresh cilantro sprigs and lime wedges for guests to squeeze over their portions.
For individual servings, use shallow bowls or dinner plates to showcase the colorful components. The golden rice provides a vibrant base, the bronzed chicken adds protein and visual appeal, while the bright green sauce creates a beautiful color contrast. This presentation makes the meal feel restaurant-quality without any fussy plating techniques.
Complement the dish with traditional Peruvian sides like crispy plantains, which add sweetness and textural contrast. A simple salad of sliced tomatoes, red onions, and avocado dressed with lime juice provides freshness that balances the richness. Warm corn tortillas or crusty bread help sop up every last drop of that addictive green sauce.
For beverages, consider serving Peruvian chicha morada (purple corn drink) for an authentic touch, though limeade or iced tea work beautifully. If serving alcohol, a crisp Sauvignon Blanc or light lager complements the bright, herbaceous flavors without overwhelming them. The refreshing acidity of these beverages cuts through the richness while enhancing the citrus notes.
Recipe Variations to Try
Protein Alternatives
Grilled shrimp version – Marinate large shrimp in the same spice mixture for just 20-30 minutes, then grill or sauté them for 2-3 minutes per side. The seafood variation cooks much faster and offers a lighter alternative perfect for warm weather dining.
Pork adaptation – Use pork chops or pork tenderloin with the same marinade, adjusting cooking time to reach an internal temperature of 145°F. Pork’s mild flavor takes beautifully to these spices, creating a slightly sweeter variation that’s equally delicious.
Vegetarian option – Marinate thick slices of cauliflower steaks or portobello mushrooms, then roast or grill until caramelized. The vegetables absorb the marinade wonderfully and provide satisfying texture. Consider adding black beans to the rice for extra protein.
Green Sauce Variations
Extra spicy version – Include serrano peppers or add a teaspoon of hot sauce to the base recipe. Some versions include a small amount of fresh ají amarillo paste if you can find it at Latin markets, which adds authentic Peruvian heat and flavor.
Milder herb sauce – Reduce jalapeños to just half of one pepper, or substitute with a poblano pepper for mild, earthy flavor without much heat. Increase the cilantro slightly to maintain the sauce’s vibrant green color.
Avocado green sauce – Add half an avocado to the blender for an even creamier, more luxurious sauce with healthy fats. The avocado creates a thicker, more substantial sauce while adding subtle buttery notes.
Rice Variations
Cilantro lime rice – Stir in extra lime zest and chopped fresh cilantro after the rice finishes cooking for a more herbaceous, citrus-forward side. This variation pairs especially well with the spicy chicken.
Vegetable-loaded rice – Add diced bell peppers, corn kernels, or diced carrots along with the peas for a more veggie-packed side dish. Sauté these harder vegetables with the onions before adding the rice.
Coconut rice variation – Replace half the chicken stock with coconut milk for a subtle tropical sweetness that complements the spices beautifully. This creates a creamier, richer rice with added complexity.
Make-Ahead Tips and Storage
The beauty of this dish lies in how well each component stores and reheats, making it ideal for meal prep. Marinate the chicken up to 24 hours in advance for even more flavor development. In fact, overnight marinating is preferable as it allows the spices to penetrate deeper into the meat, resulting in more flavorful chicken throughout rather than just on the surface.
The green sauce actually improves after a day in the refrigerator as the flavors meld together. Store it in an airtight container or jar in the fridge for up to one week. The sauce may separate slightly during storage; simply stir or shake it before using to recombine. Some people prefer making double batches since it disappears so quickly.
Cook the rice up to three days ahead and store it in an airtight container in the refrigerator. Reheat it in the microwave with a tablespoon of water or broth, covered, to restore moisture and fluffiness. You can also freeze cooked rice for up to three months in freezer-safe containers or bags.
Cooked chicken stores well for 3-4 days in the refrigerator when kept in an airtight container. For longer storage, freeze cooked chicken pieces for up to three months. Thaw overnight in the refrigerator before reheating gently in a covered pan with a splash of chicken broth to prevent drying out.
For complete meal prep, portion everything into individual containers with the rice as the base, chicken pieces on one side, and a small container of green sauce kept separate. This setup makes grab-and-go lunches or easy weeknight dinners possible with just a quick reheat.
Notes and Pro Tips
Adjust the spice level to your preference – If you’re sensitive to heat, start with just one jalapeño in the green sauce and taste before adding more. Conversely, heat lovers can add serrano peppers or include the jalapeño seeds and membranes for extra kick. The sauce should have some warmth but not be so spicy that it overwhelms the other flavors.
Always use a meat thermometer for perfectly cooked chicken – Visual cues alone aren’t reliable for determining doneness, especially with bone-in pieces or varying thicknesses. An instant-read thermometer takes the guesswork out of cooking and ensures juicy, safe chicken every time. Insert it into the thickest part without touching bone for the most accurate reading.
Don’t overcook the rice – The most common mistake when making rice is lifting the lid to check on it during cooking, which releases steam needed for proper cooking. Trust the timing and resist peeking. Properly cooked rice should be tender with distinct grains rather than mushy or sticky. If you consistently struggle with stovetop rice, consider using a rice cooker, which delivers perfect results every time.
Blend the sauce until completely smooth – The green sauce should have no chunks of cilantro or jalapeño remaining—it should be uniformly smooth and creamy. A high-powered blender like a Vitamix achieves this quickly, but even regular blenders work fine if you blend for a bit longer. Scrape down the sides as needed to ensure even blending.
The marinade doubles as a basting sauce – By reserving a portion before it touches raw chicken, you create a safe basting sauce that adds extra flavor without food safety concerns. Brush it on during the last few minutes of cooking for a glossy finish and intensified flavor.
Room temperature chicken cooks more evenly – If time allows, remove the chicken from the refrigerator 20-30 minutes before cooking. Cold chicken from the fridge can develop an overcooked exterior while the interior remains undercooked. Room temperature meat cooks more evenly from edge to center.
Frequently Asked Questions
Can I use chicken breast instead of thighs?
Absolutely! Chicken breasts work wonderfully with this recipe, though they require slight timing adjustments since they cook faster than thighs. Boneless, skinless breasts typically need only 20-25 minutes in a 450°F oven or about 4-5 minutes per side on the grill. The key is monitoring internal temperature closely and removing them at exactly 165°F to prevent drying out. Consider pounding the breasts to an even thickness for uniform cooking.
How spicy is the green sauce?
The heat level depends entirely on your jalapeños and whether you include the seeds and membranes. With two seeded jalapeños, the sauce has mild to medium heat that most people find pleasant. For a truly mild version, use just one jalapeño or substitute with half a poblano pepper. If you want it spicier, leave the seeds in or add a serrano pepper. Remember, you can always add heat but can’t take it away, so start conservatively.
What if I don’t have turmeric for the rice?
While turmeric gives the rice its signature golden color and subtle earthy flavor, you can substitute it with a pinch of saffron for a more luxurious version, or simply omit it altogether. The rice will be white instead of yellow but will still taste delicious with all the other seasonings. Some cooks use a bit of annatto powder or even a small amount of curry powder as alternatives.
Can I make this dish dairy-free?
Yes, this recipe adapts easily to dairy-free diets. Use oil instead of butter when cooking the rice. For the green sauce, substitute the mayonnaise with vegan mayo (which is widely available now) and replace the sour cream with coconut cream or dairy-free yogurt. These swaps maintain the creamy texture while keeping everything plant-based.
How do I prevent my rice from getting mushy?
Mushy rice usually results from too much water, not rinsing the rice, or stirring during cooking. Always rinse rice until the water runs clear to remove excess starch. Use the correct liquid ratio (2:1 for this recipe), and most importantly, never stir the rice while it’s cooking or lift the lid until the full cooking time has elapsed. These steps ensure fluffy, separated grains every time.
Can I prep the green sauce in advance?
The green sauce actually benefits from being made ahead—the flavors meld and develop beautifully overnight. Store it in an airtight container in the refrigerator for up to one week. The color may darken slightly over time due to oxidation, but the flavor remains excellent. Give it a good stir before serving since separation is natural. Many people make double batches specifically to use throughout the week.
What’s the best way to reheat leftovers?
For best results, reheat components separately. Microwave the rice with a tablespoon of water covered with a damp paper towel for 1-2 minutes. Heat the chicken in a covered pan on the stovetop with a splash of chicken broth, or microwave it covered at 50% power in 30-second intervals. The green sauce can be served cold or brought to room temperature. Alternatively, combine rice and chicken in a covered oven-safe dish and reheat at 325°F for 15-20 minutes.
Can I freeze this meal?
The chicken and rice freeze excellently for up to three months when stored in airtight containers or freezer bags. However, I don’t recommend freezing the green sauce, as the dairy components can separate and become grainy upon thawing. Instead, freeze the chicken and rice in meal-sized portions, then make fresh green sauce when you’re ready to eat. Thaw frozen portions overnight in the refrigerator before reheating for best results.