Five years ago, I served store-bought pumpkin pie at Thanksgiving and watched my guests politely nibble before abandoning half-eaten slices on their plates. The following year, determined to redeem myself, I spent an entire day perfecting this pumpkin custard pie from scratch. When I brought it to the table, the flaky golden crust and silky filling earned me a standing ovation—and I’ve been making it every year since. This recipe transformed me from “the one who brings store-bought dessert” to “the one whose pie everyone fights over.”
What makes this pie truly special is its departure from traditional pumpkin pie methods. Instead of simply mixing everything together and baking, this recipe treats the filling like a proper custard, resulting in a texture so silky and smooth it practically melts on your tongue. The homemade flaky crust provides the perfect buttery contrast to the creamy filling.
Why This Recipe Outshines Traditional Pumpkin Pie
This isn’t your average pumpkin pie—it’s a masterpiece that elevates a classic American dessert to something extraordinary. Most importantly, the custard-style filling sets this recipe apart from every other pumpkin pie you’ve encountered. By tempering the eggs and cooking the pumpkin puree separately, you create a filling with restaurant-quality texture and depth of flavor.
The homemade pie crust deserves equal praise. While you could certainly use store-bought dough, the flaky, buttery crust in this recipe adds layers of texture that complement the smooth filling perfectly. Each bite delivers that satisfying crunch before giving way to the velvety custard.
Perfect for Your Holiday Table
Beyond its exceptional taste, this pie looks absolutely stunning. The golden-brown crust, smooth filling, and decorative pastry leaves create a centerpiece worthy of your Thanksgiving or holiday table. Your guests will think you spent all day in the kitchen, never knowing that the actual hands-on time is surprisingly manageable.
Furthermore, this recipe uses readily available ingredients and doesn’t rely on evaporated milk, which some people find creates a metallic taste. Instead, fresh heavy cream provides richness without any off-flavors. The addition of lemon juice brightens the filling, while the warm spices create those cozy autumn flavors everyone craves.
Essential Equipment
Before you begin, gather these tools to ensure smooth preparation. You’ll need a digital scale for precise measurements (baking is science, after all), a digital oven thermometer to verify accurate temperature, and a rolling pin for the crust. A 9-inch (23cm) pie dish is essential, along with pie weights or dried beans for blind baking.
For the decorative touches, keep a leaf cookie cutter handy, though you can also cut leaves freehand with a sharp knife. A 104 piping tip creates beautiful cream rosettes, but this decoration is entirely optional. Having parchment paper and aluminum foil on hand will make the baking process much easier.
Ingredients You’ll Need
For the Flaky Pie Crust
- 190g (1½ cups) all-purpose flour – The foundation of your crust
- ½ tablespoon granulated sugar – Adds subtle sweetness
- ¼ teaspoon salt – Enhances all the flavors
- 110g (½ cup) unsalted butter (82% fat) – Must be very cold for flakiness
- 60g (¼ cup) water – Ice cold is essential
- 15g apple cider vinegar – Keeps the dough tender
For the Egg Wash
- 1 egg – Creates that beautiful golden shine
- Splash of milk – Helps with even browning
For the Pumpkin Custard Filling
- 425g (15 oz) pumpkin puree – One can of Libby’s or homemade
- 50g (¼ cup) granulated sugar – Sweetens without overpowering
- 50g (¼ cup) brown sugar – Adds depth and molasses notes
- 3 egg yolks – Creates that silky custard texture
- 1 tablespoon cornstarch – Helps the filling set perfectly
- 170g (¾ cup) heavy cream (36% fat) – Makes it incredibly rich
- 1 tablespoon lemon juice – Brightens the pumpkin flavor
- 1 teaspoon cinnamon or pumpkin spice – Essential fall warmth
For the Decoration
- 60g (¼ cup) heavy cream – Very cold for whipping
- 1 tablespoon powdered sugar – Sweetens the whipped cream
- Leftover pie dough – For making decorative leaves
- 1 cinnamon stick – The finishing touch
Making the Perfect Flaky Pie Dough
Step 1: Chill Everything
Temperature control is absolutely crucial for achieving that coveted flaky texture. In a large bowl, combine the flour, sugar, and salt, mixing until everything is evenly distributed. Place this bowl in the freezer for 5-10 minutes while you prepare the other components.
Cut your cold butter into small chunks, roughly ½-inch pieces, and place them in the freezer as well. Measure out the water and apple cider vinegar in separate containers and freeze those too. Everything must be ice cold before you begin assembling the dough.
Step 2: Create the Sand-Like Texture
Once all ingredients are properly chilled, remove them from the freezer. Add the butter chunks to the flour mixture and begin rubbing everything together between your fingers. This technique is called “cutting in” the butter, and it’s what creates those flaky layers everyone loves.
Work quickly to prevent the butter from warming up. The mixture should resemble coarse sand, but here’s the secret—leave some larger butter chunks visible in the mixture. These larger pieces create steam pockets during baking, resulting in extra flaky layers. Don’t aim for perfection; a slightly rough mixture works better than an over-processed one.
Step 3: Hydrate the Dough Carefully
Add the ice-cold water and apple cider vinegar to the flour mixture a small amount at a time. After each addition, stir gently with a spatula or wooden spoon. Watch the dough carefully—once about 75% of the liquid is incorporated, you’ll notice some parts of the dough coming together while other parts remain dry.
At this point, remove the hydrated portions from the bowl and continue adding liquid only to the dry parts. This technique ensures even hydration without overworking any part of the dough. You might need all the water, slightly less, or occasionally a tablespoon more, depending on your flour and the humidity in your kitchen.
Step 4: Bring It Together
Transfer the mixture to a lightly floured surface or silicone baking mat. Using your hands, gently press and fold the dough until it comes together. Initially, it will look quite crumbly and you might worry it won’t work—but trust the process. Within a minute or two, the dough will form a cohesive mass.
Resist the temptation to knead the dough like bread. Stop working it the moment it holds together. Remember, those visible butter chunks are your friends, and overworking develops gluten, which creates toughness instead of flakiness. Form the dough into a disk about 1 inch thick, wrap it tightly in plastic wrap, and refrigerate for a minimum of 2 hours.
Optional Lamination for Extra Flakiness
While this step is optional, it takes your pie crust from excellent to extraordinary. After the initial 2-hour rest, remove the dough from the refrigerator and let it sit on the counter for a few minutes. You want it cold but pliable enough to roll without cracking.
The Folding Technique
On a silicone mat or lightly floured surface, roll the dough into a large rectangle. Don’t worry about perfect edges—rustic works just fine. Once you have your rectangle, fold the left half over the right half, creating a long, narrow rectangle.
Next, fold the bottom half up over the top half. Then fold one more time, bringing the bottom half over the top half again. After this final fold, wrap the dough in plastic wrap and return it to the refrigerator for another 2 hours minimum.
This folding technique creates dozens of thin layers in your crust. When baked, the butter between these layers melts and creates steam, pushing the layers apart and creating that irresistible flaky texture.
Pre-Baking the Pie Crust
Step 1: Roll Out the Dough
After the second rest period, remove your dough from the refrigerator and let it warm slightly on the counter—just enough to roll without breaking. The dough should still feel cold to the touch but not rock-hard.
Place the disk on a lightly floured surface or silicone mat and begin rolling from the center outward. After each roll, turn the dough a quarter turn with your hands. This ensures even thickness and prevents sticking. For a 9-inch pie dish, roll the dough to 10 inches in diameter, creating a circle about ⅛ inch thick.
If the dough becomes too warm at any point and starts sticking, immediately pop it in the freezer for a minute. Working with cold dough is the key to success.
Step 2: Transfer to the Pie Dish
Carefully drape the rolled dough over your rolling pin and transfer it to your pie dish. Gently press the dough into the bottom and sides of the dish, making sure there are no air pockets. Don’t stretch or pull the dough—this is the most common cause of shrinking during baking.
Trim the excess dough, leaving about ½ inch overhang. Fold this excess under itself, creating a thick edge around the rim. Crimp or flute the edges using your fingers—this creates that classic decorative border and also helps the crust stay in place during baking.
Step 3: The Three-Stage Baking Process
Place your prepared crust in the freezer for 30 minutes while you preheat the oven to 200°C (370°F) with no fan. This freezing step is crucial—it helps the crust maintain its shape during baking.
After 30 minutes, line the frozen crust with parchment paper and fill it completely with pie weights or dried beans. Bake for 20 minutes with the weights in place. This initial baking sets the sides of the crust so they won’t collapse.
Remove the pie weights and parchment paper. Using a fork, prick holes all over the bottom of the crust. These holes prevent the bottom from puffing up. Return the crust to the oven for another 15 minutes.
Step 4: Seal and Finish
For the final stage, apply a thin layer of egg white to the bottom and sides of the crust using a pastry brush. This creates a waterproof seal that prevents the filling from making your crust soggy. For a beautiful glossy edge, brush the rim with a mixture of whole egg and a splash of milk.
Bake for a final 15 minutes, or until the crust is deep golden brown. Halfway through this final bake, you may need to protect the edges with a pie shield or aluminum foil strips to prevent over-browning. The entire pre-baking process takes about 50 minutes (20+15+15).
Remove the crust from the oven and let it cool to room temperature before filling.
Creating the Silky Pumpkin Custard Filling
Step 1: Temper the Egg Yolks
Pour the heavy cream into a small saucepan and heat it over medium heat until it just begins to simmer. Small bubbles will form around the edges, but don’t let it come to a full boil.
While the cream heats, whisk together the egg yolks and cornstarch in a medium bowl until smooth. This mixture will look thick and pale yellow. When the cream reaches a simmer, remove it from the heat.
Now comes the crucial tempering step. Very slowly, pour about one-third of the hot cream into the egg yolk mixture while whisking vigorously with a hand whisk. This gradual warming prevents the eggs from scrambling. Continue adding the remaining cream in a steady stream while whisking constantly. The mixture should thicken slightly and become smooth and glossy.
Step 2: Cook the Pumpkin Base
In a separate saucepan, combine the pumpkin puree with both the granulated and brown sugars. Cook this mixture over medium heat, stirring constantly, for 2-3 minutes. This step concentrates the pumpkin flavor and removes any raw taste, while the sugars dissolve completely.
Stir in the lemon juice and cinnamon or pumpkin spice, mixing until everything is evenly incorporated. The lemon juice brightens the pumpkin’s natural sweetness and prevents the filling from tasting flat or one-dimensional.
Step 3: Combine the Components
Remove the pumpkin mixture from the heat and fold in the tempered egg yolk and cream mixture. Use a gentle folding motion rather than vigorous stirring to maintain the silky texture you’ve created. The filling should be smooth, warm, and slightly thick but still pourable.
This custard-style filling is what sets this pie apart. The extra steps create a texture that’s far superior to the standard “dump and bake” method used in most pumpkin pie recipes.
Assembling and Baking Your Pie
Preheat your oven to 175°C (350°F). This lower temperature ensures the custard sets gently without cracking or curdling. Make sure your oven has reached the correct temperature before proceeding—an oven thermometer is invaluable here.
With your pre-baked crust ready and the filling still warm, carefully pour the pumpkin custard into the crust. Fill it almost to the top, leaving just ¼ inch of space. The filling will puff slightly during baking, so this space prevents overflow.
Place the pie on the middle rack of your preheated oven. Bake for approximately 45 minutes, checking on it after 30 minutes. If the crust edges are browning too quickly, loosely tent them with aluminum foil.
Knowing When It’s Done
At the end of the baking time, the edges of the filling should be set and slightly puffed, while the center remains a bit wobbly—about the size of a quarter. This slight jiggle is perfect. As the pie cools, the filling will continue to set through residual heat, creating that perfect sliceable texture.
Over-baking is the most common cause of cracks on the surface. Watch your pie carefully during the last 10 minutes of baking. Pull it from the oven as soon as the edges are set, even if the center seems looser than you’d expect.
The Critical Cooling Period
This might be the hardest part of the entire recipe—waiting. Remove the pie from the oven and place it on a wire rack at room temperature. Let it cool for at least 3 hours before serving. During this time, the custard continues setting, transforming from a soft, warm filling into a perfectly sliceable pie.
Cutting into the pie too early results in a runny filling that oozes across the plate. I know the temptation is real, but patience pays off with clean, beautiful slices that hold their shape. If you can manage it, letting the pie rest overnight in the refrigerator produces even better results.
Creating Beautiful Decorations
Pastry Leaf Decorations
Roll out your leftover pie dough to about ⅛ inch thickness. Using leaf-shaped cookie cutters or a sharp knife, cut out leaf shapes in various sizes. Use the back of the knife to score vein patterns into each leaf for realistic detail.
Place the leaves on a parchment-lined baking sheet and brush them with egg wash for that golden shine. Bake at 200°C (370°F) for about 15 minutes, or until they’re crisp and golden brown. Let them cool completely before arranging them on your pie.
Whipped Cream Rosettes
In a chilled bowl, combine the cold heavy cream and powdered sugar. Using a hand mixer or whisk, beat the cream until it reaches stiff peaks and holds its shape. This usually takes 2-3 minutes with an electric mixer.
Transfer the whipped cream to a piping bag fitted with a 104 petal tip. This tip creates beautiful rose-like swirls that add elegance to your pie. Pipe rosettes around the edge of the cooled pie, spacing them evenly.
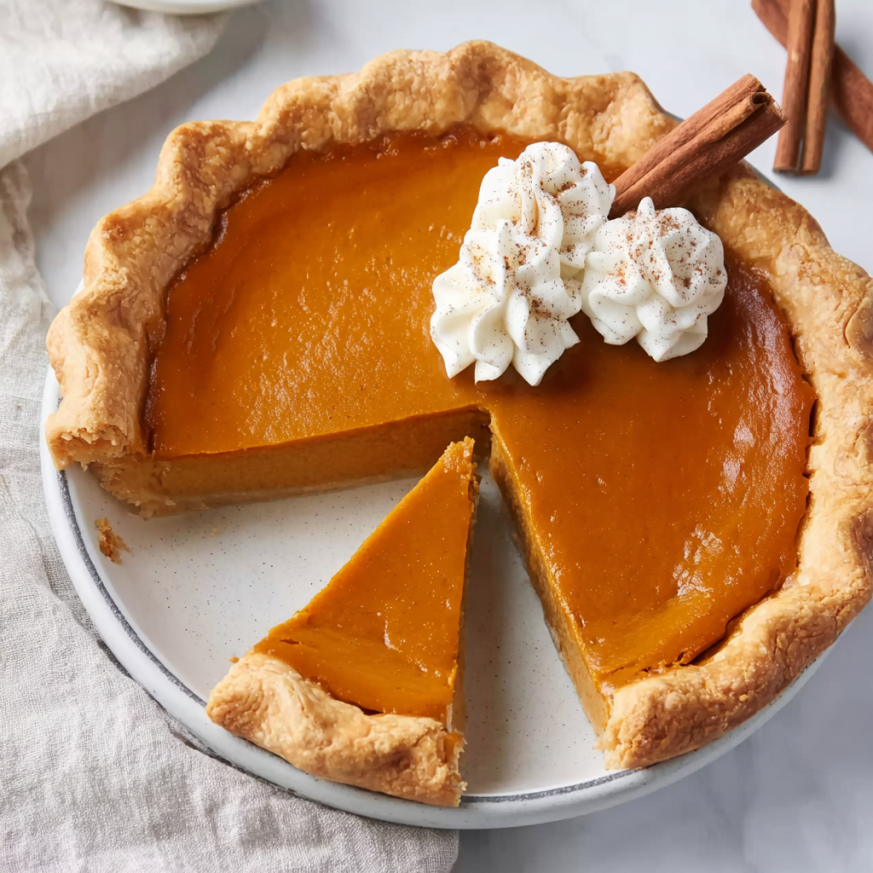
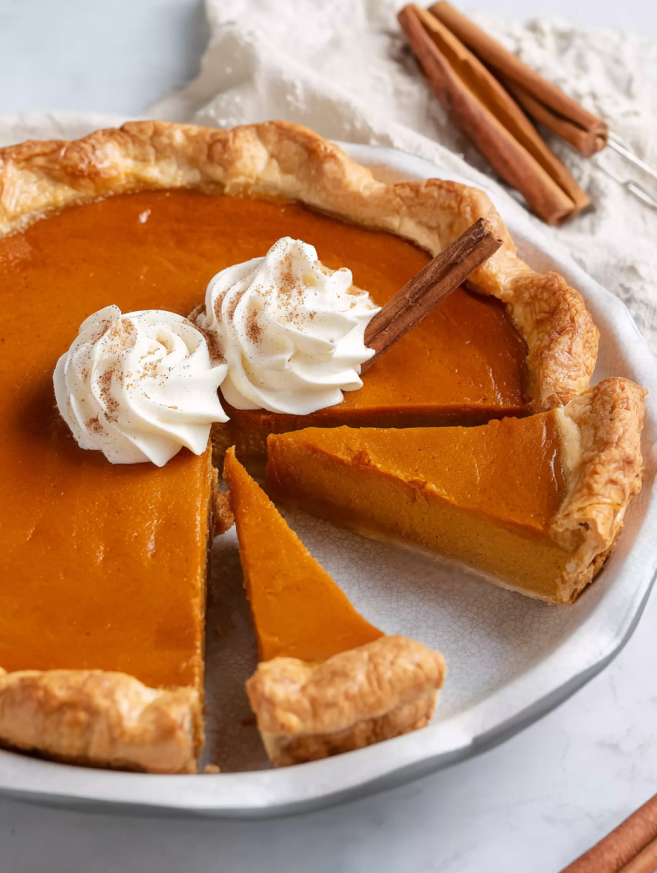
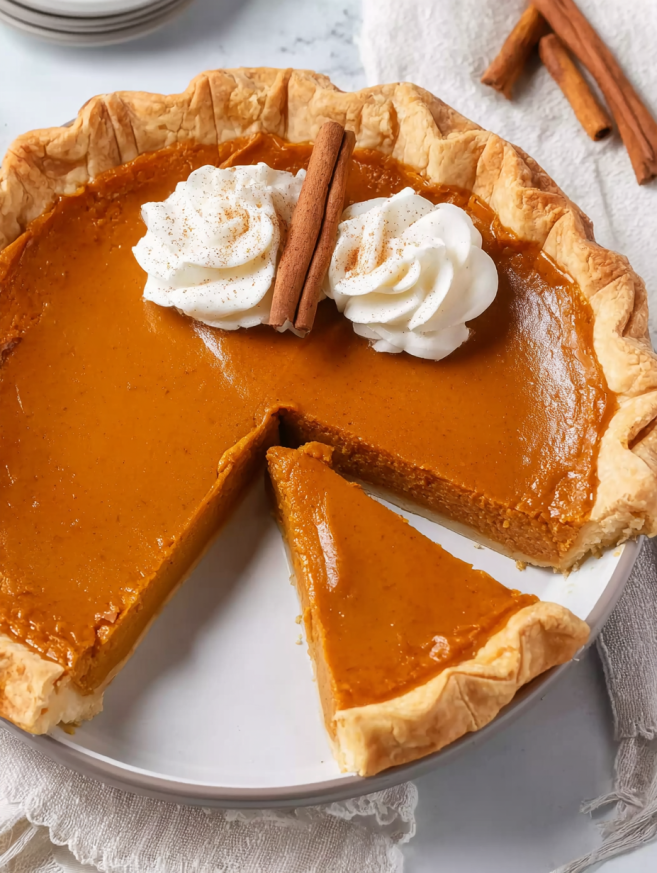
Place the baked pastry leaves artfully around or on top of the pie, and nestle a cinnamon stick among the whipped cream for a rustic finishing touch. These decorations transform your pie from homemade to bakery-worthy.
Serving Your Masterpiece
This pie tastes delicious both chilled and at room temperature, so you can cater to your guests’ preferences. Slice it with a sharp knife dipped in hot water and wiped clean between cuts—this creates neat, professional-looking slices that showcase those beautiful layers.
Serve each slice on a dessert plate with an extra dollop of freshly whipped cream if desired. A small scoop of vanilla ice cream makes an excellent accompaniment, though this pie is so rich and flavorful it certainly doesn’t need anything extra.
Storage Instructions
Cover leftover pie loosely with plastic wrap or aluminum foil and store it in the refrigerator for up to 2-3 days. The crust may soften slightly over time, but the pie remains delicious. Avoid freezing this pie, as the custard texture doesn’t hold up well to freezing and thawing.
Creative Variations
Maple Pumpkin Version
Replace half of the granulated sugar with pure maple syrup for a deeper, more complex sweetness. The maple flavor complements the pumpkin beautifully and adds an extra layer of autumn flavor. Reduce the lemon juice slightly to compensate for the maple’s acidity.
Bourbon-Spiced Option
Add 2 tablespoons of bourbon to the pumpkin filling for a sophisticated adult twist. The bourbon enhances the warm spices and adds subtle complexity. Make sure to add it after the pumpkin mixture has cooled slightly to prevent the alcohol from cooking off.
Chocolate Pumpkin Fusion
Melt 60g of dark chocolate and fold it into the finished custard filling for a decadent chocolate-pumpkin combination. This unexpected variation appeals to chocolate lovers while maintaining the essence of pumpkin pie.
Gingersnap Crust Alternative
For a different flavor profile, replace the pie dough with a gingersnap cookie crust. Simply crush 300g of gingersnaps, mix with 100g melted butter, press into the pan, and bake at 175°C for 10 minutes. The spicy ginger cookies pair wonderfully with the pumpkin custard.
Important Notes for Success
1. Temperature is Everything: All ingredients for the pie dough—butter, flour, and water—must be ice cold. This isn’t optional. Cold butter creates those flaky layers, while warm butter makes a tough, greasy crust.
2. Don’t Overwork the Dough: The entire process of mixing the pie dough should take less than 5 minutes. If you’re working it longer than that, you’re overworking it. Stop as soon as the dough comes together.
3. Resting Time is Non-Negotiable: The minimum 2-hour rest in the refrigerator allows the gluten to relax and the butter to re-solidify. Without this rest, the dough will be impossible to roll out properly.
4. Roll at the Right Temperature: Don’t attempt to roll the dough straight from the refrigerator—it will crack and crumble. Conversely, if it’s too warm, it will tear and stick. Let it sit on the counter until it’s pliable but still cold to the touch.
5. The Egg Wash is Your Insurance: Brushing the pre-baked crust with egg wash creates a waterproof barrier that prevents soggy bottom. This step makes the difference between a crisp crust and a disappointing, mushy one.
6. Don’t Skip the Lamination: While listed as optional, this simple folding technique dramatically improves the flakiness of your crust. It only adds a few minutes and another resting period, but the results are worth it.
7. Follow the Filling Steps Precisely: The pumpkin custard filling requires several steps that might seem fussy, but each one serves a purpose. Don’t try to combine them or skip any—they’re all necessary for that silky texture.
8. Watch for Over-Baking: Over-baking causes cracks and a dry, grainy texture. Monitor your pie carefully during the last 15 minutes of baking. A slightly jiggly center is perfect.
Frequently Asked Questions
Can I make this pie ahead of time?
Absolutely! This pie is actually better when made a day in advance. The flavors meld together, and the custard sets more firmly, making it easier to slice. Prepare the pie completely, let it cool, then cover and refrigerate overnight. Add the decorative elements just before serving.
My pie crust shrank during baking. What went wrong?
Shrinking happens when the dough is either overworked, stretched during placement in the pan, or not chilled enough before baking. Make sure you gently press the dough into the pan without pulling or stretching it. The 30-minute freeze before baking is crucial for preventing shrinkage.
Can I use canned pumpkin pie filling instead of plain pumpkin puree?
No, don’t substitute pumpkin pie filling for plain puree. Pie filling already contains sugar and spices, which would throw off the entire recipe. Always use plain, unsweetened pumpkin puree—Libby’s 100% Pure Pumpkin is the gold standard.
The custard filling looks too liquid. Is that normal?
Yes, the filling should be quite liquid when you pour it into the crust. It thickens during baking and continues to set as it cools. If you’re concerned, make sure you measured the cornstarch correctly and followed the tempering process for the eggs.
Can I make the pie dough in a food processor?
While possible, I don’t recommend it for this recipe. Food processors tend to overwork the dough and can make it tough. The hand method gives you better control and helps you maintain those crucial butter chunks that create flakiness.
Why does my filling have a grainy texture?
Graininess usually results from overcooking the eggs. Make sure you temper them properly by adding the hot cream gradually while whisking constantly. Also, don’t let the filling boil at any point, and avoid over-baking the final pie.
Can I freeze the unbaked pie crust?
Yes! The unbaked pie dough freezes beautifully for up to 3 months. Wrap it tightly in plastic wrap and place it in a freezer bag. Thaw overnight in the refrigerator before rolling out. You can also freeze the shaped, unbaked crust in the pie dish.
What can I do with the leftover egg whites?
Save them in an airtight container in the refrigerator for up to 4 days. Use them to make meringue cookies, royal icing, or add them to scrambled eggs for extra protein. Three egg whites are also perfect for making a small batch of macarons.
My oven doesn’t have an accurate temperature. How do I compensate?
Invest in an oven thermometer—they’re inexpensive and essential for baking success. Place it on the rack where you’ll bake the pie and adjust your oven dial until the thermometer reads the correct temperature. Most home ovens run 10-25 degrees off.
Can I make mini pies instead of one large pie?
Absolutely! Divide the dough and filling among 6-8 individual tart pans. Reduce the baking time to 25-30 minutes for the filling. Mini pies are perfect for individual servings at Thanksgiving dinner.
Recipe Details:
- Prep Time: 1 hour
- Cook Time: 2 hours
- Waiting Time: 3 hours
- Total Time: 6 hours
- Yield: 6 servings
- Course: Dessert
- Cuisine: American
Nutrition Information (per serving):
- Calories: 516 kcal
- Carbohydrates: 52g
- Protein: 8g
- Fat: 32g (Saturated: 19g, Polyunsaturated: 2g, Monounsaturated: 9g, Trans: 1g)
- Cholesterol: 207mg
- Sodium: 131mg
- Potassium: 259mg
- Fiber: 3g
- Sugar: 21g
- Vitamin A: 12,217 IU
- Vitamin C: 4mg
- Calcium: 82mg
- Iron: 3mg