When I first discovered the magic of freeze-dried raspberries in baking, it completely revolutionized my approach to fruit-flavored cookies. These raspberry sugar cookies represent everything I love about authentic flavor – no artificial coloring, no synthetic taste, just pure, concentrated raspberry essence that creates both stunning natural pink color and an irresistible sweet-tart flavor. The moment you bite into one of these tender, cream cheese-enriched cookies, you’ll understand why they’ve become my go-to recipe for anyone seeking real fruit flavor in their baking.
Why These Cookies Will Transform Your Baking Game
Authentic Fruit Flavor: Unlike artificially flavored cookies that taste synthetic, these deliver genuine raspberry taste thanks to ground freeze-dried berries that intensify the natural fruit essence without adding moisture.
Natural Beauty: The gorgeous pink hue comes entirely from real raspberries, creating cookies that are as visually stunning as they are delicious – perfect for special occasions or everyday indulgence.
Perfect Texture Balance: The addition of cream cheese creates an incredibly tender, soft cookie with just enough structure to hold its shape during cutting and baking.
Versatile Foundation: This technique works beautifully with other freeze-dried fruits, making it a valuable base recipe for creating an entire rainbow of naturally flavored cookies.
Make-Ahead Excellence: Both the dough and finished cookies freeze beautifully, allowing you to prepare ahead for parties, gifts, or whenever a raspberry craving strikes.
Essential Ingredients
For the Cookie Dough
- 2 cups (56g) freeze-dried raspberries
- 3 cups (375g) all-purpose flour (spooned & leveled)
- 1½ teaspoons baking powder
- ½ teaspoon salt
- 1 cup (226g) unsalted butter, softened to room temperature
- 4 ounces (113g) full-fat brick cream cheese, softened to room temperature
- 1 cup (200g) granulated sugar
- 1 large egg, at room temperature
- 1 teaspoon pure vanilla extract
- Optional: 1 teaspoon almond extract
For Optional Chocolate Decoration
- 4-ounce bar (113g) semi-sweet and/or white chocolate, coarsely chopped
- Extra freeze-dried raspberry powder, for garnish
Prep Time: 2 hours, 30 minutes | Cook Time: 13 minutes | Total Time: 2 hours, 45 minutes | Yield: 36 3-inch cookies
Step-by-Step Instructions
Creating the Raspberry Foundation
Step 1: Transform Berries into Powder Using either a blender or food processor, pulse the freeze-dried raspberries until they form a fine powder – this should yield approximately ½ cup of vibrant pink dust. Consider grinding extra berries to use as garnish later, as this raspberry powder adds beautiful color and flavor to finished cookies.
Step 2: Prepare the Dry Mixture In a large mixing bowl, whisk together the raspberry powder, flour, baking powder, and salt until evenly distributed. This ensures the raspberry flavor permeates every bite while maintaining proper leavening throughout the dough.
Building the Creamy Base
Step 3: Cream the Fats Using either a hand mixer or stand mixer fitted with a paddle attachment, beat the softened butter and cream cheese together on medium-high speed for about 2 minutes until the mixture becomes completely smooth and creamy. This step is crucial for achieving the tender texture that makes these cookies special.
Step 4: Add Sweetness and Flavor Add the granulated sugar to the butter mixture and beat until fluffy and well combined, approximately 1 minute. The mixture should appear lighter in color and increased in volume.
Step 5: Incorporate Final Wet Ingredients Beat in the egg, vanilla extract, and almond extract (if using) on high speed until fully combined, about 1 minute. Scrape down the sides and bottom of the bowl as needed to ensure even mixing throughout.
Forming the Dough
Step 6: Combine Components Add the dry ingredients to the wet mixture and mix on low speed just until combined. The resulting dough will be very soft and creamy – this is exactly what you want for tender, melt-in-your-mouth cookies.
Step 7: Roll and Shape Generously flour both your hands and rolling pin to prevent sticking. Divide the soft dough into two equal portions, then roll each piece on lightly floured parchment paper or silicone mats to approximately ¼-inch thickness. Focus on maintaining even thickness throughout for uniform baking.
Essential Chilling Process
Step 8: Prepare for Chilling Lightly dust one rolled dough portion with flour, then place parchment paper on top to prevent sticking. Layer the second rolled portion on top, cover the entire stack with plastic wrap or aluminum foil, then refrigerate for at least 2 hours or up to 2 days.
Step 9: Cut and Shape Once properly chilled, preheat your oven to 350°F (177°C) and line large baking sheets with parchment paper. Carefully separate the chilled dough layers and use cookie cutters to create your desired shapes. Re-roll scraps and continue cutting until all dough is used – you’ll be surprised how many cookies you can create from the seemingly small amount of dough.
Baking to Perfection
Step 10: Bake with Precision Arrange cut cookies 3 inches apart on prepared baking sheets. Bake for 12-13 minutes, watching for very light browning around the edges. If your oven has hot spots, rotate the pans halfway through baking time for even results.
Step 11: Cool Properly Allow cookies to cool on the baking sheet for 5 minutes before transferring to a wire cooling rack. Complete cooling is essential before any decoration to prevent melting.
Optional Chocolate Enhancement
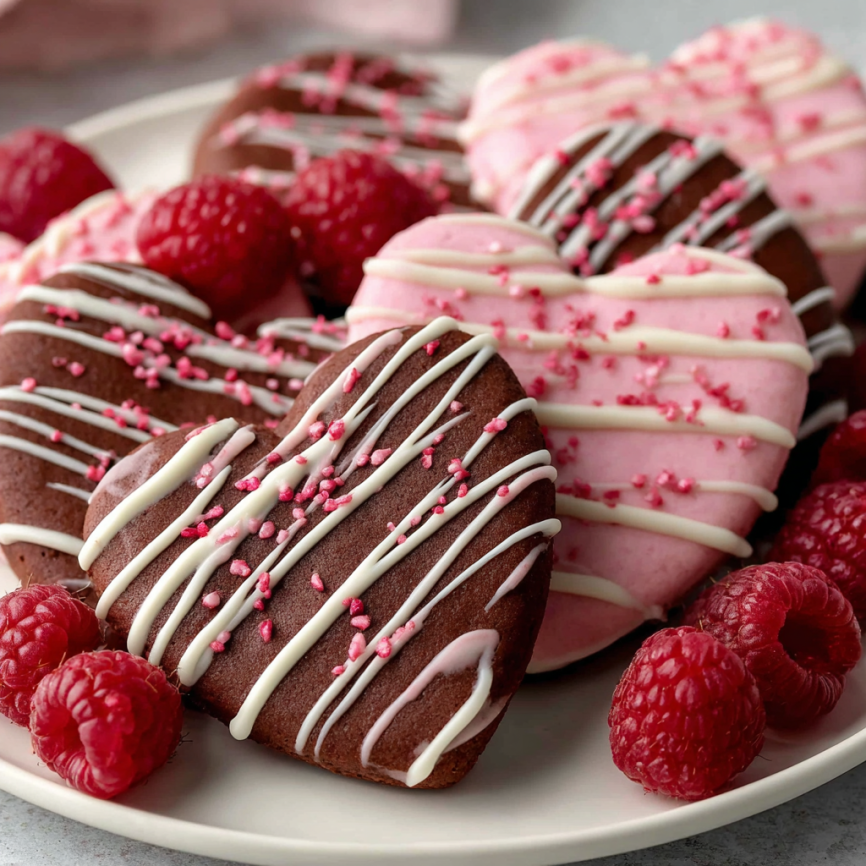
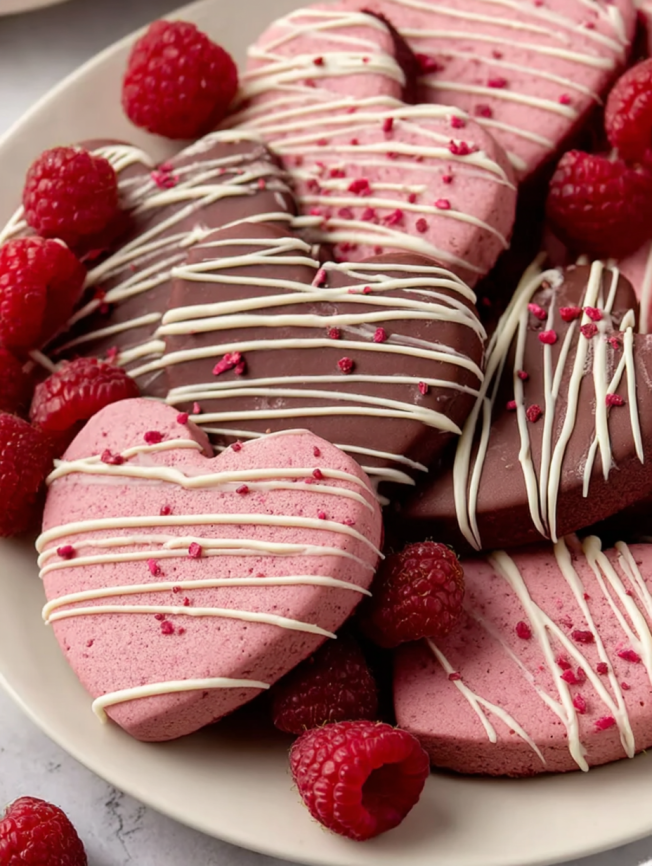
Step 12: Create Chocolate Magic Melt chopped chocolate using either a double boiler or microwave method (20-second increments with stirring). Dip cooled cookies in melted chocolate or create artistic drizzles, then return to lined baking sheets. Sprinkle with extra raspberry powder while chocolate is still wet, then allow to set in the refrigerator for 20-30 minutes.

Serving Suggestions
These stunning raspberry cookies shine in various settings throughout the year. For elegant afternoon tea service, arrange them on tiered stands alongside delicate finger sandwiches and scones. During Valentine’s Day or anniversaries, their natural pink color makes them perfect romantic treats.
Create beautiful gift boxes by layering cookies between sheets of parchment paper, or present them in clear containers to showcase their gorgeous color. For children’s parties, the natural fruit flavor appeals to young palates while the pretty pink hue delights their eyes.
Consider pairing these cookies with complementary beverages – Earl Grey tea enhances the berry notes, while champagne creates an elegant dessert course for special celebrations.
Creative Recipe Variations
Multi-Berry Medley
Combine equal parts freeze-dried raspberries and strawberries for a more complex berry flavor profile that creates beautiful speckled cookies.
Citrus Enhancement
Add 1 teaspoon of lemon or orange zest to the dough for bright citrus notes that complement the raspberry’s tartness beautifully.
Chocolate Chip Integration
Fold mini chocolate chips into the finished dough for cookies that combine fruit and chocolate in every bite.
Seasonal Adaptations
During holidays, use themed cookie cutters and coordinate decorations – white chocolate drizzle for winter elegance, or pastel sprinkles for spring celebrations.
Alternative Fruit Explorations
Experiment with freeze-dried strawberries, blueberries, or mango using the same proportions for an entire rainbow of naturally flavored cookies.
Make-Ahead Strategies
Dough Preparation Timeline
The cookie dough can be prepared through step 4, then divided into discs, wrapped tightly in plastic wrap, and frozen for up to 3 months. Thaw in the refrigerator overnight, then bring to room temperature for about 1 hour before rolling.
Rolled Dough Storage
After rolling in step 7, the dough layers can be refrigerated for up to 2 days, making this recipe perfect for busy baking schedules or planned events.
Finished Cookie Storage
Both plain and decorated cookies freeze excellently for up to 3 months. Layer between parchment paper in freezer-safe containers, ensuring chocolate decorations are completely set before freezing.
Professional Baking Insights
Freeze-Dried Fruit Excellence
Freeze-dried raspberries are essential for this recipe’s success – they provide intense flavor and natural color without adding moisture that would compromise the cookie’s texture. Look for them in the dried fruit aisle of most grocery stores, or purchase online for convenience.
Alternative Fruits: While raspberries provide the most potent flavor, this technique works beautifully with freeze-dried strawberries, blueberries, or mango. Use the same ½-cup measurement of ground powder for consistent results.
Cream Cheese Considerations
Full-fat brick cream cheese creates the tender, melt-in-your-mouth texture that distinguishes these cookies. Ensure it’s properly softened to room temperature for smooth mixing and optimal results.
Substitution Option: To make traditional sugar cookies with raspberry flavor, omit the cream cheese and add the raspberry powder to any basic sugar cookie recipe using the same technique.
Temperature and Timing Tips
Room temperature ingredients are crucial for proper mixing and texture development. Plan ahead by removing butter, cream cheese, and eggs from the refrigerator 1-2 hours before baking.
The 2-hour minimum chilling time isn’t optional – it firms the dough enough for clean cutting and prevents spreading during baking.
Storage and Serving Notes
Store finished cookies tightly covered at room temperature for up to 3 days, or refrigerate for up to 1 week. For longer storage, freeze decorated cookies in airtight containers with parchment paper layers.
When serving, allow refrigerated cookies to come to room temperature for the best texture and flavor experience. The natural raspberry flavor actually intensifies slightly as the cookies reach room temperature.
Frequently Asked Questions
Q: Can I use regular dried raspberries instead of freeze-dried? A: No, regular dried raspberries won’t work for this recipe. Freeze-dried berries have all moisture removed, allowing them to grind into powder. Regular dried fruit is chewy and won’t create the fine powder needed for flavor distribution.
Q: Where can I find freeze-dried raspberries? A: Most grocery stores carry them in the dried fruit or health food aisle. Target, Trader Joe’s, and online retailers offer reliable options. For this recipe, you’ll need about 2 cups, which is slightly less than two standard 1.2-ounce bags.
Q: Why is my dough too soft to roll? A: The dough is naturally soft due to the cream cheese content. Ensure you’re using plenty of flour on your work surface and tools, and don’t skip the chilling step. If it’s still too soft, chill for an additional 30 minutes.
Q: Can I make these without almond extract? A: Absolutely! The almond extract is optional and simply adds depth to the flavor profile. The cookies will be delicious with just vanilla extract.
Q: How do I prevent the cookies from spreading during baking? A: Proper chilling is key – don’t skip the 2-hour minimum refrigeration time. Additionally, ensure your oven is fully preheated and avoid overbaking, which can cause excessive spreading.
Q: What’s the best way to store decorated cookies? A: Allow chocolate decorations to set completely before storing. Layer cookies between parchment paper in airtight containers, and refrigerate if your kitchen is warm. This prevents chocolate from melting or decorations from smudging.
Q: Can I double this recipe? A: Yes, this recipe doubles beautifully. You may need to work in batches when rolling and cutting, but all the techniques remain the same. Consider using multiple baking sheets to accommodate the larger batch efficiently.


