There’s something magical about the moment when two beloved desserts come together to create something entirely new and wonderful. That’s exactly what happened in my kitchen one autumn afternoon when I found myself craving both the chewy richness of blondies and the warm, cinnamon-kissed comfort of snickerdoodle cookies. Instead of choosing between them, I decided to create a dessert that celebrated the best of both worlds.
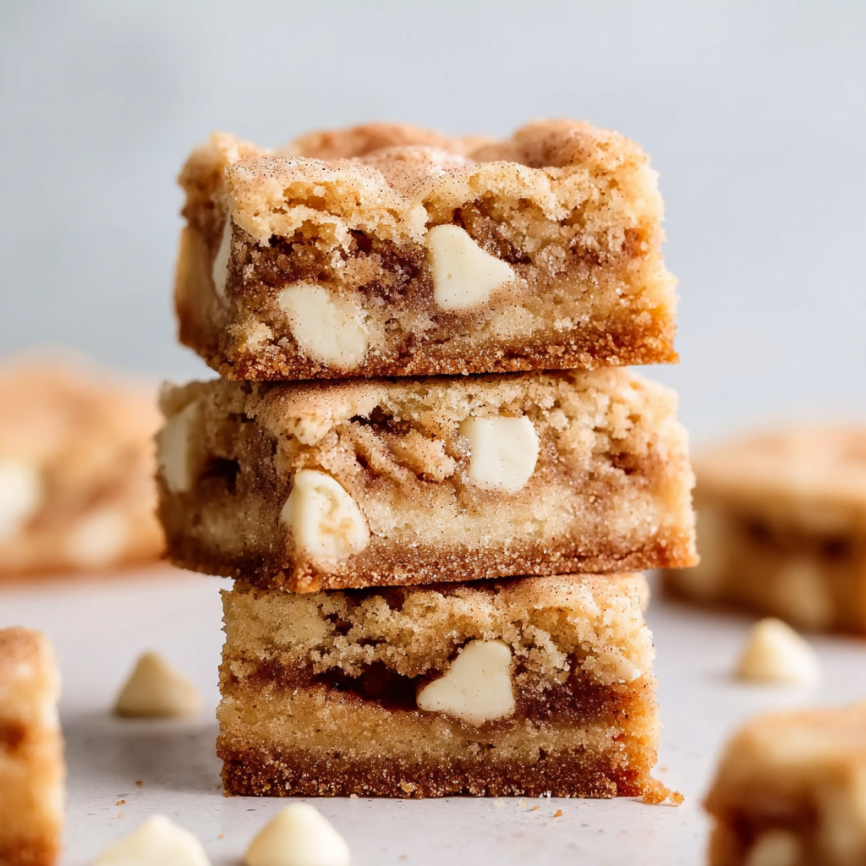
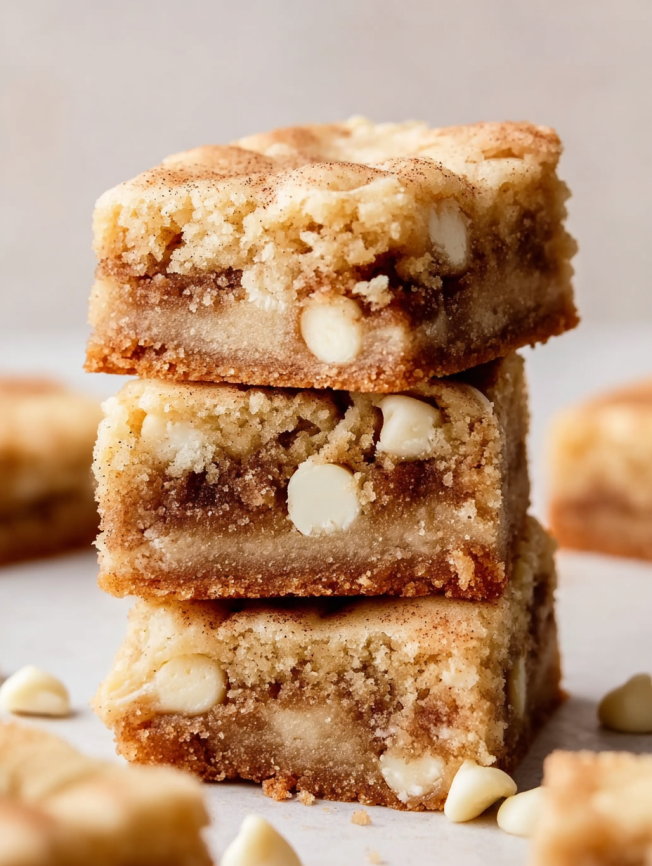
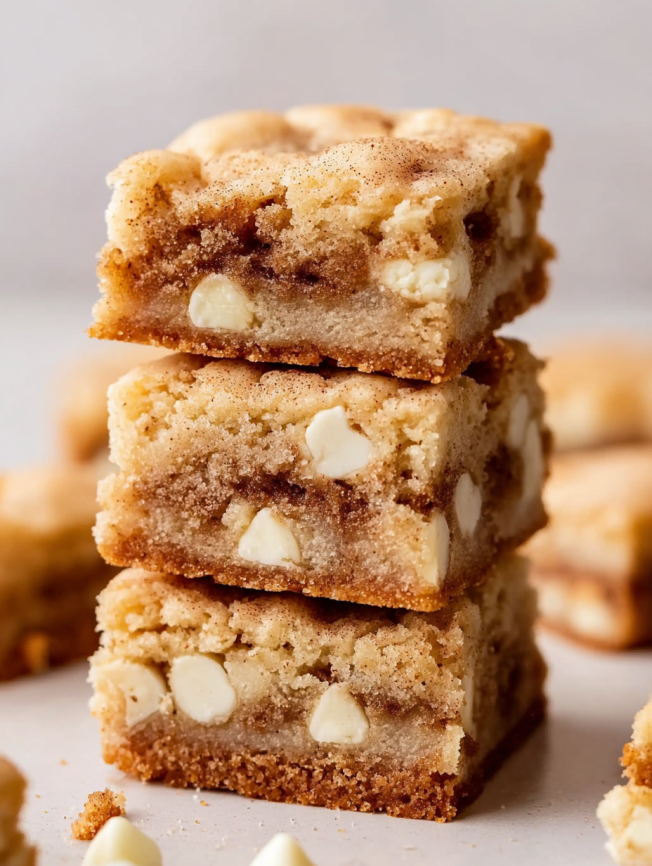
The result was these incredible Snickerdoodle Blondies – bars that capture the soft, buttery texture of classic blondies while delivering all the cinnamon sugar magic that makes snickerdoodles so irresistible. Moreover, the addition of white chocolate chips creates delightful pockets of sweetness that perfectly complement the warm spice flavors.
Why These Snickerdoodle Blondies Will Become Your New Favorite
These aren’t just ordinary bar cookies – they’re a sophisticated fusion that delivers comfort and elegance in every single bite. Here’s what makes this recipe absolutely extraordinary:
Perfect Texture Symphony: Each bite offers multiple layers of texture, from the chewy blondie base to the ribbons of cinnamon sugar that create delightful sweet pockets throughout. Additionally, the white chocolate chips provide creamy bursts that melt slightly during baking, creating an almost fudge-like richness.
Foolproof Bar Cookie Success: Unlike traditional cookies that require individual shaping and careful timing, these bars bake evenly in one pan, making them perfect for feeding crowds or satisfying sudden dessert cravings. Furthermore, the layered construction means every piece gets the perfect distribution of cinnamon sugar and white chocolate.
Seasonal Versatility: While the warm cinnamon flavors make these bars perfect for fall and winter gatherings, they’re equally delicious year-round and sophisticated enough for elegant dinner parties. Consequently, they’ve become my go-to dessert for everything from casual coffee dates to holiday cookie exchanges.
Make-Ahead Friendly: These bars actually improve with time as the flavors meld and develop, making them ideal for busy schedules or advance party preparation. Therefore, you can bake them days ahead and still serve something that tastes freshly made.
Essential Ingredients for Snickerdoodle Blondie Perfection
The Blondie Foundation
Creaming Base:
- 3/4 cup (12 tablespoons; 170g) unsalted butter, softened to room temperature
- 3/4 cup (150g) granulated sugar
- 3/4 cup (150g) packed light brown sugar
- 2 large eggs, room temperature
- 2 teaspoons pure vanilla extract
Dry Ingredients:
- 2 and 1/3 cups (291g) all-purpose flour, spooned and leveled, plus extra for handling
- 1 and 1/2 teaspoons baking powder
- 1/2 teaspoon cream of tartar (the secret snickerdoodle ingredient!)
- 1/2 teaspoon salt
Special Additions:
- 1 cup (180g) white chocolate morsels, plus 1 tablespoon for topping
The Cinnamon Sugar Magic
Swirl Filling:
- 1/4 cup (50g) granulated sugar
- 2 teaspoons ground cinnamon
Perfect Serving Companions
These rich, cinnamon-spiced bars pair beautifully with vanilla ice cream, hot coffee, or cold milk. Additionally, consider serving them alongside fresh apple slices or a drizzle of caramel sauce for an extra-special dessert experience.
Step-by-Step Instructions for Blondie Bar Success
Setting the Foundation
Step 1: Prepare Your Baking Environment Preheat your oven to 350°F (177°C) and line a 9-inch square baking pan with parchment paper, leaving overhang on the sides for easy removal. This preparation step ensures perfect bars that lift out cleanly every time.
Step 2: Create the Creamy Base In a large bowl using a handheld or stand mixer fitted with a paddle attachment, beat the softened butter, granulated sugar, and brown sugar together on medium-high speed. Continue beating for 2-3 minutes until the mixture becomes fluffy and noticeably lighter in color.
Building the Flavor Profile
Step 3: Add the Binding Elements Add the eggs and vanilla extract to the butter mixture, then beat on high speed until everything is well combined. Scrape down the sides and bottom of the bowl as needed to ensure even mixing.
Step 4: Incorporate the Dry Ingredients In a separate bowl, whisk together the flour, baking powder, cream of tartar, and salt until evenly combined. Pour this mixture into the wet ingredients, then beat on low speed just until combined. Finally, beat in 1 cup of white chocolate morsels. The resulting dough will be thick and delightfully sticky.
Creating the Layered Magic
Step 5: Form the Bottom Layer Spoon half the dough into your prepared pan and press it into an even layer using floured hands or an offset spatula. The flour prevents sticking and makes handling this sticky dough much easier.
Step 6: Add the Cinnamon Sugar Swirl In a small bowl, mix together the sugar and cinnamon for the filling. Sprinkle this mixture evenly over the bottom layer, reserving about 1 teaspoon for the final topping.
Assembling the Top Layer
Step 7: Create the “Shingle” Effect Flour your hands generously, then take handfuls of the remaining dough and press them between your palms to flatten into rough “shingles.” Place these pieces over the cinnamon sugar layer like puzzle pieces, re-flouring your hands as needed. Don’t worry if some cinnamon sugar remains visible – this creates beautiful flavor pockets.
Step 8: Final Touches Press the remaining white chocolate morsels into the top surface, then lightly sprinkle with the reserved cinnamon sugar for a beautiful finishing touch.
Baking to Golden Perfection
Step 9: Bake and Cool Bake for 32-35 minutes until the top is golden brown and a toothpick inserted in the center comes out with just a few moist crumbs. Avoid over-baking to maintain the perfect chewy texture. Cool completely in the pan for about 1 hour before cutting.
Creative Serving and Presentation Ideas
Elegant Dessert Plating
Cut the bars into neat squares and serve on individual dessert plates with a light dusting of powdered sugar and a small dollop of whipped cream. The contrast between the rustic bars and elegant presentation creates a restaurant-quality dessert experience.
Casual Gathering Style
Arrange the bars on a wooden cutting board alongside other fall-themed treats like apple slices, caramel dip, and warm cider. This creates a cozy, seasonal spread that encourages socializing and sharing.
Gift-Worthy Packaging
Wrap individual bars in cellophane or place them in decorative boxes for thoughtful homemade gifts. The sophisticated flavor combination makes these bars perfect for teacher gifts, neighbor treats, or holiday exchanges.
Delicious Variations to Explore
Double Chocolate Indulgence
Replace the white chocolate chips with semi-sweet chocolate chips and add 2 tablespoons of cocoa powder to the dry ingredients. This creates a rich, chocolatey version while maintaining the classic cinnamon sugar swirl.
Maple Pecan Upgrade
Substitute 1/4 cup of the granulated sugar with pure maple syrup and add 1/2 cup of chopped toasted pecans to the dough. This variation brings warm, nutty flavors that complement the cinnamon beautifully.
Apple Pie Inspired Version
Add 1/2 cup of finely diced dried apples to the dough and increase the cinnamon in the swirl to 1 tablespoon. Include a pinch of nutmeg for an extra layer of warm spice that evokes classic apple pie.
Cream Cheese Swirl Luxury
Create a cream cheese layer by beating 4 oz softened cream cheese with 1/4 cup sugar and 1 egg yolk. Swirl this mixture with the cinnamon sugar for an incredibly rich and tangy variation.
Make-Ahead Strategies for Busy Bakers
Complete Advance Preparation
These bars are actually better after sitting for a day, as the flavors meld and the texture becomes more cohesive. Prepare them up to one week in advance, storing them covered at room temperature.
Freezer Storage Solutions
The bars freeze exceptionally well for up to 3 months. Wrap individual portions in plastic wrap, then store in freezer bags for easy portion control. Thaw at room temperature or in the refrigerator before serving.
Dough Preparation Options
You can prepare the blondie dough up to 2 days in advance and store it covered in the refrigerator. When ready to bake, let the dough come to room temperature for easier handling and spreading.
Holiday Baking Timeline
For holiday gatherings, bake these bars 2-3 days before serving. This timing allows the flavors to fully develop while ensuring the bars remain fresh and delicious for your event.
Essential Baking Notes for Perfect Results
Room Temperature Importance: Both the butter and eggs should be at room temperature for proper creaming and even mixing. Cold ingredients can cause the mixture to curdle or create uneven texture in the final bars.
Cream of Tartar Magic: This ingredient is what gives snickerdoodles their distinctive tang and extra chewiness. While you can omit it if unavailable, including it creates the authentic snickerdoodle flavor that sets these bars apart from regular cinnamon treats.
Flour for Handling: Keep extra flour handy throughout the assembly process. The dough is intentionally sticky, which creates the perfect chewy texture, but requires floured hands for easy manipulation.
Don’t Overbake: These bars continue cooking slightly from residual heat after removal from the oven. Slightly underbaking ensures they remain chewy rather than becoming dry or cake-like.
Frequently Asked Questions
Q: Can I use regular chocolate chips instead of white chocolate? A: Absolutely! Semi-sweet or milk chocolate chips work wonderfully and create a different but equally delicious flavor profile. You might also try butterscotch chips for a unique twist that complements the cinnamon beautifully.
Q: Why is my dough so sticky and hard to work with? A: The sticky texture is intentional and creates the perfect chewy consistency. Keep your hands well-floured and work with small portions at a time. If the dough seems excessively sticky, you can add 1-2 tablespoons of additional flour.
Q: How do I know when the bars are properly baked? A: Look for a golden brown top and insert a toothpick in the center – it should come out with just a few moist crumbs. The surface should spring back lightly when touched, but shouldn’t feel completely firm.
Q: Can I make these in a different pan size? A: These are specifically designed for a 9-inch square pan to achieve the proper thickness. Using a larger pan will result in thinner bars that may overbake, while a smaller pan will create thicker bars that may not cook evenly.
Q: What’s the best way to cut clean squares? A: Use a sharp knife and wipe it clean between cuts. For extra-clean lines, you can chill the bars for 30 minutes before cutting, though they’re easier to serve at room temperature.
Q: Can I make these bars dairy-free? A: Yes! Substitute the butter with an equal amount of vegan butter or coconut oil (solid, not melted). Choose dairy-free white chocolate chips to maintain the same flavor profile while accommodating dietary restrictions.
Prep Time: 20 minutes | Cook Time: 35 minutes | Total Time: 55 minutes (plus cooling)
Calories: 285 kcal per bar | Serves: 16 bars


