Total Time: 30 minutes | Yield: 20 cookies
When my eight-year-old nephew announced he wanted to bring “the coolest Halloween cookies ever” to his class party, I knew we needed something that was both impressive and achievable for little hands. That afternoon in my kitchen became one of my favorite baking memories as we created these adorable Spider Cookies together. Watching his face light up when he realized how simple it was to transform ordinary round cookies into creepy-crawly creatures was absolutely magical.
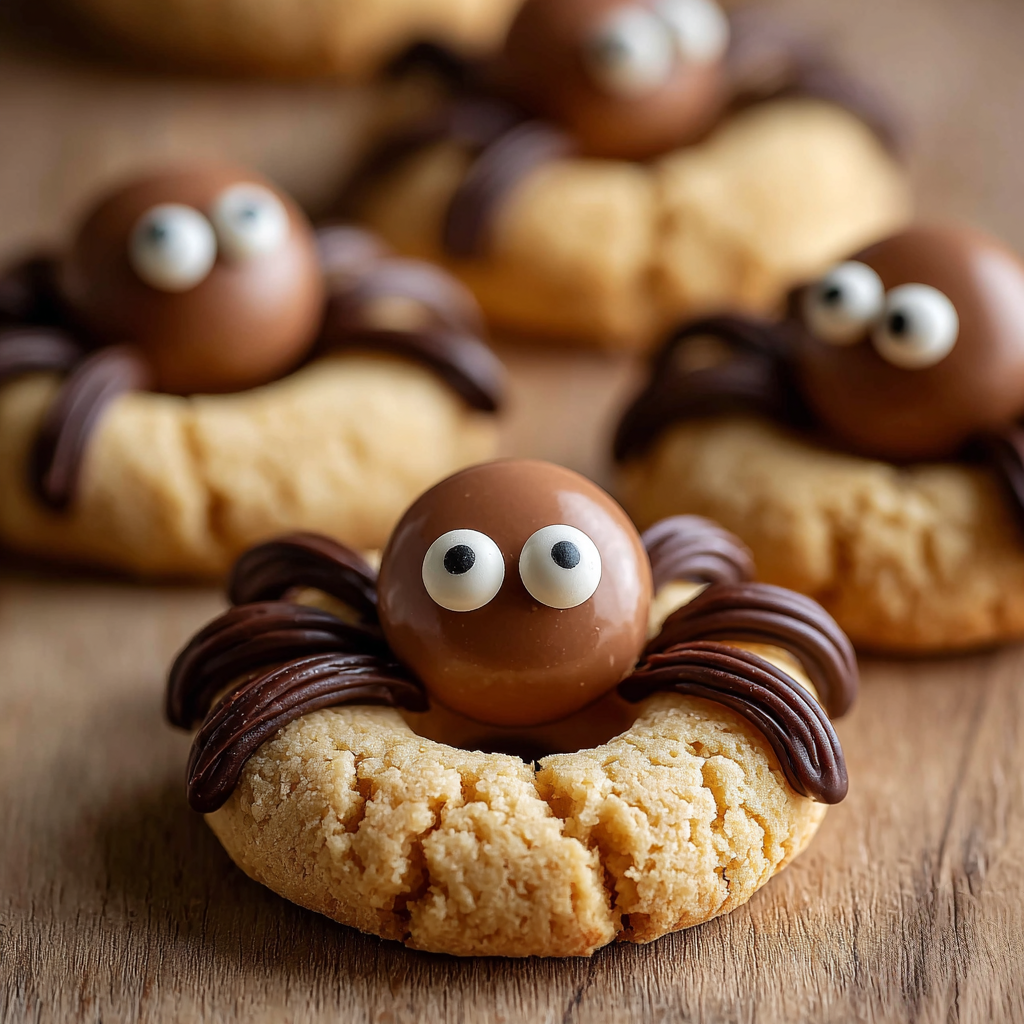
These cookies have since become my go-to recipe whenever I need a Halloween treat that’s both spooky and approachable. The combination of soft, chewy cookie base topped with chocolate Maltesers and delicate chocolate “legs” creates an irresistible treat that looks far more complicated than it actually is. Best of all, the decorating process is so enjoyable that it often becomes the highlight of any Halloween gathering.
Why These Spider Cookies Are Absolutely Perfect
Kid-Friendly Fun Factor
These cookies transform baking into an exciting craft project that children can actively participate in and enjoy. The decorating process is forgiving and creative, allowing each little baker to develop their own unique spider personalities while building confidence in the kitchen.
Quick and Simple Technique
With just 30 minutes from start to finish, these cookies fit perfectly into busy Halloween schedules. Moreover, the straightforward method means you won’t need any special equipment or advanced decorating skills to achieve impressive results.
Irresistibly Soft Texture
The combination of melted butter, dual sugars, and cornflour creates cookies that are beautifully soft and chewy. Additionally, they maintain their tender texture for days, making them ideal for gift-giving or storing for parties.
Budget-Friendly Ingredients
Using common pantry staples and affordable Maltesers, these cookies deliver maximum impact without requiring expensive specialty ingredients or decorating supplies.
Essential Ingredients and Substitutions
Cookie Base Components
- 150g butter, melted and slightly cooled
- ½ cup (100g) brown sugar, packed
- ½ cup (110g) white granulated sugar
- 1 large egg, room temperature
- 1 tsp vanilla essence (extract)
- 2 cups (300g) plain all-purpose flour
- ¼ tsp salt
- 1 tsp baking soda
- 2 Tbsp cornflour (cornstarch)
Spider Decoration Elements
- 140g Maltesers (or similar round chocolate candies)
- 100g dark chocolate, melted for piping
- White icing tube for creating eyes
Smart Substitution Options
If Maltesers aren’t available, try chocolate-covered peanuts, Whoppers, or even round chocolate candies. For the legs, you can use melted chocolate chips or chocolate writing gel. White chocolate chips can replace icing for the eyes if you prefer a different look.
Step-by-Step Spider Creation
Preparing the Cookie Dough
Start by preheating your oven to 170°C (340°F) and lining two baking sheets with parchment paper. This moderate temperature ensures the cookies bake evenly without browning too quickly on the bottom.
In a large mixing bowl, combine the melted butter with both brown and white sugars, whisking until the mixture becomes smooth and well combined. The melted butter technique creates the signature chewy texture that makes these cookies so special.
Beat in the egg and vanilla essence until fully incorporated, creating a smooth, glossy mixture that forms the base of your spider cookies.
Combining Dry Ingredients
In a separate bowl, sift together the flour, salt, baking soda, and cornflour to ensure even distribution and eliminate any lumps. This sifting step is particularly important for achieving the perfect tender texture.
Gently fold the dry ingredients into the wet mixture using a large spoon or spatula, mixing just until the dough comes together. Avoid overmixing, as this can result in tough cookies that won’t have that desired soft, chewy quality.
Shaping and Baking
If the dough feels too sticky to handle, refrigerate it for 10 minutes to firm up slightly. This brief chilling makes rolling much easier and prevents the cookies from spreading excessively during baking.
Roll the dough into evenly-sized balls using your hands or a small cookie scoop, then place them on the prepared baking sheets with adequate spacing between each cookie.
Bake for 12-15 minutes, or until the cookies appear set around the edges but still look slightly soft in the center. They’ll continue cooking on the hot pan after removal from the oven.
Creating Spider Bodies and Legs
While the cookies are still warm and slightly soft, gently press one Malteser into the center of each cookie to create the spider’s round body. The warmth helps the candy adhere naturally without additional adhesive.
Using a piping bag or squeeze bottle filled with melted dark chocolate, carefully pipe four legs on each side of the Malteser body. Start from the body and curve each leg outward, creating realistic spider leg shapes that extend to the edges of the cookies.
Finally, use the white icing tube to create two small dots on the Malteser for the spider’s eyes, bringing each creature to life with personality.
Allow the cookies to cool completely before handling, giving the chocolate legs time to set properly.
Creative Presentation Ideas
Halloween Party Display
Arrange these spider cookies on a dark serving platter surrounded by plastic spiders and fake cobwebs for maximum spooky effect. Consider creating different “spider sizes” by using mini Maltesers for baby spiders and regular ones for adults.
Interactive Decorating Station
Set up a cookie decorating area where party guests can create their own spiders using pre-baked cookies and bowls of melted chocolate, candies, and icing supplies. This becomes an entertaining activity that doubles as dessert.
Gift Packaging Solutions
Package individual spider cookies in clear cellophane bags tied with orange and black ribbons, creating perfect trick-or-treat alternatives or party favors that children will treasure.
Exciting Recipe Variations
White Chocolate Ghost Spiders
Use white chocolate for both the legs and melted coating, creating ghostly white spiders with dark chocolate chip eyes for an elegant Halloween variation.
Peanut Butter Spider Bodies
Replace Maltesers with chocolate-covered peanut butter balls and add a hint of peanut butter extract to the cookie dough for enhanced flavor complexity.
Mini Spider Cookies
Create bite-sized versions using mini chocolate chips as bodies and very thin chocolate legs, perfect for parties where guests want to sample multiple treats.
Colorful Halloween Spiders
Tint the melted chocolate with food coloring to create purple, orange, or green spider legs, adding vibrant Halloween colors to match party themes.
Storage and Make-Ahead Tips
Dough Preparation
Cookie dough can be prepared and refrigerated for up to 2 days before baking, making party preparation much more manageable. Let the dough come to room temperature for easier rolling.
Component Assembly
Bake cookies up to 3 days in advance and store in airtight containers, then add spider decorations on the day of serving for the freshest appearance and best chocolate adhesion.
Finished Cookie Storage
Decorated spider cookies maintain their quality for up to one week when stored in airtight containers with parchment paper between layers to protect the delicate chocolate legs.
Professional Baking Tips
Melted Butter Technique: Allow melted butter to cool slightly before mixing to prevent the eggs from cooking and ensure smooth dough consistency.
Chocolate Leg Consistency: The melted chocolate should be fluid but not hot when piping legs. If it’s too thick, warm it gently; if too thin, let it cool slightly before decorating.
Timing is Key: Add Maltesers while cookies are warm so they adhere naturally, but wait until cookies are cooled before adding chocolate legs to prevent melting and running.
Even Spacing: Use a toothpick to lightly mark where legs should go before piping, ensuring each spider has symmetrical, well-proportioned legs.
Frequently Asked Questions
Can I make these cookies ahead of time for a party? Absolutely! Bake the cookies up to 3 days in advance and store them in airtight containers. Add the spider decorations on the day of the event for the best appearance and freshest chocolate legs.
What if I don’t have Maltesers available? Any round chocolate candy works wonderfully as a substitute. Try chocolate-covered peanuts, Whoppers, chocolate truffles, or even large chocolate chips depending on your preference and availability.
How do I prevent the chocolate legs from breaking? Ensure your melted chocolate is the right consistency – fluid enough to pipe smoothly but thick enough to hold its shape. Allow each leg to set completely before moving the cookies, and store them carefully with minimal handling.
Can children safely help make these cookies? These cookies are perfect for kids to help with! Children can assist with mixing, rolling dough balls, pressing on the Maltesers, and even piping legs with supervision. Just ensure adults handle the hot oven and melted chocolate portions.
Why do my cookies spread too much during baking? Excessive spreading usually occurs when the dough is too warm or the butter was too hot when mixed. Try chilling the shaped dough balls for 10-15 minutes before baking, and ensure your melted butter has cooled to room temperature.
How can I make the spider eyes more prominent? For more visible eyes, use white chocolate chips pressed into the Maltesers while they’re still warm, or create larger dots with white icing. You can also add pupils using mini chocolate chips or dark icing dots on top of the white eyes.


